Introduction
The purpose of this document is to guide users through the features and functionality of the RetailPlayer. It provides a detailed description of each component of the RetailPlayer system, explaining the purpose and operation of every button, LED, webpage, and more. This will enhance the user's understanding of the product.
What is RetailPlayer?
RetailPlayer from Barix is a multi-site, multi-channel streaming platform for background music distribution and message scheduling playback. RetailPlayer is a cloud-managed solution, the best choice when there are multiple devices installed in different geographical locations, configured, controlled and supervised from a centralized web app.
The solution encompasses 2 key elements:
-
The RetailPlayer Devices - compact and robust audio decoders, easy to install, connected to the network, and to the amplification system through standardized connections
-
The RetailPlayer Portal - Cloud-based management solution where an organization can register their RetailPlayer devices and control them at once with an easy-to-use interface
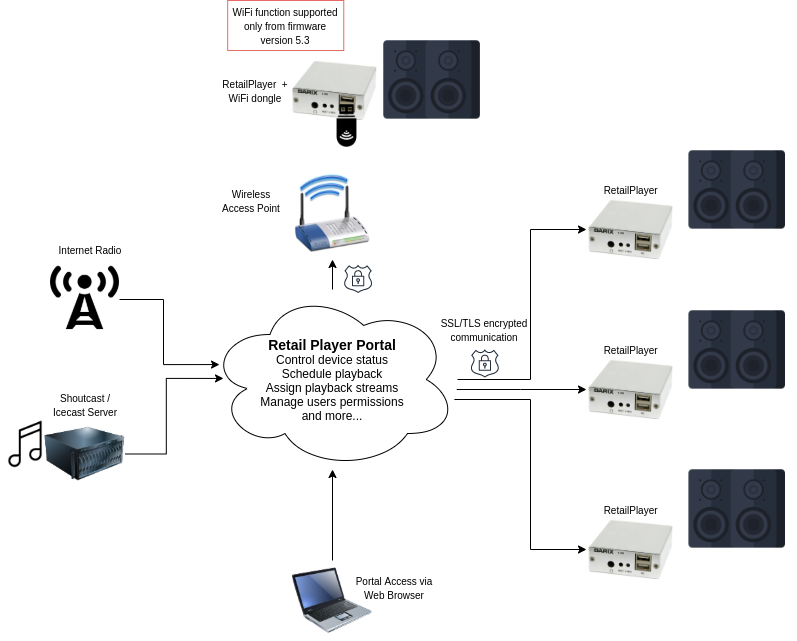
The RetailPlayer devices, out of the box, estrablish a secure connection with the RetailPlayer Portal (over web secure socket) and retrieve their configuration from it (streaming channels, volume, scheduling information and much more).
Applications
RetailPlayer is suitable for:
-
Distributing background music (e.g., in retail stores, restaurants, gyms, hotels, etc.)
-
Radio distribution systems with centralized management
-
Corporate audio streaming solutions
-
Music on Hold systems
-
Sonic branding organizations seeking a professional music playback solution
About this manual
This manual is designed for distributors, installers, and users of the RetailPlayer solution. It covers the functions of the RetailPlayer device, how to set up connections, and how to access and utilize the Portal’s features. The manual is written for those with basic networking knowledge.
This guide assumes that the RetailPlayer device and the Portal are running the latest firmware versions. (For more details on the release history and change log, refer to the release notes.)
Barix strongly recommends using the latest firmware version to benefit from important new features, security fixes, and updated libraries and components.
RetailPlayer allows firmware updates either locally via its web interface or remotely through the Portal (see the Update Page section for details).
Additional documents and support
The following additional documents are available for the RetailPlayer Solution:
-
RetailPlayer Quick Install Guide: This document explains the essential steps to quickly set up the RetailPlayer on an S400 decoder.
-
RetailPlayer Knowledge Base Articles
In addition to regularly visiting the Barix website and Help Center, users can access support through several channels:
-
Contact your local distributor for the technical support they provide. A list of distributors is available on the Barix website at this link.
-
Reach out to a Barix support technician directly via email at: support@barix.com.
RetailPlayer devices
RetailPlayer runs on the following Barix Products, from this point onward referred to as “RetailPlayer Devices”:
|
Product |
PN |
Description |
|---|---|---|
|
RetailPlayer S400 |
2017.9221 EU Package 2017.9222 US Package 2017.9223 UK Package 2017.9224 No PSU Package |
Compact audio decoder with 3.5mm stereo line output, requires external power supply. |
|
RetailPlayer SP400 |
2019.9284 |
Compact audio decoder with 3.5mm stereo line output. PoE powered (IEEE 802.3 af)
|
|
RetailPlayer M400 |
2020.9318 EU Package 2020.9319 US Package 2020.9320 UK Package 2020.9321 No PSU Package |
Audio decoder with stereo line output on RCA , requires external power supply.
|
|
RetailPlayer TPA400 |
2020.9314P |
Audio decoder with amplified output to drive 4-8 ohms loudspeaker, max power output 6W. PoE powered (IEEE 802.3af) |
First Installation
RetailPlayer devices connect to the network via an Ethernet wired interface. By default, each device is configured as a DHCP client, requiring connection to a DHCP server to obtain an IP address.
For more information on network requirements, click here.
After booting, the device will immediately attempt to connect to the RetailPlayer Portal, a cloud-based platform used to manage all devices within an organization.
Portal URL: https://manage.barix.com
To request an account, send an email to support@barix.com with the following details:
-
Organization Name
-
Organization Address
-
Organization Website
-
Admin Full Name
-
Admin Email Address
-
RetailPlayer Device MAC Address
Your account will be verified and opened in maximum 2 working days.
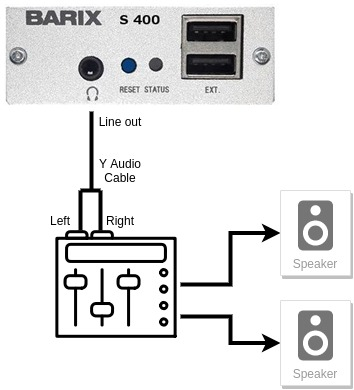
Below is an example of how to connect a RetailPlayer S400 to an amplification system:
-
Connect the audio cable to the 3.5mm line-out of the RetailPlayer device.
-
On the opposite end of the cable, the two connectors carry the left and right channels of the stereo stream. Connect these to the input of your amplification system, mixer, or DSP unit.
-
If you need to hear the IP address during boot (using the Sonic IP® function), increase the volume on your amplification system.
-
Connect the network cable to the RetailPlayer device.
-
Connect the power. The device will boot. Listen for the IP address announcement via Sonic IP®
-
The LED on the front panel will turn green. It will blink if the device is not yet registered with the RetailPlayer Portal, and will remain solid once registered and able to connect to the Portal.
Local web configuration interface
The RetailPlayer device offers some level of control via local web configuration. Specifically the local configuration can be accessed to:
-
Change the Priority streaming url
-
Change the Portal URL
-
Change the RTP Forwarding capability
-
Change the device’s IP configuration (DHCP or Static)
-
Change the time servers configuration (NTP)
-
Change the security policy of the RetailPlayer device
These settings can only be changed via local web configuration interface. Accessing this interface is not mandatory unless one of the above settings must be changed. Any other configuration is perfromed via RetailPlayer Portal.
Additionally, it is also possible to:
-
Update the firmware of the device
-
Apply reset to defaults
-
Reboot the device
In order to access the local web configuration interface type the IP address of the device in the browser URL. .
Sonic IP® function
Each device comes with a feature from Barix called “Sonic IP®”. When the device boots and connects to a network with a DHCP server, it automatically acquires an IP address and announces the address through the audio output. This feature is particularly helpful when accessing the device’s web interface for the first time.
To access the web interface of the device the "Webconfig" flag on the Portal must be set to enabled otherwise the unit will reply with a ‘connection timeout’ or ‘connection refused’ when trying to open the web configuration interface. This option can be found in Devices → Basic Settings → Device Webconfig. More details are provided in the RetailPlayer Portal chapter of this manual.
In the following paragraphs, the settings and the different sections of the local web interface are described.
The Settings Page
As soon as the web interface is accessed it visualizes the SETTINGS page.
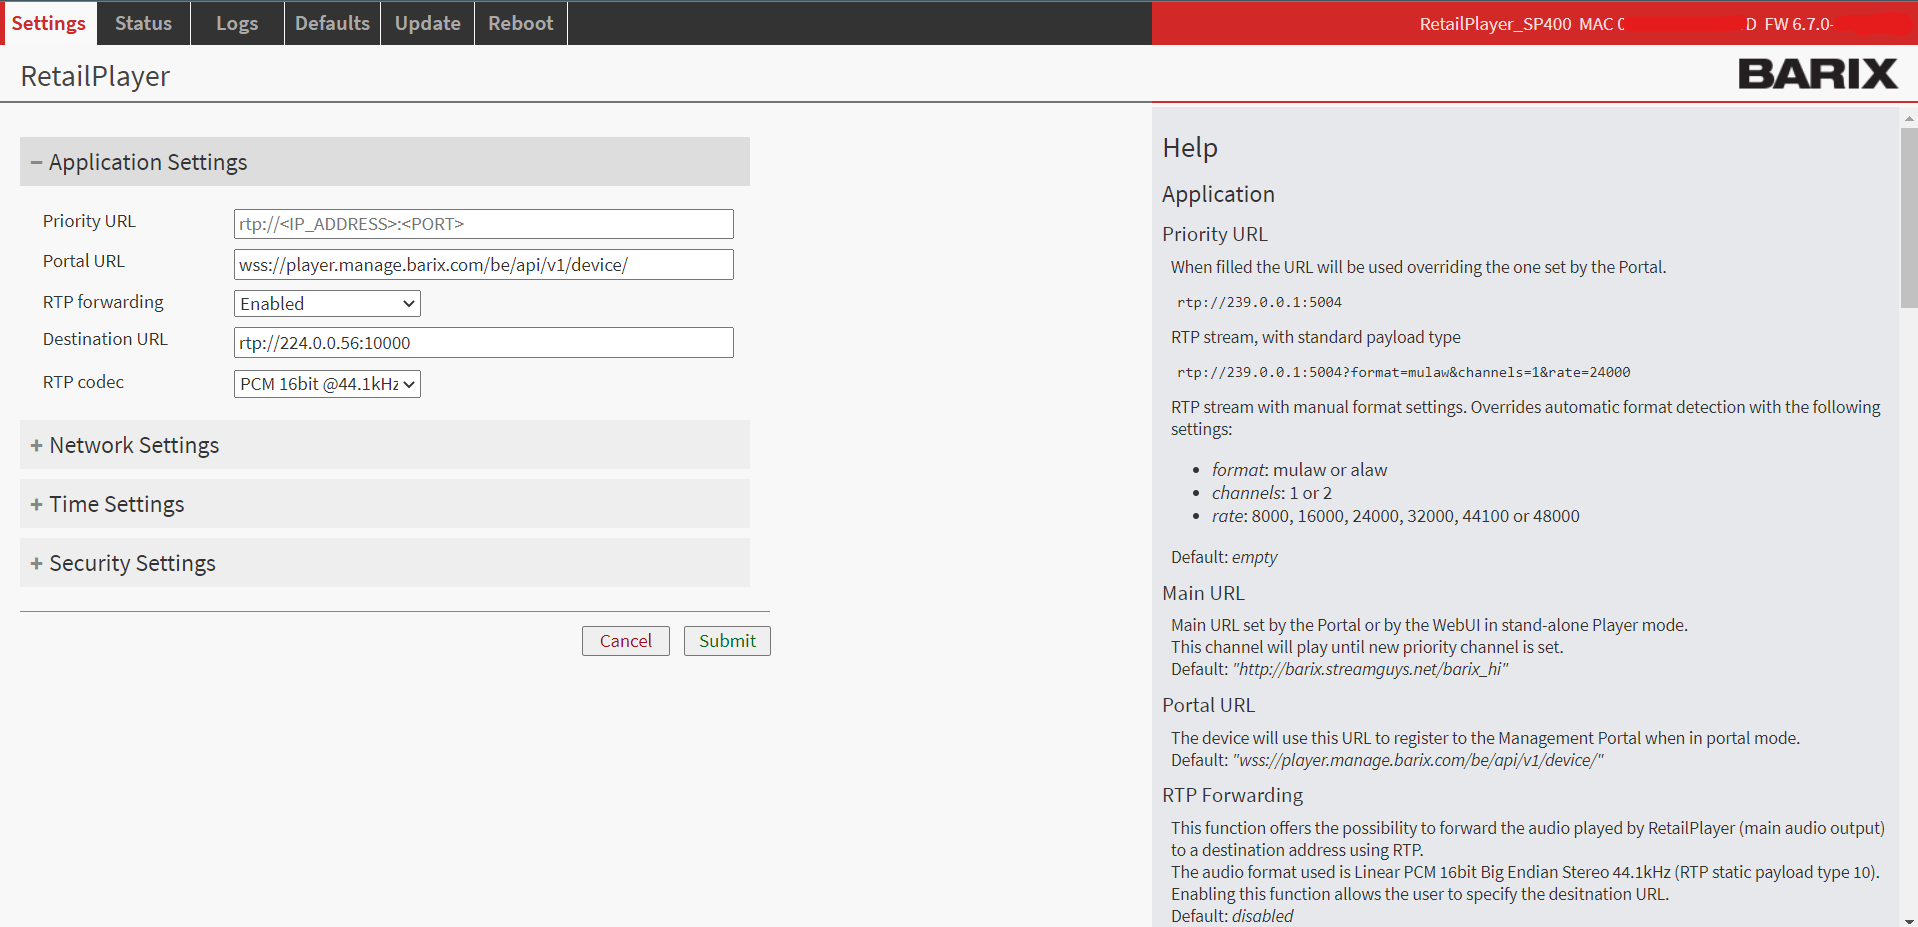
The interface is organized into three main sections:
-
Top Navigation Bar: This includes options for Settings, Status, Logs, Defaults, Update, and Reboot. In the top-right corner, you’ll also find the device’s MAC address and the current firmware version installed.
-
Operational Area: This is where users can input values and configure parameters.
-
Side Help Section: This section provides a brief overview of the parameters and values, assisting users without requiring them to leave the page.
TIP: Each parameter has a default value, which is also displayed in the help section.
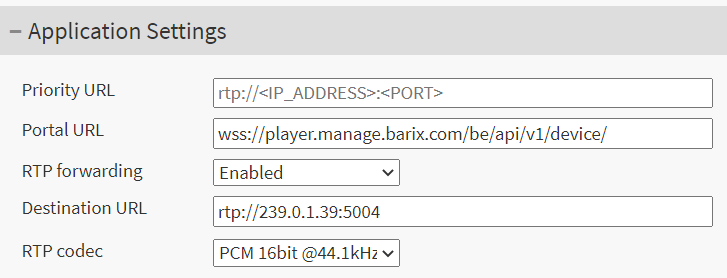
Application Settings
This section is used to configure the device’s main operational mode.
|
Priority URL |
The Priority URL will interrupt any audio currently being played. By default, this field is empty. It is particularly useful for interfacing the RetailPlayer with any paging device capable of sending audio over RTP, thereby overriding the background music. The device supports RTP in multicast, unicast, or broadcast formats. When using any RTP static payloads the URL schema is as follow:
For non-standard payloads, use the following URL schema:
Where you can assign the following values to the respective fields:
For example, if you want to play RTP PCM at 48 kHz in stereo, use the following URL:
When the manual format setting is used, it will override the automatic format detection. |
|
Portal URL |
This is the Portal URL that the device connects to. By default, the devices are configured to connect with the Barix Portal. The connection to the Portal is established over HTTPS and upgraded to Web Secure Sockets. Only change this field if you have your own on-premises Portal; otherwise, do not modify this value. |
|
RTP Forwarding |
This feature enables the RetailPlayer device to re-broadcast its main audio output to a destination address over RTP (Real-time Transport Protocol). When this option is enabled, you can configure the Forwarding Destination Address, which must be an RTP multicast or unicast address
Additionally, you can select the audio format from the following options:
This functionality allows the RetailPlayer to serve as a primary audio source for a fully IP-based installation using IP Formers. |
Playback Priorities
This chapter clarifies the various audio sources that the RetailPlayer can handle. One of the key strengths of RetailPlayer is its range of fallback mechanisms designed to ensure continuous playback under all circumstances.
The playback sources are organized into three categories: PRIORITY, FOREGROUND, and BACKGROUND.
|
Priority |
Category |
Source |
Description |
|---|---|---|---|
|
1- Highest |
Priority |
Priority URL |
When audio is received at the priority URL whatever is playing is immediately overridden |
|
2- High |
Foreground |
Scheduled Assets and Cues |
Any scheduled clip (asset) or manually triggered cue always plays over background material. (I.e ads, messages etc.) |
|
3- Medium |
Background |
Main Stream/Store & Play/USB Tracks |
Under normal conditions, the playback source is either the main stream, a store-and-play channel, or USB tracks (the latter must be enabled through the Portal). |
|
2- Low |
Background |
Fallback Stream |
Only when the device is set to play a STREAM, in the channel configuration is possible to setup a fallback streaming server that will play only in absence of the main stream (not applicable to Store & Play) |
|
1- Lowest |
Background |
Failover Tracks |
When the device is configured to play a STREAM, the Channel List settings allow you to upload Failover Tracks. These are locally stored music tracks that will play only in the absence of the main or fallback stream, such as during a network disruption at the player location. |
Se the RetailPlayer Portal configuration chapter to learn how to setup the playback material on the RetailPlayer device.
Network Settings - Ethernet

IIn this section, you can configure the network settings for the RetailPlayer device. You can choose between dynamic or static address assignment methods for the Ethernet interface.
The RetailPlayer supports the Dynamic Host Configuration Protocol (DHCP), which enables the device to acquire an IP address from a pool managed by a DHCP server. When the device is discovered on the network, the server assigns an available IP address. This address is associated with a lease time, meaning that once the lease expires, the DHCP server may reassign the IP address to other devices on the network, potentially giving it a different address than before. Additionally, the DHCP server provides all related information to the requesting device, including subnet, gateway, and DNS addresses.
While DHCP offers a convenient way to assign IP addresses, there are situations where static IP addresses are necessary. In these cases, you can manually assign a static IP address to the RetailPlayer device to ensure it remains consistent over time.
IMPORTANT
While is possible to use either DHCP or Static IP methods to assign an IP address to the Ethernet (wired) interface of the RetailPlayer, the wireless interface supports only the DHCP method. If you are operating your RetailPlayer solely on a wireless connection (with no Ethernet cable plugged in), ensure that the Ethernet method field is set to DHCP. Failing to do so will prevent your device from connecting to the wireless network.
|
DHCP Method |
Static Method |
|---|---|
|
DHCP Hostname When DHCP is the chosen protocol it is possible to indicate the Hostname of the DHCP server to be sent in the DHCP request. It's an optional field.
|
IP Address
This is the fixed IP address of the RetailPlayer device. The IP address serves as a unique identifier for the device on a network. If you are using static assignment, ensure that no other device on the same network has the same IP address assigned to the RetailPlayer. |
Netmask
In addition to the IP address, it is essential to provide information about the subnet mask. The subnet mask indicates which bits in the IP address are allocated for the network portion and which are allocated for the host portion. In a Class C LAN, the subnet mask is commonly set to 255.255.255.0. This configuration specifies that the first three octets of the IP address (e.g., 192.168.1.100) are used for network identification, while the last octet (e.g., 192.168.1.100) is reserved for host identification within the network. |
|
Gateway IP Address
The Gateway IP address is the address of the device that connects your Local Area Network (LAN) to the Internet, typically a router that all devices on the LAN connect to. To utilize the RetailPlayer’s cloud-based features and receive a stream from an Internet radio in stand-alone mode, it is essential to provide this address. If you are unsure of the Gateway address on your network, please contact your network administrator. |
Network Settings - Wireless
RetailPlayer devices are equipped with (2x) USB ports in the front panel that can be used for a WiFi Dongle to be connected, in this way the device can connect to the network wirelessly.
It is necessary to configure the wireless parameters to access the WiFI network.
RetailPlayer devices are compatible with the Realtek RTL8188EU and RTL8812BU chipsets.
To connect your RetailPlayer to a wireless network, follow these steps:
-
Insert your WiFi USB dongle into one of the USB ports (it does not matter which port you choose).
-
Refresh the local web interface in your browser or power on the device if it was turned off. You should now see an indication stating "not configured" next to the WIRELESS label.
-
Select the SSID you wish to connect to from the drop-down list.
-
Set the Security Protocol to WPA.
-
Enter the password for the selected SSID.
-
Ensure that the IP assignment method is set to DHCP. As of firmware version 5.3.0, static IP assignment is not available for the WLAN interface. Also, make sure the Ethernet method is set to DHCP; otherwise, your device will not connect to the wireless network.
-
Click on Submit at the bottom of the page. The device will apply the configured settings and reboot. After rebooting, the WiFi status should show as connected, indicated by a green dot next to the WIRELESS label.
-
Visit the Status page of the web interface to locate the Wireless Settings. Here, you can check the IP address configured on the device. Make a note of it if you intend to access the device via WiFi.
-
Power off the RetailPlayer and disconnect the Ethernet cable. Power it back on and wait until the boot process is complete. If Sonic IP is enabled, it will announce its IP address over the audio output. Verify that the wireless connection is fully operational.
While it is possible to use DHCP or Static IP methods for assigning an IP address at the Ethernet (wired) interface of the RetailPlayer it is not possible to do the same with the wireless interface, which supports only the DHCP method. If you run your RetailPlayer using solely Wireless connection (no Ethernet cable plugged), make sure to set the Ethernet method field to DHCP, failing in doing so will result in the impossibility to connect your device to the wireless network.
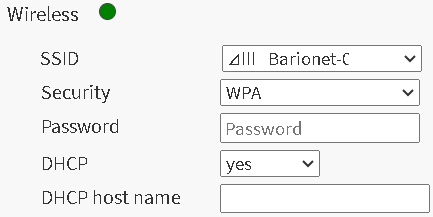
When the device connects correctly to a wireless network it will be indicated in the web UI as follow:
|
WIRELESS |
|
|---|---|
|
Connection LED |
It shows the status of the connection to the wireless network and if a dongle is inserted and configured
|
|
SSID |
It is the Service Set Identifier or the name of the wireless network you intend to connect to or if already connected, it's the one that you are currently using . RetailPLayer doesn’t support the selection of ‘hidden’ networks |
|
Security |
Select the correct security protocol to be used |
|
Password |
The password to authenticate within the wireless network |
|
DHCP |
Define the Dynamic Host Configuration Protocol. For the wireless interface of the RetailPlayer, only the DHCP method is available IMPORTANT: If you intend to connect only using the wireless interface make sure to set also the Ethernet method to DHCP |
|
DHCP hostname |
It indicates the hostname to be sent in the DHCP request. It is an optional field |
WiFi USB dongles tested and known to work with RetailPlayer
DNS, SonicIP® Volume
Completing the network configuration of the RetailPlayer device are the below settings:
|
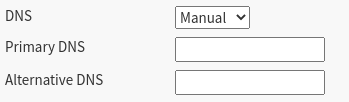
DNS Auto |
Automatic Domain Name System resolution. If set in Auto the DHCP server will provide the address of a DNS server to contact for the IP name resolution process. |
|
DNS Manual |
If DNS is set to Manual the device expects the Primary and Alternative DNS server fields to be filled with the related information. When Ethernet IP method is set to Static, DNS will always be set Manual and it is mandatory to provide the address information |
|
Primary DNS and Alternative DNS |
This address is for the Domain Name Server (DNS), which informs the RetailPlayer which DNS server to contact to resolve domain names into IP addresses. For example, the address of an Internet radio, such as http://barix.streamguys.net/Barix_hi, needs to be translated into an IP address, and this task is handled by the DNS server. The Alternative DNS serves as a backup for name resolution in case the primary DNS server is unavailable. This field is not mandatory. If you are unsure about which DNS server address to use, please contact your network administrator. |
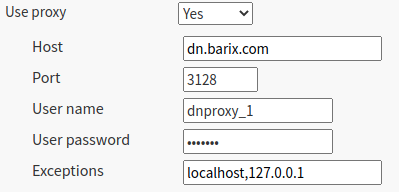
Proxy Configuration
Proxy type supported: HTTP
|
Host |
The Hostname or the IP Address of the proxy server to be configured |
|
Port |
The port number used by the proxy |
|
User name |
If the proxy requires authentication, inset here the username to be used, otherwise leave the field empty |
|
User password |
If the proxy requires authentication, inset here the password to be used, otherwise leave the field empty |
|
Exceptions* |
Set here any proxy exception, connections that will bypass the Proxy |
Time Settings
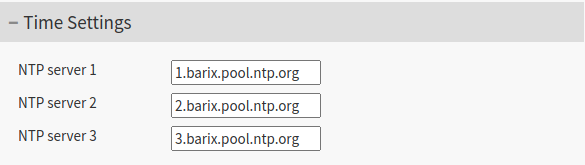
It is essential for the RetailPlayer device to operate with the correct date and time. This is crucial because the validation of HTTPS certificates, which establish a secure connection with the Portal, relies on these certificates being valid within a specific time window. The device presents its system time during this process; if the time is outside the expected window, the device will be unable to connect.
RetailPlayer devices utilize an NTP (Network Time Protocol) daemon to set their system time, operating over the standard port 123. The time set by NTP is in UTC (Coordinated Universal Time).
In the web interface, the time settings allow users to modify the default NTP pools used by the device. This flexibility is beneficial for customers who may wish to use their internal NTP servers or prefer alternative options. The fields accept either a domain name (which requires a valid DNS connection to resolve to an IP address) or an IP address.
Users can verify the system time on the Status page of the device or from the Portal's status page.
Once the device has booted, NTP is used to set the time only at startup. After establishing a connection with the Portal, the time is managed by the Portal, which also allows for the selection of the appropriate time zone for the device's installation. This ensures that the device always operates on the correct schedule for its intended use.
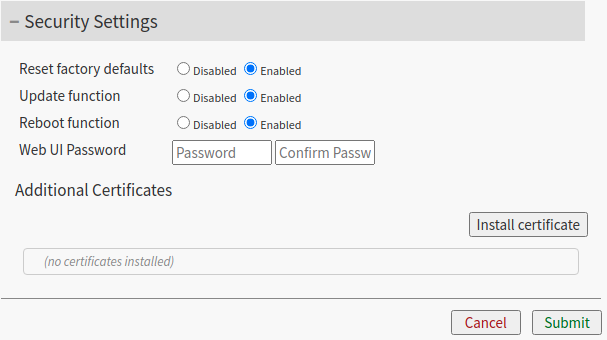
Security Settings
This section is dedicated to securing access to the RetailPlayer web interface and enabling or disabling critical operations such as rebooting, resetting to factory defaults, and updating the device.
|
Reboot Function |
Enable or disable the reboot function of the device from the web UI |
|
Reset Factory Defaults |
Enable or disable the possibility to reset the device to factory default from the web UI (hard reset via button continue to operate) |
|
Update Function |
Enable or disable the possibility to update the device from the web UI |
|
Web UI Password |
Set the password for accessing the web interface of the RetailPlayer device. If a password is already set, an additional field labeled OLD PASSWORD will be displayed, which is required to change the password. By default, the web interface of the device is protected by the password printed on the back of the device. You also have the option to disable access to the web interface by turning off the Webconfig option in the Portal settings, which will disable the device's web servec effectively closing access to port 80 or 443. Default Username: admin |
|
Additional Certificates* |
Allows the possibility to upload custom .crt certificates to the device. Useful when the device is used in private enterprise networks where a private CA is in place to validate secure connections between devices. |
SUBMIT
By clicking on the button SUBMIT all the changes made in the SETTINGS page are applied in the configuration.
By clicking on CANCEL all the changes are not applied and the fields return to their previous inserted value.
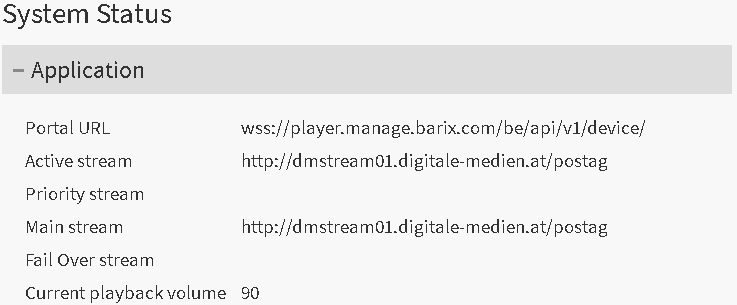
Status Page
Click on STATUS in the top navigation bar to view the current status of the RetailPlayer device.
The status report provides information about the hardware and application status, offering a quick overview of the device's current configuration.
The Status Page displays the following information:
|
Application accordion |
|
|---|---|
|
Portal URL |
The current portal URL configured in the settings page |
|
Active stream |
The audio stream that is currently playing. It is a useful indication to verify if it is playing any stream among priority, main, failover or fallback tracks (failover playlist with mp3 files) |
|
Priority stream |
The priority stream URL configured on the settings page. This is the stream with the highest priority, if it is received it will overlap any other stream currently playing |
|
Main stream |
The main stream URL configured on the settings page |
|
Failover stream |
The failover stream URL configured on the settings page |
|
Current playback volume |
The playback volume of the player currently set. If the device is used in Portal mode the volume is set from the Portal, in stand-alone mode, the volume is set from the settings page |
|
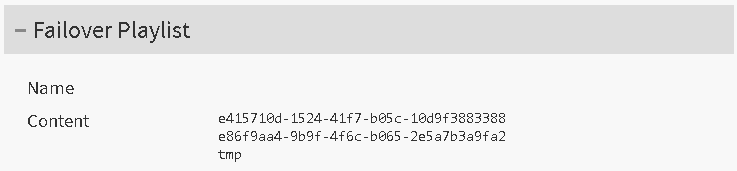
Failover Playlist accordion |
|
|---|---|
|
Name |
This is the name of the playlist.m3u file saved in the device configuration. It is filled automatically when fallback tracks are identified, either from the Portal, when the device is used in Portal mode or from the USB drive, when used in stand-alone mode |
|
Content |
The actual fallback tracks (mp3 files) the device will play in absence of any stream provided. This field is useful to verify if the fallback tracks uploaded from the Portal are actually retrieved from the device NOTE: When the tracks are retrieved from the Portal the name of the file is the unique identifier used in the Portal to match with the corresponding resource |
|
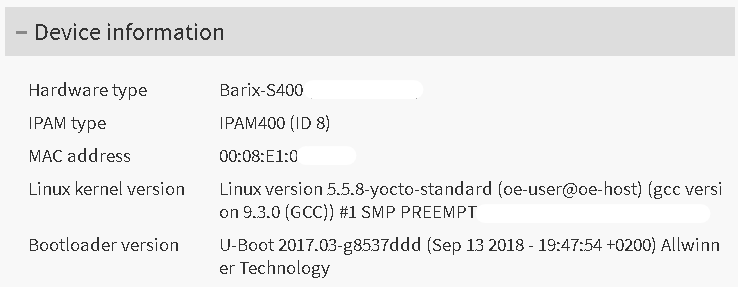
Device Information accordion |
|
|---|---|
|
Hardware type |
The actual RetailPlayer device (in parenthesis is the Part Number) |
|
IPAM type |
The Barix IPAM codec module installed in the device (in parenthesis the Part Number of this component) |
|
MAC Address |
Media Access Control address - This is the hardware address of the Ethernet interface of the device. It is required when the device is registered on the RetailPlayer Portal. It is found here but also on a sticker applied underneath the device |
|
Firmware version |
The running firmware installed on the device |
|
Application |
The name of the application currently running |
|
Linux kernel version |
The version of the Linux operating system in use |
|
Bootloader version |
The bootloader version currently in use |
|
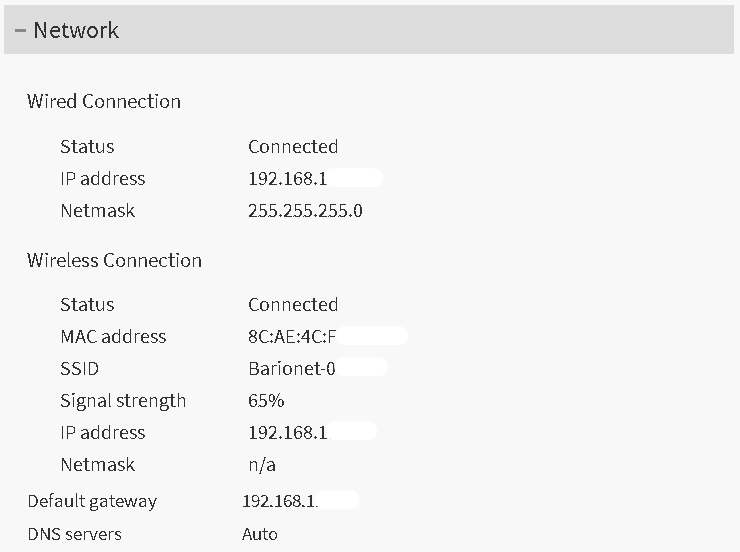
Network accordion |
|
|
Wired Connection |
|
|---|---|
|
Status |
Shows if the device is connected via the Ethernet interface to the network |
|
IP Address |
The current IP address of the Ethernet interface |
|
Netmask |
The subnet mask on which the device is operating |
|
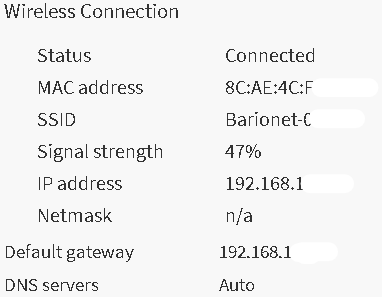
Wireless Connection |
|
|
Status |
Shows if the device is connected via the Ethernet interface to the network |
|
MAC Address |
Media Access Control address - This is the hardware address of the wireless interface of the inserted WiFi USB dongle |
|
SSID |
The Service Set Identifier - the name of the wireless network to which the device is currently connected |
|
Signal Strength |
The power expressed in percentage (0% - 100%) of the WiFi radiation Try to position the device where this value is higher than 45% to get better results when using a WiFi connection |
|
IP Address |
The current IP address of the wireless interface |
|
Netmask |
The subnet mask on which the device is operating |
|
Network |
|
|
Default Gateway |
The gateway address currently set |
|
DNS Servers |
The DNS server addresses (primary and secondary) currently in use. Provided either by the DHCP or entered manually in the settings page |

|
System accordion |
|
|---|---|
|
System time |
Shows the current time of the device, synchronized with the set time zone |
|
Uptime |
Displays the duration since the device last connected or rebooted, indicating continuous operation time |
|
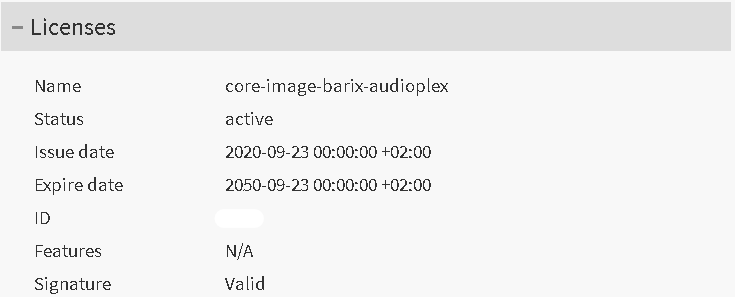
Licenses accordion |
|
|---|---|
|
License name |
Indicates the device’s license name |
|
Status |
Indicates the current state: active/inactive |
|
Issue date |
Indicates the date when the license was issued |
|
Expire date |
Indicates the date when the license will expire |
|
ID |
Unique identifier for the license |
|
Features |
Eventual features will be listed here |
|
Signature |
Parameter which confirms the license validity |

|
Mass storage devices accordion |
|
|---|---|
|
Type |
Indicates the type of the mass storage device |
|
Usage |
Indicates, with a graphic the storage’s usage:
|
|
Size |
Total memory of the mass storage device |
|
Used |
Amount of memory already used |
|
Available |
Amount of memory still available |
|
File system |
Indicates the type of file system present on the storage device |
|
Status |
Indicates the current permission status on the storage device |
Logs Page
The Logs page displays the events occurring operation of the RetailPlayer device.
Logs are useful for debugging issues, they give a detailed insight into every process within the RetailPlayer OS.
On the top-right corner, it is possible to click the button “Download all messages” to download all log files.
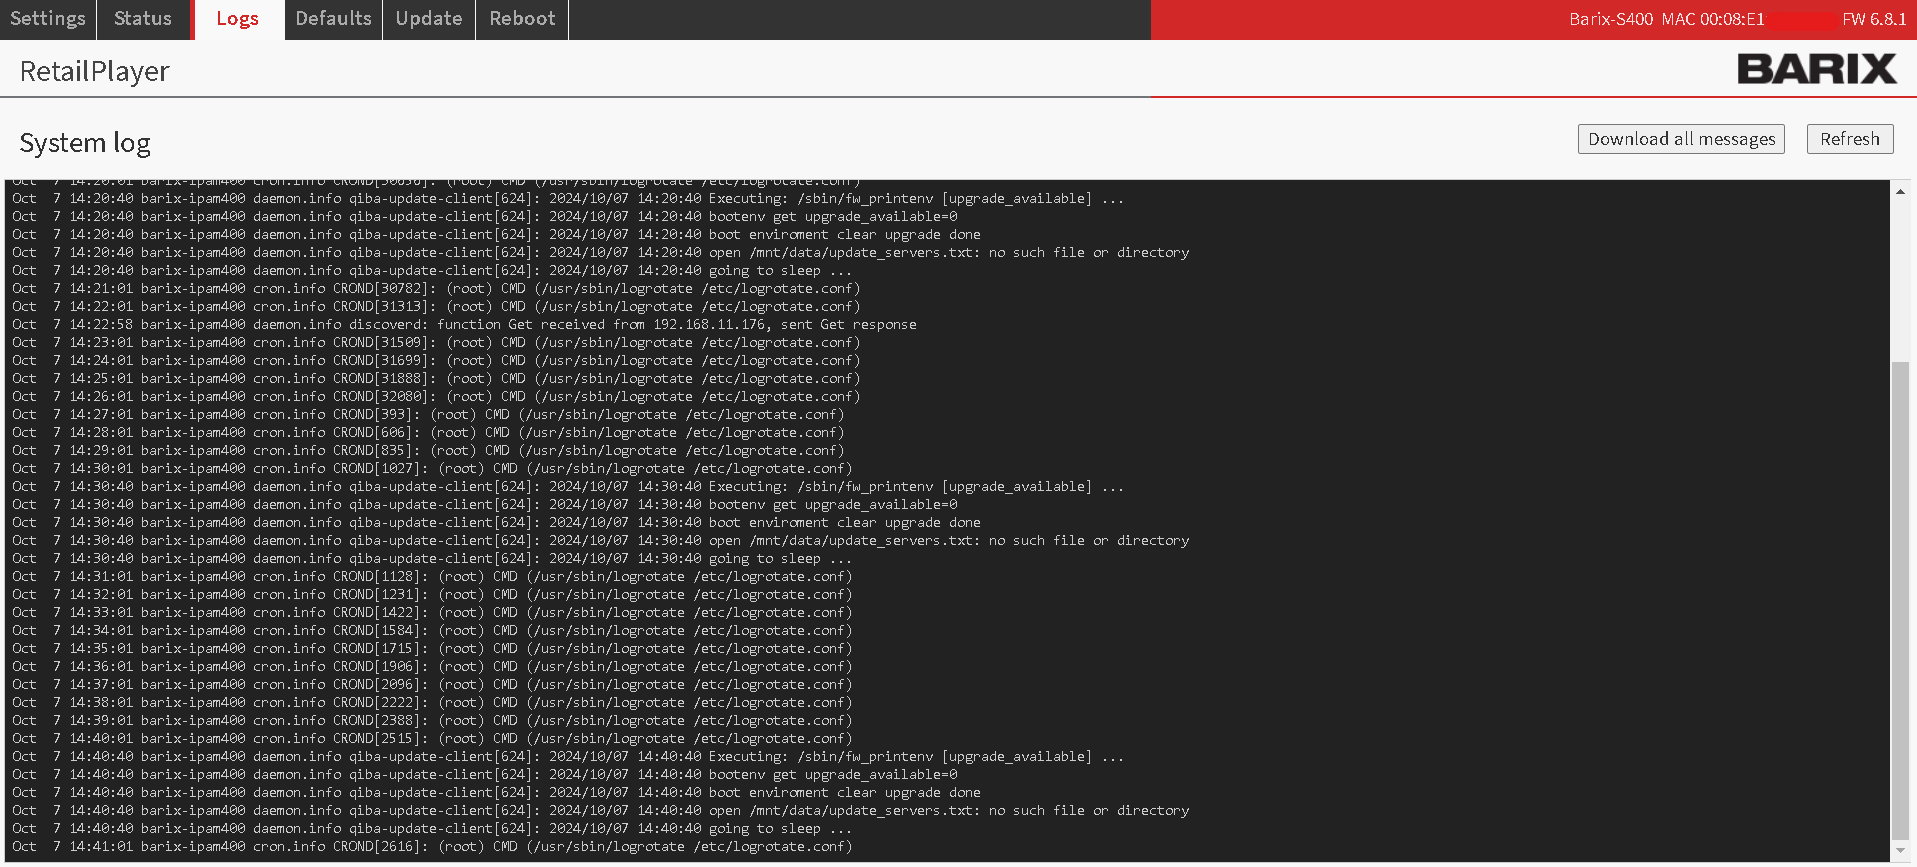
When contacting the Barix support it is useful to attach along with the communication the Log files downloaded and the status page screenshot. Do not forget to give a description as much detailed as possible about the steps made that led to the issue.
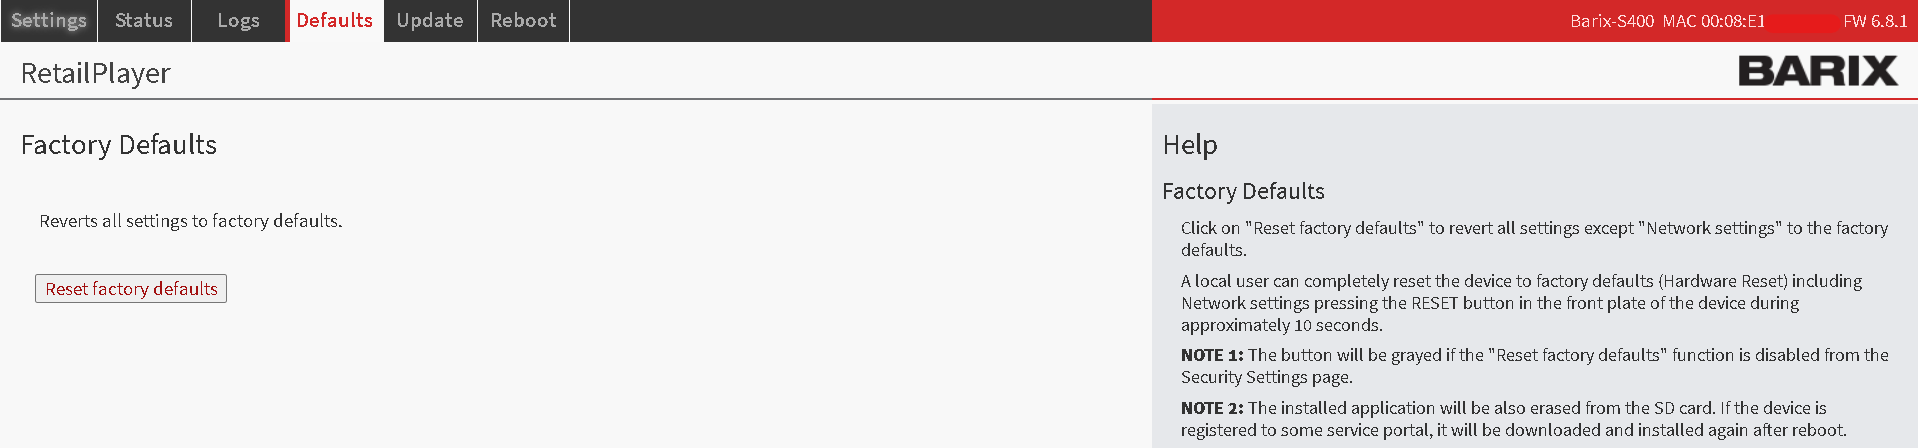
Defaults Page
Reset to Factory Defaults - Soft Reset
The Defaults page on the web interface of the RetailPlayer device allows you to perform a soft reset. This operation reverts all settings, except the network settings, back to factory defaults. It does not downgrade the firmware; it simply resets the settings for the running application.
The option to enable or disable the reset to factory defaults can be found on the Settings page under Security Settings.
When the reset button is clicked, the device initiates a 10-second countdown, after which you can reload the web interface.
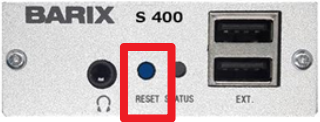
Reset to Factory Defaults - Hard Reset
The RetailPlayer device also supports a hard reset, which reverts all settings to factory defaults, including network settings.
To perform a hard reset, locate the reset button on the front panel of the RetailPlayer device. Using a sharp-pointed tool, press and hold the button for approximately 10 seconds. The status LED will blink green three times, indicating that the reset operation has begun. After a few seconds, the device will reboot with factory defaults. Be sure to reload the web page once the operation is complete.
Update Page
The RetailPlayer platform offers the possibility to update the firmware of the device locally from the web interface or remotely via the Portal. More details are provided in this chapter on both functionalities.
Run always the latest firmware available from Barix as it might include bug fixes, improvements or new useful features
The Update page has 3 purposes:
-
Visualizes the current software loaded on the RetailPlayer device
-
Enables the remote update of the device
-
Updates the device directly
in order to update to a firmware version newer than 5.0 from an older firmware it is mandatory to first update to FW version 5.0 and then update to the 5.X or 6.x FW. More on the subject here.
Visualize the current version installed
Under “Currently Loaded Version” it is visible the current firmware installed, the root file system version, the web UI release version, the kernel details, and the Bootloader information.
Remote update via RetailPlayer Portal
The RetailPlayer Portal allows you to update the firmware of RetailPlayer devices remotely. (For details on accessing device settings from the Portal, please refer to the RetailPlayer Portal chapter.)
To update the firmware remotely from the Portal, follow these steps:
-
Log in to the Portal at manage.barix.com.
-
Navigate to the Devices menu and select the device you wish to upgrade from the list.
-
In the device's Overview page, locate the Firmware drop-down menu under Basic Settings.
-
Select the desired firmware version.
Any device running firmware v5.x or an earlier version will not connect with the RetailPlayer Portal. Update your device via local web configuration intarface to enable Portal connection.
The Device needs to be powered overnight in order to perform the automatic update at 4 am.
Automatic Firmware Update via Portal
In the Portal, you can set up an automatic firmware update by selecting a ".x" release from the drop-down menu (e.g., Firmware 6.x). With this configuration, any release available within the 6.x version will be automatically installed by the devices. They will check for updates daily at 4 AM to see if there is any available on the Barix update server at https://release.barixupdate.com
Update via the Web Interface
To update the firmware locally from the update page, start by downloading the latest firmware package from the Barix website at http://www.barix.com/downloads . The firmware for the RetailPlayer is located under the Products section, specifically in the Decoder category. Alternatively, you can simply type “RetailPlayer” in the search bar on the website. Please note that the ability to download firmware packages is available only to registered users.
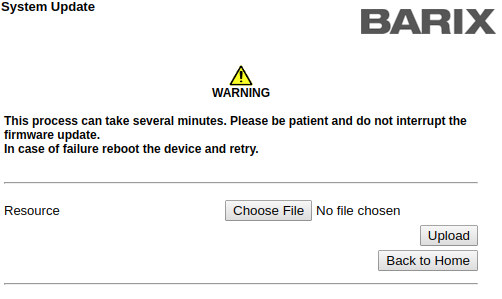
The firmware is provided as a TAR archive file. To update from the web interface:
-
In the Update page, click on Please click here to start the update to access the system update page.
-
Click on Choose File, then locate and select the corresponding TAR archive.
-
Click on Upload.
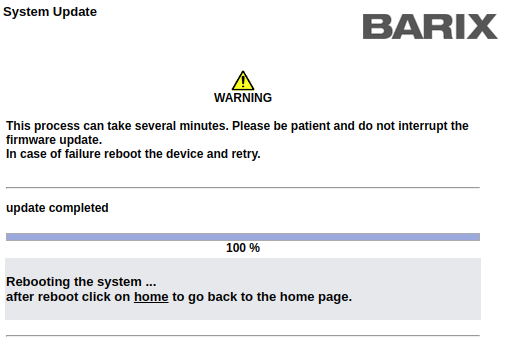
-
A progress bar will appear, indicating the completion of the upload process. Wait until the upload is finished (do not disconnect the power supply during this operation).
-
Once the upload is complete, the device will reboot automatically. Reload the page or click the home link to return to the home page.
Please clear the cache or restart your browser to ensure the web interface of your device is displayed correctly after the update.
Do not disconnect the power supply during the update. The software update can take up to several minutes depending on the size of the firmware.
Rescue Image Process
The RetailPlayer application runs on a removable flash memory card in microSD format. In cases where the application fails to load correctly from the flash memory, you can execute a rescue process to restore the original factory firmware on a new microSD. For example, if your device was shipped with firmware version 5.2.0 and you were using 5.3.0, this process will revert the firmware to version 5.2.0 and reset all settings to factory defaults, including network settings.
Procedure:
-
If your RetailPlayer device is powered on, shut it off.
-
Ensure the device is connected to the internet. For this process to work, the device will attempt to connect to the Barix update server (http://release.barixupdate.com) via HTTP (port 80) to download the rescue image.
-
While the device is off, press and hold the reset button.
-
Keep the button pressed while powering on the device (for S400, connect the power cable; for SP400, connect the Ethernet cable).
-
Continue holding the button for at least 8 seconds after power is applied.
-
Release the button to start the rescue process.
-
The device will restart, and the LED will blink orange, indicating that a firmware update or downgrade is in progress.
-
When the LED turns green (either blinking or steady), reboot the device.
Your device is now rescued.
Reboot Page
This page is dedicated to rebooting the RetailPlayer device.
Rebooting is the process of power cycling the device (ON → OFF → ON) and can be performed from the web interface or by using the reset button on the front panel.
Reboot from the Web Interface
-
Click Reboot the device to restart the device.
-
A countdown screen will appear, lasting for 10 seconds. At the end of the countdown, the device will reboot.
-
Wait approximately 20 seconds, then reload the web page or click on the text that says Click here to return to the home page.

Reboot from the reset button
The reboot of the device from the button is performed by pressing the Reset button located on the front panel of the RetailPlayer device for 3 seconds approximately.
A long press of this button (10 seconds) will reset the device to factory defaults.
The RetailPlayer Portal
The Barix RetailPlayer Portal is a cloud-based management platform that allows users to control, monitor, and troubleshoot RetailPlayer devices remotely.
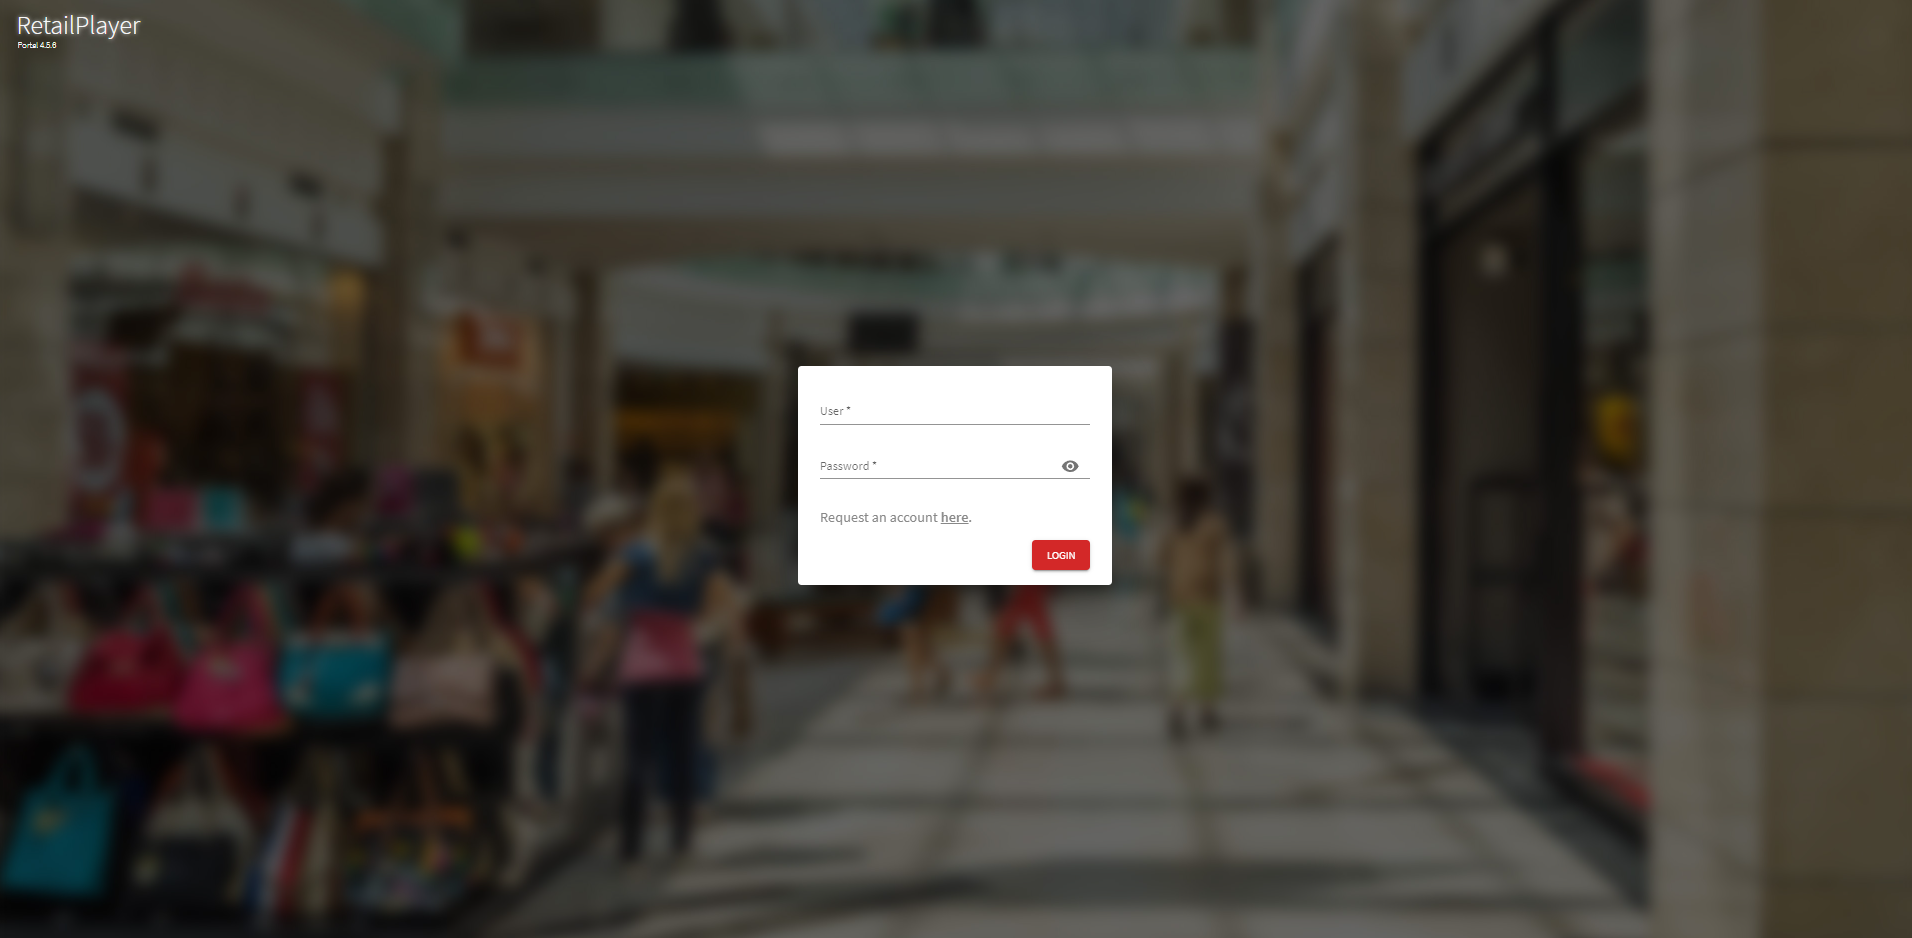
The Portal is accessible using any web browser at: https://manage.barix.com/
To request an account follow this link: https://to.barix.com/retailplayer_portalaccount_request
Portal Login
In the Login area, enter the credentials and click the SUBMIT button to access the portal.
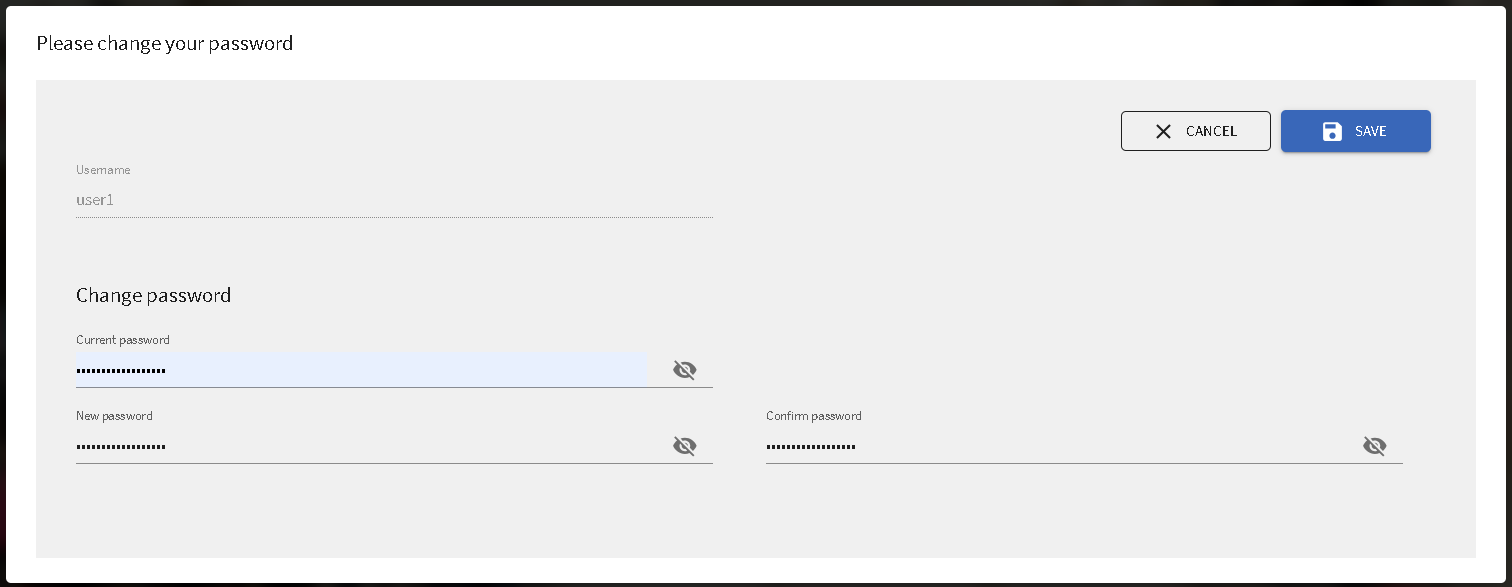
First Access
The first time the Portal is accessed it will ask to change immediately the password used for login.
Insert the new password, confirm by clicking on ![]()
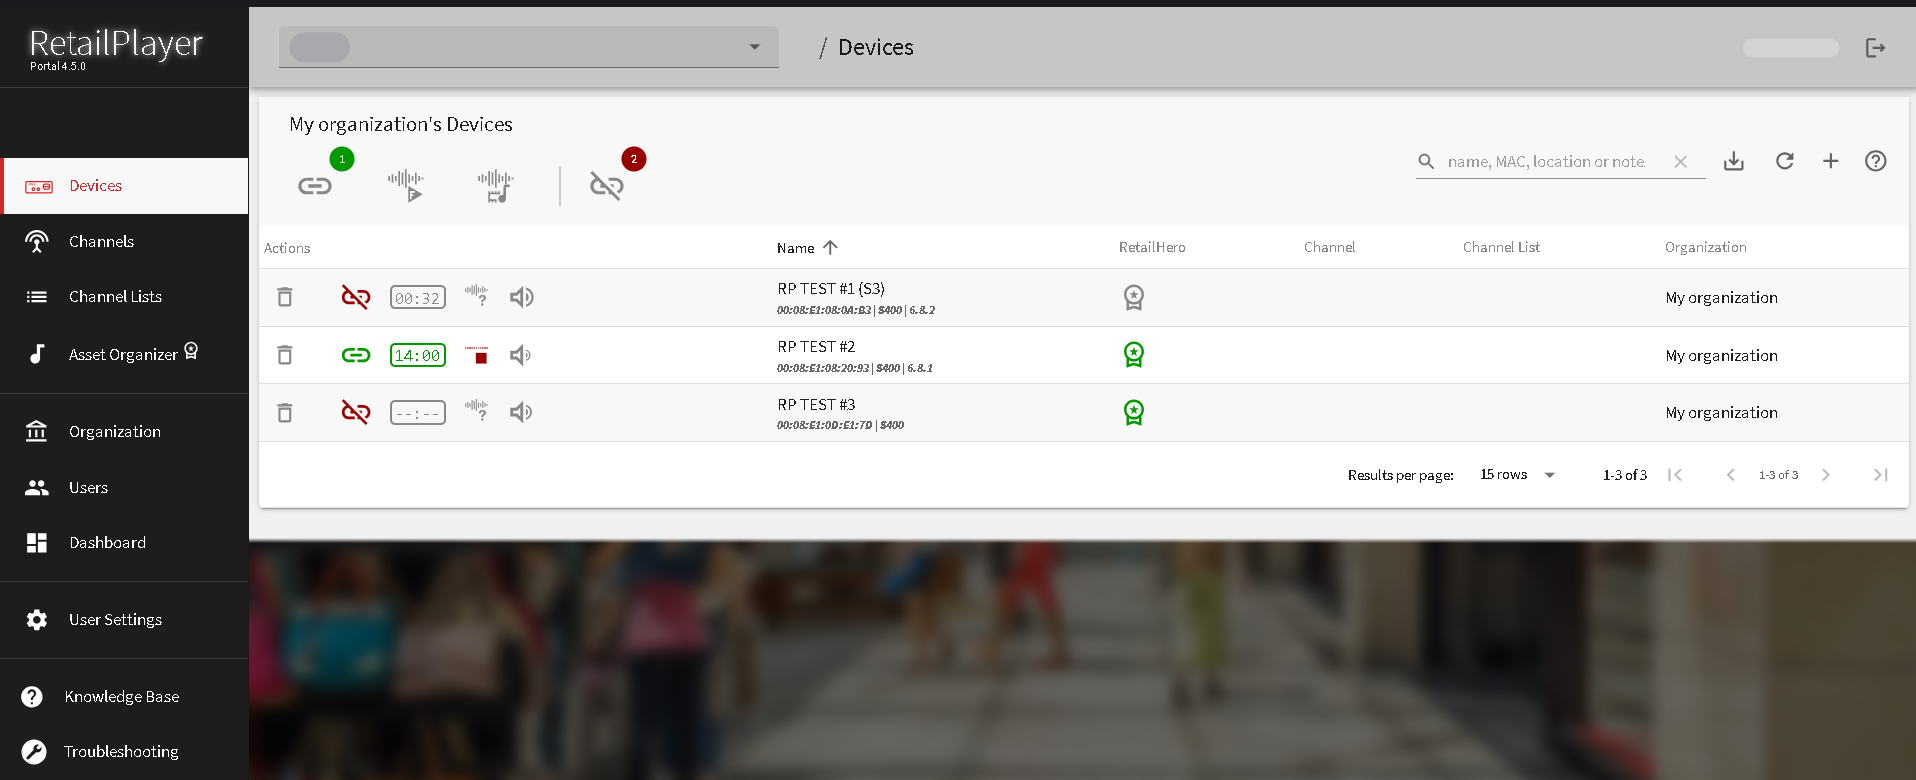
User Interface Layout
Once logged in the Portal, clicking on the Devices link opens the list of units registered under the current organization selected:
The sidebar menu on the left provides access to the following sections of the RetailPlayer Portal:
-
Devices: The device management section, where you can register, configure, control, and monitor each RetailPlayer device.
-
Channels: Access the configuration of stream URLs used as channels.
-
Channel List: Manage groups of channels by configuring channel lists.
-
Asset Organizer: Manage audio clips for scheduling on a weekly planner, interlacing them with streaming channels. You can also create Cue Sets to play audio files manually from the QR Code web app or directly from the Portal.
-
Organization: An overview of the main organization and its associated resources, such as sub-organizations, users, devices, and channel lists.
-
Users: Manage user creation, privileges, and settings in this section.
-
Knowledge Base: Redirects to the RetailPlayer user manual.
-
Troubleshooting: Redirects to the user manual, specifically to the section on connectivity issues.
It is possible to change organization by using the selector in the top navigation area:
-
Organization Selector: If the organization in use has sub-organizations, they will appear in this dropdown. Switching between organizations will change the displayed resources, including devices, channels, channel lists etc.
Devices management
The "Devices" button gives access to the device list. All the registered devices of an organization and its sub-organizations are listed here.
The device list is organized as follow, from top to bottom:
|
Quick Filters with counters and search bar |
|

|
ONLINE device filter
|

|
OFFLINE device filter
|
|
|
FALLBACK URL device filter
|

|
FAILOVER TRACKS device filter
|
|
|
RESEARCH BAR - search in the list
|
|
|
Refresh the list button
|
|
Device List |
|

|
|
|
|
Delete device from the Portal button
Removing a device from the Portal triggers a RESET TO DEFAULTS and consequent reboot. Additionally, if the device was licensed with RetailHero, the Portal loses it and the device must be subscribed again. |
|
|
|
|
|
|
|
|
|
|
|
|
|
NAME |
This column shows the device's name, it is the default sorting used in the table. Clicking on the arrow it is possible to sort them from A..Z or from Z..A |
|
CHANNEL |
The current channel selected, the name visualized is the one assigned to the channel in the channel configuration |
|
CHANNEL LIST |
The current channel list selected, the name visualized is the one assigned to the channel list in the channel list configuration |
|
ORGANIZATION |
The organization the device belongs to |


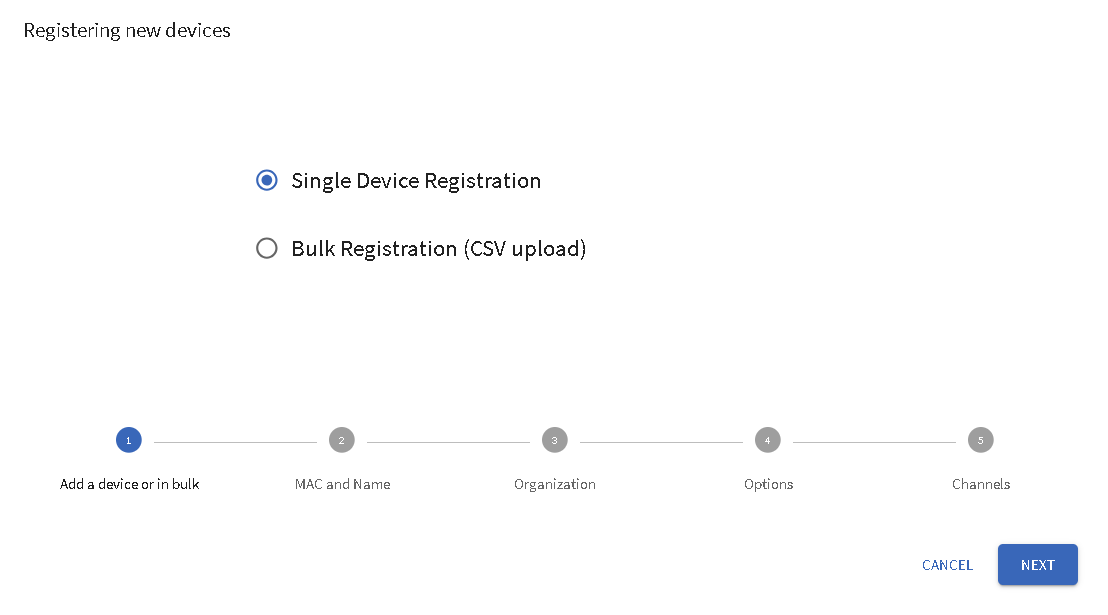
Device registration
From the device list window, click on the ➕ button in the top-right corner to add a new device in the Portal.
This opens a wizard configuration that guides the user toward the first configuration of the device, the steps are as follow:
-
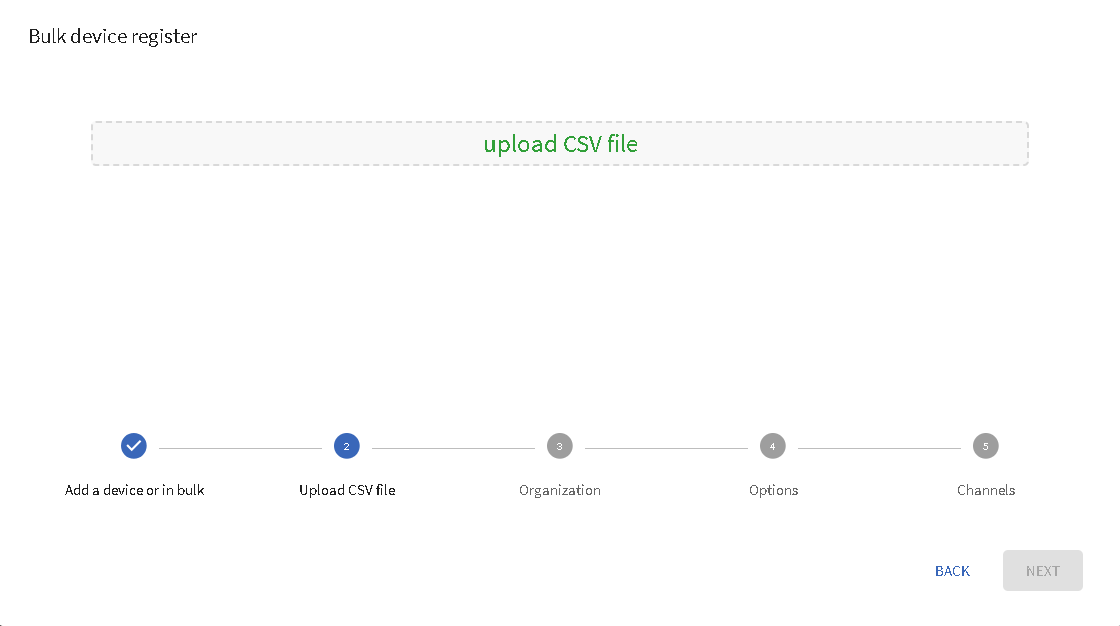
Select the registration mode. You can register one device at a time or register multiple devices at once, using bulk registration.
BULK REGISTRATION
-
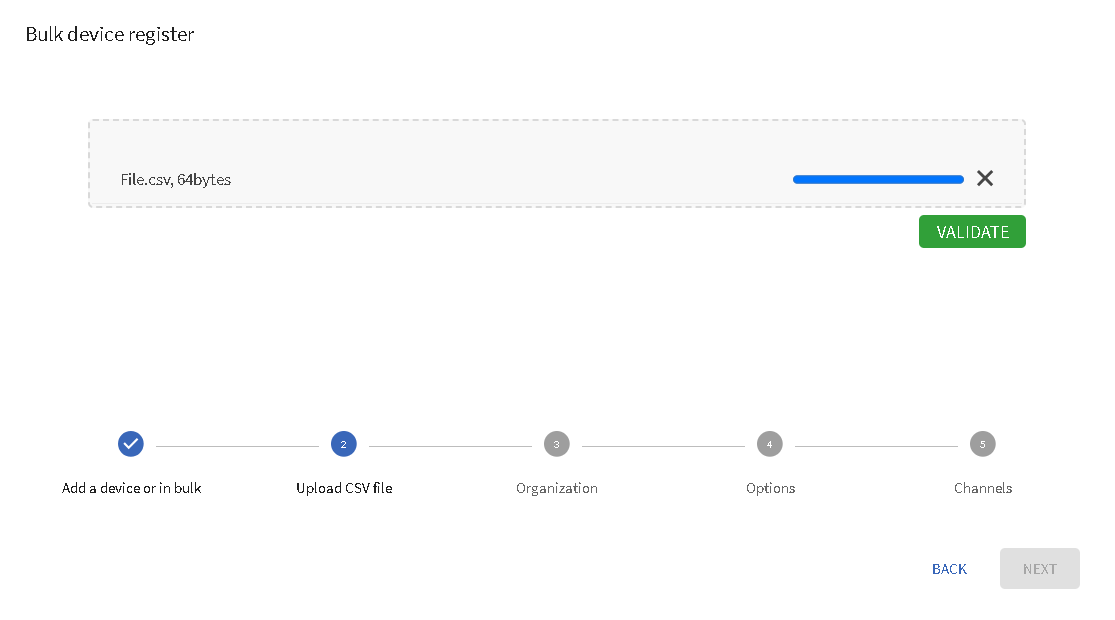
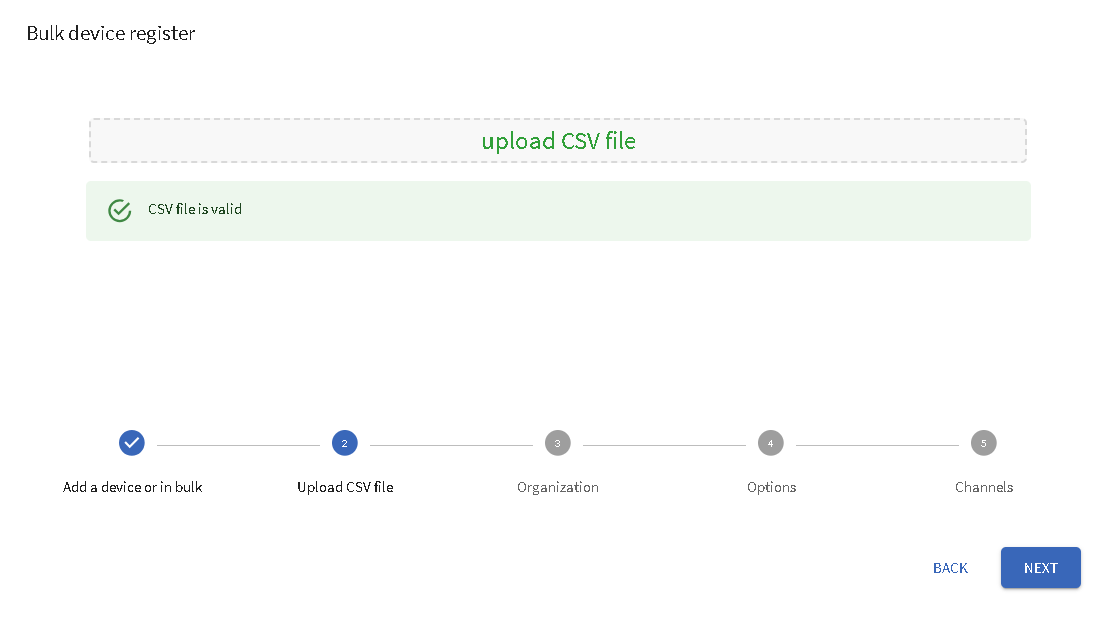
Click on the “Upload CSV file“ to load the text file containing devices names and MACs:.
To device bulk registration, upload a CSV file with following format:
"00:08:E1:WW:XX:YY";"My device alias YY"
"00:08:E1:WW:XX:ZZ";"My device alias ZZ"
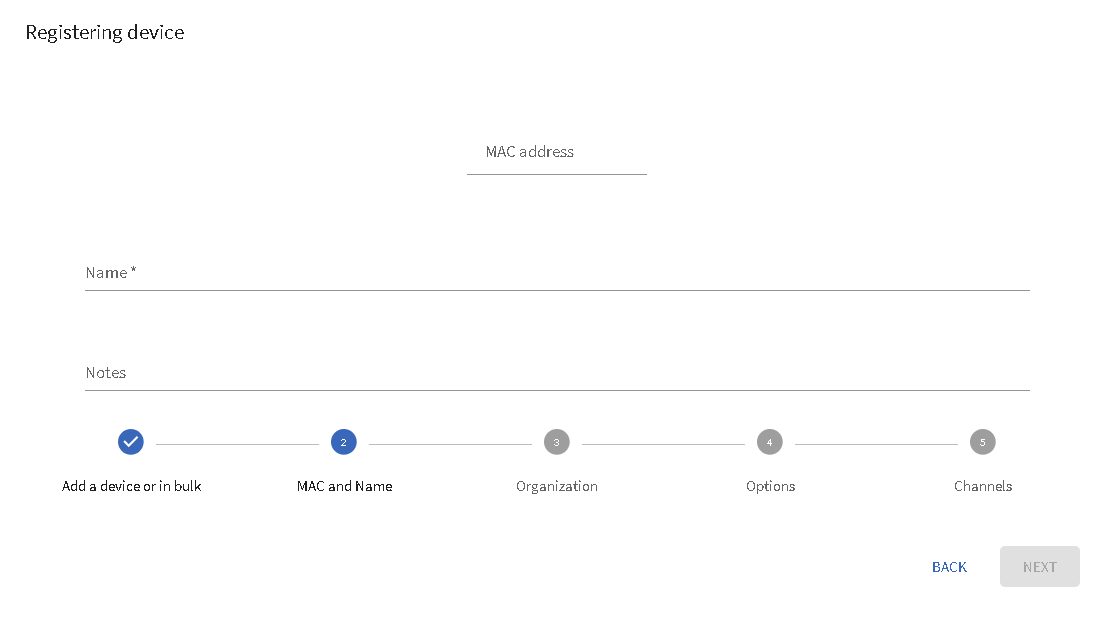
SINGLE DEVICE REGISTRATION
-
Enter the MAC Address of the RetailPlayer device, assign a name to the device, and, if necessary, add a note for additional information.
-
Select the Organization this device belongs to.

-
Settings configuration to be applied to the registered device(s)
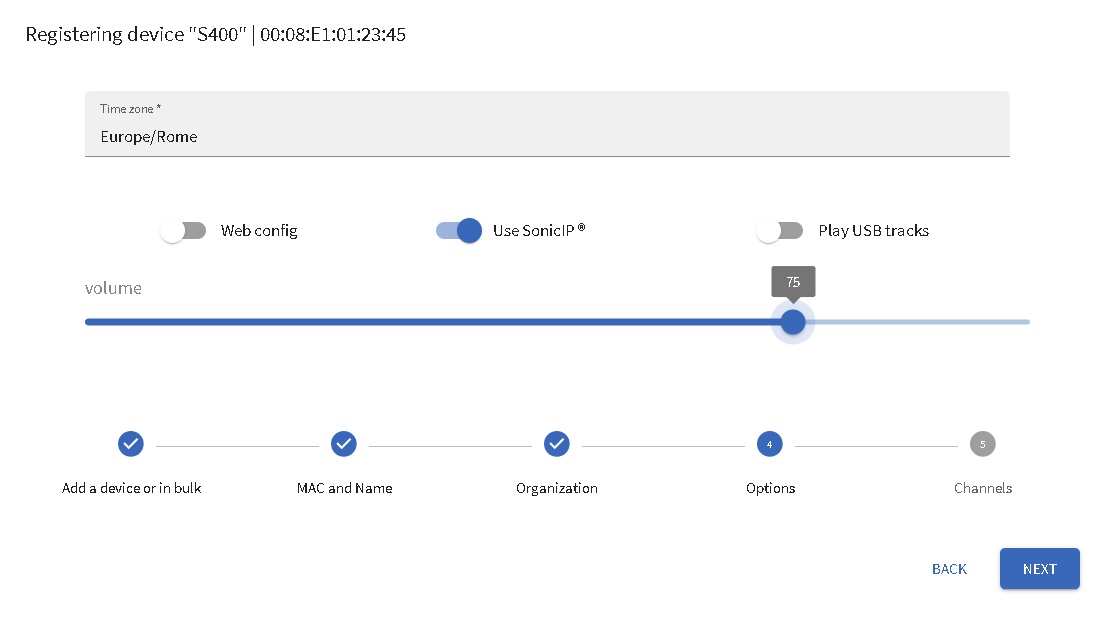
|
Options |
|
|---|---|
|
Time zone menu |
Select the appropriate time-zone based on the geographic location where the device is installed. This ensures the correct time is set for functions like HTTPS certificate validation. |
|
Web config switch
|
This switch enables / disables the RetailPlayer local web configuration ineterface. |
|
Sonic IP swirch
|
When enabled, this feature enables the IP address announcement of the device during boot. |
|
Play USB tracks switch
|
This option enables the playback of audio tracks from a connected USB drive. When enabled, only tracks from the USB pen drive will be played. |
|
Volume slider
|
The volume slider allows you to adjust the output volume of the RetailPlayer device. |
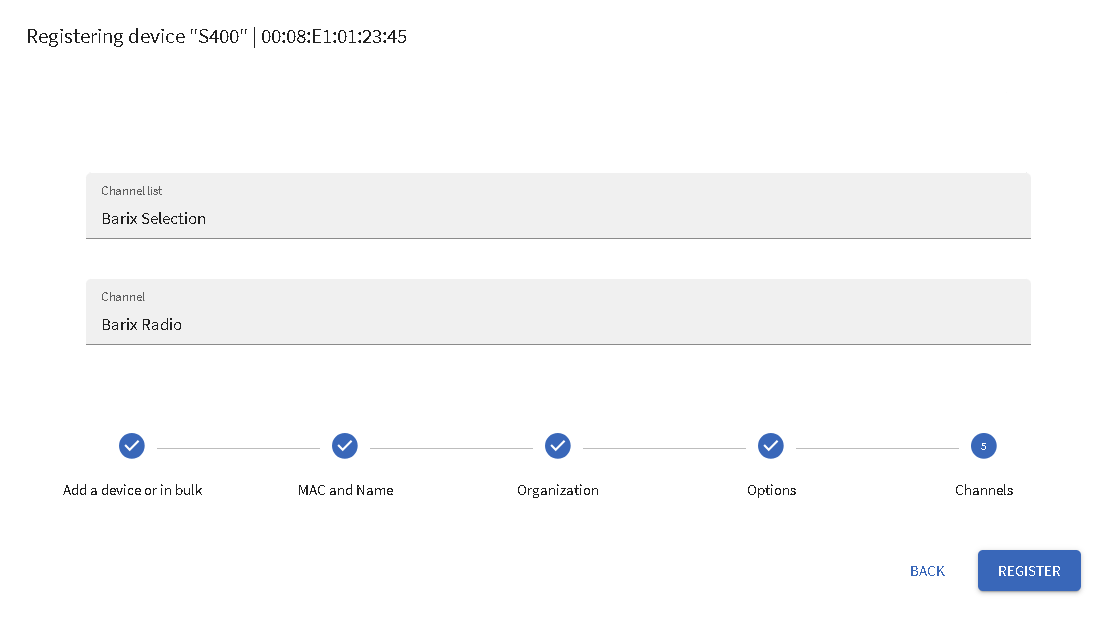
-
Select the channel list and the specific channel you want the device( to play after registration, then complete the setup by clicking the

You can also choose not to select a channel or channel list, but in that case, the device will not play anything.
Device Settings
After registration, the user should navigate to the Device Settings to finalize the configuration of the newly added device. This section can also be used to modify the configuration of an existing device.
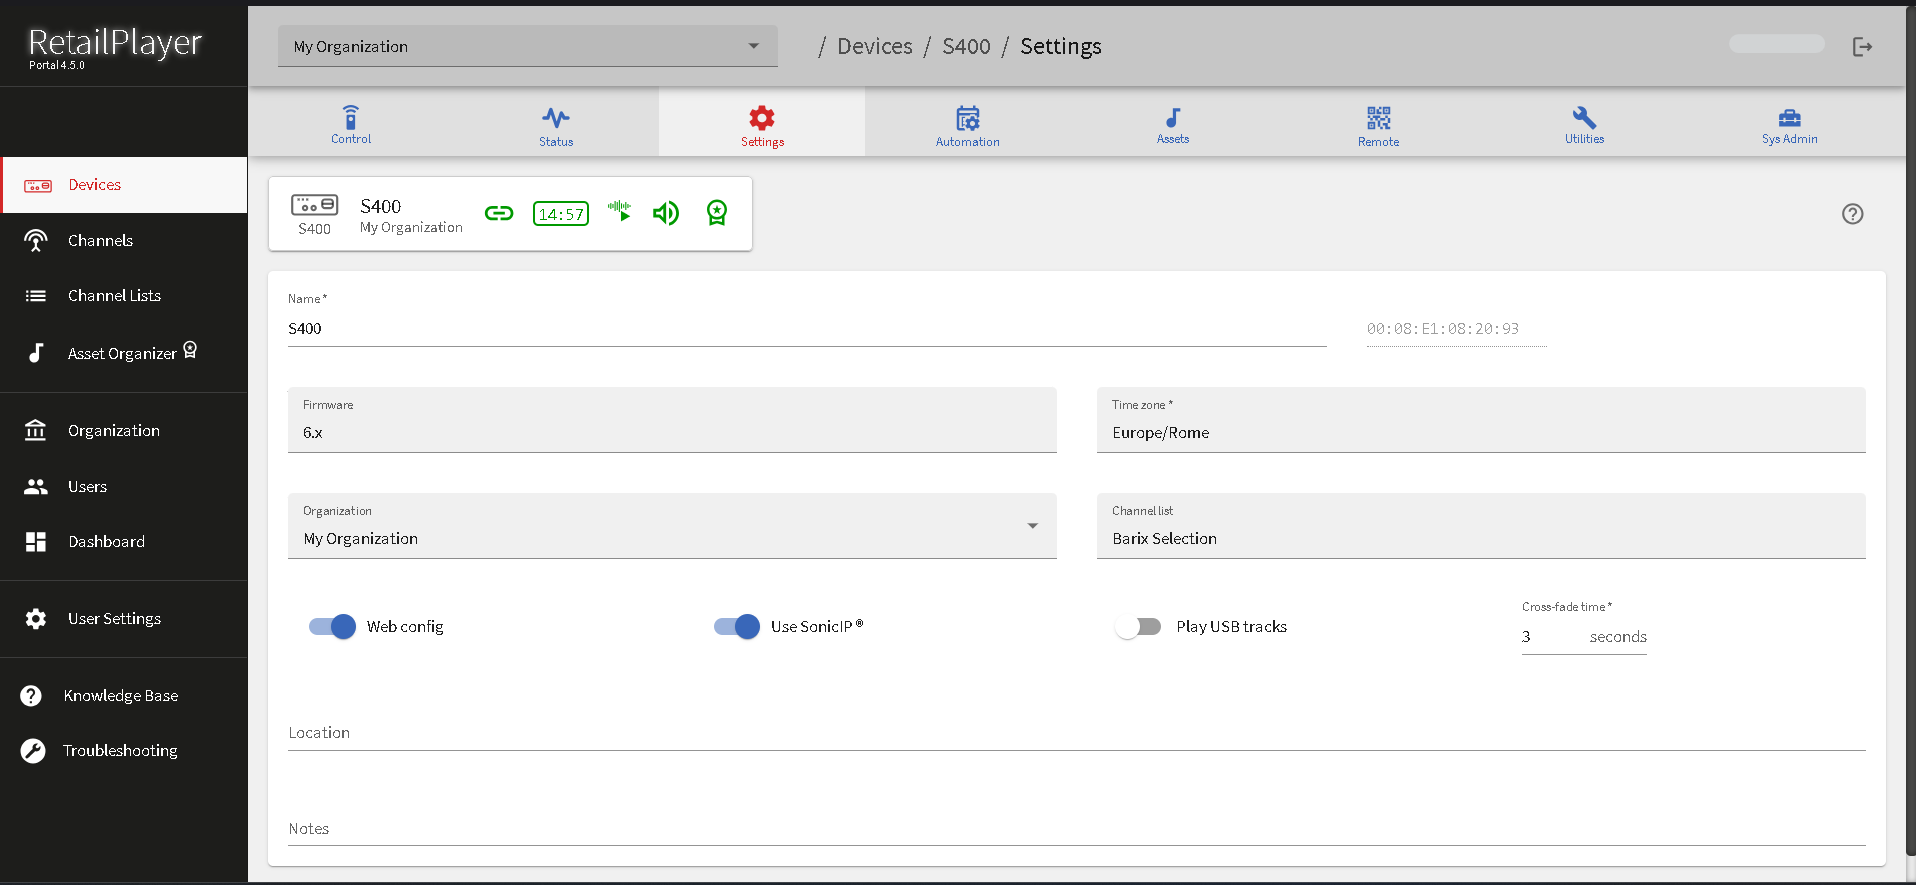
|
Settings page |
|
|---|---|
|
Name |
Assign a name of your choice to the device |
|
MAC |
Shows the MAC Address of the device |
|
Firmware |
Select the firmware version to run on the device. The latest firmware is automatically added to the menu when available, but it is not automatically installed on the device. Firmware updates occur at 4 AM the following morning. Starting with firmware version 6.5.0, you can force an update by power cycling the device after selecting the firmware. During the update, the device will reboot, and the audio will be muted for a few seconds. If the desired firmware is not listed (e.g., a Beta version), ensure you click the "X" in this field to manually update the firmware. This will display the message “please choose...”. Failing to do this will cause the device to reconnect to the Portal and reload the firmware selected in the Portal. |
|
Time zone |
Set the local time for the device. This is essential to ensure that scheduling functions operate according to the device's local time.
|
|
Web config
|
Enable/disable the possibility to access the local web interface of the device, when disabled the device cannot be accessed locally by connecting to its web server |
|
Use Sonic IP®
|
Enable/disable the Sonic IP® function of the device |
|
Play from USB
|
Enables playback from any USB stick connected to one of the device's USB ports. The files must be located in the USB root folder, and playback will be random and looped. This USB playback source have the same priority as the main stream. |
|
Cross fade time
|
This function manages the duration of the audio transition between two tracks, specifically for Store and Play tracks or Failover Tracks. It does not control the crossfade time for opening/closing streams or switching between streams. The crossfade time determines how smoothly one track fades out while the next fades in, creating a seamless listening experience.
|
|
Organization |
Assign the device to an organization, this field cannot be empty. |
|
Channel list |
Assigns a channel list to the device. A channel list is a group of channels. Channels of this list can then be changed in real-time while a device is connected to the Portal from the Real-Time Control section or remotely from a smartphone or tablet by scanning a QR code, see following chapters |
|
Location |
This field is called location but it can be used as a custom tag. It is useful to add the location in order to be able to filter devices quickly from the search bar in the device list. Any word in this field can be used to search devices in the device list |
|
Notes |
Another custom tag that can be used to facilitate the search of devices that contain any word stored in this field |
Once the device is registered and configured further controls and possibilities are available.
Device control section
Clicking on any device in the device list grants access to the Control section for that specific device.
This section provides real-time controls that can be applied to any online device directly from the Portal.
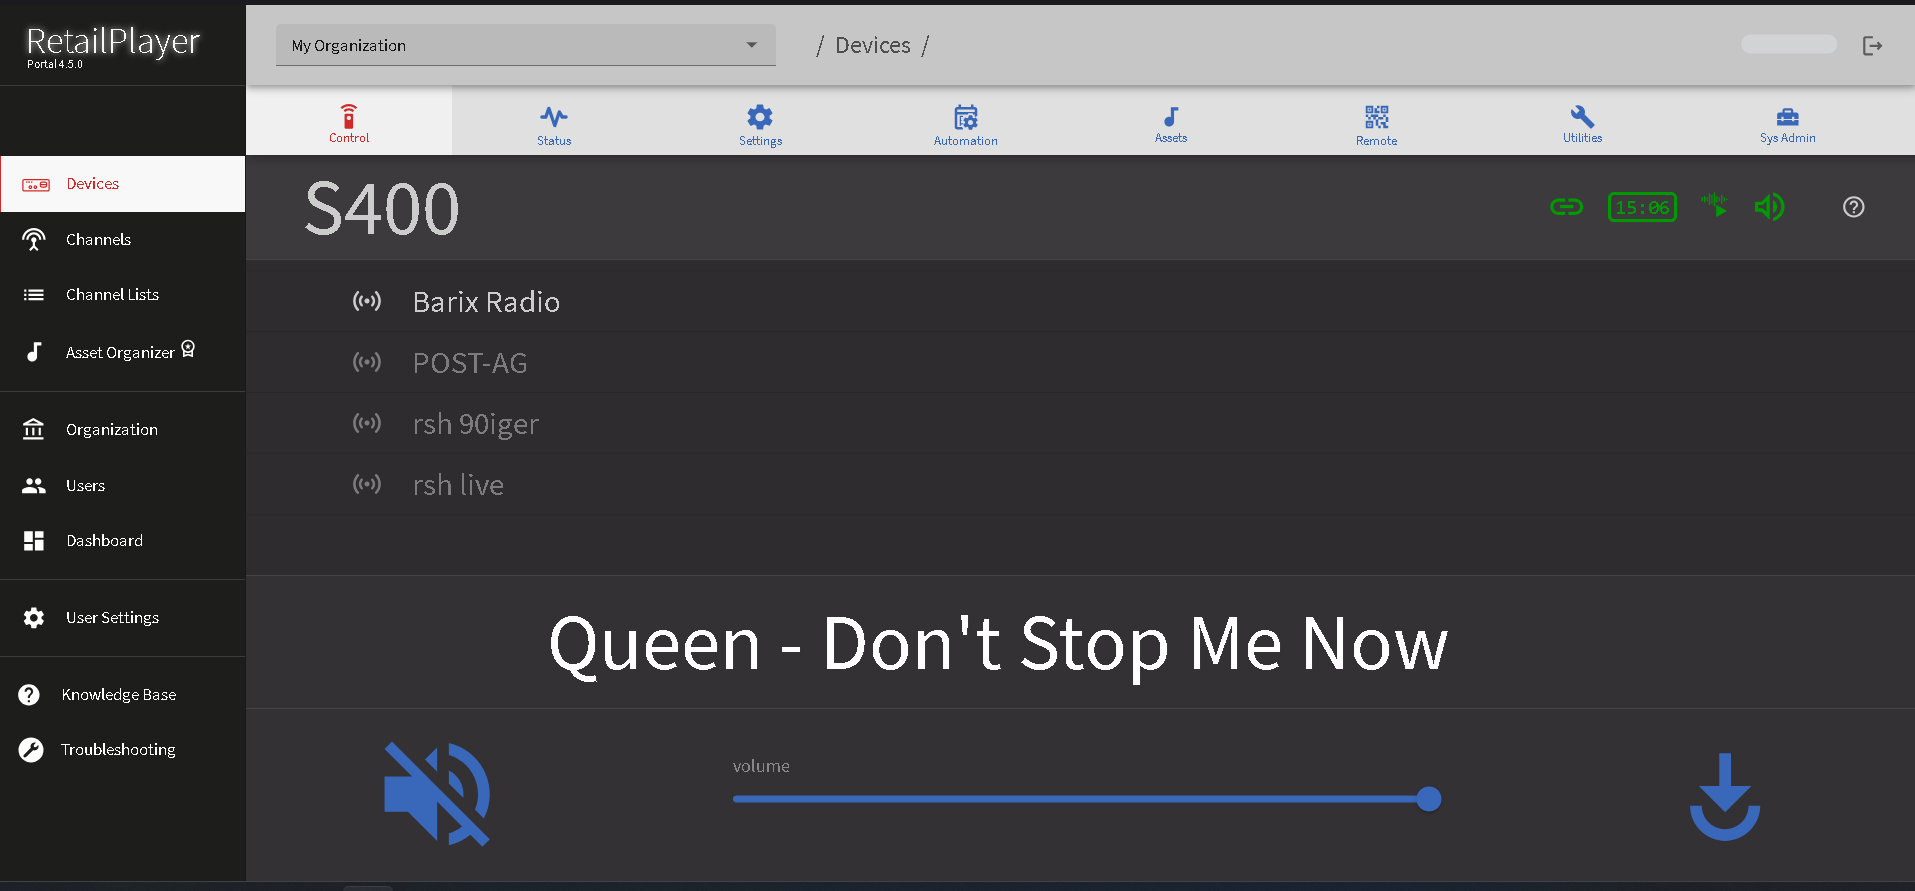
In the top of the window there is a snippet close to the name of the device that shows the status of the device, the icons are the same as the ones described in the device list area.
|
Real time controls |
|
|---|---|
|
Channel |
These are the channels added in the channel list selected in the settings section. Click on the desired channel to start its playback on the device. The large channel name at the center of the screen shows the current playback channel |
|
Mute/Unmute |
It mutes/unmutes the audio output of the device |
|
Volume |
Sets the volume of the device audio output |
|
Audio Cues
|
Click on the Cue set button to visualize the list of assets (cues) assigned to this device. Clicking on an asset will trigger its playback
|

These controls are applied in Real-Time to devices that are ONLINE.
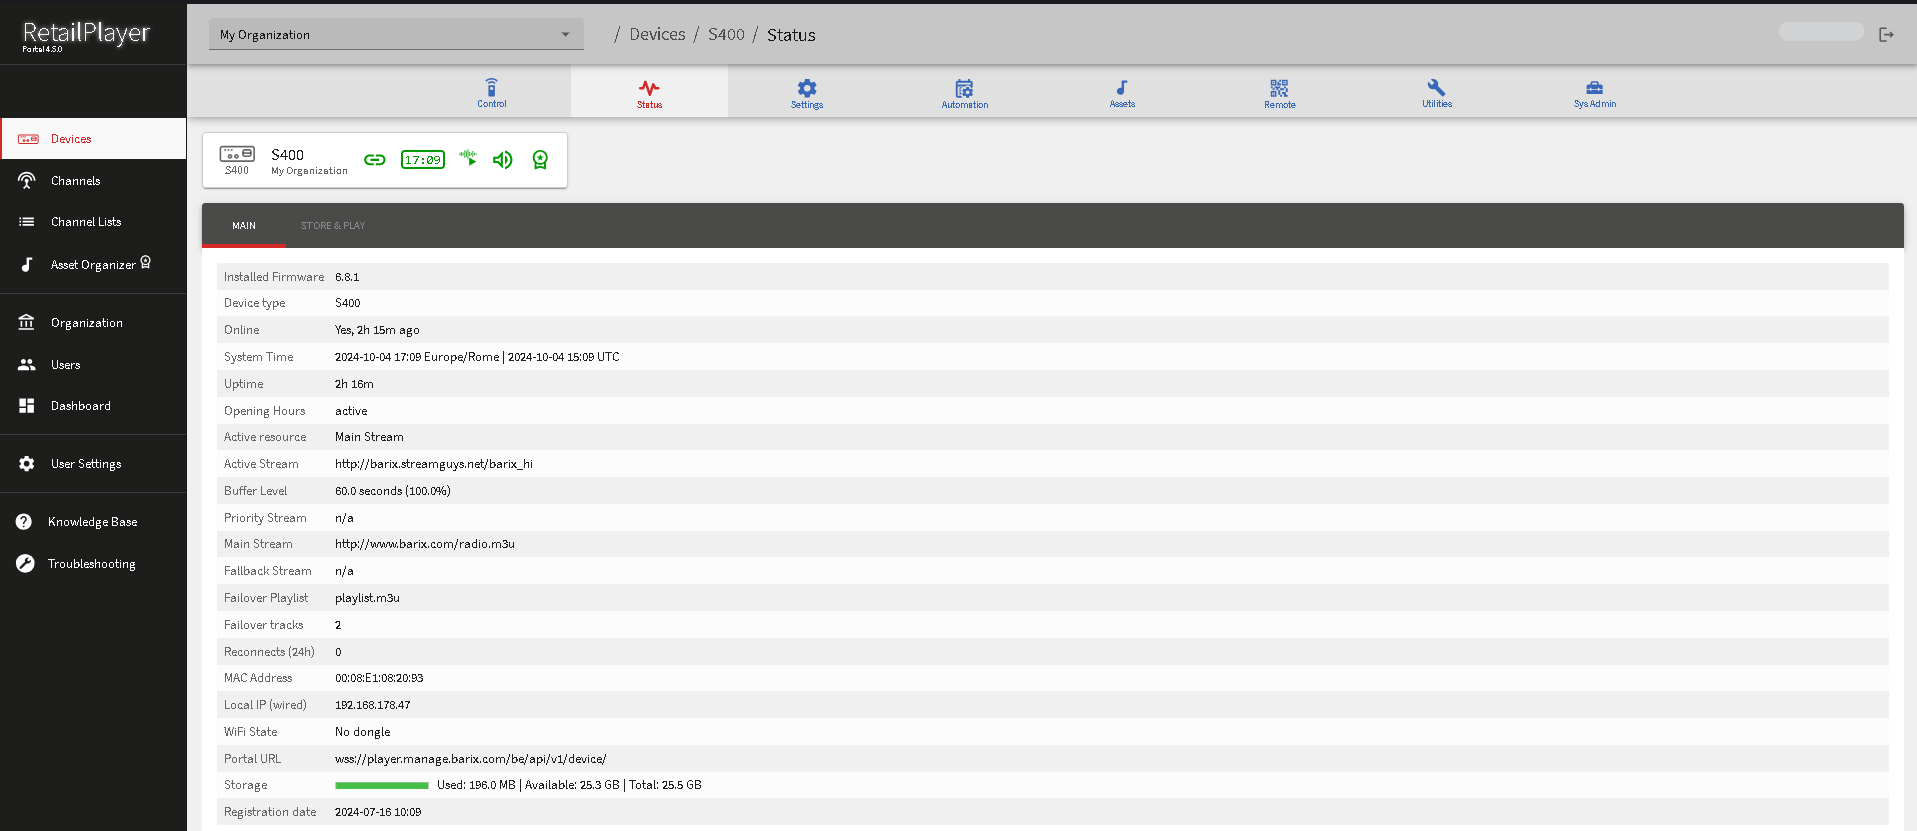
Device Status
The status panel is a great remote monitoring tool that can be used to check the current status of the device.
Main section
|
Field |
Description |
After portal connection |
Every 1 min |
Every 10 min |
Every 1 hour |
On change |
|---|---|---|---|---|---|---|
|
INSTALLED FIRMWARE |
Indicates the installed firmware on the RetailPlayer device |
x |
|
|
|
|
|
DEVICE TYPE |
Indicates the device model |
x |
|
|
|
|
|
ONLINE |
Indicates the Online Status (Online YES/Online NO) and since how long the device is in the indicated status |
x |
|
|
|
|
|
SYSTEM TIME |
Indicates the actual device system time in UTC |
x |
|
|
|
x |
|
UPTIME |
Indicates since how long the device is being powered |
x |
x |
|
|
|
|
OPENING HOURS |
Indicates the opening hours playback activity |
x |
x |
|
|
x |
|
ACTIVE RESOURCE |
Indicates which resource is playing among:
|
x |
|
|
|
x |
|
ACTIVE STREAM |
Indicates the currently playing stream or track (for the track is shown the ID of the same, in case of Local USB playing it shows the filename) |
x |
|
|
|
x |
|
BUFFER LEVEL |
Indicates the actual streaming buffer level in seconds. This is a good indication that informs how many seconds of audio playout is guaranteed in case the stream that is playing fails. The max size is 60s. |
x |
x |
|
|
|
|
PRIORITY STREAM |
Indicates the priority stream that is configured in the device settings |
x |
|
|
|
x |
|
MAIN STREAM |
Indicates the main stream that is configured in the device settings |
x |
|
|
|
x |
|
FALLBACK STREAM |
Indicates the Fallback Stream that is configured in the device settings |
x |
|
|
|
x |
|
FAILOVER PLAYLIST |
Indicates if a failover playlist file is present on the device.
|
x |
x |
|
|
|
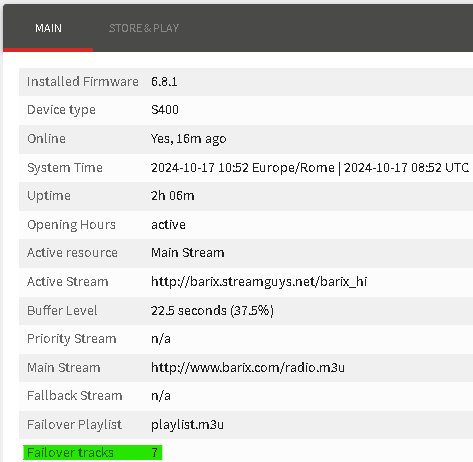
|
FAILOVER TRACKS |
Indicates the number of tracks that the device has downloaded from the Failover tracks configured in the Channel List |
x |
x |
|
|
|
|
RECONNECTS (24h) |
Indicates how many times the devices has reconnected the Portal during the last 24 hours |
x |
x |
|
|
|
|
MAC ADDRESS |
Indicates the MAC address of the device |
x |
|
|
|
|
|
LOCAL IP |
Indicates the local IP address of the device's ethernet interface |
x |
x |
|
|
|
|
WIFI STATE |
Indicates the current status of the WiFi connection |
x |
x |
|
|
|
|
PORTAL URL |
Indicates the Portal URL from the device settings |
x |
|
|
|
|
|
STORAGE |
Indicates the level of storage still available on the device |
x |
|
x |
|
|
|
REGISTRATION DATE |
Indicates the date on which the device was registered on the portal |
x |
|
|
|
|
The actual status update is only possible if the device is connected to the Portal (Status Online YES). If the device is not connected (Status Online NO) the Portal will show the last status reported. Firmware older than 5.1 doesn’t report Status updates
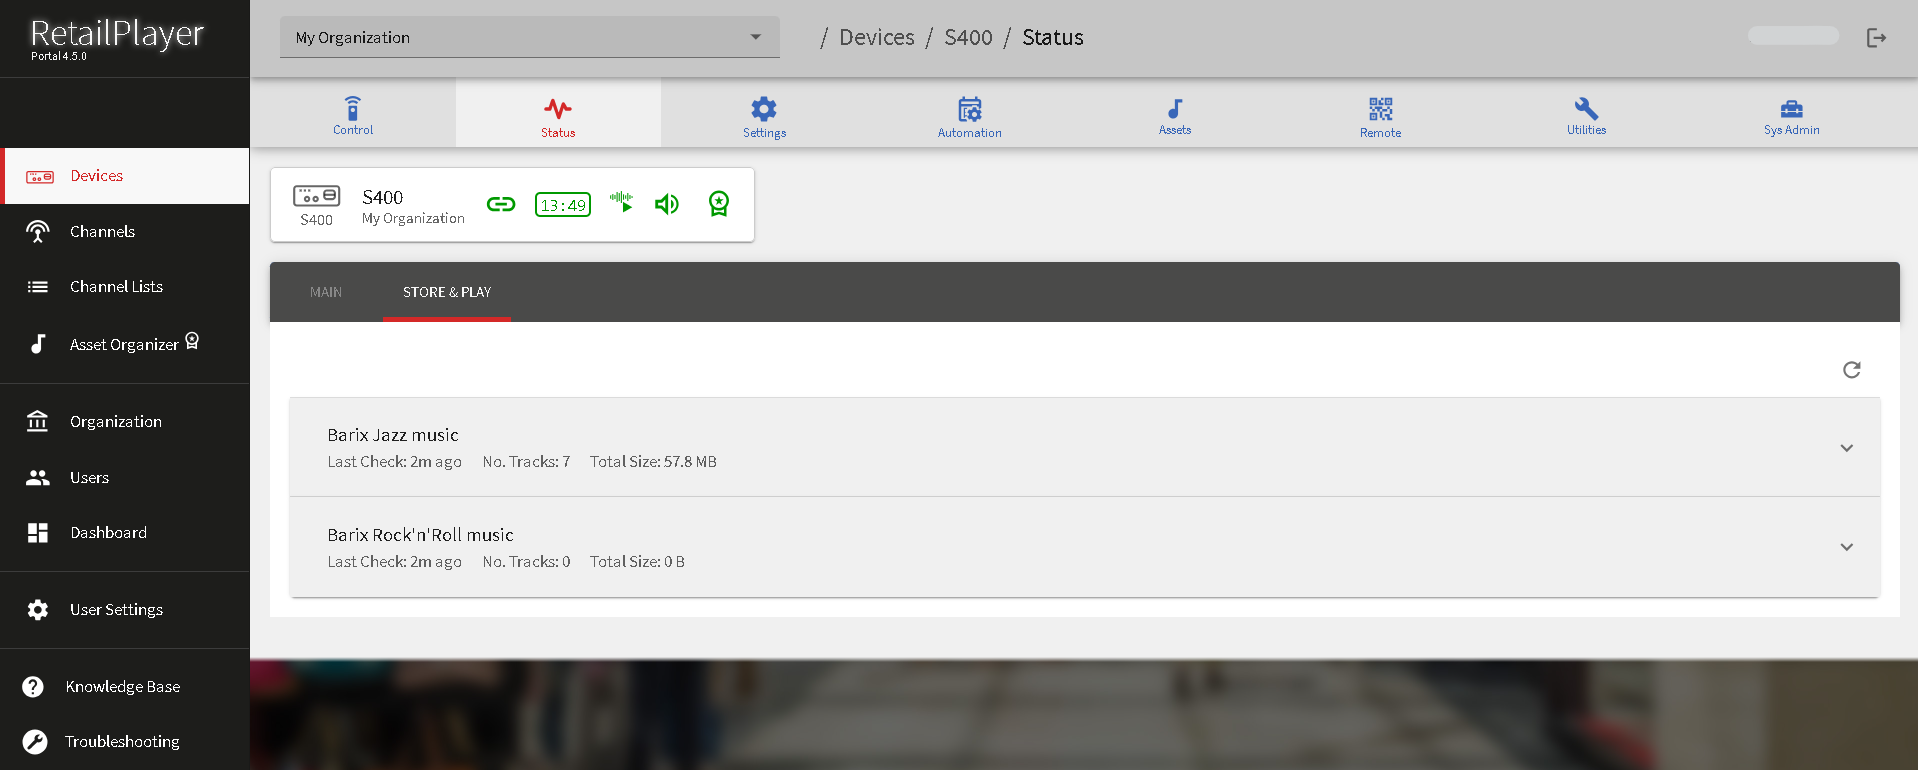
Store & Play section
This section allows the user to see the Store & Play channels assigned to the device including the current status for each channel:
-
Last Check: the last time the device checked for new content in the channel.
-
Number of tracks: the number of the current tracks downloaded and stored in the channel
-

-
Total size: the amount of memory occupied by the channel playlist
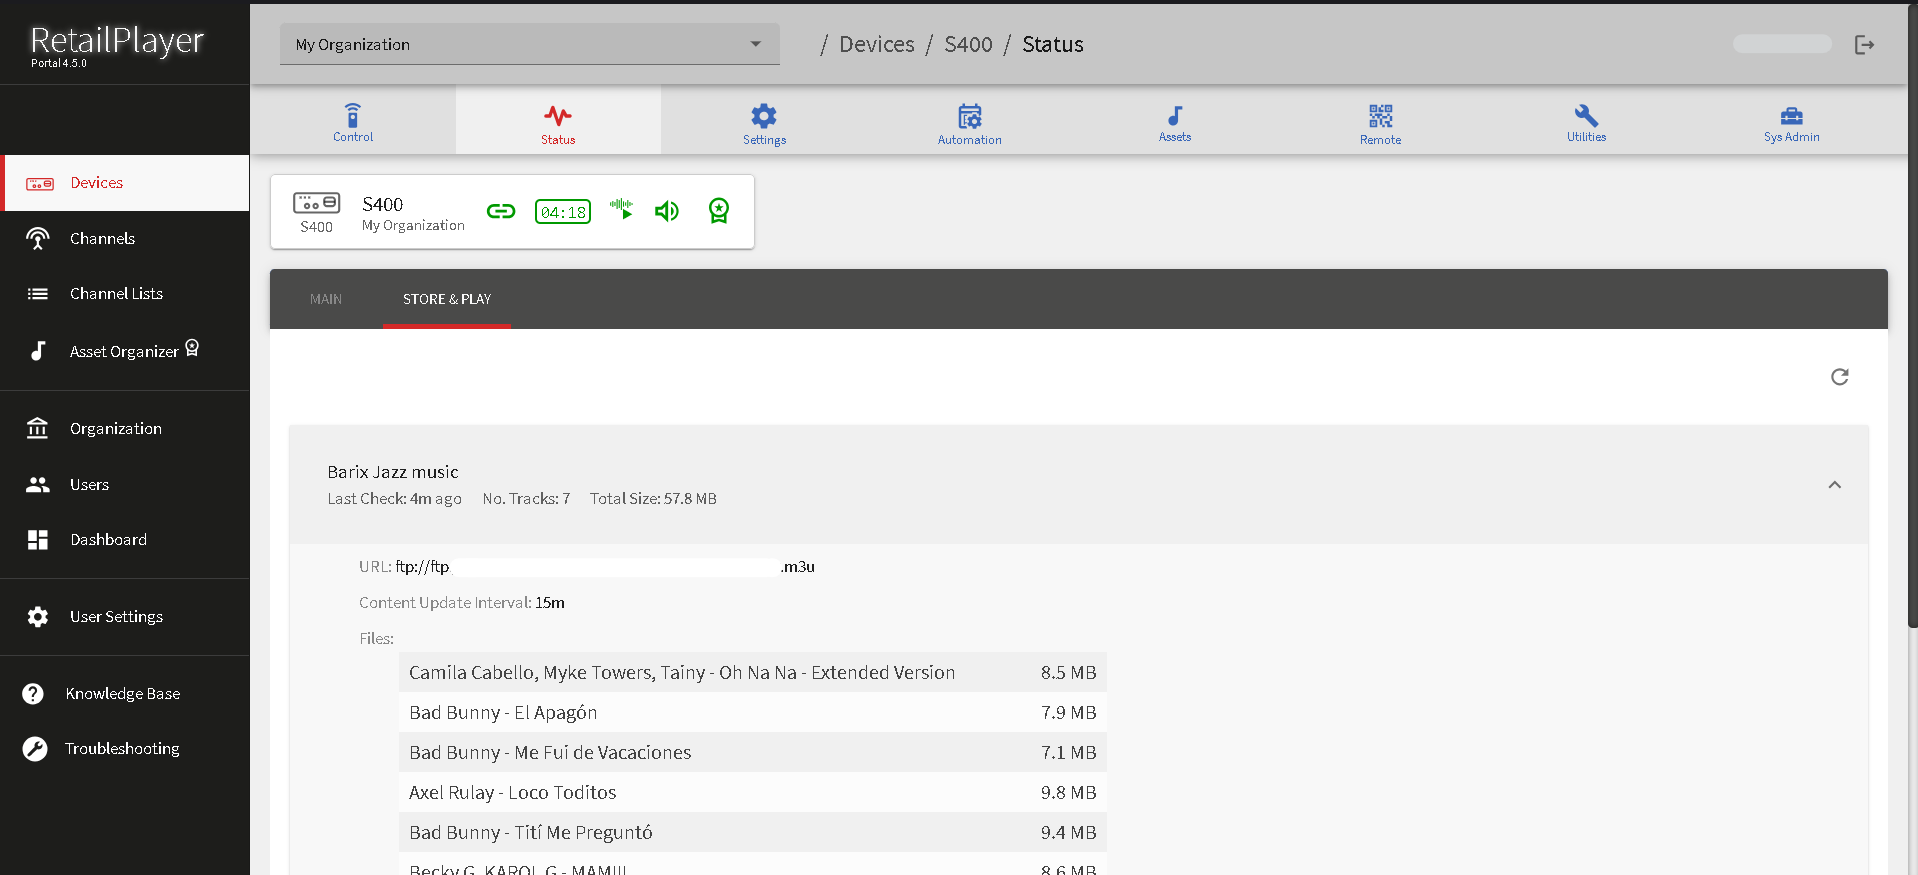
When clicking on a Store & Play channel, the selected channel expands, allowing the user to view the currently downloaded tracks and also:
-
URL: the URL of the file server, where the M3U playlist looks for files to download
-
Content update interval: time interval that specifies how often the device checks for any change in the file server URL
-
Files: Show a list of currently downloaded songs
Automation
The automation tab is where the user can find:
-
The opening hours scheduler
-
The channels scheduler
-
The volume scheduler
-
The assets scheduler
-
The Cue sets
Opening Hours Scheduler
This function allows the RetailPlayer device to activate or deactivate the audio player at a specific time on a weekly basis.
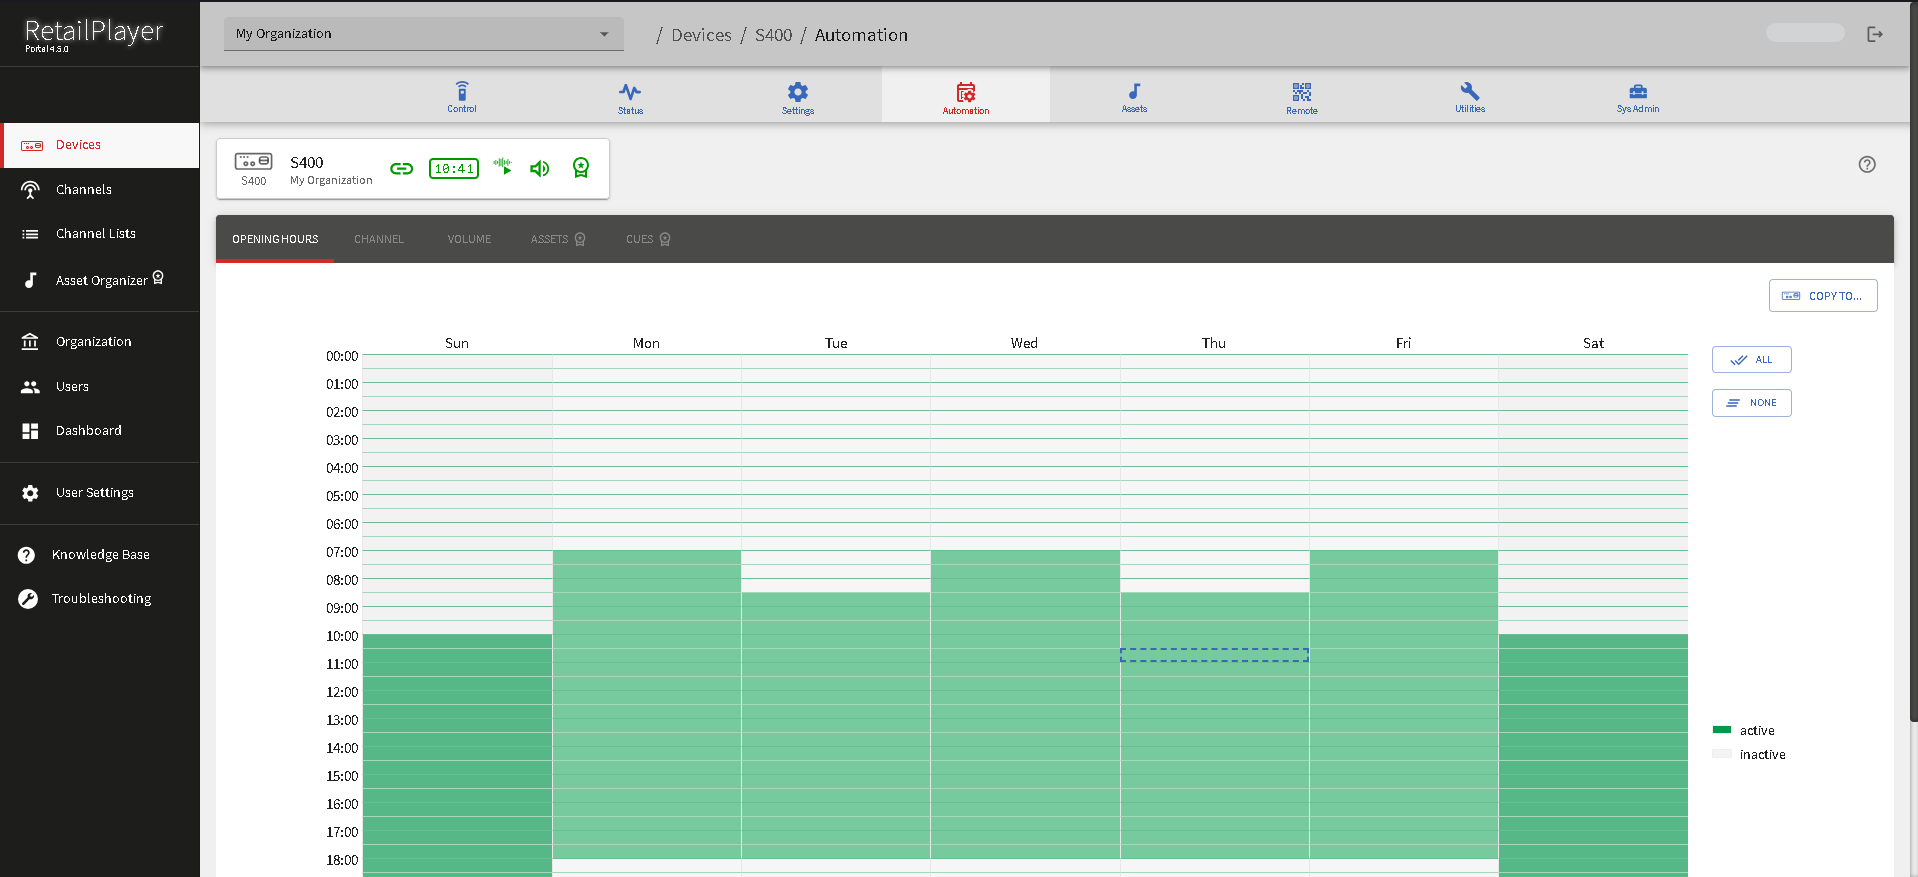
How to use the opening hours scheduler:
-
Select the time zone your device is in
-
The green areas display when the audio player must be active, playing music, while the gray areas display when the audio player must be inactive
-
Use the mouse to switch between green and gray, drag and drop vertically on each day to switch between green (on) or gray (off)
-
Use the buttons “all” or “none” to switch the playback ON or OFF
-
To apply the settings click on

-
To apply the scheduler configuration to other devices part of the same organization of the device being modified, use the button “Copy to…“ and select the interested RPs
Channel Scheduler
This function allows you to schedule the playback of specific streaming channels at designated times during the week
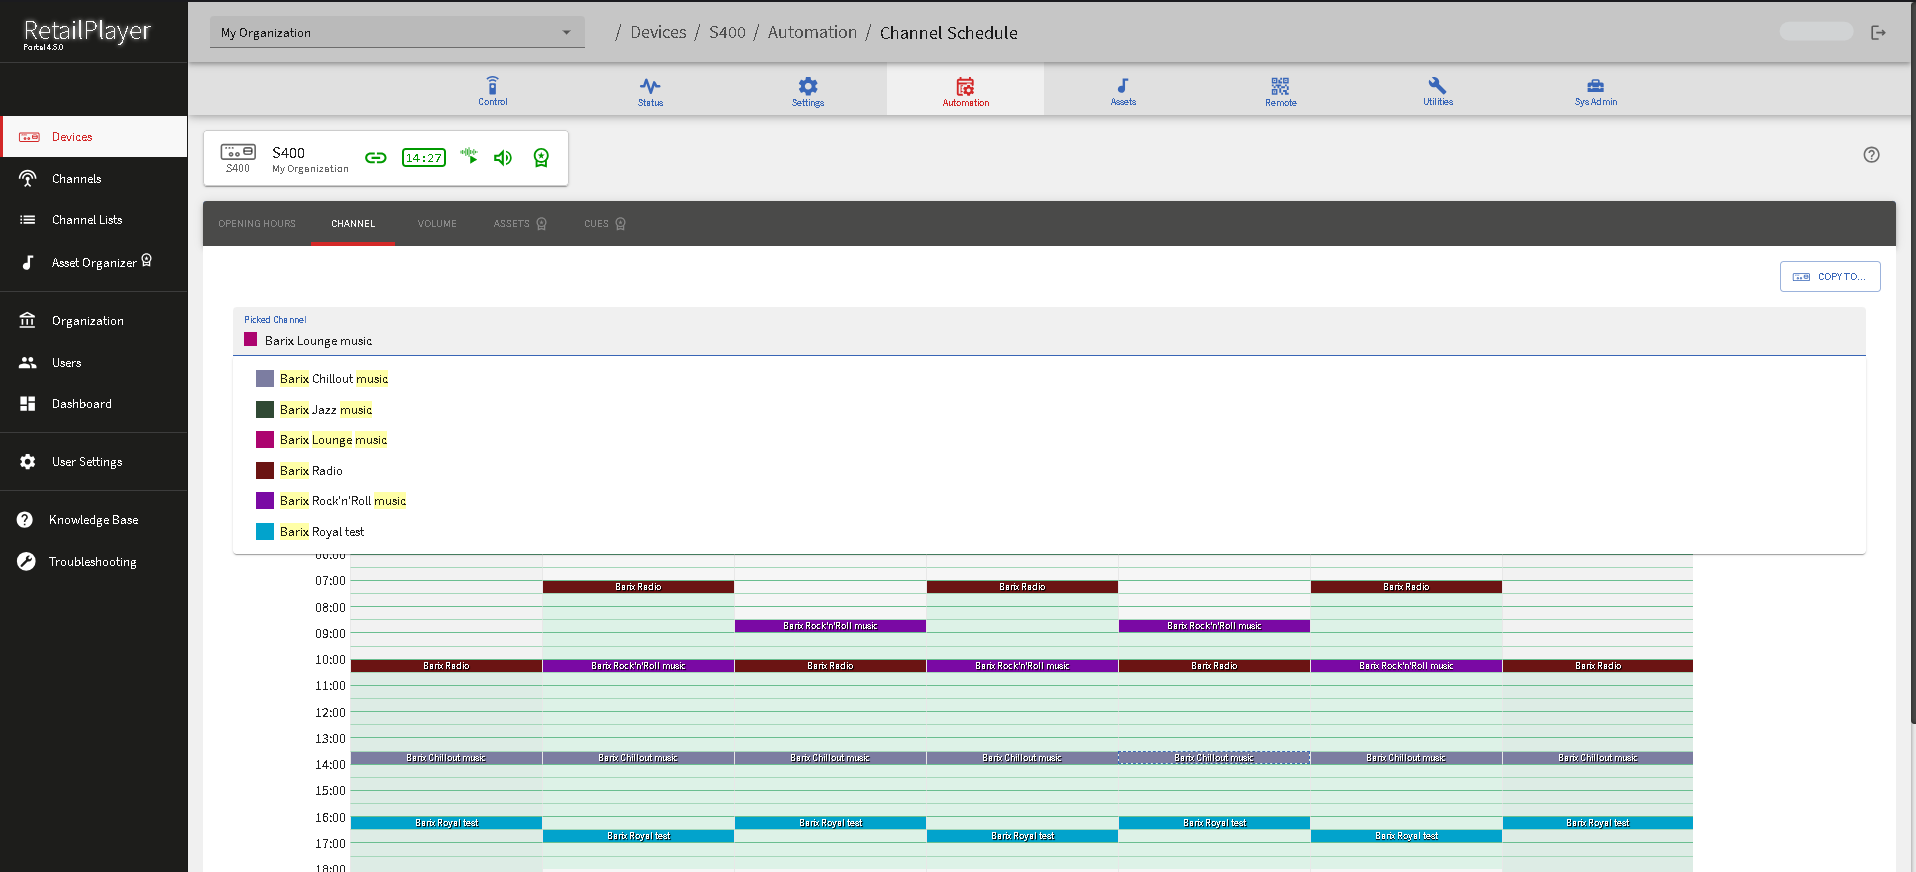
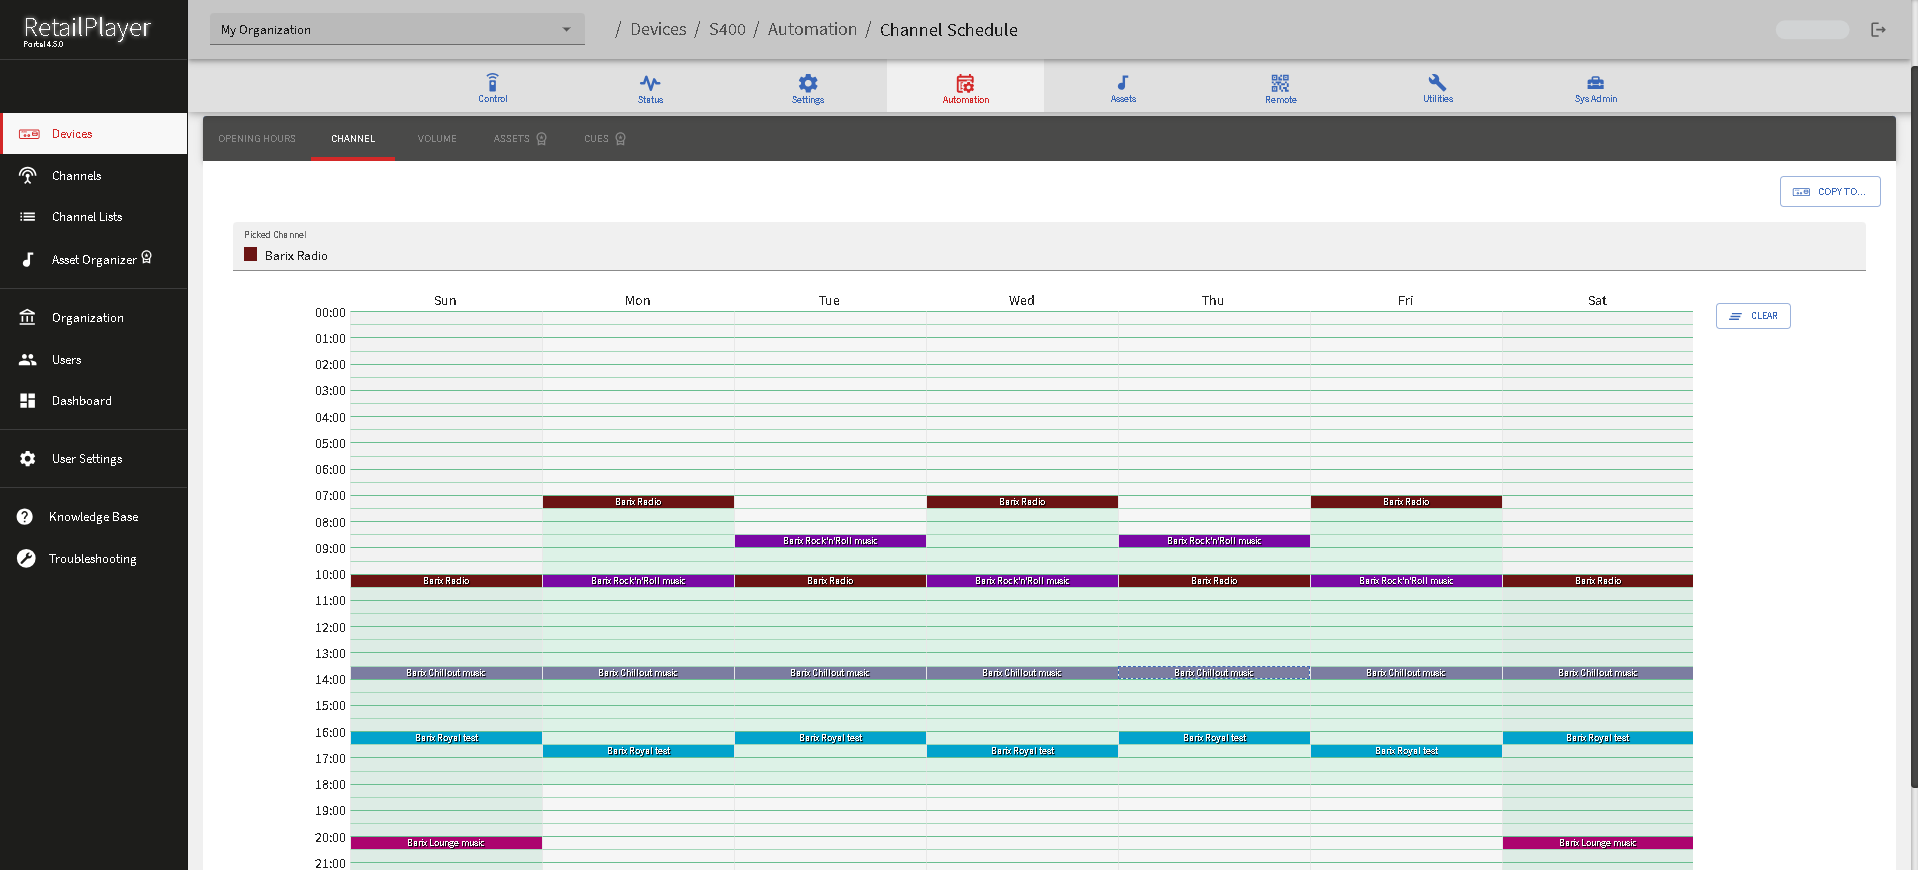
How to use the Channel Scheduler:
-
Select the channel you want to schedule from the Picked Channel drop-down menu
(only channels from the current channel list are available; the channel list is selected in the Overview tab under Basic Settings). -
Click on the desired day and time when you want the playback to switch to the selected channel.
-
You can insert triggers for different channels in 30-minute intervals, allowing you to schedule channel changes every 30 minutes.
-
Click
-
Use the "Clear" button to reset the scheduler, this will delete all configured channels
-
To apply the scheduler configuration to other devices part of the same organization of the device being modified, use the button “Copy to…“ and select the interested RPs
Volume Scheduler
This function allows you to schedule the volume level of the channels at designated times during the week
Just above the scheduler are several buttons that have the following functions:
|
View as list - |
Opens a sliding window where all the triggers are listed with their icon, day of the week, time and volume percentage |
|
Select all - |
Select all triggers configured in the voulme scheduler |
|
Delete selected - |
Delete all selected triggers from the scheduler |
|
Zoom fit to selection - |
Show all scheduler triggers compressed so you can view them all together |
|
Zoom out - |
Zooms out the scheduler in order to view more time cells |
|
Zoom in - |
Zooms in on the scheduler so you can see more time slots between hours |
|
Zoom full out - |
It completely zooms out the entire scheduler so you can see every hour and trigger |
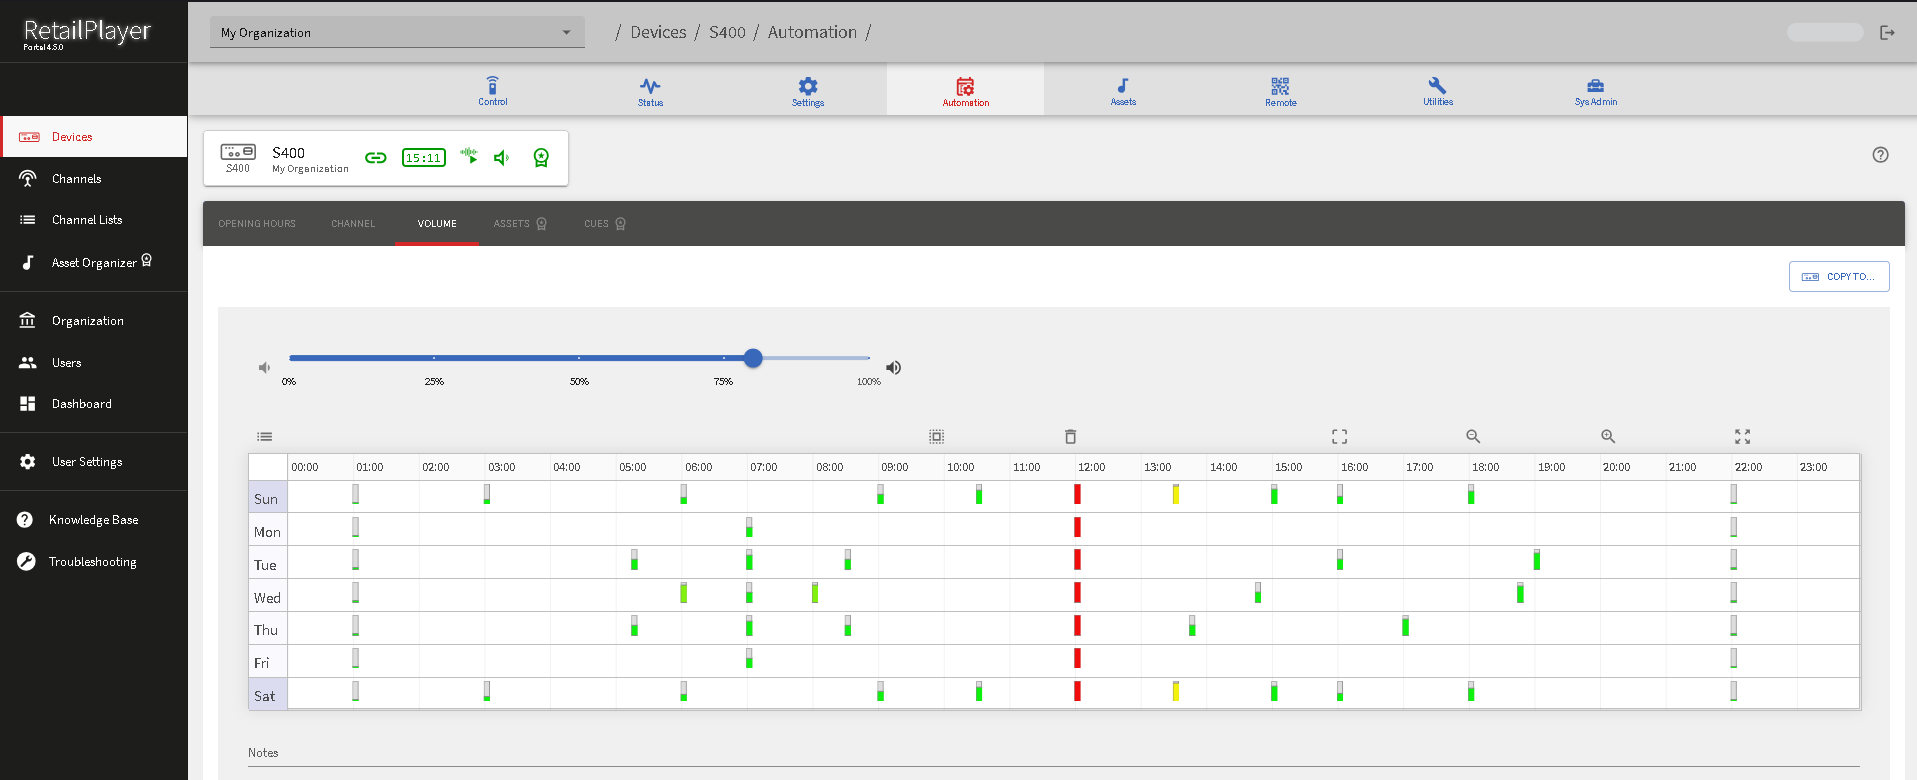
How to use the Volume Scheduler:
-
Select the volume level you want to assign to the device using the volume slider
-
Assign that volume to the time and day you want
-
Click SAVE in the top right corner to apply your settings
-
Click "Copy to..." to apply this configuration to other devices part of the same organization of the device being modifed
-
You can also write eventual notes in the textfield just below the scheduler.
COPY TO…
These 3 schedulers: opening hours, channels and volume schedulers offer a COPY TO functionality which can be used to apply the same scheduler configuration to multiple devices. When clicking on the COPY TO.. button a dialogue appears which lists the devices part of the ORG selected in the top navigation bar. By flagging the “include sub-organizations” checkbox the list will populate with all the devices part of any sub organization registered under the main organization selected in the top navigation bar. This effectively offers a quick way to copy the same configuration to multiple devices across an entire fleet.
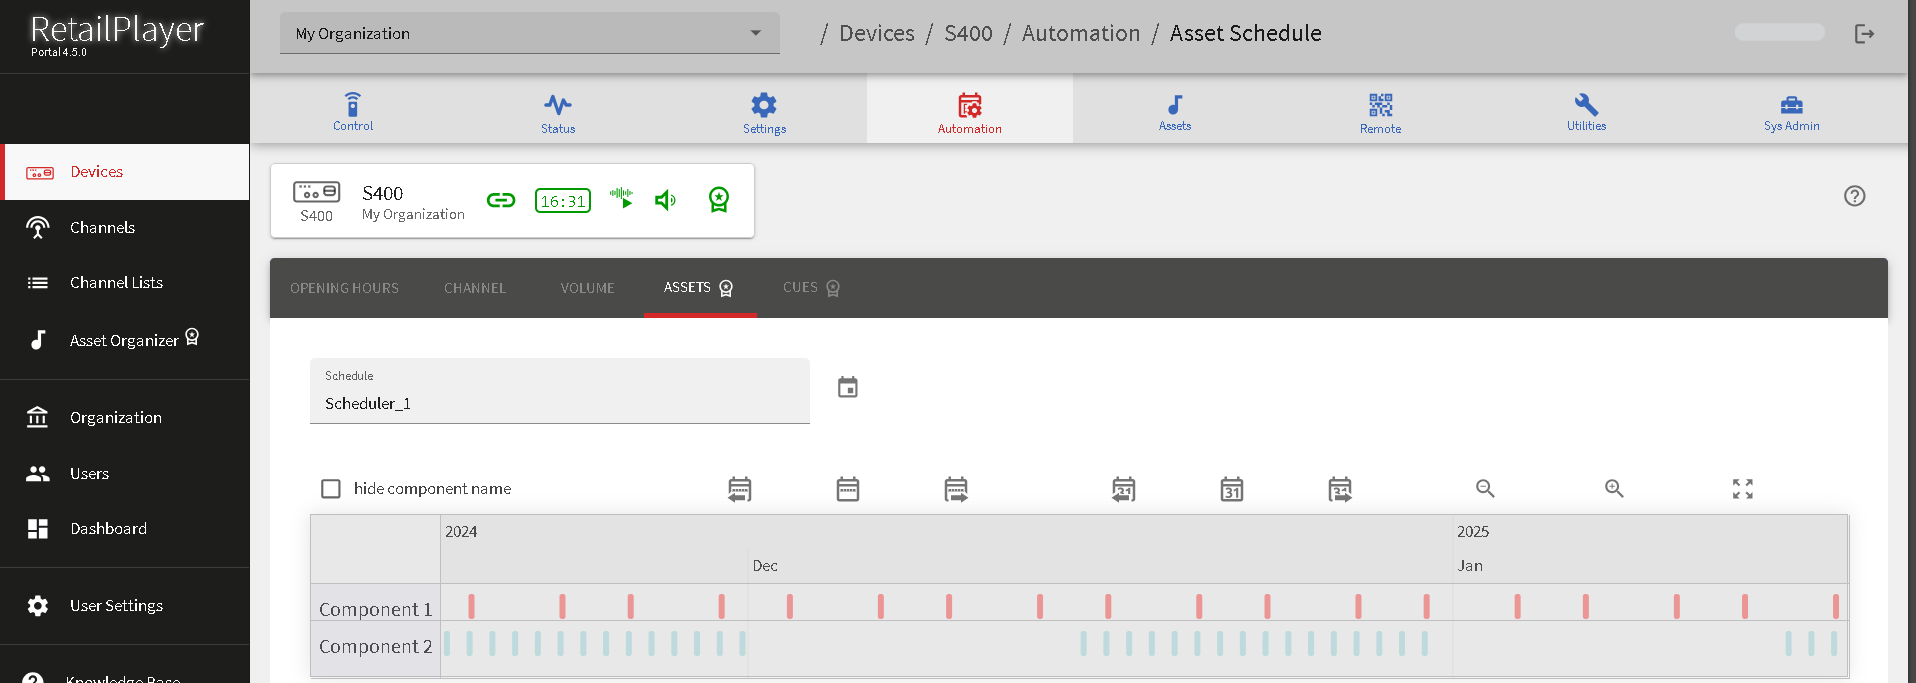
Asset scheduler
This section of the Devices page allows you to view an already configured asset scheduler, including its respective audio components, by selecting it through the drop-down menu. However, please note that the components in this section cannot be modified or removed. To manage and edit them, visit the following link: Scheduling Section.
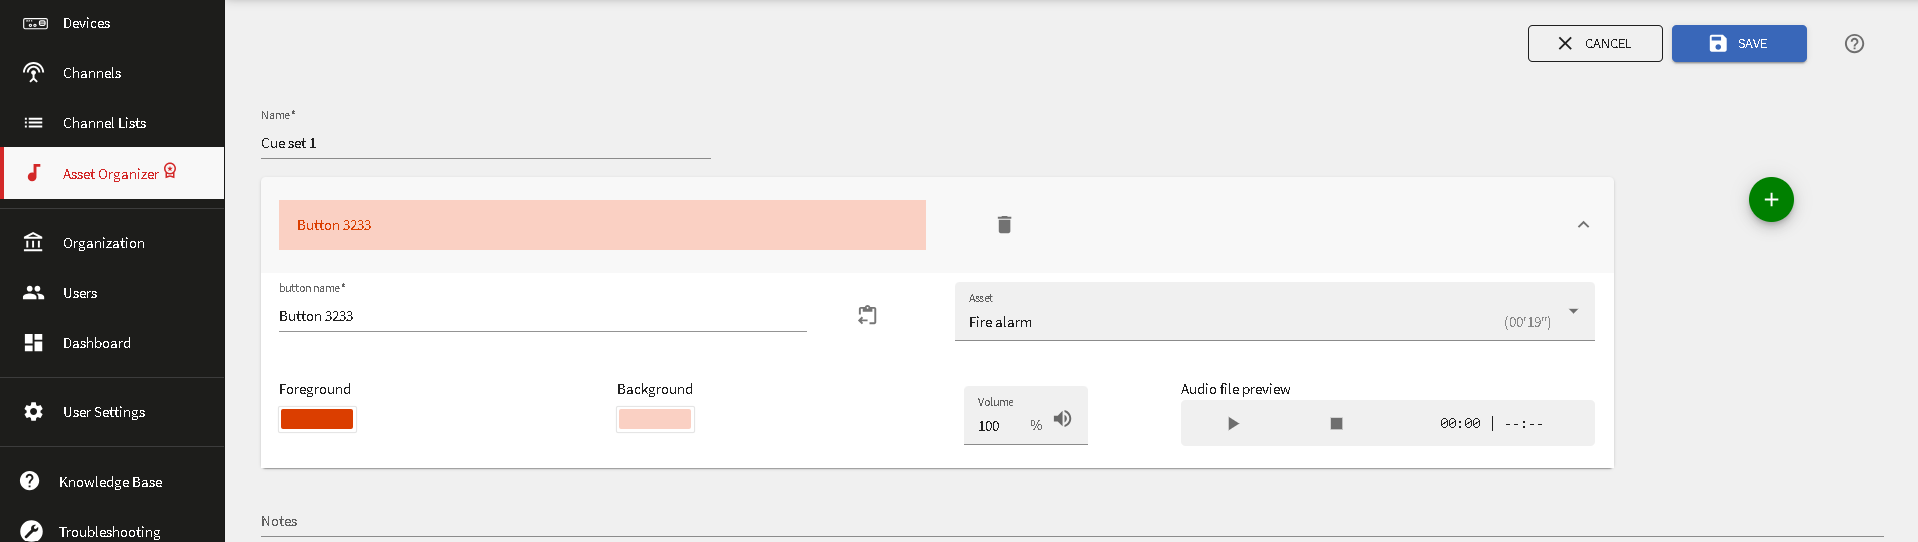
Cue sets
This section is accessible exclusively to Retail Hero subscribers
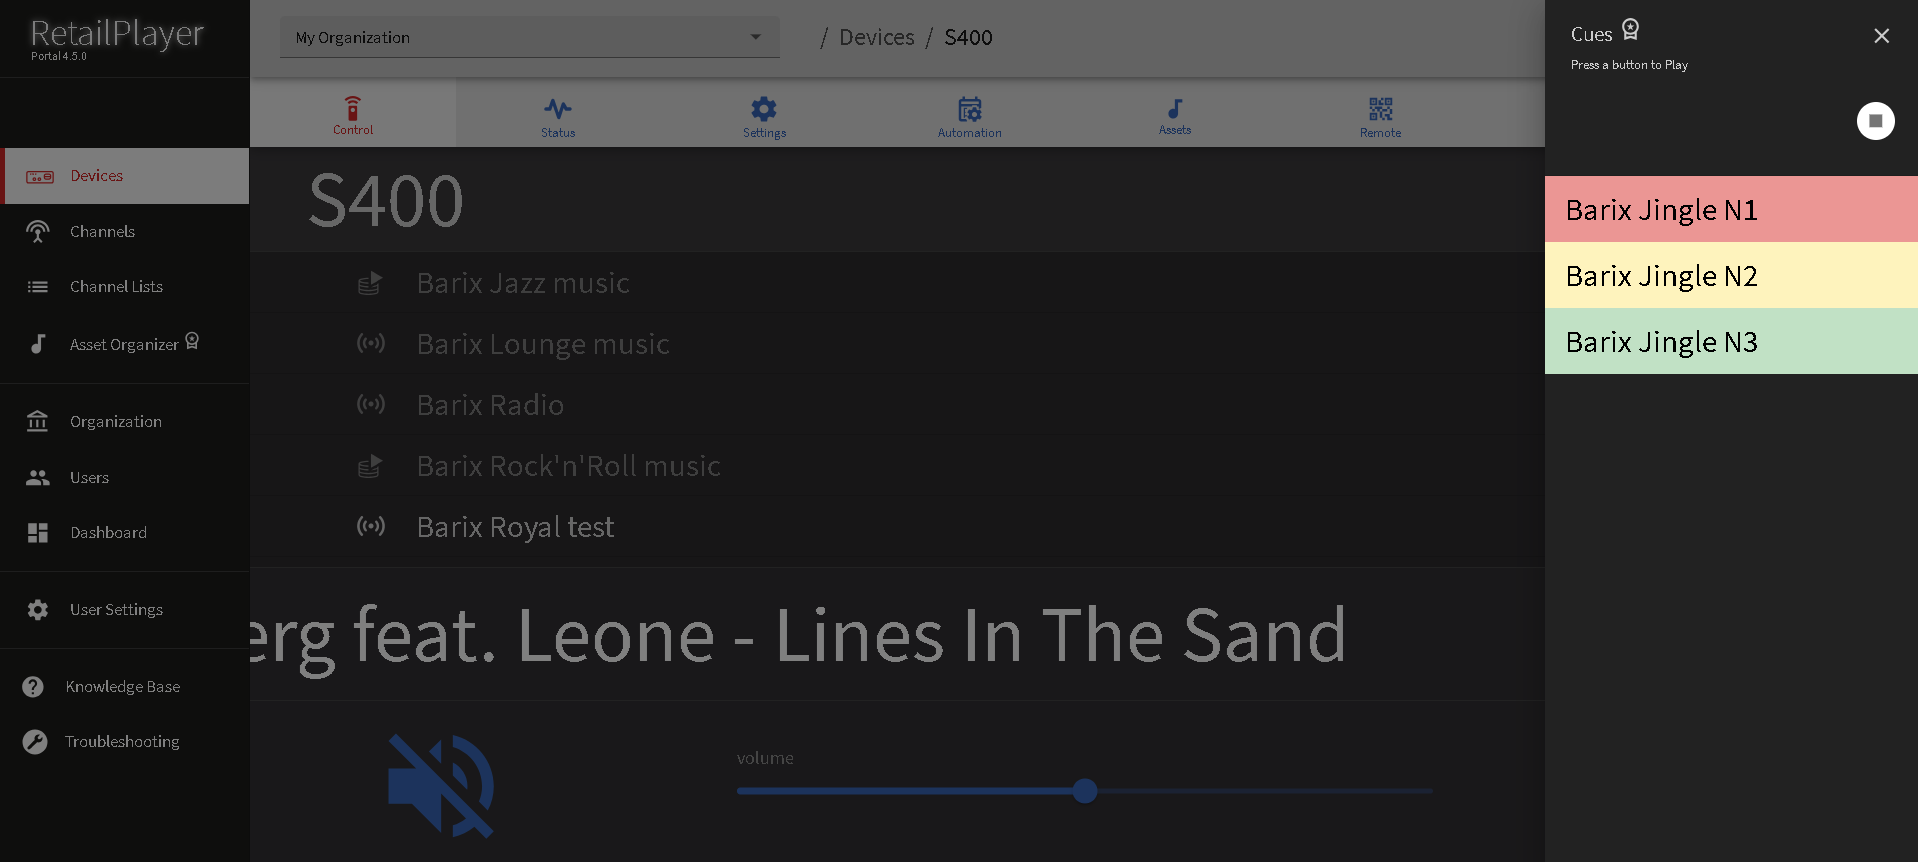
The Cue Sets in the device section allow store managers to view the sets assigned to the device. A Set consists of buttons linked to specific audio files. When a button is pressed, the player fades out the current music and plays the triggered audio file, which could be an ad, a pre-recorded message, an alarm, a product offer, or even a birthday song.
Once the audio file finishes playing, the music fades back in automatically.
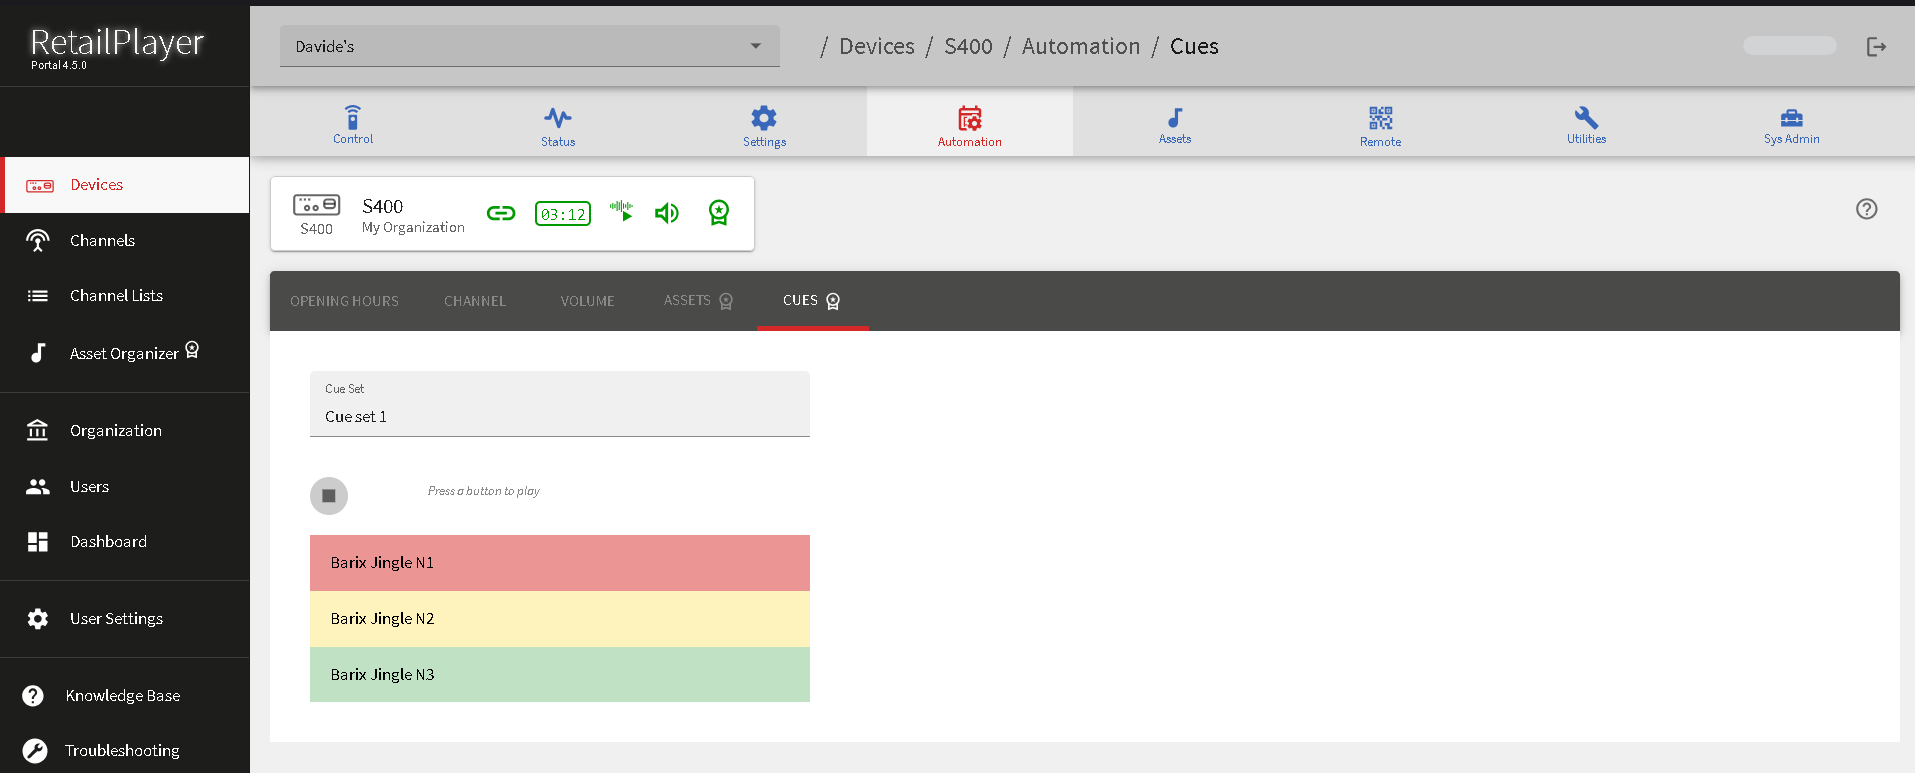
Playback can be triggered from the Automation tab (refer to the screenshot above), the Control section (see screenshot below), or from a smartphone that accesses the Control section via QR Code. For more details, see the corresponding chapter on QR Code access.
To see how to create a Cue set and assign it to multiple devices visit this chapter
Remote Control
In this area, you can generate QR codes that, when scanned by smart devices, open a link to the Portal’s responsive web application. This feature is useful, for example, when an organization’s administrator allows employees to manage basic controls on players installed at their location.
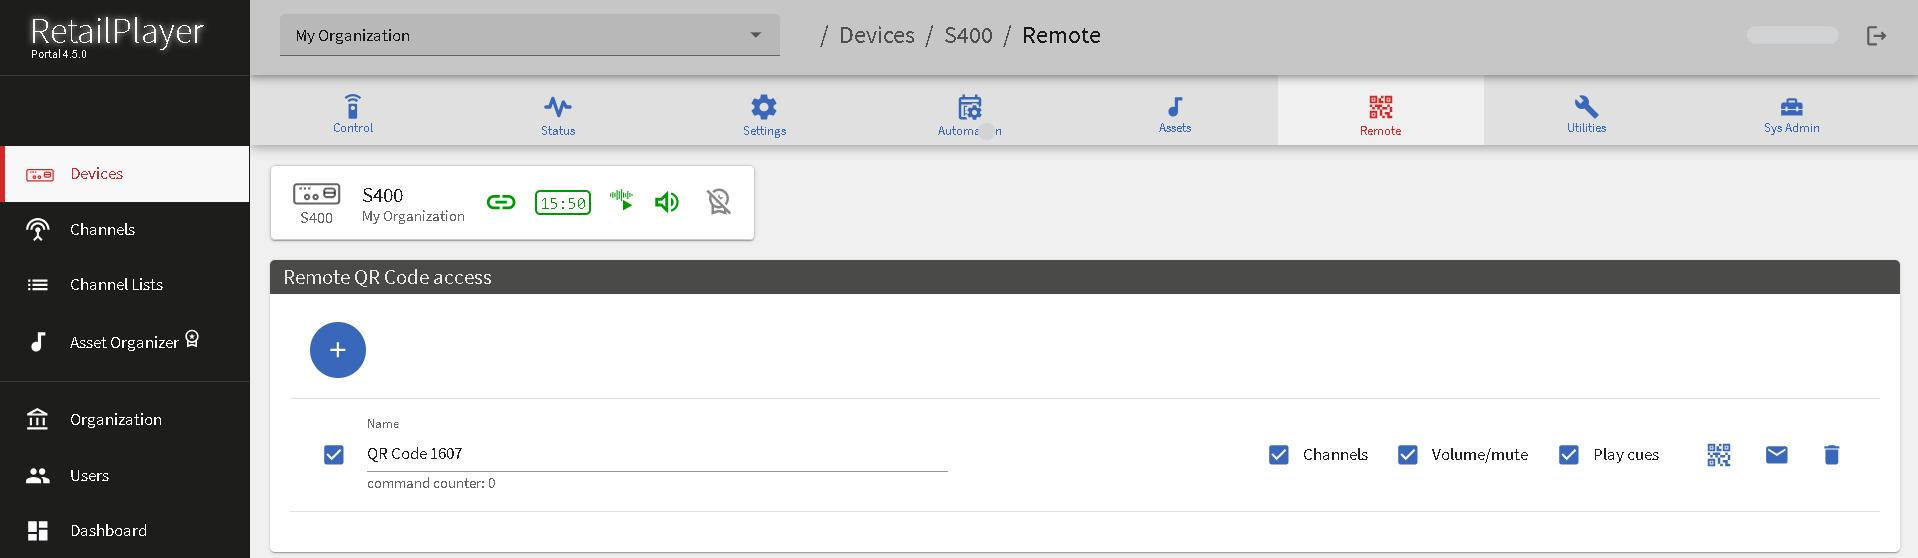
To create a new QR code, click the "+" button. Once generated, the QR code is ready for immediate use.
Each QR code can be named, scanned directly from the screen, or sent via email. To send it via email, simply click the email icon and enter the recipient’s details.
You can enable or disable access through a QR code link by using the corresponding toggle on the left side of the QR code name.
The QR code also displays the last access timestamp and the number of times it has been used.
When an employee scans the QR code, the smart device’s web browser will open a link. From there, the following controls are available:
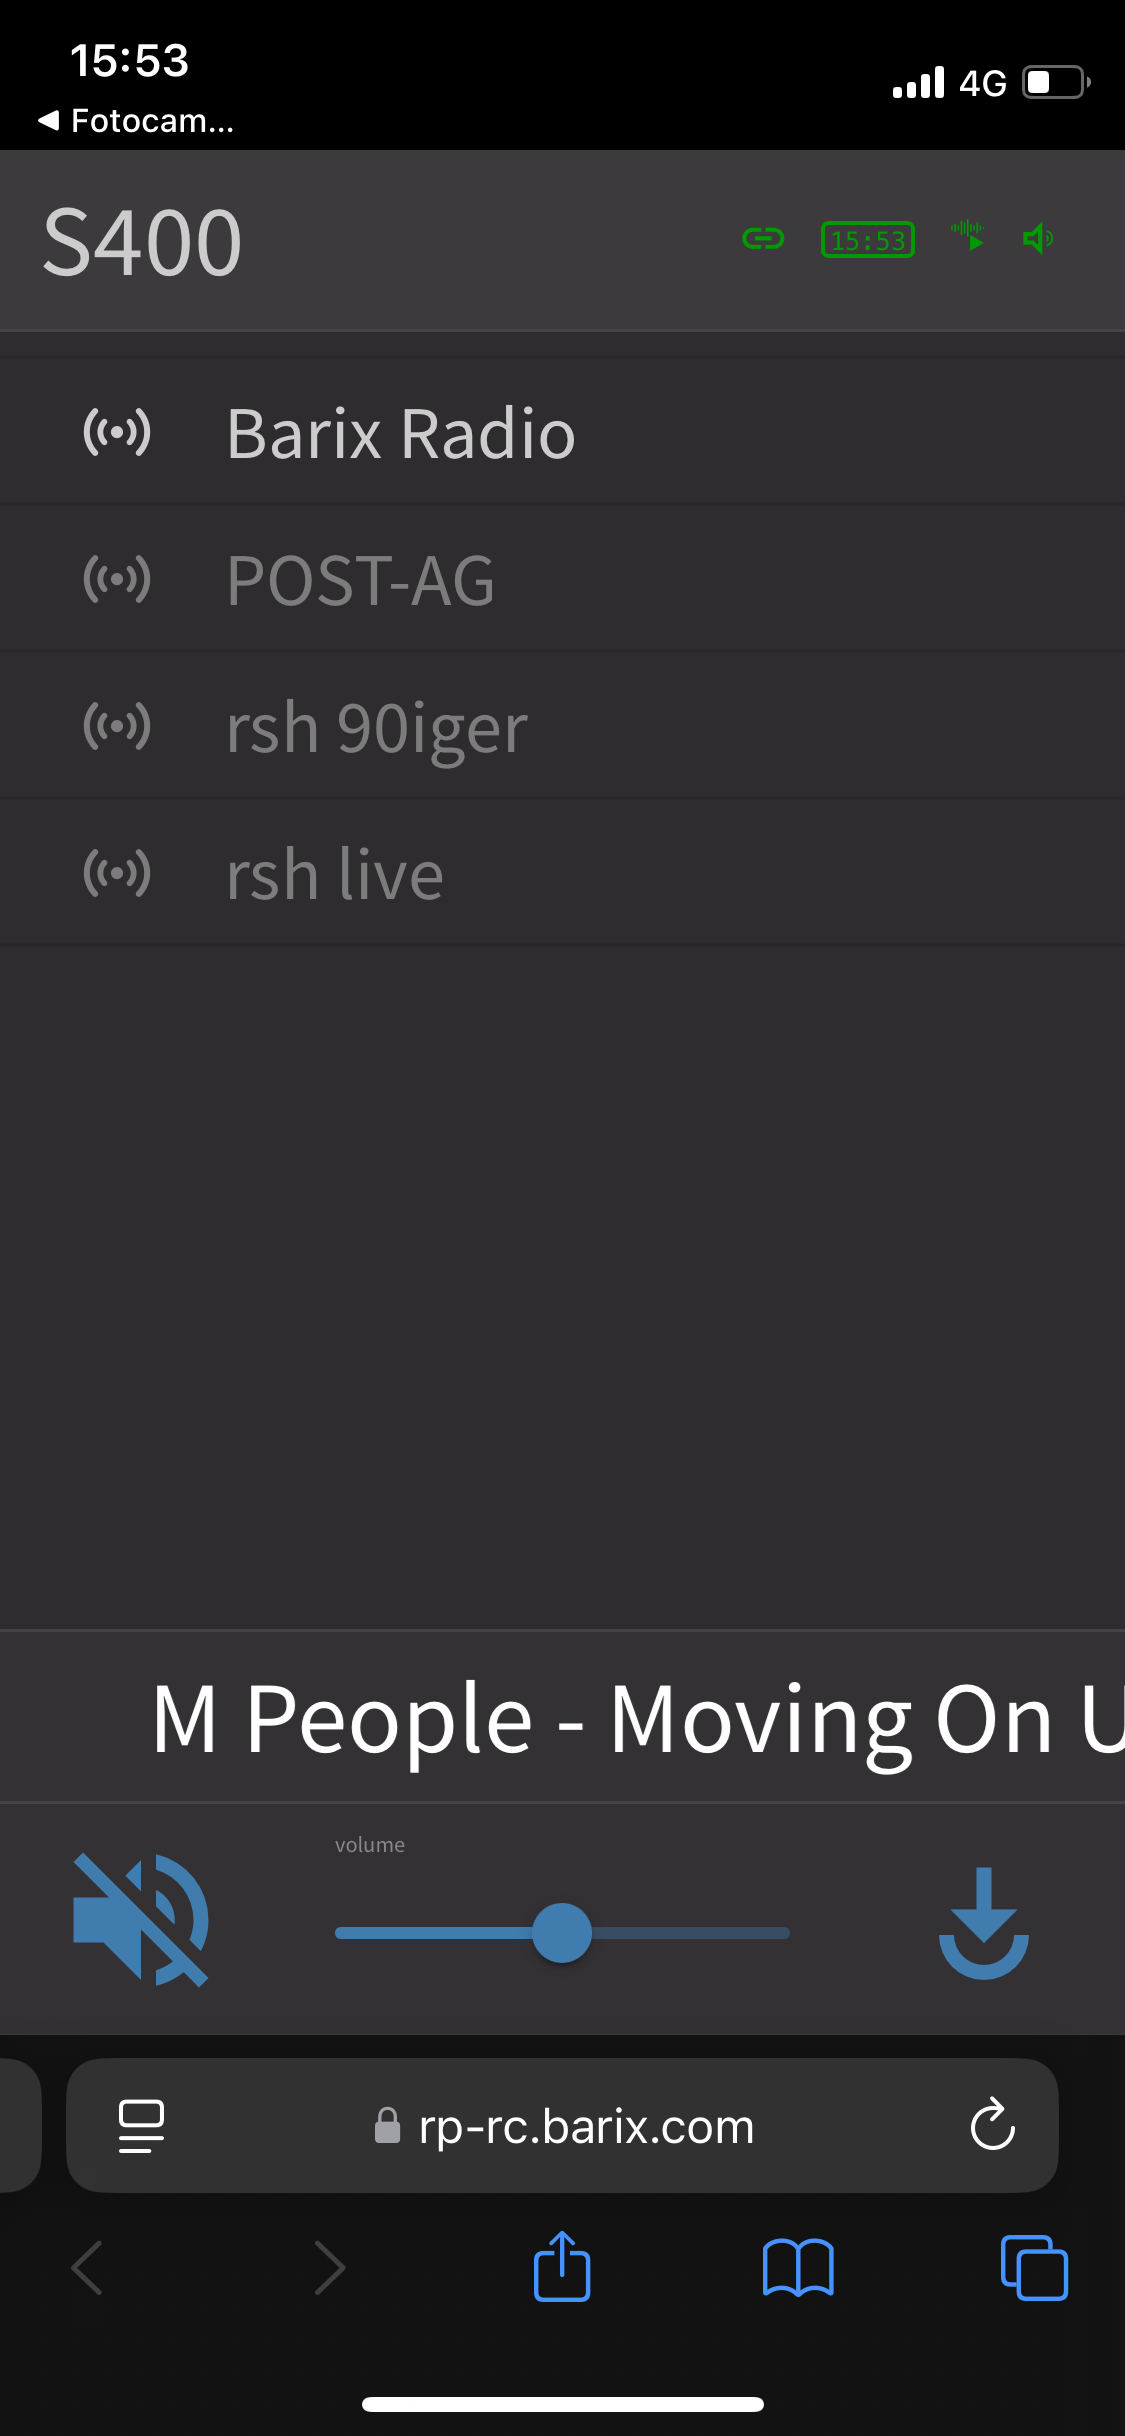
-
View the device status, as shown in the Portal.
-
Switch between any channels assigned to the device’s channel list.
-
Mute or unmute the device.
-
Adjust the volume using the provided slider.
-
Trigger playback of assets assigned to the device’s cue set.
Utilities section:
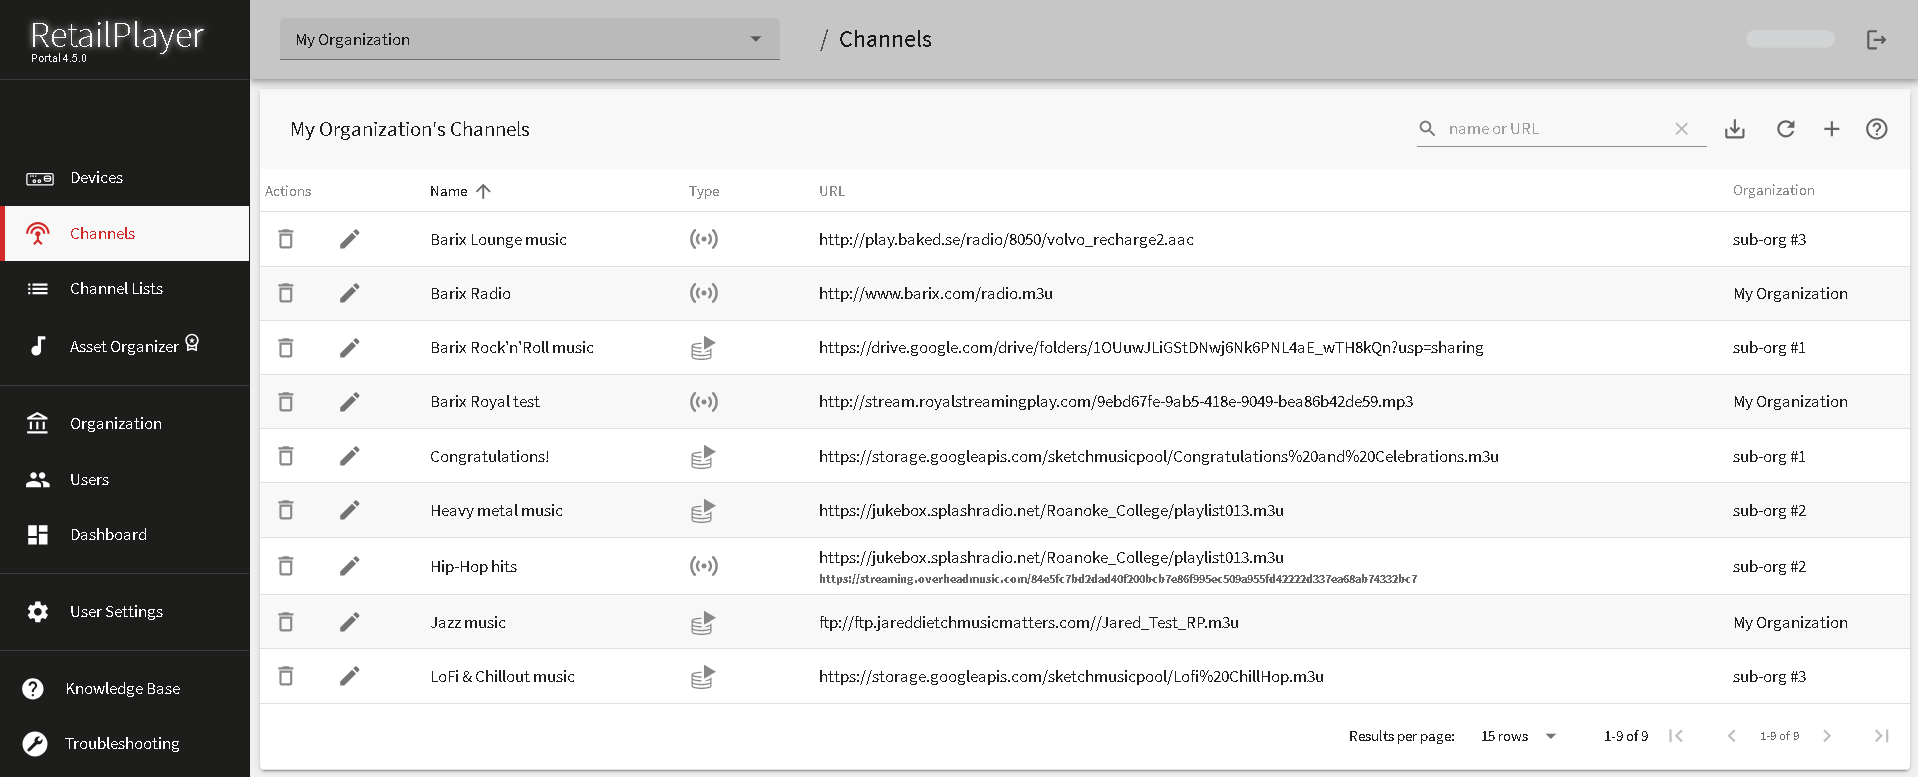
Channel Management
Channels can be of 2 types: streaming channels or Store & Play channels, they are essential to configure in order to hear audio from RetailPlayer devices when they are used in Portal mode.
To manage channels, click on "Channels" from the side-bar menu to enter the channel management section. The channels displayed here belong to the selected organization and its sub-organizations. When creating a new channel, it must be assigned to a specific organizational unit.
For example, in the image below, the user "Manuel" belongs to an organization called "My Organization" The channels listed are only those associated with "My Organization" and its sub-organizations, as shown in the channel table. Since the user is operating within this organization, only relevant channels are visible.
In the upper-left corner, you can change the organization unit, which will update the displayed resources (devices, channels, and channel lists) accordingly.
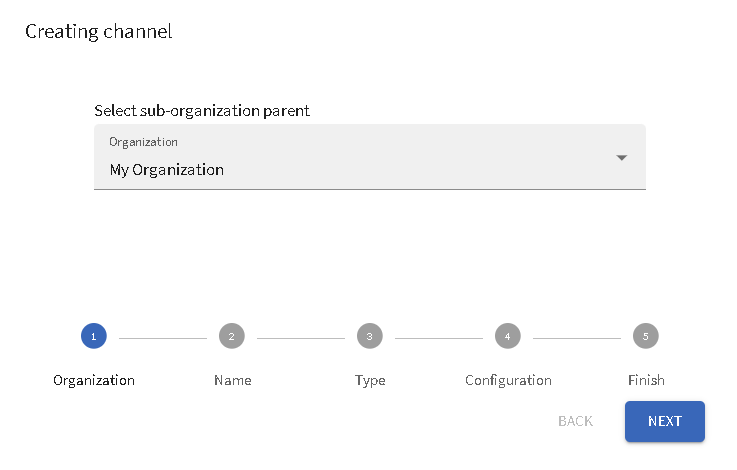
Create a new channel
On the top bar click on ➕ to add a new channel.
In order to configure the channel, you will need to fill in the following fields:
-
Assign the new channel to the organization it belongs to.
-
Assign the name of the new channel

-
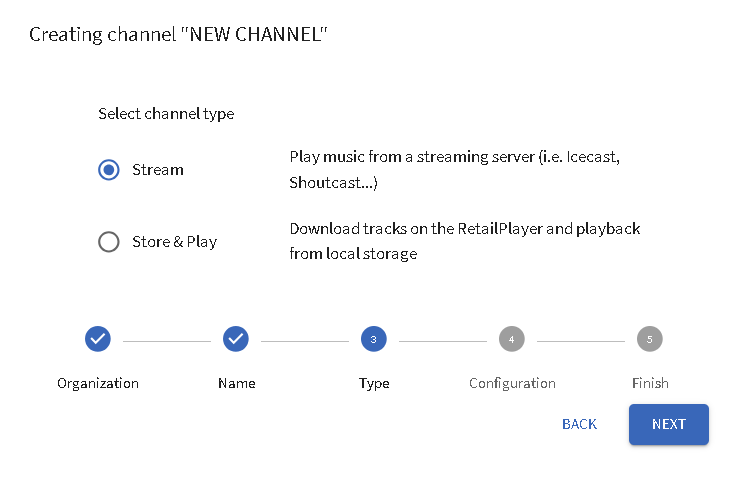
Select the channel type according to your specific needs:
-
Store & Play: This option allows the RetailPlayer to connect to an external web server directory to download music tracks and store them locally on the device’s memory. The player will then play these stored audio files. This setup is ideal for environments with poor or unstable network connections, ensuring continuous music playback even if the internet connection is lost.
-
Stream: This option connects the RetailPlayer to a streaming server, such as an Instreamer ICE, Icecast, Shoutcast Server, or other cloud-hosted web radio services.
-
Streaming channel:
-
NAME: This is the name of the channel and will be displayed in the device control section and on the remote app used for channel selection.
-
ORG UNIT: The organizational unit to which this channel belongs. It determines which devices and users can access the channel.
-
URL: The primary URL where the audio stream is sourced from. This is the main stream the device will play.
-
FALLBACK URL: A backup stream that will play if the primary URL is unreachable or experiences downtime. This ensures continuous audio playback.
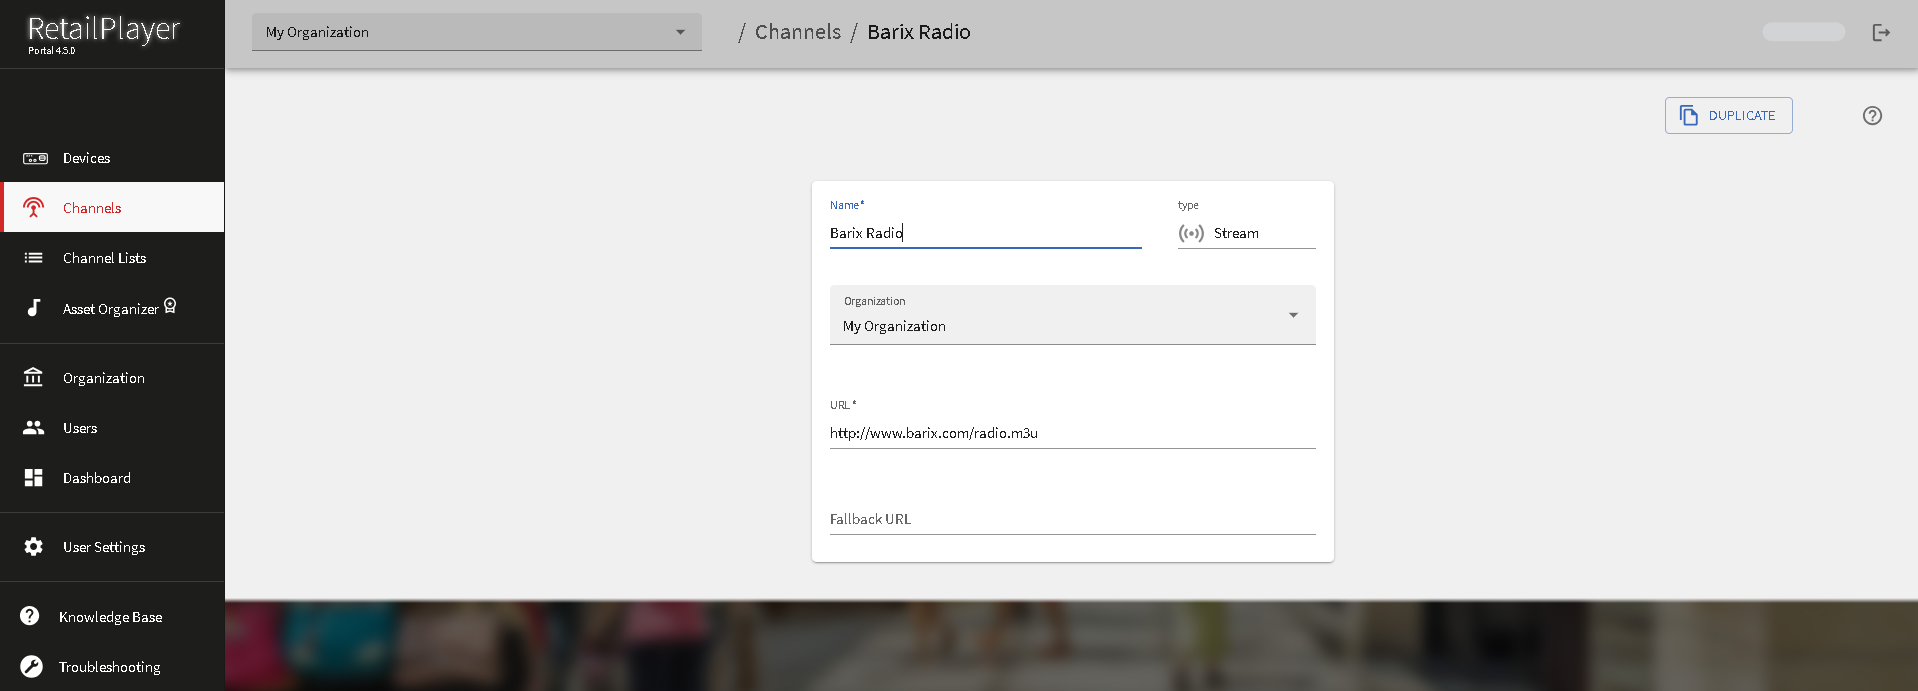
The URL field are to be filled always with a valid syntax among: "http://<YourURL>/path/" or "https://<YourURL>/path/"
The Portal is only used for configuration, it is not involved in audio routing or playback. Once the URL is assigned to a device the device connects directly with the streaming server configured.
The HTTP request sent by the device to the streaming server contains the following user-agent: retailplayer-<MAC_LAST_3_BYTES> (i.e. retailplayer-12ab34)
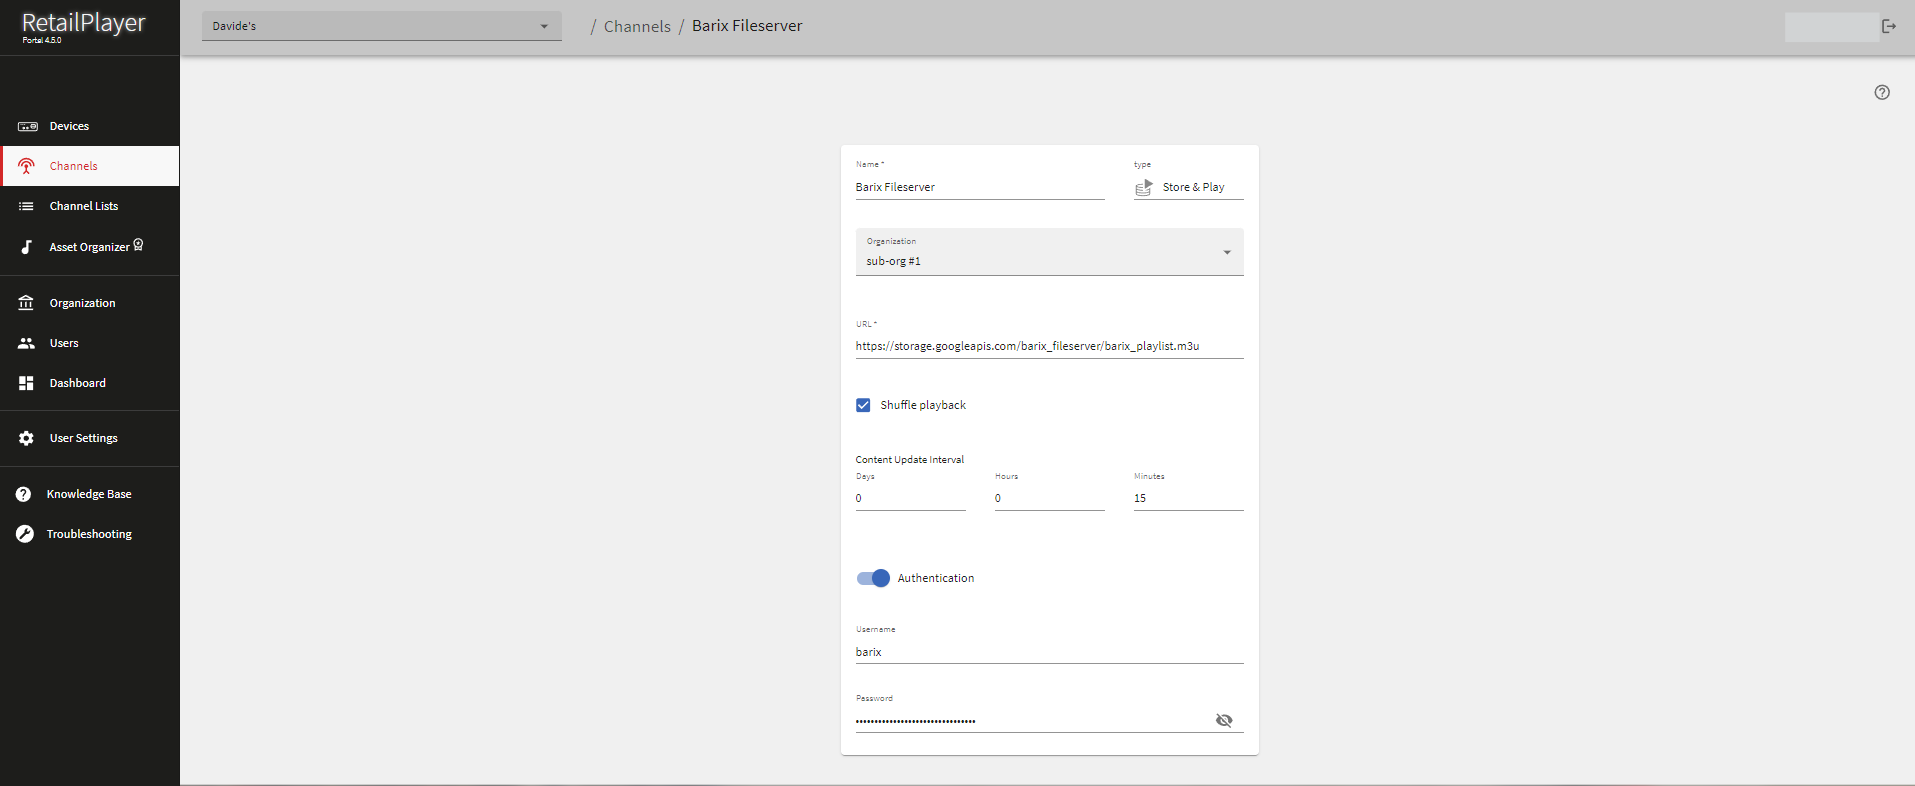
Store & Play channel
-
NAME: This is the name of the channel and will be displayed in the device control section and on the remote app used for channel selection.
-
ORG UNIT: The organizational unit to which this channel belongs. It determines which devices and users can access the channel.
-
URL: The URL points to an
.m3uplaylist, which contains the list of files that the player will download and play. RetailPlayer supportsftporhttp(s)protocols to download data from the provided fileserver. -
CONTENT UPDATE INTERVAL: Defines the interval at which the RetailPlayer device will check for any modification applied to the m3u file. When filenames are removed from the m3u file they will be removed from the player’s memory too, when new files are added those will be downloaded by the player in addition to the ones already downloaded. If a file is not found in the file server directory (same directory of the M3U) the player will attempt to sync with the m3u once every 2..3 minutes.
-
AUTHENTICATION: If the access to the fileserver configured in the URL field is protected by authentication insert here the username and password to be used.
Store and Play doesn’t support Google Drive, Dropbox integration. The m3u link provided in the URL must be a direct download link open to public access.
RetailPlayer supports http digest authentication method.
The m3u file MUST be stored in the same directory where the files to be downloaded are and the filenames reported in it match exactly the filenames of the tracks that the player has to download.
RetailPlayer supports UTF-8 encoded text, but in some cases this is not enough to guarantee that the files will be found correctly depending on how the file server encodes special characters. For this reason avoid using accented characters and other special ones for the filenames of the tracks to be downloaded.
Any line in the M3U that is not a name of a file stored in the same directory will generate an error on the player.
Once the settings are defined click on ![]()
If necessary, you can copy the current channel by clicking ![]()
When configuring channels, remember that the RetailPlayer supports the following audio formats:
-
MP3 Decoding:
-
MP3 (MPEG-1 Audio Layer III or MPEG-2 Audio Layer III)
-
MP2 (MPEG-1 Audio Layer II or MPEG-2 Audio Layer II)
-
-
AAC+ Decoding:
-
Formats:
.m4aand.aac -
Profiles: LC (Low Complexity) and HE-AAC/HE-AACv2 (High Efficiency)
-
-
Opus
-
Ogg Vorbis
-
WAV:
-
Linear PCM 16-bit, 44.1kHz, Big Endian
-
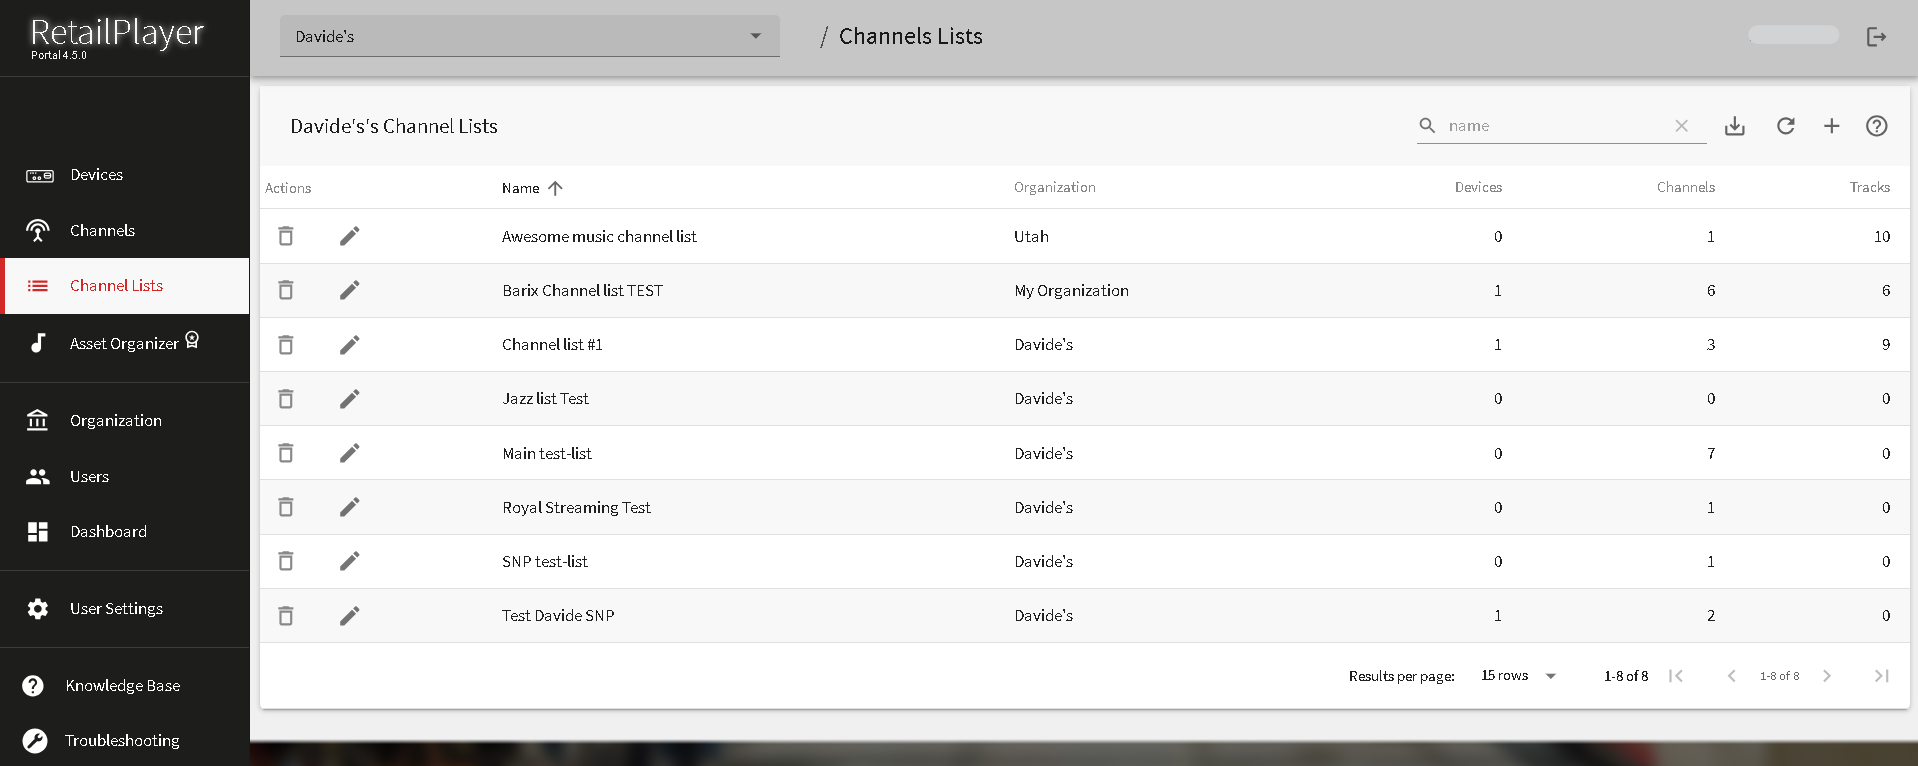
Channel Lists
In this section, you can group channels into Channel Lists. Click on "Channel List" in the sidebar menu to view existing Channel Lists or create a new one. The page will display the ones that belong to the selected organizational unit and its sub-organizations. When creating a new Channel List, it must be assigned to an organizational unit.
the ![]()
Add channel lists
Click on the ➕ button in the top-right corner to create a new channel list:
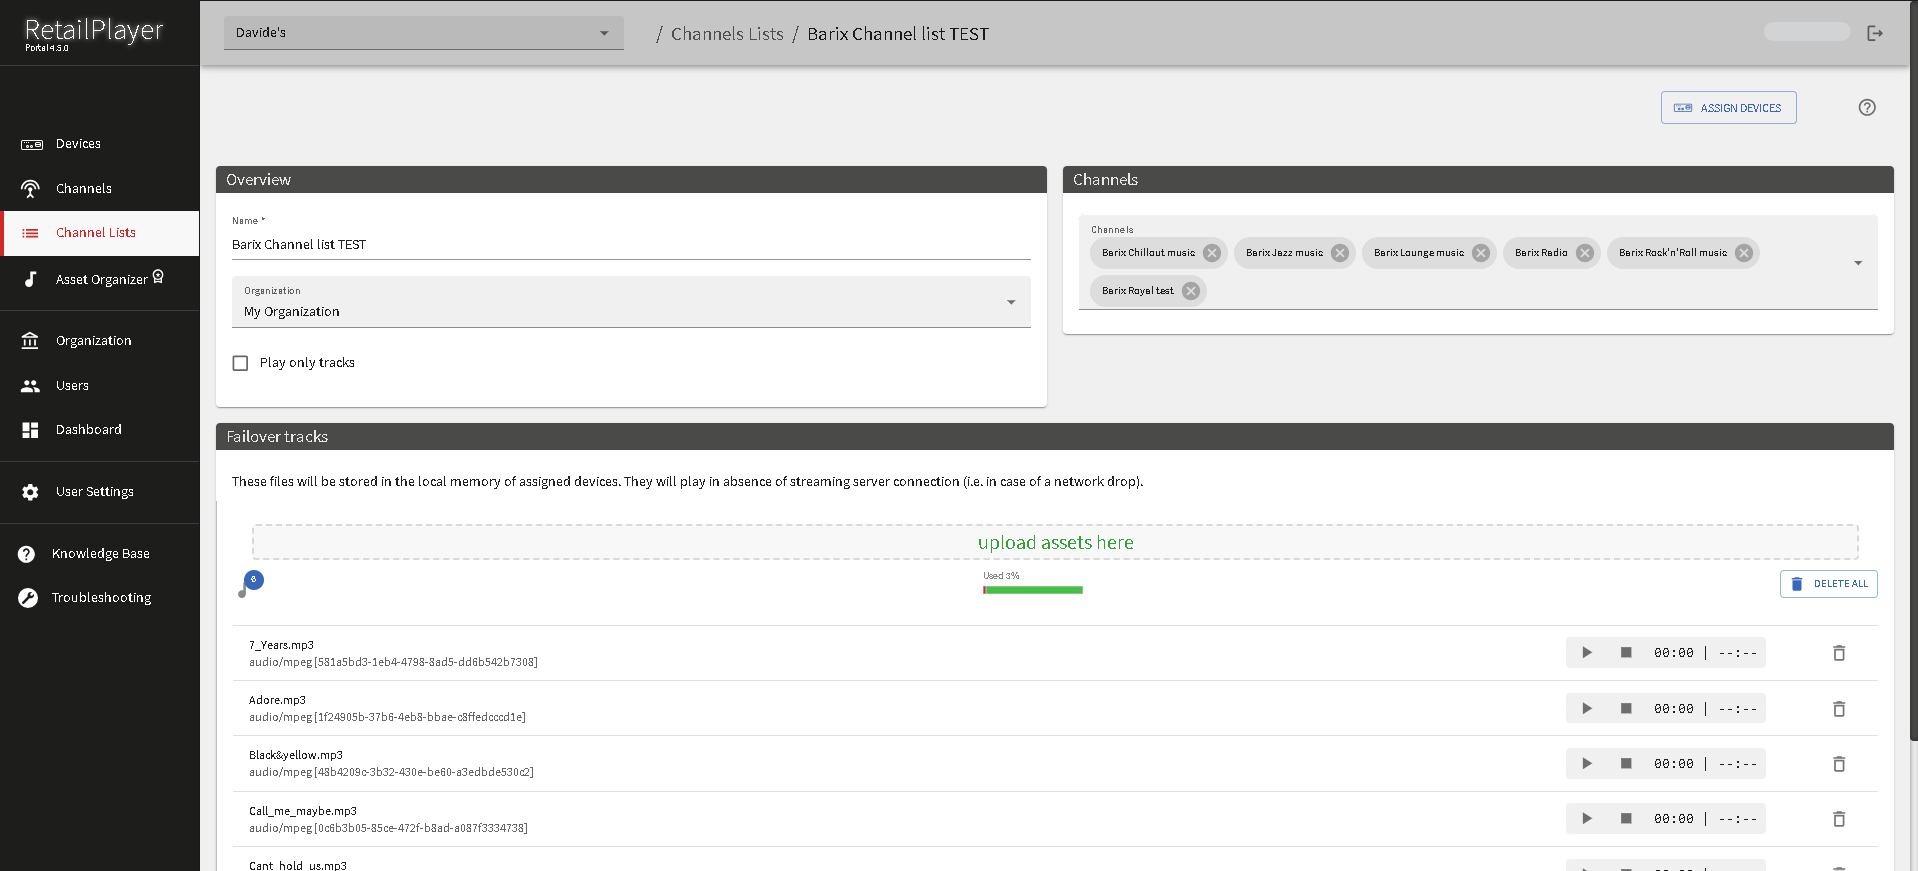
When creating a new Channel List, the following information is required:
-
NAME: Assign a name to the channel list.
-
ORGANIZATION: Select the organizational unit to which the list belongs.
-
CHANNELS: Click on the drop down menu to add channels (Store & Play or Stream) to the list. The menu will appear, allowing you to select from the channels already added to the same organizational unit. Click ✕ to remove a channel from the list.
-
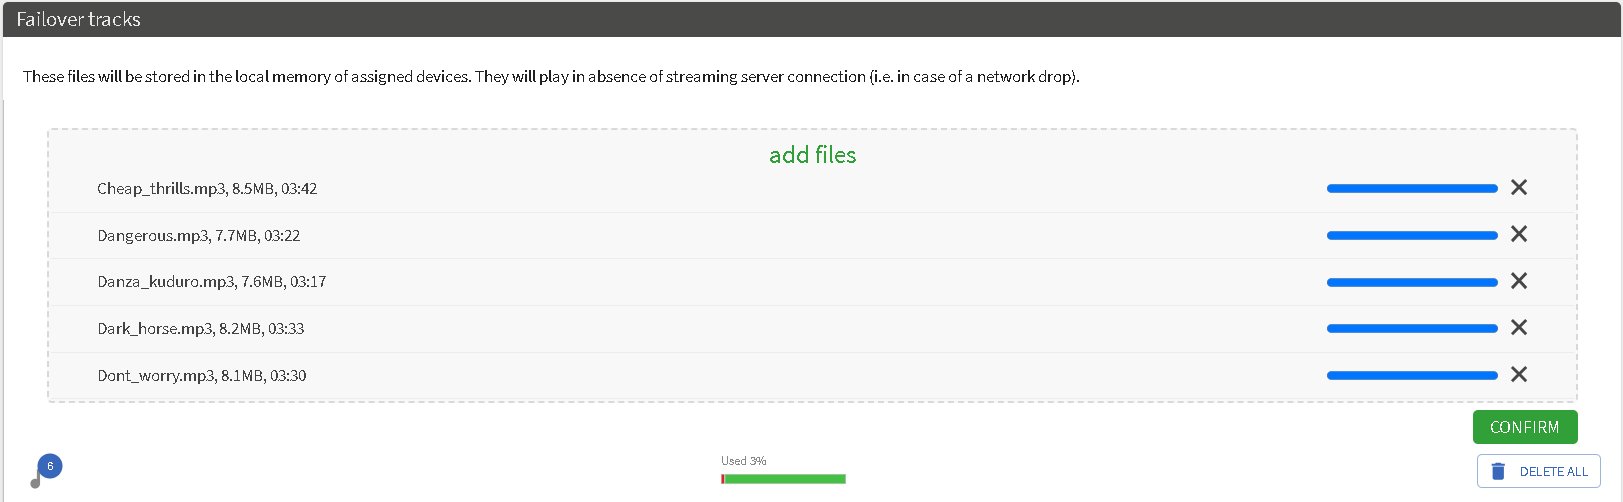
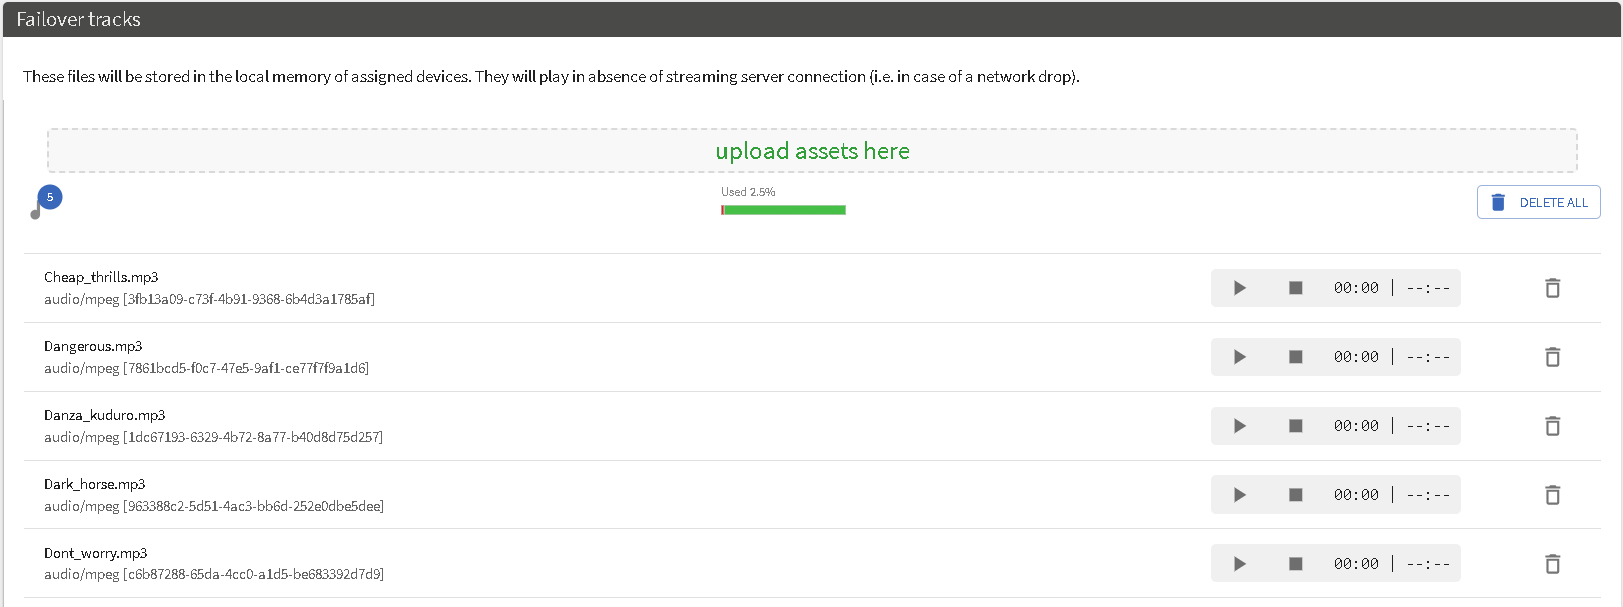
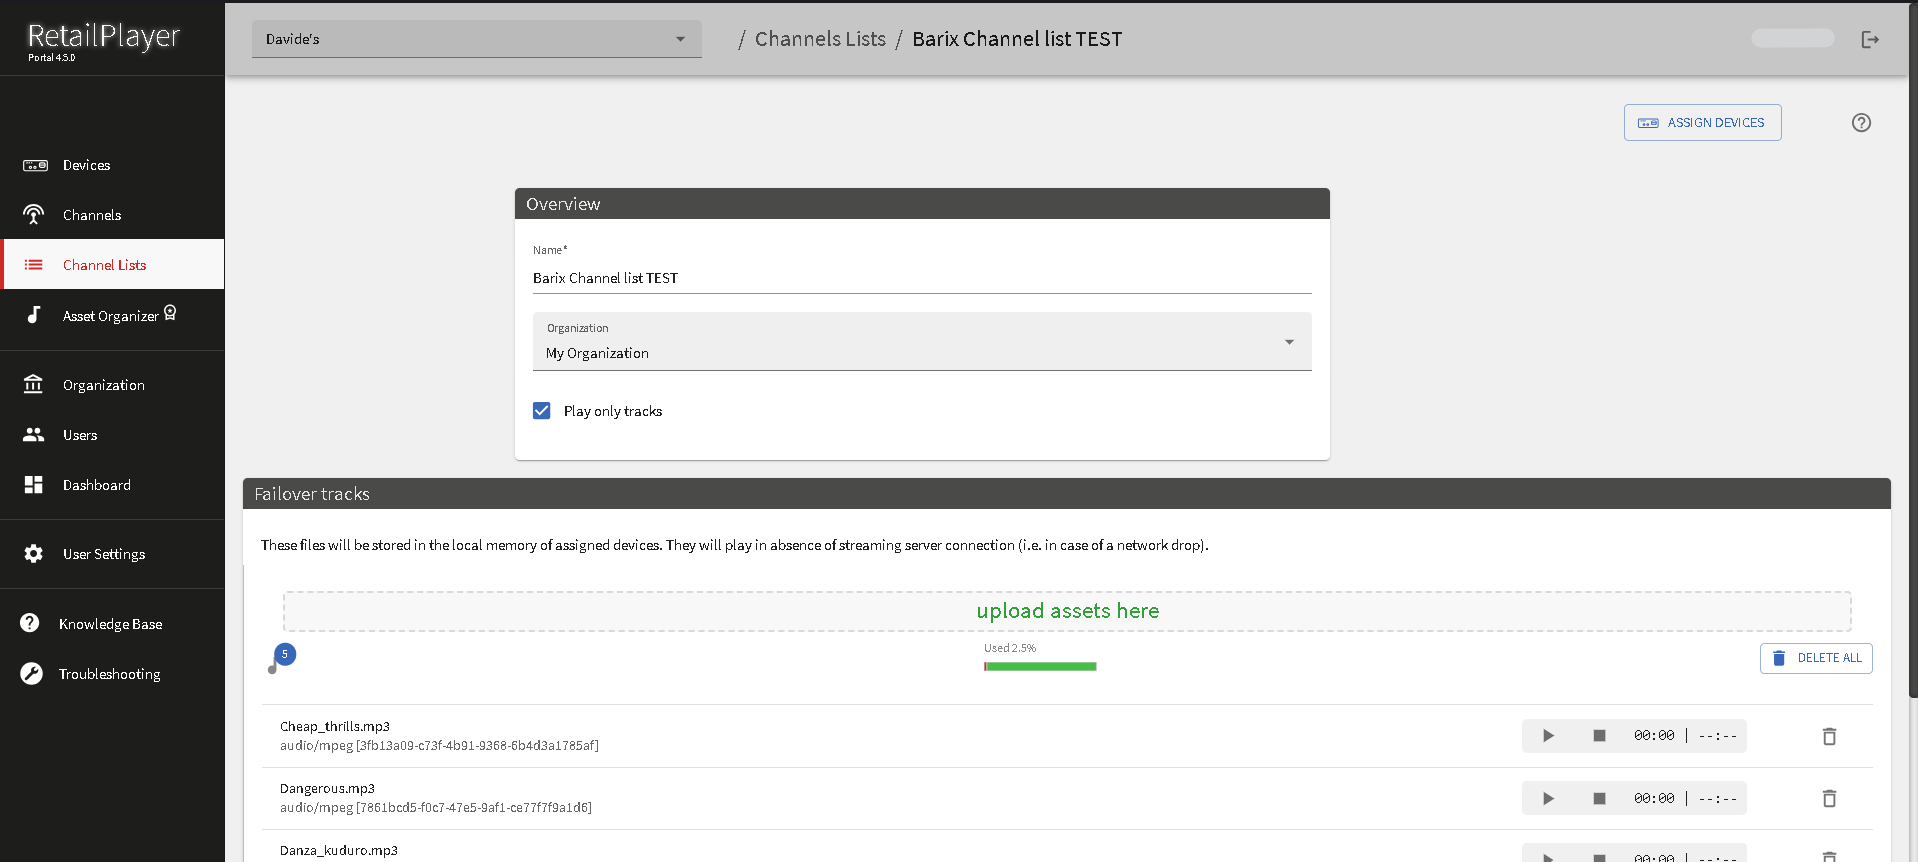
FAILOVER TRACKS: The tracks are downloaded locally to the RetailPlayer device and will play when no other stream is available. Once a stream is restored, the RetailPlayer will immediately switch back to streaming. Failover tracks must be in one of the following formats: .
mp3,.wav,.ogg,or.aac. It is possible to have Barix hosting the tracks (limited to max. 200 tracks) or to use a Store and Play channel as a failover playlist. See below. -
PLAY ONLY TRACKS: Introduced in Portal release 3.2.1. When this option is flagged and saved, all RetailPlayer devices using the Channel List will play only the failover tracks, without attempting to stream audio. This allows for the creation of music playlists (up to 200 tracks). To switch back to streaming, un-flag this option and click
Failover Tracks
The goal of failover tracks is to have a backup playback mechanism in place to ensure 24/7 constant music playout even in situations where the streaming server is not reachable for any reason. Failover Tracks can be hosted on the Barix Portal or any Store and Play channel configured can act as a Failover Playlist.
When hosting the tracks on the RetailPlayer Portal the customer simply must upload the tracks on the portal, any device that will be assigned this channel list will download the tracks immediately and store them in local memory.
It is possible upload a maximum of 200 failover tracks, and the number of uploaded tracks is visible in the corresponding area of the Portal. While a device is downloading failover tracks, it cannot play them. The time required for downloading these tracks depends primarily on the network connection speed of the RetailPlayer device. You can monitor the download progress and the number of downloaded failover tracks through the device’s Status Report. - Each audio file (track) can have a maximum size of 16MB.
When Store and Play as Failover Tracks is selected the customer must pick a Store and Play channel, which essentially points to a URL of a playlist stored at customer’s premises, to be used as a Failover Playlist. The tracks will be downloaded and stored locally in the device memory. More information on how to setup a Store and Play channel here. In this case there is no limit on the number of tracks to be used (the limit is the device’s storage available which can be verified in the status page) and on the size of the individual file.
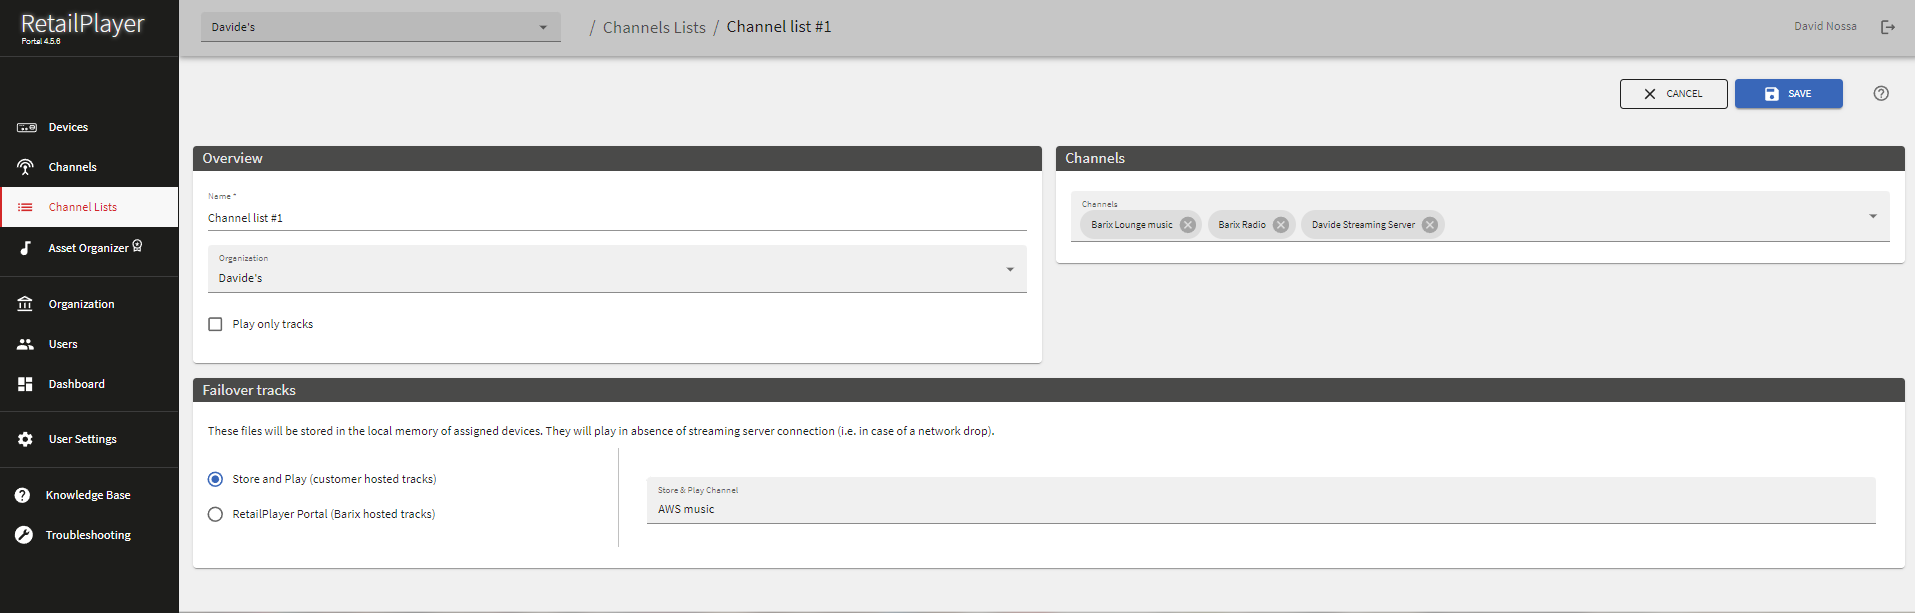
Barix will change the policy about hosting failover tracks on the Portal during 2025. It is recommended to migrate to Store and Play as Failover Tracks as soon as possible.
How to play only tracks
With the new function "PLAY ONLY TRACKS" added in Portal release 3.2.1 it is possible to use the faiover tracks as a music file playlist. How it works:
-
Create your channel list, if already created click on


-
Upload the required number of faiover tracks, it is possible to upload multiple tracks at once
-
See the upload status, when all tracks are uploaded click on

-
At this stage, the fallback tracks are being downloaded by the RetailPlayer devices if they are set to play from the selected channel list. Please wait until all tracks have been downloaded onto the players. You can monitor the download progress by navigating to the Device tab → Status → Main → Failover tracks.
-
In the Channel List area click on

After making all the necessary changes to your Channel list, click on ![]()
Asset organizer
This section is accessible exclusively to Retail Hero subscribers.
In RetailPlayer Portal V3.x, the premium section "Asset Organizer" has been introduced. This platform allows users to upload audio assets (such as announcements, messages, information, etc.) and schedule their playback on a weekly or monthly basis. The playback is seamlessly integrated with the streaming channel being played by the RetailPlayer devices.
Access the Asset organizer section to open the Asset manager
Asset Manager section
The Asset Manager window displays all the audio files uploaded for the currently viewed organization. In the example below, the organization is "My Organization" and the files listed are associated with this specific organization.
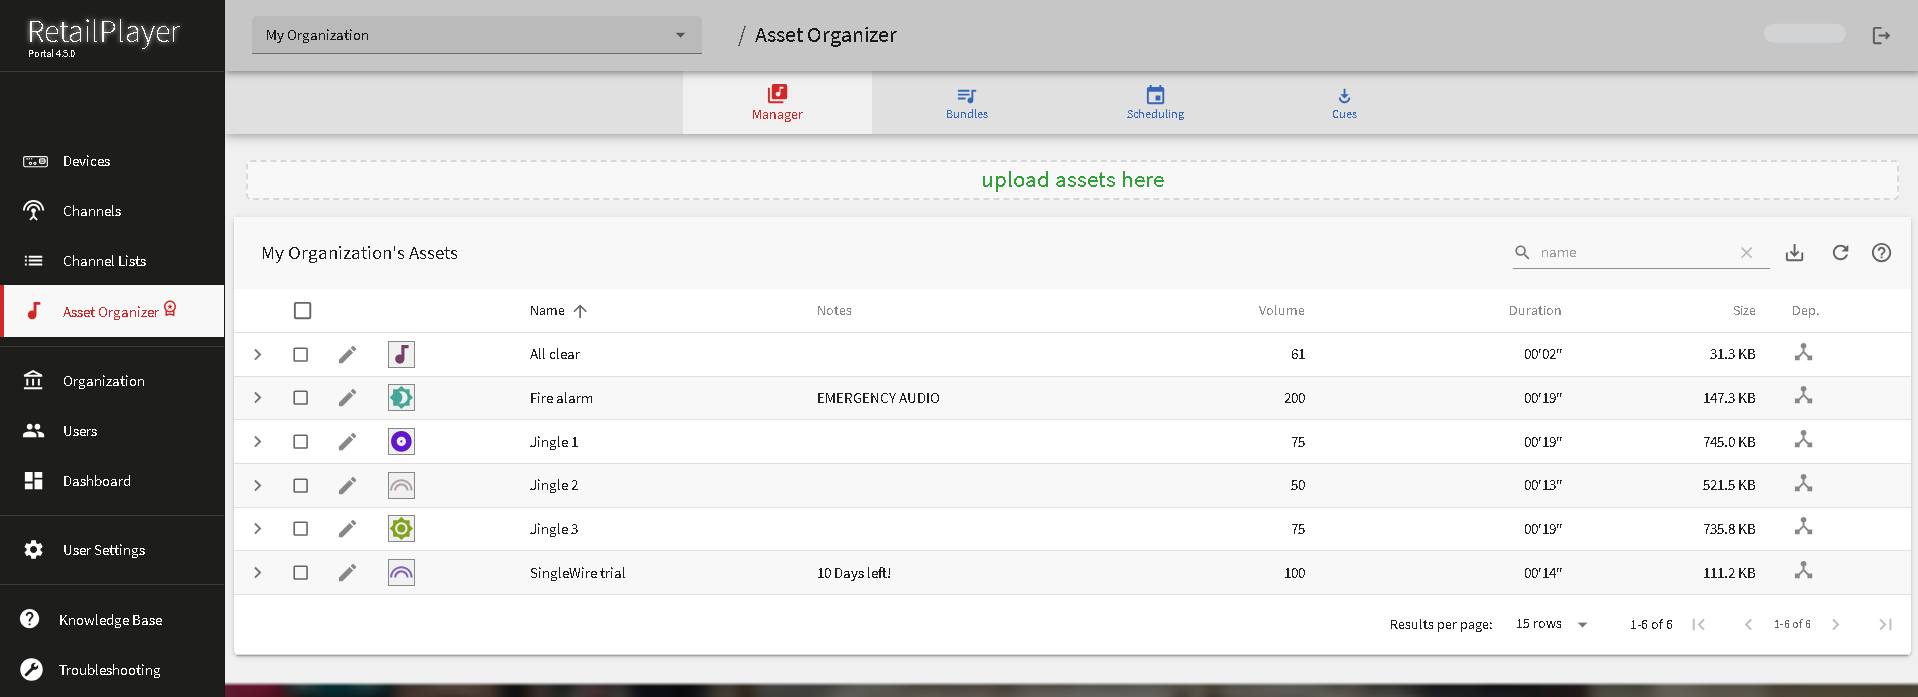
The big button on the top "upload files here" allows to upload assets from the local PC where the Portal is accessed.
Audio Files format supported: .mp3/.wav/.ogg/.m4a/.opus
By clicking ![]()
-
Edit the asset name.
-
Add any necessary notes.
-
Set the playback volume level (range: 0-200).
-
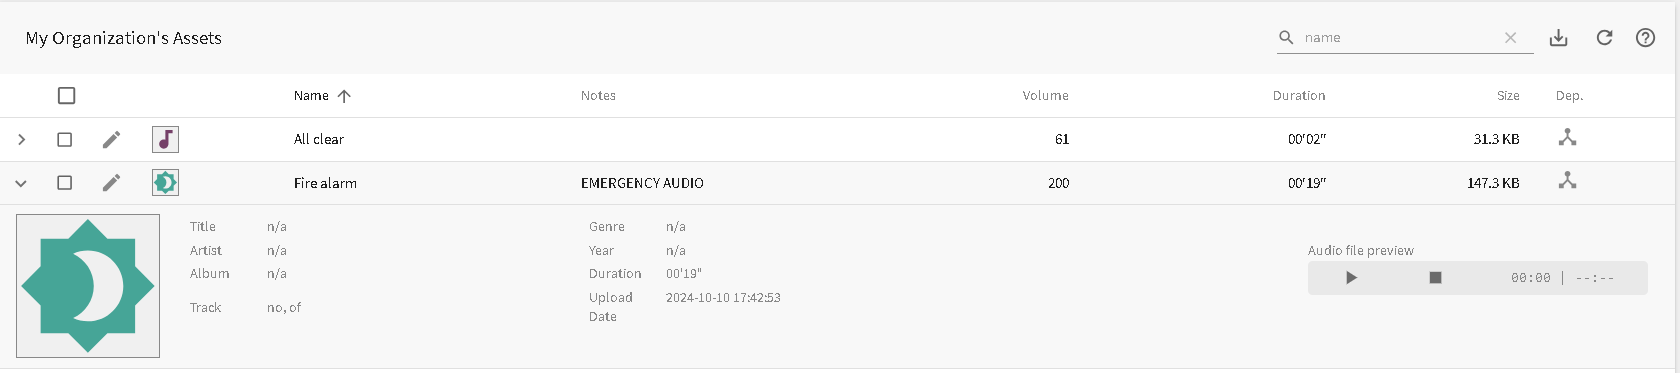
Play and preview the asset.
Additionally, clicking on ![]()
To delete an audio file uploaded:
-
Click on the checkbox for the desired file
-
The upper row turns red and a bin icon appears on the right corner, click on

Each individual audio file must not exceed 16 MB in size.
Bundles section
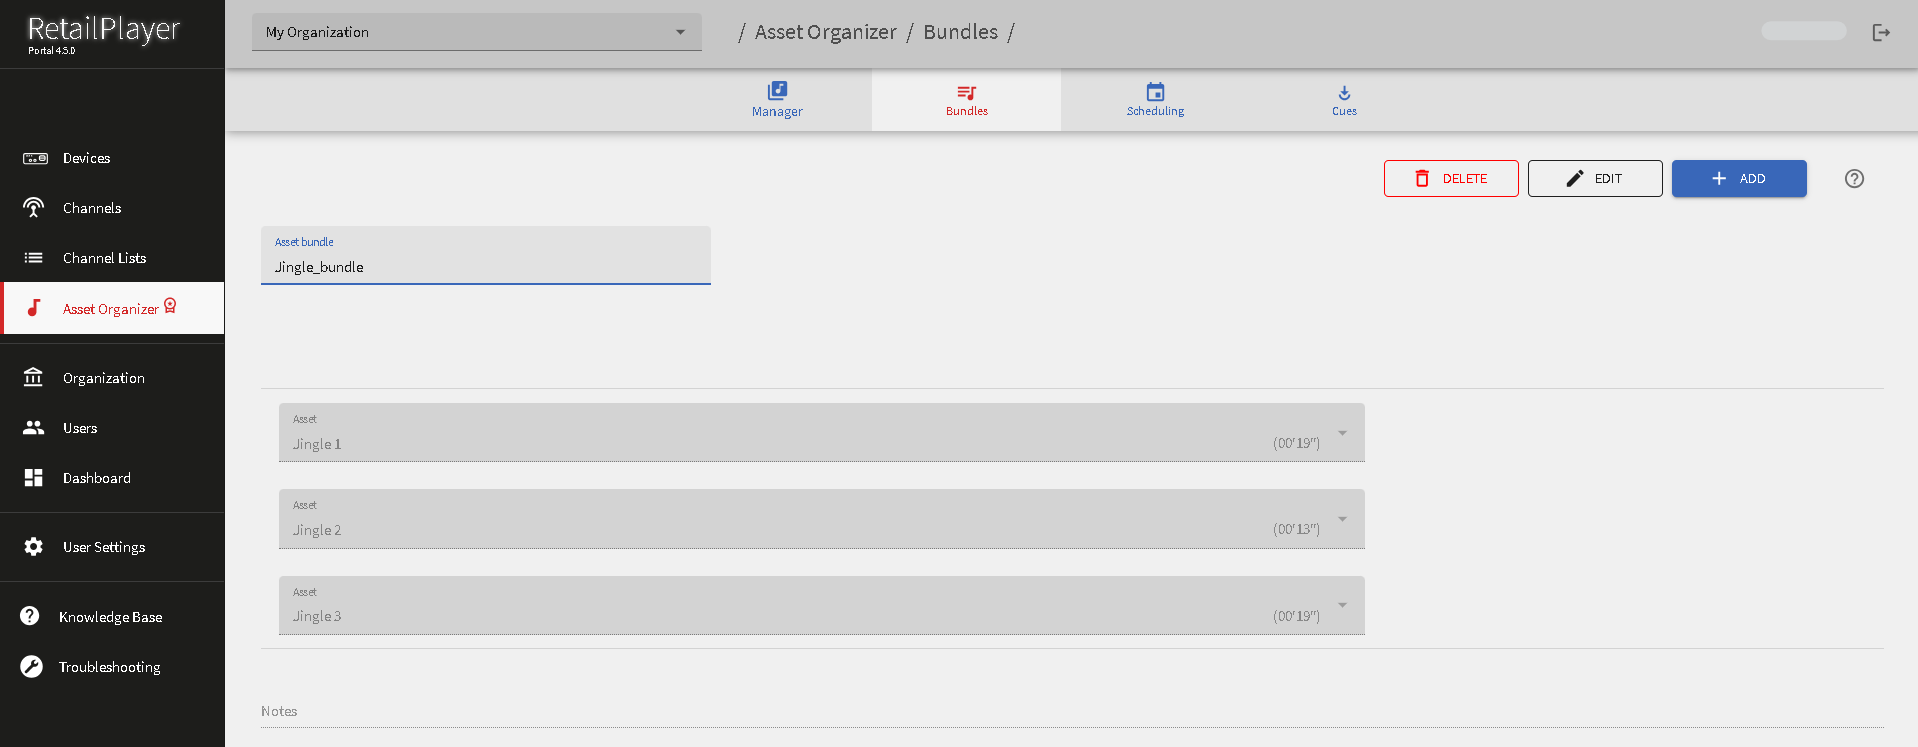
Only available on devices running FW > 6.x
A bundle is a pre-configured sequence of assets that can be scheduled and managed as a single entity. When a bundle is scheduled, the components within the bundle will play one file at a time at the specified intervals, rather than all files playing simultaneously at the scheduled time. This setup allows for flexibility in organizing and distributing content over the scheduled period.
Once you are in the section, you will see a drop-down menu that lists all your previously configured bundles. If you do not have any bundles set up yet, click on ![]()
To create the bundle correctly, configure the following parameters:
-
NAME: The name you want to assign to the individual bundle.
-
ASSET: After clicking on the

-
NOTES: Any notes related to the bundle.
To remove an unwanted asset, click on the ![]()
![]()
Bundles actions
Once a bundle is selected, these buttons appear in the top right corner:
|
|
This button allows you to delete the selected bundle in one action |
|
|
This button allows you to apply changes to the already configured bundle |
Scheduling section
The Scheduling section enables you to create schedules that include one or more components. These components can play individual assets or asset bundles, allowing you to specify the days on which they will be played.
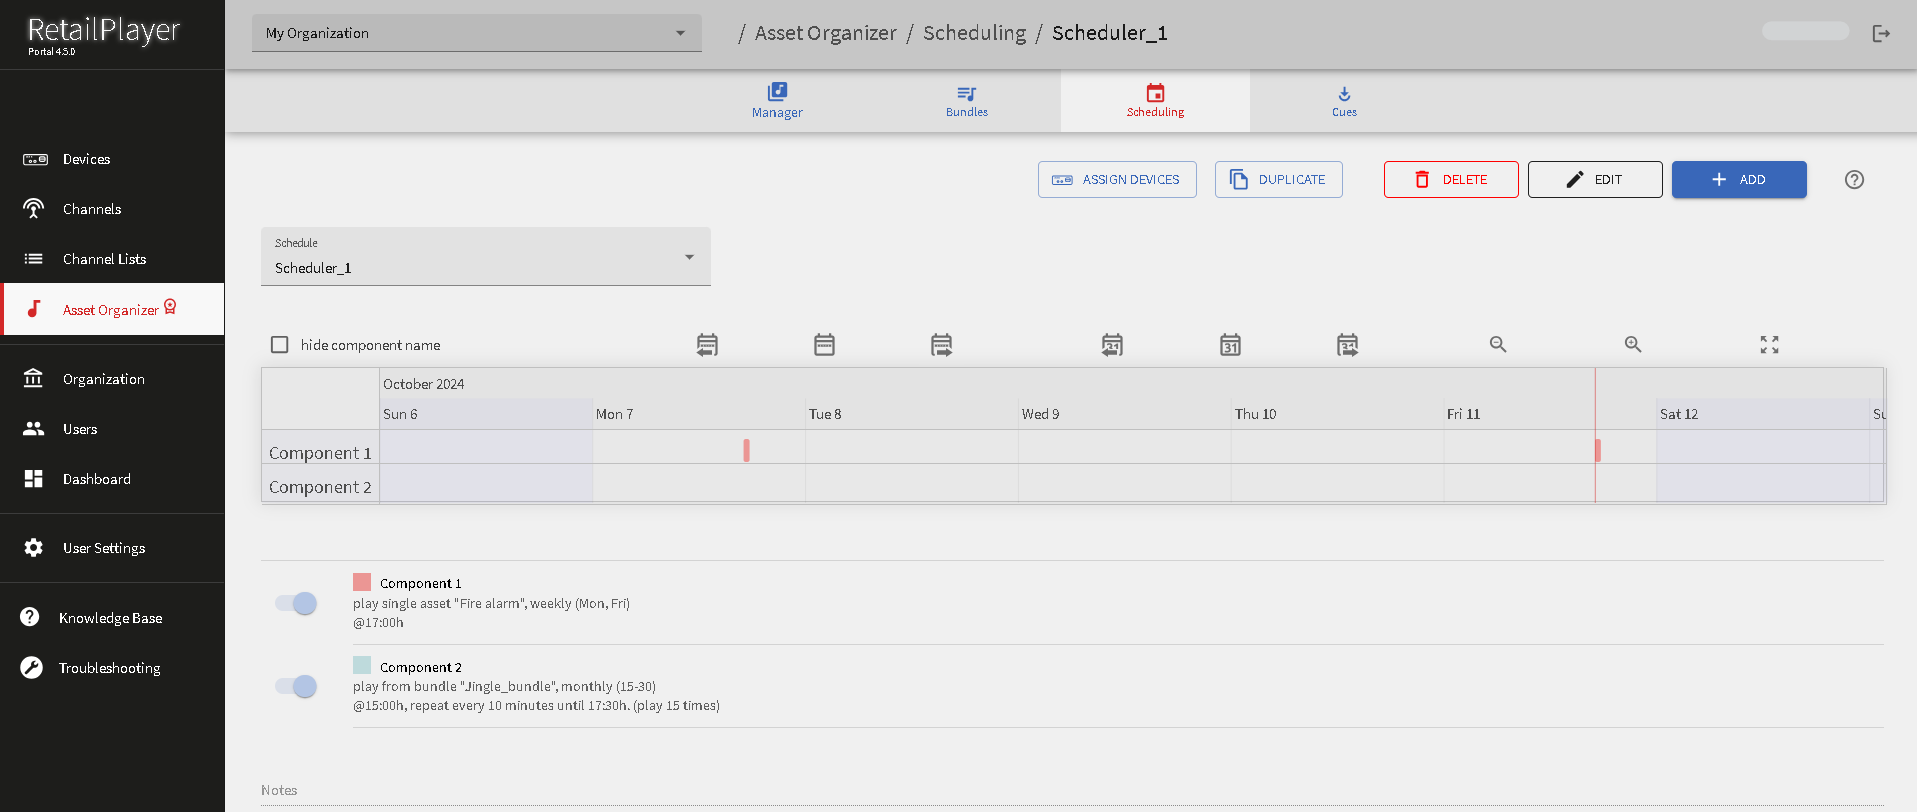
Once you are in the section, you will see a drop-down menu that lists all your previously configured schedulers. If you do not have any schedulers set up yet, click on ![]()
To create the scheduler correctly, configure the following parameters:
-
NAME: The name you want to assign to the individual scheduler.
-
COMPONENT: Click on the
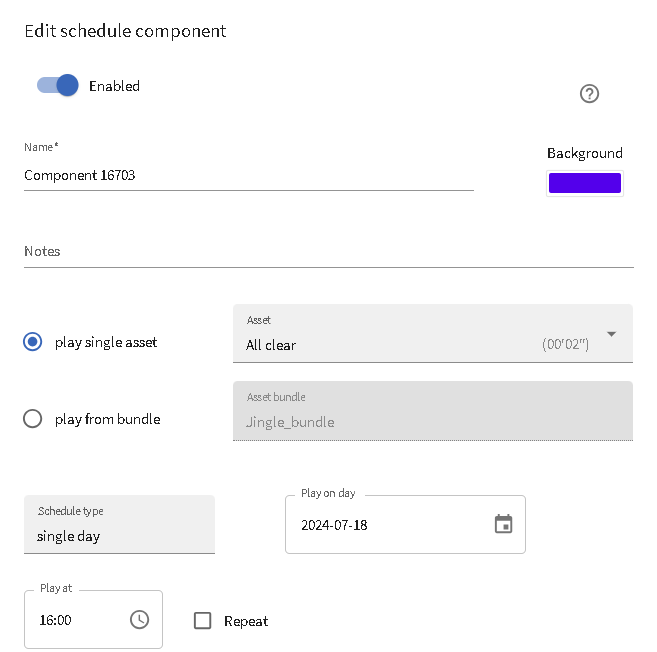
Below here there is an explanaton of all the parameters:
|
|
When this switch is disabled, the component will be turned off, preventing it from playing any audio. |
|
These two text fields enable you to configure the component's name and add any necessary notes. |
|
|
This button allows you to select the color of the component from an RGB menu, which will be displayed on the scheduler. |
|
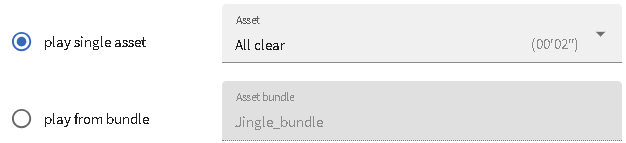
By clicking on one of the two radio buttons, you can easily select whether to configure the component to play audio assets or asset bundles. |
|
|
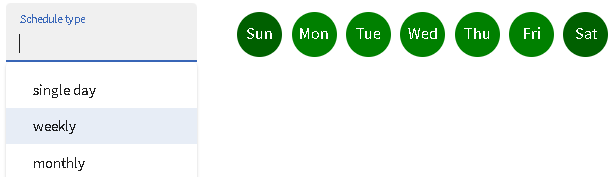
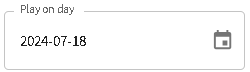
This dropdown menu allows you to select the time interval for when the component should play. The available options are:
|
|
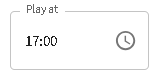
This clock menu allows you to select what time the component should play. |
|
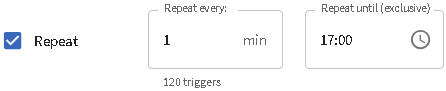
The Repeat checkbox enables the option to set a time frame within which an asset can be repeated. The frequency of repetition is determined by the "Repeat Every" input field, allowing you to specify the interval between each playback of the asset. This feature is useful for scheduling recurring content at regular intervals within a set time frame. |
To apply every change to the component, click on ![]()
![]()
The devices will play the scheduled files even without internet connection.
When a scheduled file is playing, the status report changes the "Active Resource" and "Active Stream" to "Event" and the associated unique ID of the event playing, see below:

This is a good way to remotely verify if a schedule is running correctly.
Cues section
This section is accessible exclusively to Retail Hero subscribers.
Only available on devices running FW > 6.1.x
This is another premium feature added to RetailPlayer, enabling the creation of Cue sets consisting of a maximum of 10 buttons. Each button can be used to manually trigger the playback of audio files associated with it.
The playback can be initiated either from the Portal or through the web application accessed by scanning a QR code.
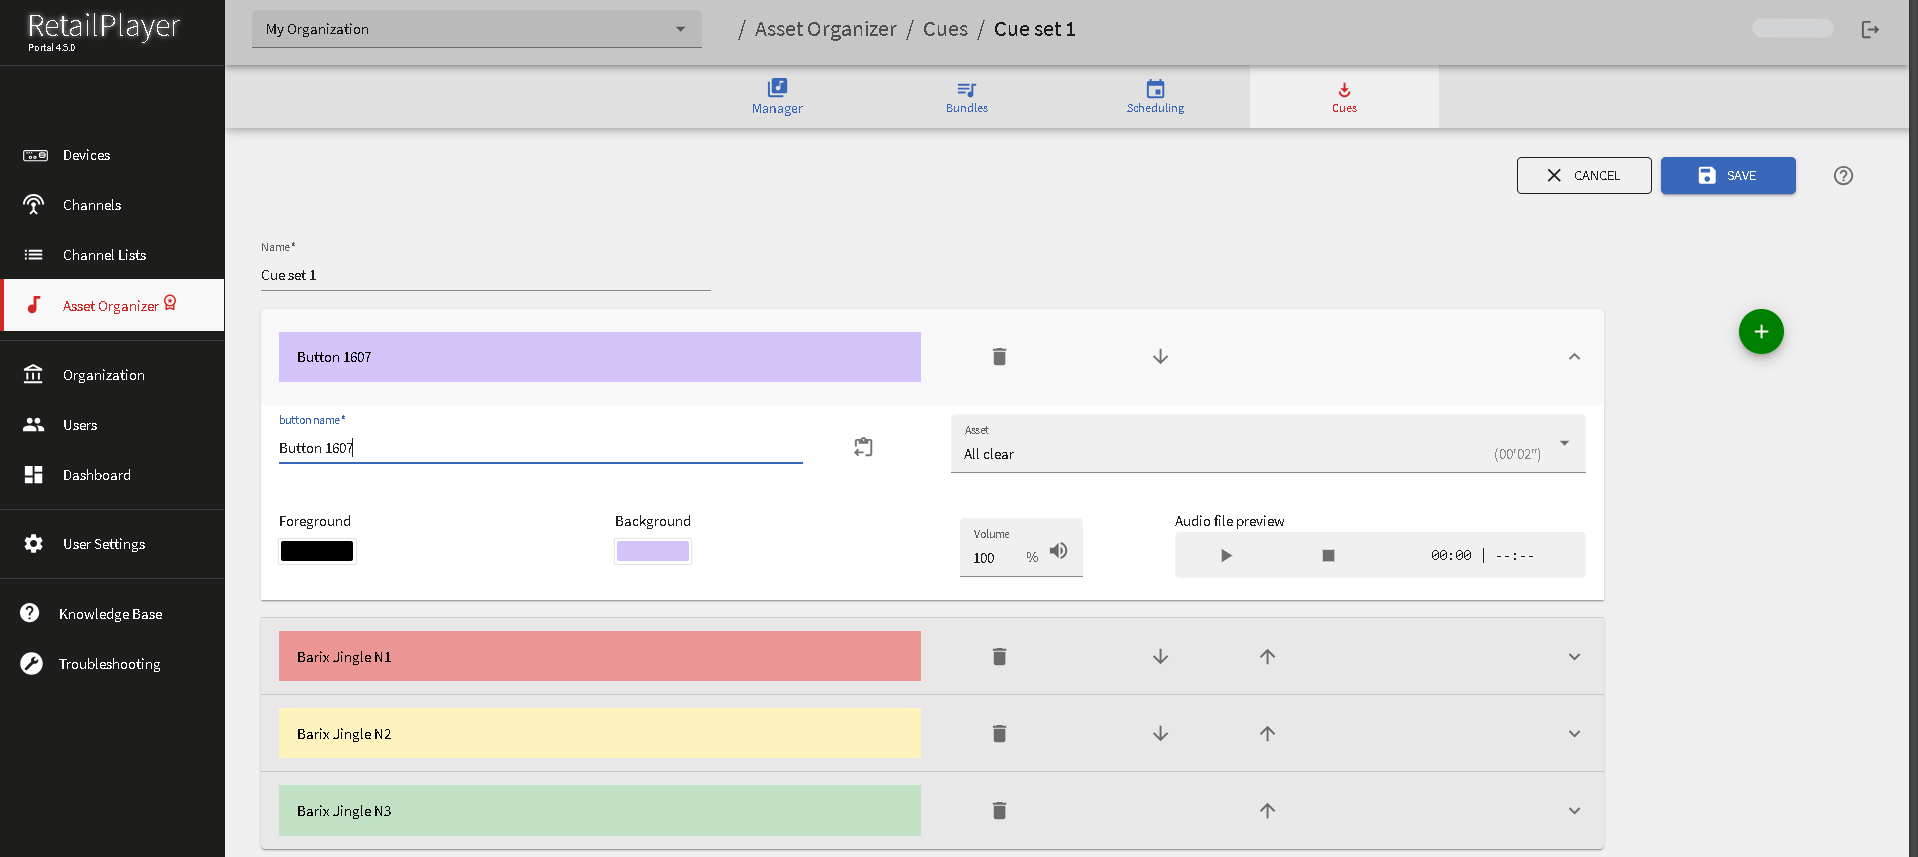
How to create a Cue set
-
Go into the Audio Files section and Audio Files Triggers
-
Click on

-
Assign a Name to the SET

-
Click on
-
Click on "Configure me" to open the editing area of the selected button
-
For each button is possible to: assign a name (this will also be displayed on the UI of the remote control app) and an audio file (uploaded in the Asset Manager)
-
Set the volume of the audio file, preview it and modify the background and foreground colors to match your wishes.
-
Do the same for all the buttons created
-
While in EDIT mode is possible to arrange the buttons to match the desired order. Use the arrows to move a button up or down. Use
-
Click on
-
Click on ASSIGN DEVICES to assign the trigger set to the desired devices
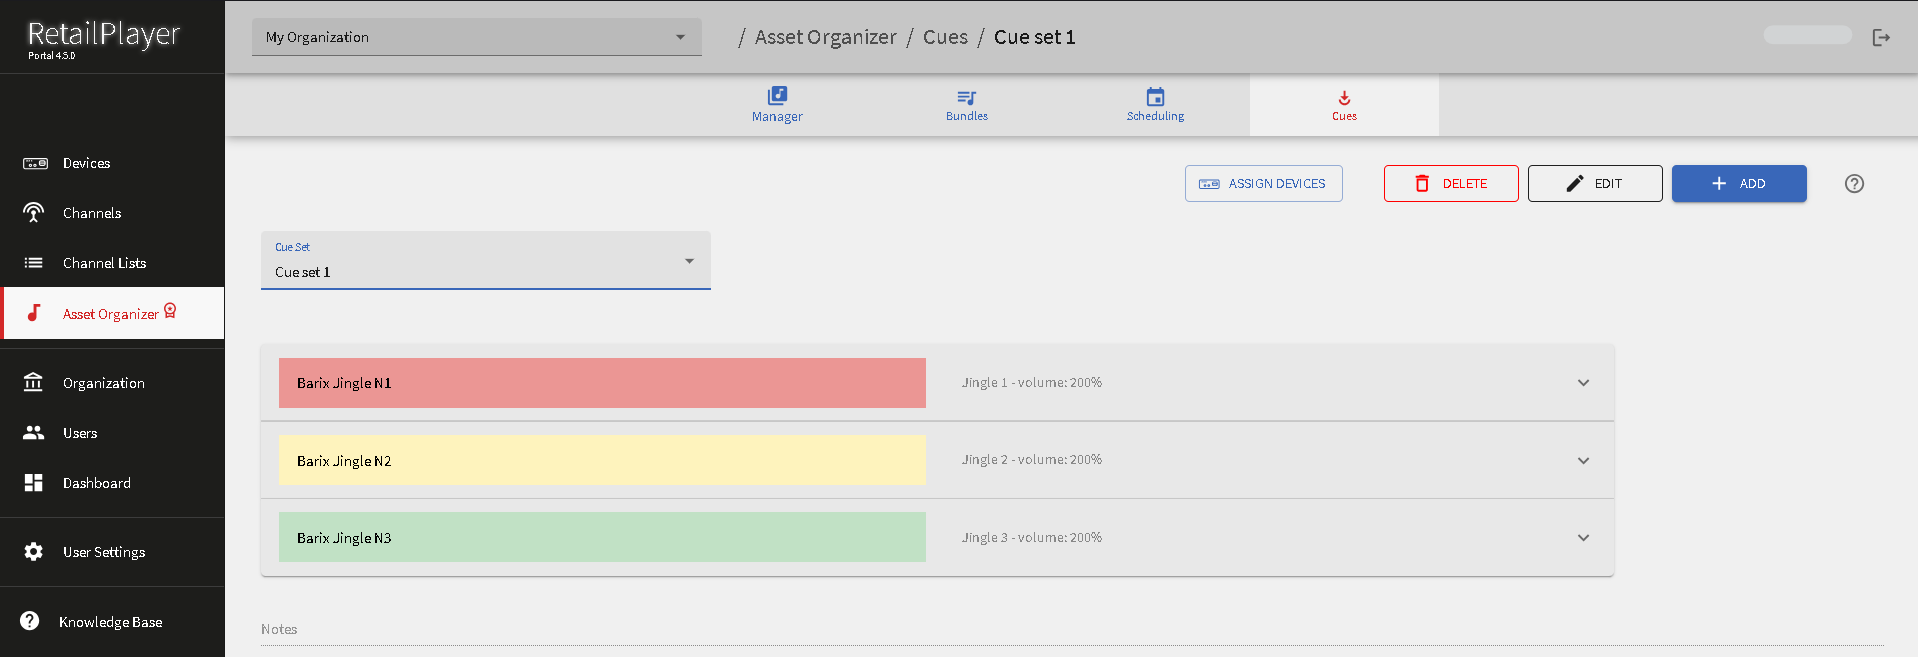
Once a Trigger set is assigned to a device it is possible to trigger the playback of the audio files associated with the buttons from the Portal. Devices → Select the device → Automation → Cues
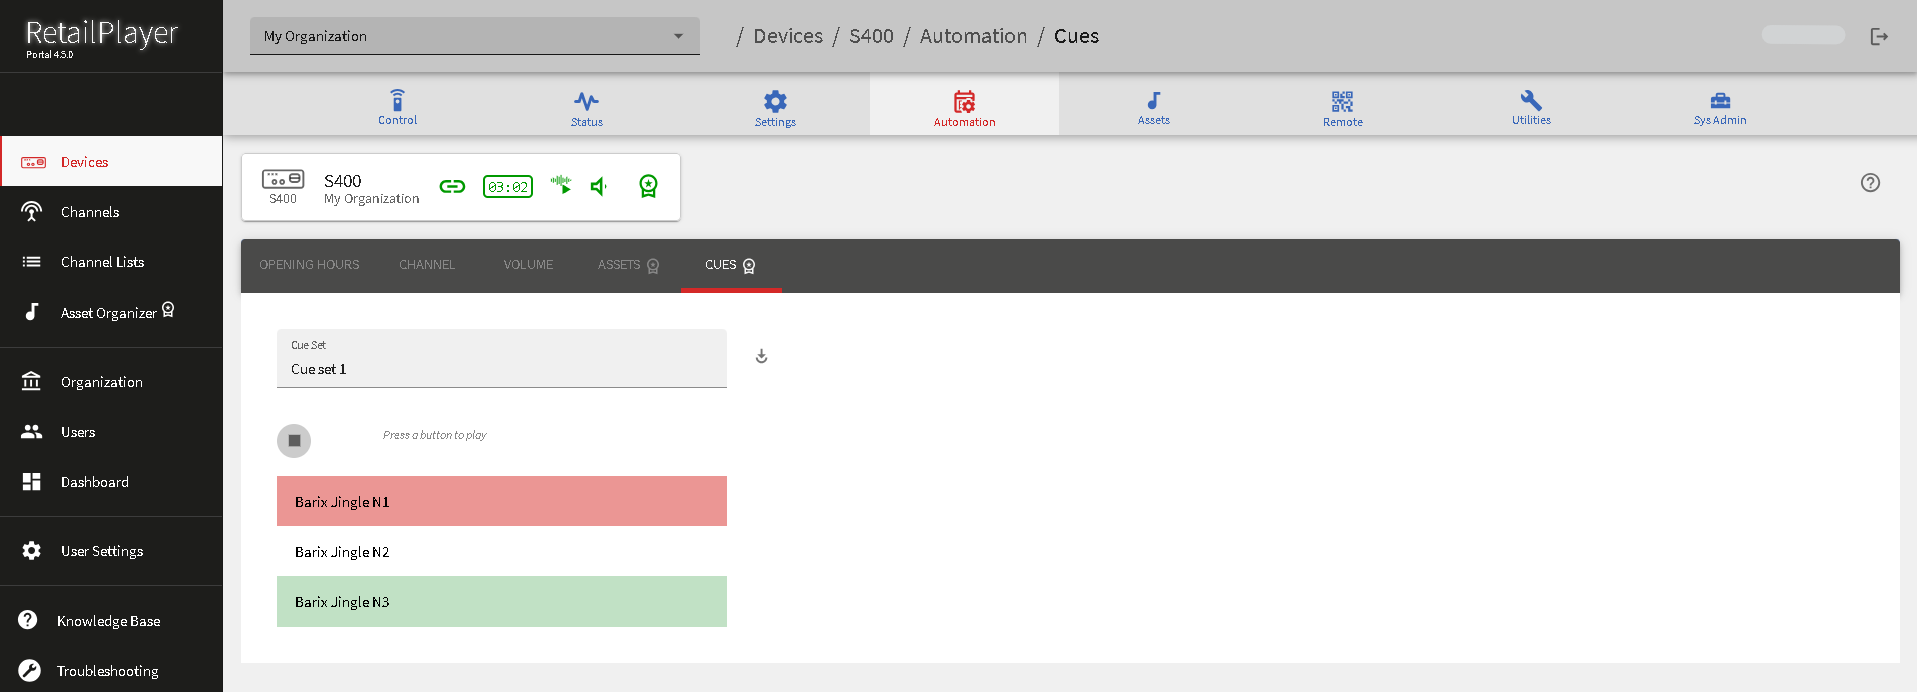
By clicking on each button displayed on this page, you can trigger the playback of the associated audio files.
By clicking ![]()
The real advantage of this feature emerges when accessed through the web app via smartphones (using QR code scanning). For example, when a waiter is bringing a cake to a customer in a restaurant, clicking any of the buttons will immediately play the corresponding audio file.
Audio files triggered manually take precedence over the main stream, fallback, and failover tracks but do not override the priority URL (if configured) or the USB tracks (when the Play from USB function is active).
Organization management
This chapter and the following sections focus on organization and user management, covering the administrative aspects of the Portal.
The RetailPlayer platform is structured to allow users to be assigned configurable permissions for managing organizations. An organization encompasses a set of resources, including devices, channels, and channel lists, which must be assigned to a specific organization upon creation. For each user within an organization, different permissions can be assigned to control the platform, enabling the creation of distinct roles based on their responsibilities.
Organizations can also have sub-organizations. Users in the main organization have control over all resources in the sub-organizations. However, users assigned to a sub-organization do not have access to the resources of the parent organization and are not even aware of their membership in a sub-organization.
Settings section:
In this section of the page, you will find a text field labeled "Name" where you must enter the name of the main organization. Below that, there is another text field labeled "Notes," which can be used to include any additional information or notes that may be necessary for your organization.
At the top right of the page, there are two buttons designed for managing sub-organizations. The "Add Sub Organization" button allows you to create a new sub-organization under the main organization. Clicking this button will prompt you to enter the relevant details for the new sub-organization.
Conversely, the "Remove Sub Organization" button is used to delete an existing sub-organization. Before proceeding with this action, ensure that you want to remove the selected sub-organization, as this action may result in the loss of associated resources.
To manage sub-organizations, follow these steps:
-
To add a sub-organization, click the "Add Sub Organization" button, fill in the required details, and save your changes.
-
To remove a sub-organization, select the organization you wish to delete and click the "Remove Sub Organization" button. Confirm the action when prompted to complete the removal process.

Proof of Play section:
This section provides a detailed list of all metadata sent by the players registered within the current organization. The metadata includes essential information such as titles, albums, artists, and URLs of various track types, including stream tracks, S&P tracks, failover tracks, USB tracks, and cue sets.
Additionally, users can view the MAC address of each device, the specific resource it is currently playing from, and other relevant parameters. For convenience, all this information can be easily downloaded to a CSV file by clicking on the ![]()
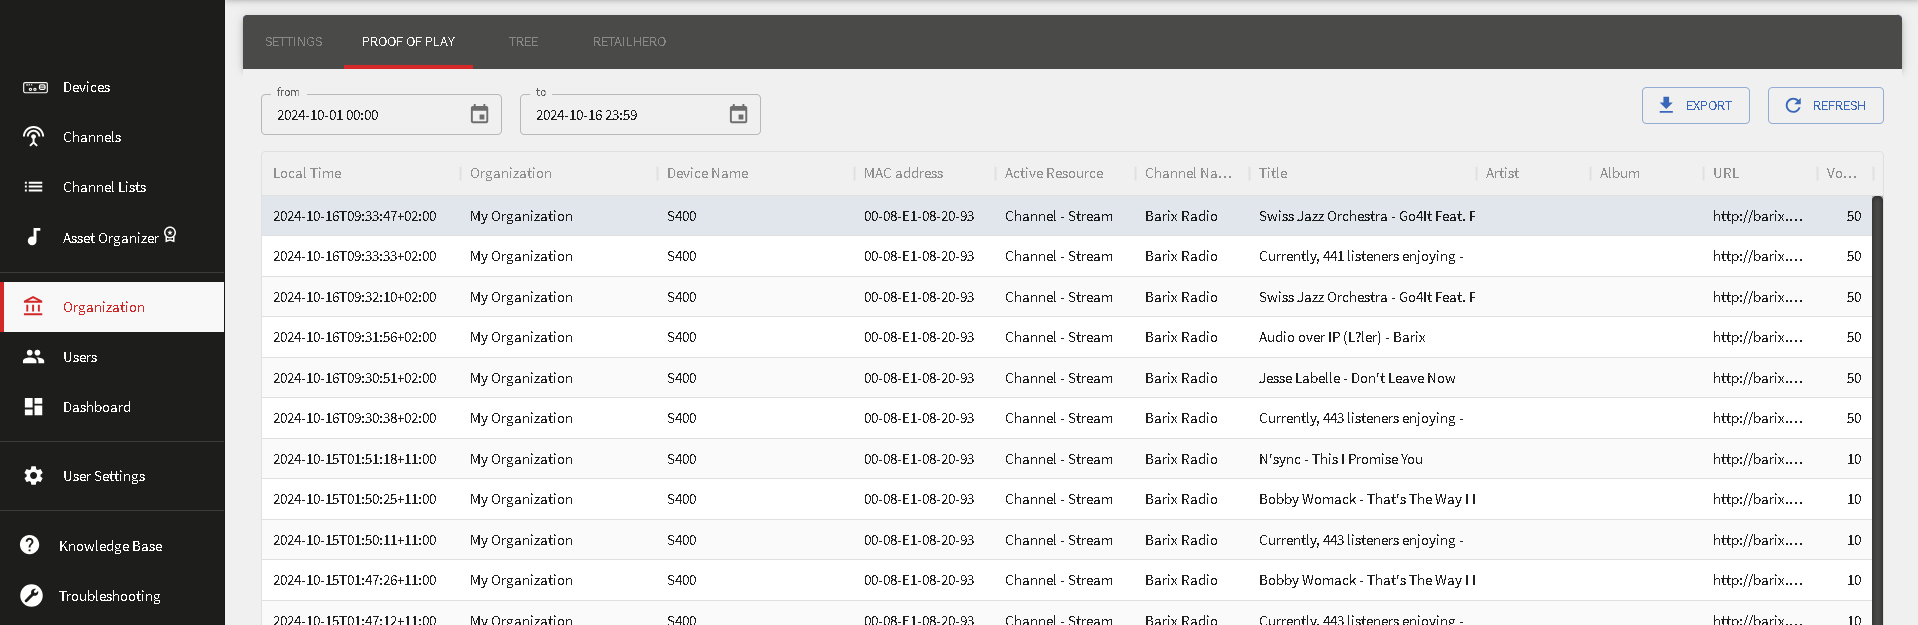
Tree section:
In this section of the page, you are presented with a hierarchical view of your organization's structure, displayed in a tree format.
The sidebar on the left provides options to manage various aspects of the organization, including Devices, Channels, Channel Lists, Asset Organizer, Organization, Users, and more. The "Tree" tab is currently selected, allowing you to visualize and manage the relationships between the main organization and its sub-organizations.
Within the tree view, you will see a list of sub-organizations and associated resources, such as Channel Lists and Devices. Each entry has icons that indicate the type of resource it represents. For instance:
-
The temple icon represent the sub-organizations and the main one
-
The document icon indicates a channel list.
-
The device icon signifies a RetailPlayer registered.
You can expand or collapse each entry to view more details. The checkboxes next to each item allow you to select multiple resources for batch actions if needed.
This interface provides a convenient way to navigate through your organization's structure, making it easy to manage devices and channel lists across various locations.
The checkboxes located under the page sections indeed, act as filters that allow you to control the visibility of different resource types within the tree view.
-
Users: When checked, the tree will display users associated with the organization and its sub-organizations.
-
Channel Lists: Checking this option will display any channel lists created for the organization.
-
Devices: When this checkbox is selected, devices associated with the organization will be visible in the tree.
By enabling or disabling these checkboxes, you can customize the view to focus on specific elements (e.g., only devices, only users, or a combination of both) depending on your needs.
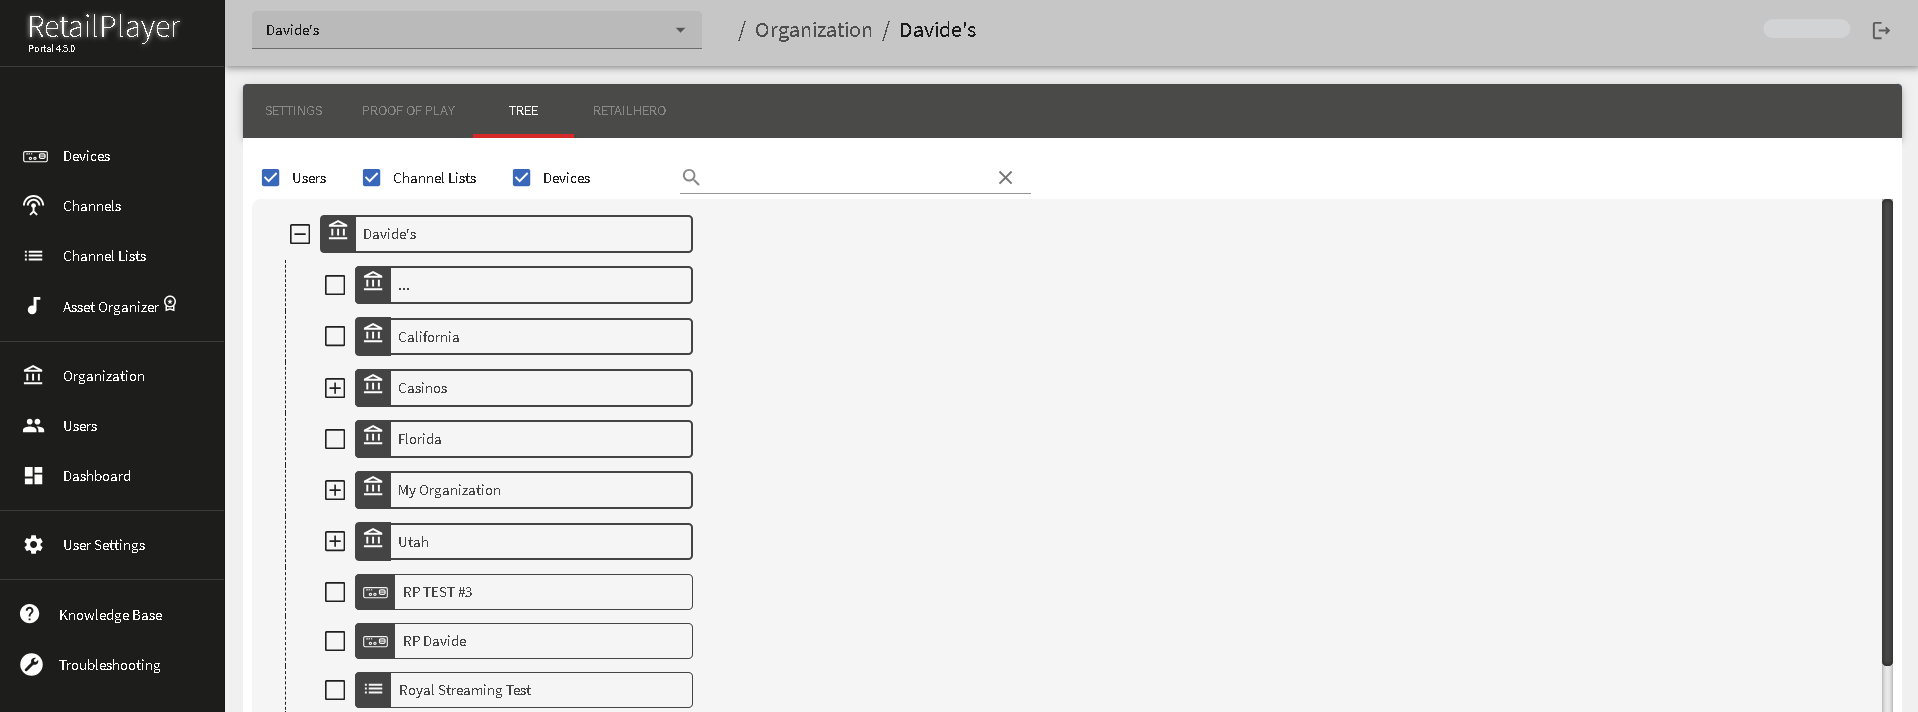
Retail Hero section
Click here to learn more about Retail Hero → https://help.barix.com/retailplayer/retailhero
This section displays a comprehensive list of all devices registered under the organization. For each device, it provides the status of the Retail Hero subscription, allowing users to easily track subscription details. The status can be filtered using the two status filters located above the list, making it convenient to view devices based on their subscription status.
Additionally, the checkbox next to the status filters allows users to activate an option to display devices that are also present in any sub-organizations, ensuring a more comprehensive overview of all devices within the organizational structure.

If a device does not have an active Retail Hero subscription, users can order one by selecting the device and clicking the ![]()
Please follow the instructions provided in the center at the top of the page to complete the ordering process.
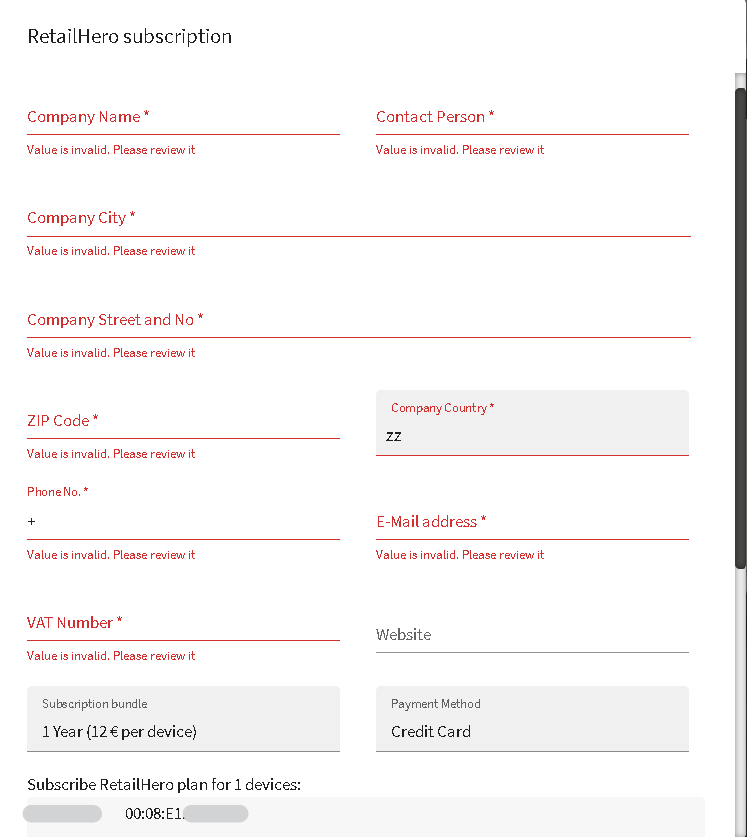
Users management
Users can be created and managed from the corresponding panel accessible from the sidebar menu clicking on "Users".
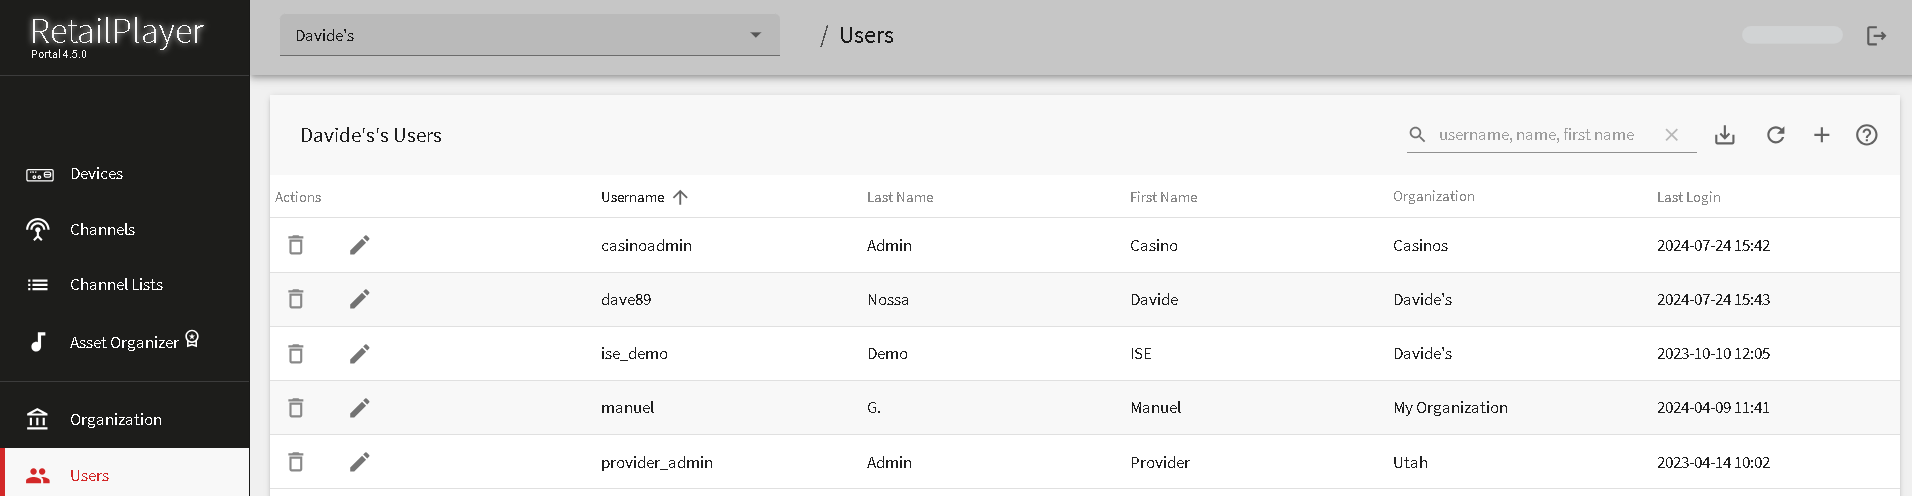
The user list table provides a detailed overview of each user in the portal, displaying important information about their account and activity:
-
USERNAME: The unique identifier or username that the user utilizes to log in to the portal.
-
FIRST NAME: The user's first name.
-
LAST NAME: The user's last name.
-
ORGANIZATION: The organization to which the user is assigned.
-
LAST LOGIN: The most recent date and time when the user accessed the portal.
This table helps administrators quickly identify users and check relevant details, such as their organizational affiliation and recent activity.
Click ![]()
![]()
Add new user
To add a new user, click on the "Add User" button located in the top-right bar of the page. After clicking, you will be prompted to fill out the necessary fields for the new user:
-
Username: A unique identifier for the new user, which will be used to log into the Portal.
-
First Name and Last Name: The user's personal details.
-
Password: Create a password for the user to log in with.
-
Optionally, you can tick the checkbox labeled "Force change password at next login", which will require the user to change their password the first time they log into the Portal for added security.
Once all required information is entered, the new user account will be created and added to the system.
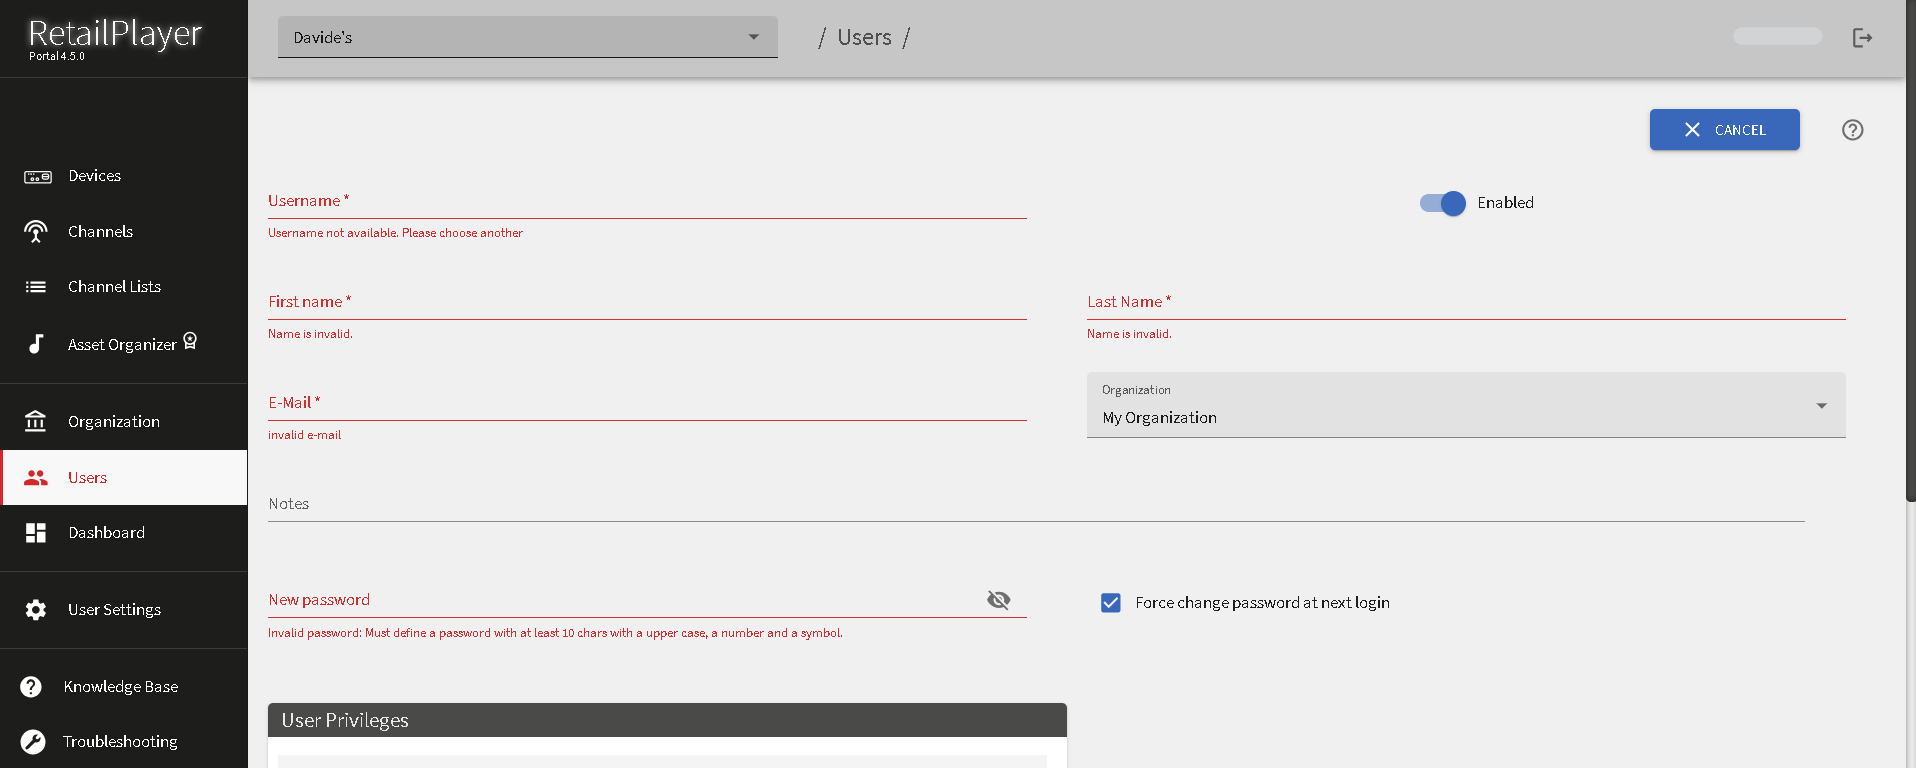
User privileges window
When creating or modifying a user, you will notice the "User privileges" option in the sidebar menu. Click on this option to access the User Privileges Settings.
In this area, you can configure specific permissions for the selected user. These privileges determine what actions the user can perform within the Portal, such as managing devices, creating channels, editing organizational units, or modifying settings.
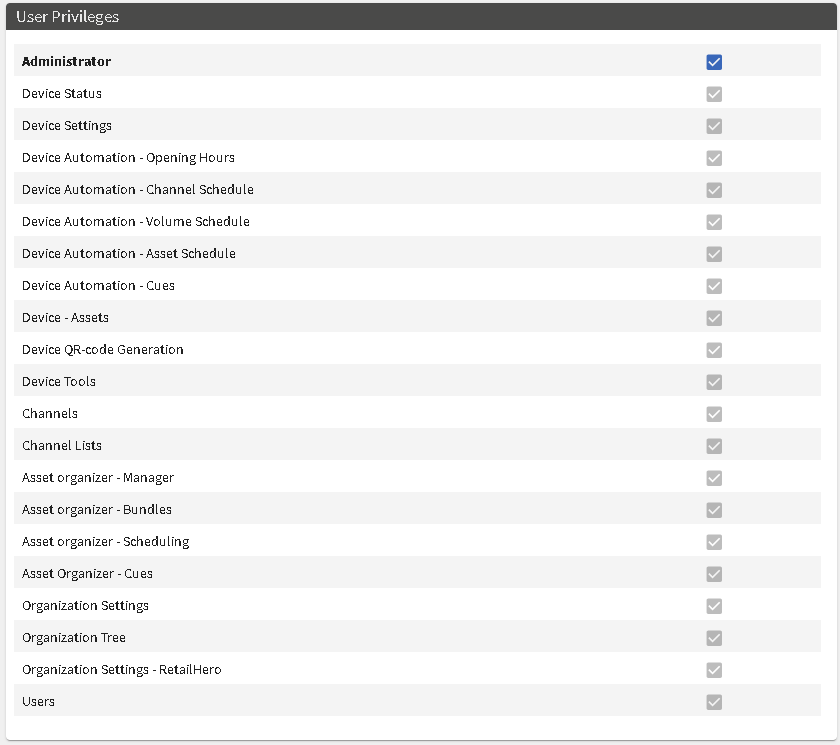
For each user, specific permissions can be assigned to control access and the ability to modify certain platform functions. Additionally, users can be assigned to sub-organizations that are part of the main organization they belong to. This flexible permission system allows for customized roles based on user responsibilities within the organization.
|
Roles panel |
|
|---|---|
|
Administrator |
Granting Administration privilege to a user overrides all other privileges and provides full access to the entire platform. |
|
Device status
|
This privilege allows the user to access the Device Status panel in the device editing section. |
|
Device settings
|
This privilege allows the user to access the Device Settings panel in the device editing section. |
|
Device automation - Opening hours
|
This privilege grants the user access to the Opening Hours section, where they can manage a scheduler divided into 30-minute time cells. |
|
Device automation - Channel scheduler
|
This privilege grants the user can specify which channels from a set channel list the device should play, based on the Opening Hours schedule. |
|
Device automation - Volume scheduler
|
This privilege grants the user access to the Volume Scheduler, enabling them to set different volume percentages for selected devices. |
|
Device automation - Asset scheduler
|
This privilege allows the user to access Asset Components, which are pre-configured assets (such as alert messages, short advertisements, or general notices) displayed in a scheduler similar to the Volume Scheduler. |
|
Device automation - Cue sets
|
This privilege grants the user access to view Cue Sets, which are displayed in a list format. |
|
Device - QR code generation
|
This privilege grants the user access to the Remote Control panel within the device editing section. By enabling this privilege, the user can view and manage remote control settings, including the ability to add QR codes. |
|
Channels
|
This privilege grants the user access to the Channel Menu Item, enabling them to manage channels effectively. |
|
Channel lists
|
This privilege allows the user to access the Channel List menu, enabling them to manage channel lists efficiently. |
|
Asset organizer - Manager
|
This privilege grants the user access to the Asset Organizer, empowering them to manage audio assets effectively. |
|
Asset organizer - Bundles
|
With this privilege, the user gains access to Audio Bundles, which are collections of pre-uploaded audio assets on the portal. |
|
Asset organizer - Scheduling
|
With this privilege, the user can access the Scheduler that enables the programming of "components," which can contain either single audio assets or entire audio bundles. |
|
Asset organizer - Cues
|
With this privilege, the user can create Cue Sets, consisting of up to 10 buttons. |
|
Organization - Settings
|
This privilege grants the user access to the Organization Settings section. |
|
Organization - Tree
|
This privilege allows the user to access the Organization Tree, a hierarchical view of the organization’s structure displayed in a tree format. |
|
Organization settings - RetailHero
|
With this privilege, the user can access the RetailHero section on the organization page, which displays a comprehensive list of all registered devices. |
|
Users
|
This privilege grants the user access to the Users page, empowering them to manage all users within the organization, viewing their parameters such as username, first name, last name, password, and email address. |
ORG UNITS: A newly added user is always assigned to the organization unit of the administrator creating the user. One user can be part of multiple organizations, thus controlling devices, users, channel lists if allowed to do so from the roles panel.
User Settings
By clicking on the gear symbol in the top bar menu, the user settings will be displayed. In this section, you can update your current user information, including:
-
First Name: Modify your first name as needed.
-
Last Name: Update your last name if necessary.
-
Login Password: Change your password to enhance security.
Make sure to save any changes you make to ensure your updated information is retained.
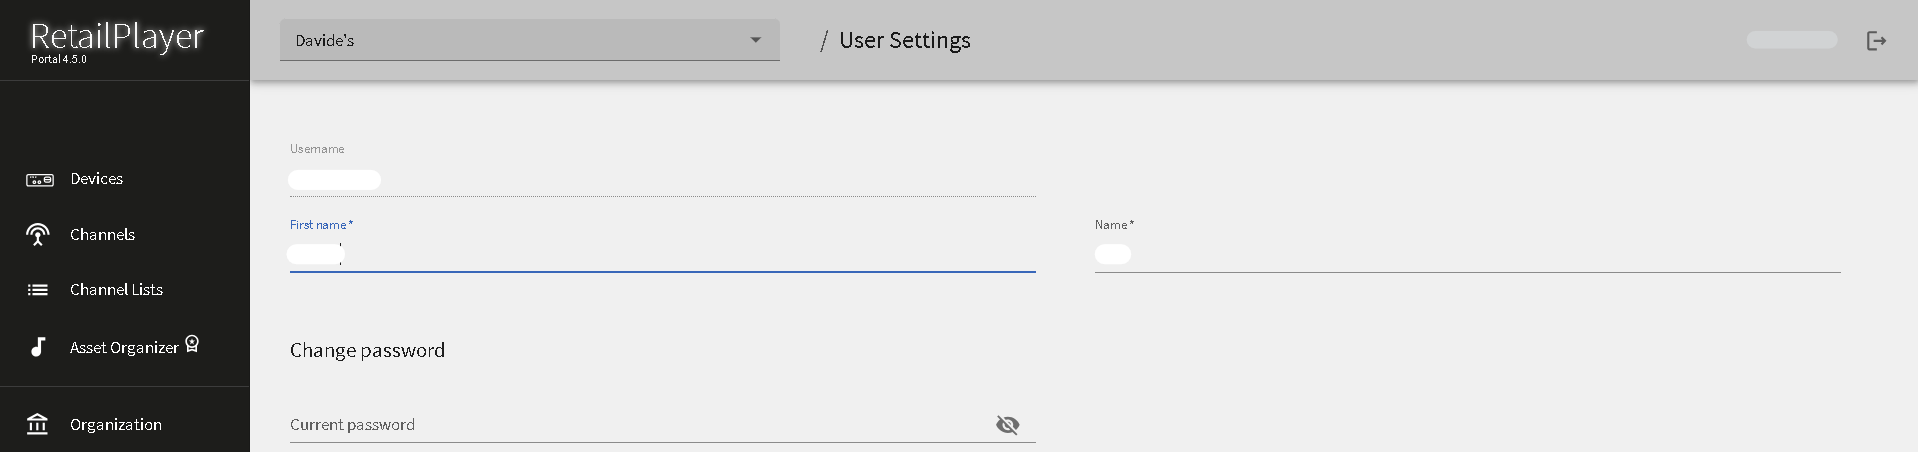
Logout
To log out of the portal, click on the ![]()
RetailPlayer Security Information
Using RetailPlayer in a live environment often raises security concerns beyond just streaming music. Questions such as "Does this device create a security vulnerability?" or "What happens if the device gets hacked?" are common. To address these, we have compiled an overview of the RetailPlayer's security features, ensuring a safe and secure operation of the device in any environment.
Encrypted Communication with client certificates
The communication between the RetailPlayer and the Portal is a key feature of the RetailPlayer solution and must be highly secure. The connection is established using the WebSocket protocol, secured by SSL/TSL encryption, which is considered state-of-the-art technology for encrypted internet communication.
To initialize this secure connection, each player must have a local client certificate issued by Barix. This certificate is installed during firmware updates and ensures the device’s connection is protected against third-party attacks, preventing unauthorized access. Loading different certificates is not possible, and any connection without a valid Barix-issued certificate will be rejected. Only Barix can issue these certificates, guaranteeing the security of the system.
Unique Password for every device
Every Barix device developed after 2019 comes with a unique, randomly generated, and secure password assigned directly by the factory. This ensures that each device is shipped with built-in security, providing a strong layer of protection right from the start.
Latest Linux Based Software
RetailPlayer devices operate on the latest software provided by Barix, ensuring optimal performance and security. The devices use a Linux-based OpenSource Operating System, offering a secure platform for the RetailPlayer solution. Barix regularly provides software updates with each firmware update to maintain the security and functionality of the devices.
Barix firmware and Malware
There are no concerns about malware on a RetailPlayer device. Although it operates like a complete computer system, it cannot download or run malware. The device runs a closed firmware package that only accepts Barix software, with no option for SSH or Shell connections, making it impossible to install third-party software. The sole application running on the device is the RetailPlayer software, and this cannot be changed. Since all external access to the system is blocked, it is impossible for the device to catch viruses or Trojans.
It is highly recommended to change default passwords and use strong, unique passwords for accessing both the RetailPlayer Portal and the web interface on any RetailPlayer device. Ensure your passwords are stored securely in a safe location to prevent unauthorized access.
Compliance and further Information
This equipment has been tested and complies with the limits for a Class B digital device, as per part 15 of the FCC Rules. These limits are in place to offer reasonable protection against harmful interference in residential installations. The device generates, uses, and may emit radio frequency energy, which, if not installed and used properly, may cause interference to radio communications.
While the system is designed to prevent interference, there is no absolute guarantee it won’t occur in specific setups. If you experience interference with radio or TV reception (which you can confirm by turning the equipment off and on), try the following steps:
-
Reposition or relocate the receiving antenna.
-
Increase the distance between the equipment and the receiver.
-
Connect the equipment to a different outlet, preferably on a circuit separate from the receiver.
-
Seek help from the dealer or an experienced radio/TV technician if needed.
For further safety and precaution guidelines, you can download the relevant documentation from http://www.barix.com.

Find your distributor on this list for more hardware.
For questions that are extending the documentation, feel free to contact us on:
International: +41 434 33 22 22
USA: +1 866 815 0866
Email: support@barix.com
All information and the use of this product including all services are covered under the Barix Terms & Conditions and our Privacy Policy. Please follow the Safety and Precaution Recommendations. Barix is a ISO 9001:2015 certified company. All rights reserved. All information is subject to change without notice. All mentioned trademarks belong to their respective owners and are used for reference only.