Introduction
The aim of this document is to guide the user through the functionalities of the Paging Gateway M400 application.
Package Content
-
M400 device
-
Audio cable with RCA connectors
-
Power Supply Unit (depends on the PN purchased)
-
Quick Install Guide
What is IP Paging Gateway M400?
The Paging Gateway M400 is an audio over IP decoder with a line-level output on headphone and stereo RCA connections.
The Barix Paging Gateway, running on M400 device, is a flexible application that allows to page and send pre-recorded messages from mobile phones and from any computer or tablet on the network. It easily integrates with most existing analog paging systems (through analog output) and with Barix IC Paging application.
The web app provides a simple to use interface that allows paging into any paging system, even fully analog ones (no application needs to be installed).
Access protection makes sure only persons allowed to page can use the system.
The Paging Gateway M400 can also be used as a zone-based paging station. The user selects the zones he/she wants to page to and the fully IP based IC Paging solution routes the paging to the right speakers or zone amplifiers.
With Paging Gateway M400 you can:
-
send paging and pre-recorded messages through WEB APP to the analog output
-
send paging and pre-recorded messages through WEB APP to a Barix IC Paging system
-
record / play / send live messages
-
administer users
Installation
STEP 1 Connect the Audio Equipment
The Paging Gateway M400 provides an unbalanced line level output (nominal at 0dBu), to be connected to a mixer, a DSP, an amplifier, etc.
STEP 2 Connect the network
Connect your Paging Gateway M400 to the network using a standard Ethernet cable (CAT5e or better).
STEP 3 Connect the power supply
Plug the power chord into the power connector on the back panel of the device. The device will boot:
-
Right after power-up both status LEDs are red (boot in process).
-
15s after power-up → Device announces its IP Address (take note to be able to enter the web interface later) → Left LED turns from red to green.
-
35s after power up → Application is ready → Right LED turns from red to green.
Paging Gateway M400 is ready to be configured.
Retrieve the IP address using the Sonic IP® function
Paging Gateway, by default, is configured to be a DHCP client, it acquires an IP address from a DHCP server reachable in the network.
All Barix devices are equipped with a function called “Sonic IP®”, meaning that when you boot the device and this is connected to a network where a DHCP server is present, the device will acquire an IP address and announce it over its audio output. This function is useful when you connect to the device for the first time and need to access its web interface for performing the first configuration.
IMPORTANT: Before connecting to the amplification system, make sure the volume of your system is lowered at minimum or completely switched off to avoid potential damage to the system.
Follow the below steps to take advantage of the SonicIP® function:
-
Connect the audio output to the receiving system, this varies depending on the compatible device being used .
-
Make sure the receiving system works fine so that when the compatible device boots you are able to hear the IP Address.
-
Power up the device.
-
After 20s listen to the Sonic IP® announced and note it somewhere.
-
After 35s the device is ready.
Retrieve the IP address using the Discovery Tool
Other than the Sonic IP® function, there are other ways to find out a Barix device’s IP address. One is by using the Discovery Tool from Barix.
The Discovery Tool is freely available for download from help.barix.com .
The Discovery Tool is distributed in a Java Archive (.jar) file. On most operating systems you can run the Discovery Tool by simply double-clicking on the discover.jar file. When the discovery tools open it will show the following interface.
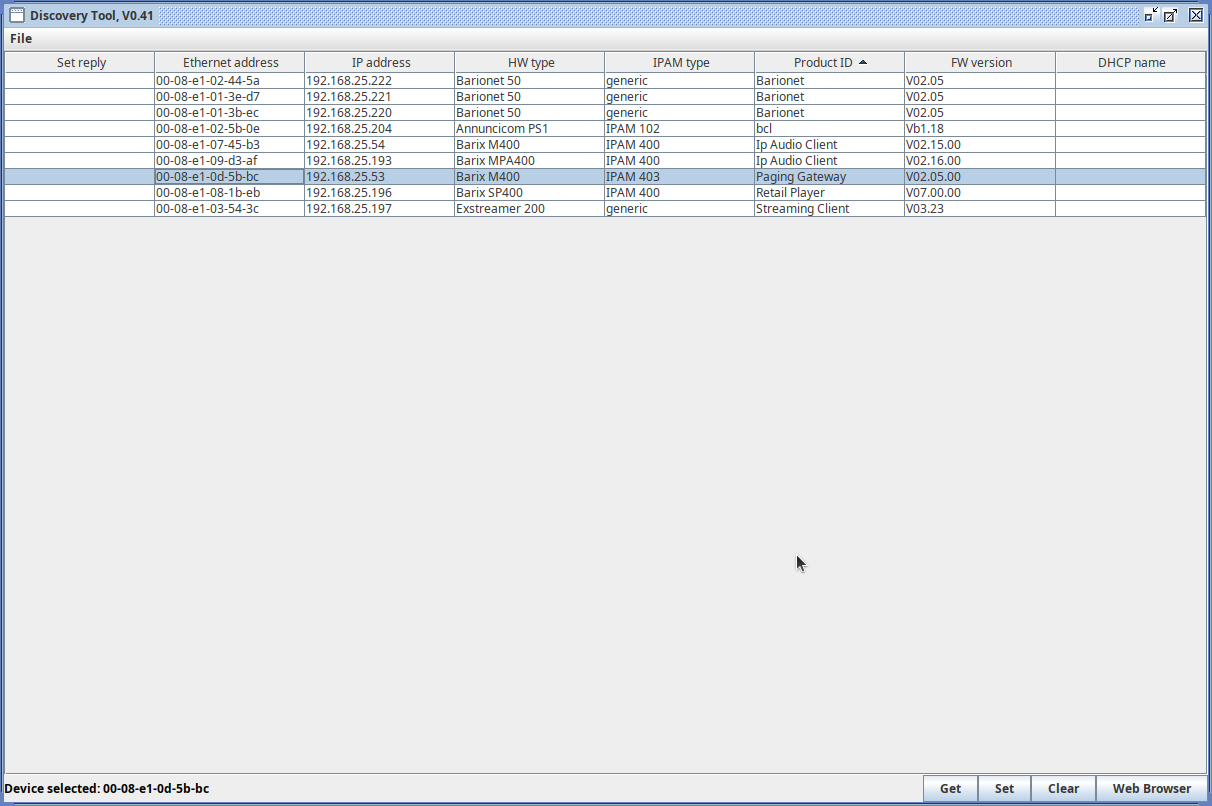
Click the "Get" button to initiate a search. The program will scan the network and list all the Barix devices found with its current IP address, MAC address (labeled "Ethernet Address" in the Discovery Tool), firmware version, and other information. The Discovery Tool will find any device that is on the same network as the computer running the tool, regardless of their current IP address setting. The tool will not search through a router to another subnet. Use the address that appears in the Discovery Tool to access the compatible device via a web browser.
Setting a static IP Address using the Discovery Tool
-
In the discovery tool window double click the IP Address field of the device which you want to change to the Static IP Address.
-
Enter the IP address you want to assign.
-
Click SET in the lower right corner - the tool will reply with a “No error” in the “Set reply” column.
-
Reboot your device and access the web interface through the newly assigned IP Address. Make sure to finalize the network settings configuration (Subnet, Gateway, DNS), otherwise the device might not work correctly.
General Settings
With the IP address of the device it's possible to connect to the web interface served by the the Paging Gateway application.
Open a web browser and type the IP address of the device in the URL field.
When the web protocol is set in HTTPS, the communication between the browser and the device is encrypted. The application uses a self-signed certificate for the SSL/TLS authentication, not one from a CA (Certificate Authority) considered safe from web browsers.
For this reason when using HTTPS the browser will warn that the certificate used is not a trusted one (NET::ERR_CERT_AUTHORITY_INVALID). To continue and open the web interface it is necessary to advance manually, “forcing” the browser to trust the self signed certificate. The connection and data communication will be fully encrypted.
When the web protocol is set in HTTP only messages playing support is available (no paging).
Default Password
By default new devices or devices that are accessed after a reset to defaults (soft or hard) will ask for credentials to login:
user: admin
password: printed on the back-side of the device
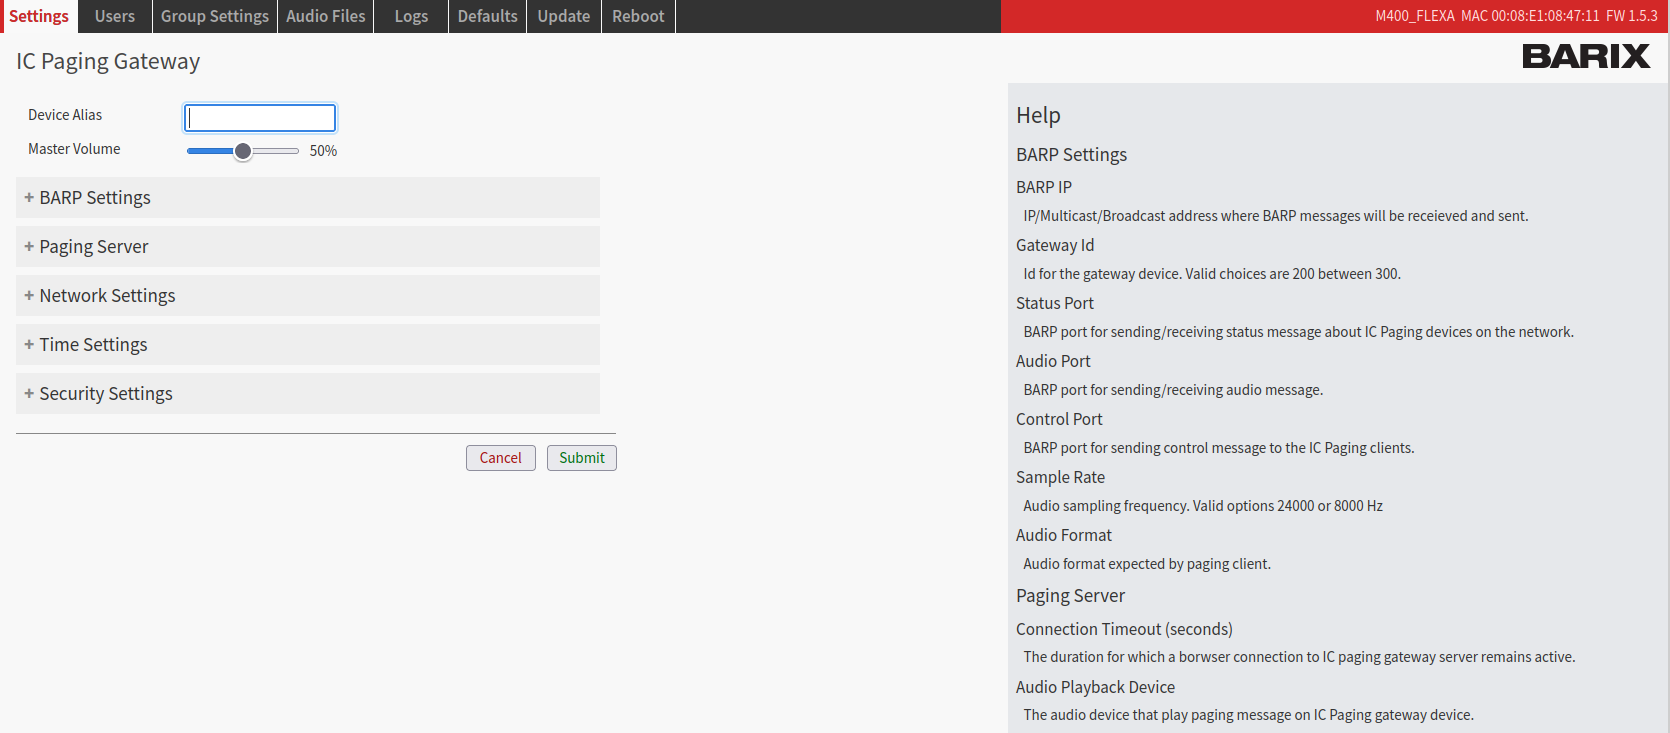
The settings page is where are available the BARP settings, network settings, time settings, security settings of the application.
The window is organized in:
-
The top navigation bar. In addition on the top right corner there are the MAC address and current firmware installed on the device.
-
The operational area, where the user input values and set parameters.
-
The help section on the left side of the window.
Main application controls
|
Item |
Description |
|---|---|
|
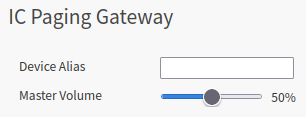
Name |
In the top bar it is visualized the name of the Firmware and the "Device Alias". |
|
Device Alias |
A custom name that can be assigned to the device. Default value is: "icpgw" |
|
Master Volume |
The main output volume (analog output) of the device. From 0% to 100%. Default value is: 50% |
Network Settings
In this area, it's possible to configure the device’s network interface and few other functions.
Paging Gateway, like all other Barix products, supports the Dynamic Host Configuration Protocol (DHCP), which allows the device to acquire an IP address available from a pool of addresses hosted by a DHCP server. It is the server that offers an IP address to the device when discovered on the network. The IP address offered by a DHCP server comes with a lease time, meaning that when the leased time is over the DHCP server re-issues the IP addresses to the devices on the network, with the possibility that it might assign a different address than the one assigned previously. In addition, the DHCP server provides all associated information to the requesting device, such as subnet, gateway, and DNS addresses.
|
Item |
Description |
|---|---|
|
Avahi Announce |
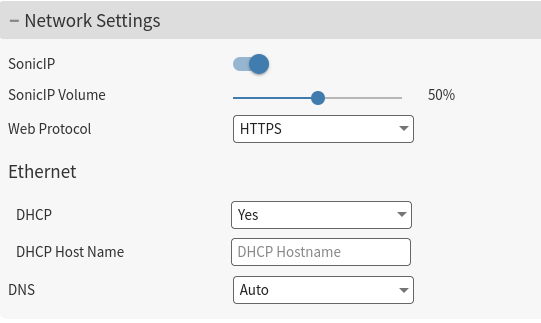
This enables / disables the Avahi service, which is the network discovery daemon based on mDNS / DNS-SD used to discover the device in the network. When enabled the device sends a query packet on the network at the Multicast IP address: 224.0.0.51 on port 5353 as defined by the mDNS protocol. The interval at which these query packets are sent doubles as time passes and no other devices are found in the network. Default: Yes |
|
Sonic IP / Sonic IP Volume |
Enable / Disable the Sonic IP function so the device announces its IP Address during boot time. Set the volume of the SonicIP with the corresponding slide. Default: Yes |
|
Web Protocol |
Changes the web communication protocol used.
In HTTP mode only messages support is available (no paging). After changing the protocol make sure to reload the page with the proper URL “http://” or “https://” |
|
DHCP |
Set the DHCP (Yes) or Static IP addressing mode (No). Default: DHCP |
|
DHCP Hostname Only available in DHCP Mode |
Provides the DHCP with an hostname to easily identify the device in the DHCP list of leased IP addresses. Default: " " |
|
Static IP mode
|
IP Address It is the fixed IP address of the Paging Gateway M400 device. The IP address is the unique identifier of a device on a network, in case of static assignment make sure that no other device on the same network has the same IP address assigned to the Paging Gateway M400. |
|
Netmask In addition to the IP address, it is mandatory to provide information about the subnet mask. The subnet mask indicates which bits in the IP address are used for the network portion and which bits for the host portion. It is common in Class C LAN to see 255.255.255.0, this configuration indicates that the first 3 octets of the IP address (e.g. 192.168.1.100) are dedicated to the network identification, while the last octet (e.g. 192.168.1.100) is dedicated to the host identification on the network. |
|
|
Gateway IP Address The Gateway IP is the address of the device that bridges your Local Area Network with the Internet or others LANs. Typically is a router where devices on a LAN are connected. If you are not sure about the Gateway address in your network contact your network administrator |
|
|
DNS Auto |
Automatic Domain Name System resolution. If set in Auto the DHCP server will provide the address of a DNS server to contact for the IP name resolution process. |
|
DNS Manual |
If DNS is set to Manual the device expects the Primary and Alternative DNS server fields to be filled with the related information. When Ethernet IP method is set to Static, DNS will always be set Manual and it is mandatory to provide the address information. |
|
Primary DNS and Alternative DNS |
This address is for the Domain Name Server. It tells the Paging Gateway M400 which DNS server to contact to resolve domain names into IP addresses. I.e the address of NTP time server (see below) has to be translated into an IP address, this is the job of the DNS server. The alternative DNS is a backup resolution in case the primary DNS server is down. The alternative DNS is not a mandatory field. If you are not sure about the DNS Server address to be used, contact your network administrator. |
Time Settings
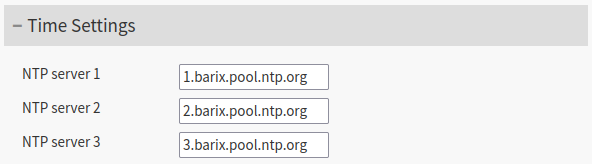
It's important that the Paging Gateway M400 device operates running the correct date and time. Paging Gateway M400 uses an NTP daemon to set its system time. The NTP protocol is used on the standard port 123. The time set by NTP is in UTC.
On the web interface, the time settings allow the user to change the default NTP pools used by the device. This is because in some situations, customers might be using their internal NTP servers, or they simply prefer to use others. The fields accept either a domain name (which requires a valid connection to the DNS to be able to associate an IP Address to the domain name) or an IP Address. It's possible to check the system time in the Status page of the device.
NTP sends packets once every 4mins to the same NTP server to check for clock updates. By leaving the configuration fields empty it's possible to disable the NTP function.
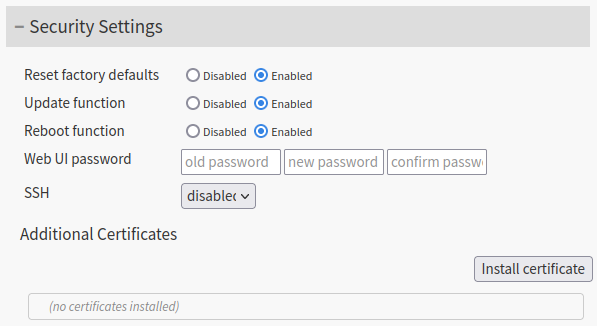
Security Settings
This area is dedicated to secure the login to the device web interface and to enable or disable the possibility to run critical operations: reboot, reset to factory defaults and update.
|
Item |
Description |
|---|---|
|
Reboot Function |
Enable or disable the reboot function of the device from the web UI. Default: Enabled |
|
Reset Factory Defaults |
Enable or disable the possibility to reset the device to factory default from the web UI. Default: Enabled |
|
Update Function |
Enable or disable the possibility to update the device from the web UI. Default: Enabled |
|
Web UI Password |
Set the password to access the web interface of the device. If a password is already set another field is displayed: OLD PASSWORD, which is required to modify the current password. Default username: admin (it cannot be changed) Default password: printed on the backside of the device |
|
Additional Certificates |
Allows the possibility to upload custom .crt certificates to the device. Useful when the device is used in private enterprise networks where a private CA is in place to validate secure connections. Default: None |
SUBMIT
By clicking on the button SUBMIT all the changes made in the SETTINGS page are applied in the configuration.
By clicking on CANCEL all the changes are not applied and the fields return to their previous inserted value.
Application Settings
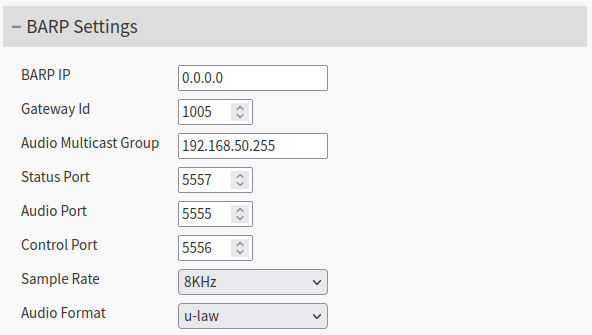
BARP Settings
On BARP settings section you can configure the parameters to have Paging Gateway working as IC Client Master on a Barix IC Paging system (see IC Paging User Guide https://help.barix.com/pstouch/IC-Paging-User-Guide.7696879255.html).
|
Item |
Description |
|---|---|
|
BARP IP
|
IP/Multicast/Broadcast address where BARP messages will be received and sent. Default: 0.0.0.0 |
|
Gateway Id |
Id for the gateway device. Valid choices are 200 between 300. Default: 1005 |
|
Audio Multicast Group |
IP/Multicast/Broadcast address where audio stream will be sent. Default: 0.0.0.0 |
|
Status Port
|
BARP port for sending/receiving status messages to/from IC Paging devices on the network. Default: 5557 |
|
Audio Port
|
BARP port for sending audio stream. Default: 5555 |
|
Control Port |
BARP port for sending control messages to the IC Paging clients. Default: 5556 |
|
Sample Rate |
Audio sampling frequency. Valid options 24 KHz or 8 KHz. Default: 8 Khz |
|
Audio Format |
Audio format expected by paging client: G.711 uLaw / aLaw. Default: uLaw |
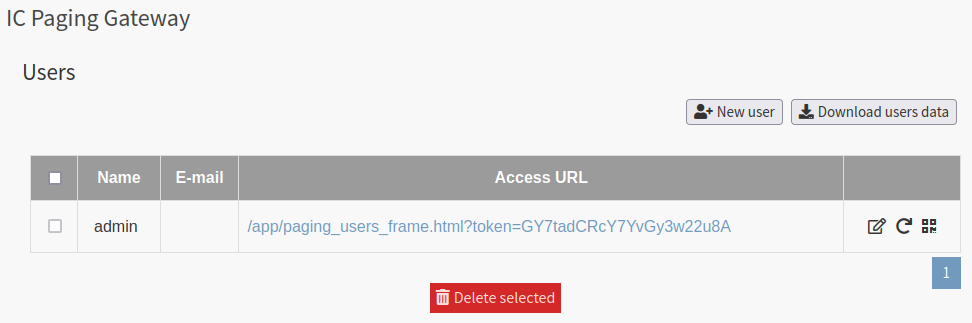
Users
On the Users page you can define and manage the users that are enabled to send paging.
The Access URL is generated by the application; it can also be printed as QR Code and a list of the Users can be downloaded as csv file.
You can click on the Access URL to open the Paging page and send your message (see Paging section below).
|
Item |
Description |
|---|---|
|
|
Download users data You can download here the users.csv file containing the list of users (with user data and Access URL). |
|
|
New user / Edit user Write here Name and Email of the user. |
|
|
Generate new Access URL Click here to generate a new Access URL. |
|
|
Check QR code Click here to open a picture with the Access URL with QR code. You have also the option do download it as pdf file. |
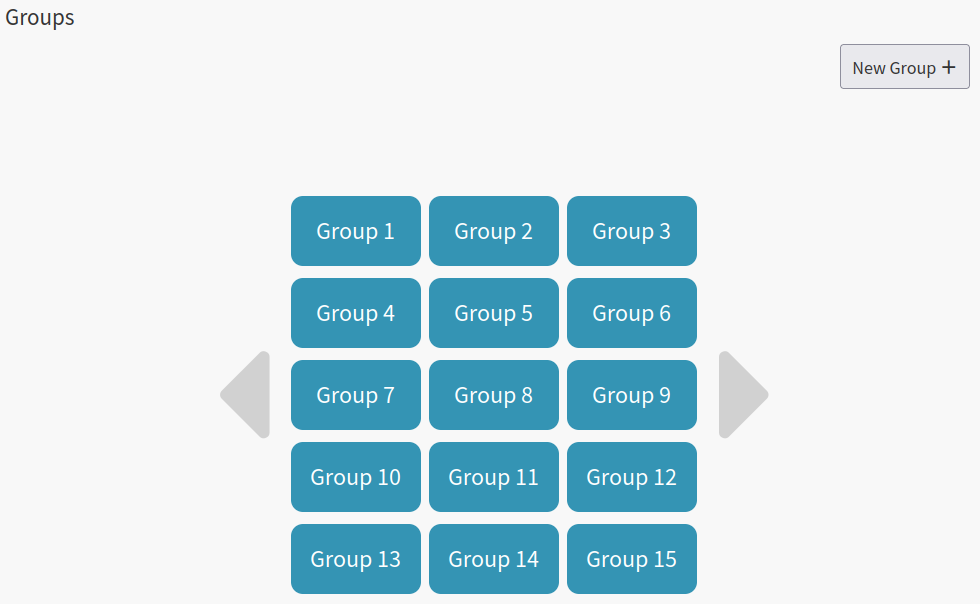
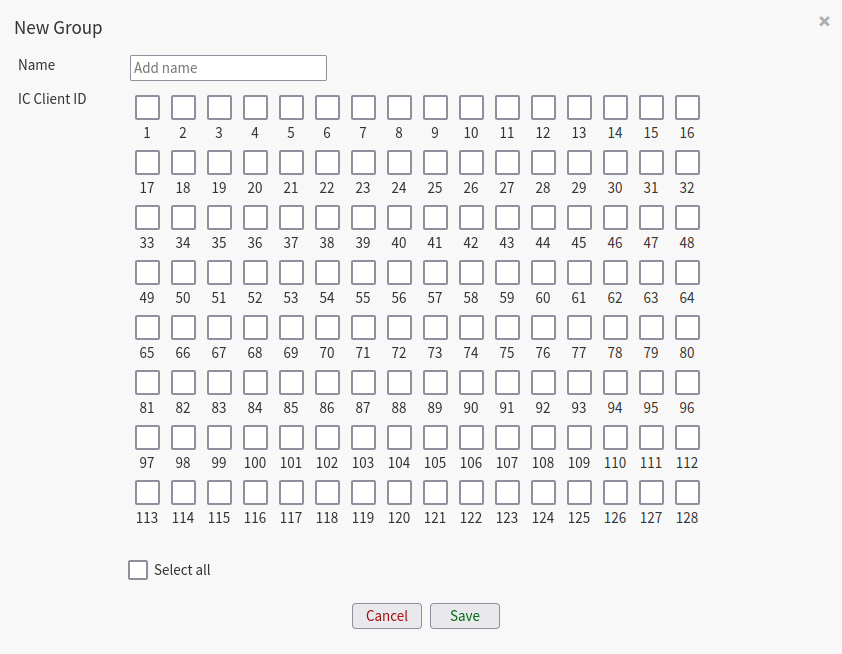
Group Settings
On Group Setting page you can create/delete/edit the paging Group of IC Paging application, assigning the Groups name and IC Paging Clients (Device ID), for a maximum of 128 groups.
Click on the group to edit/delete or on New Group + to create a new one.
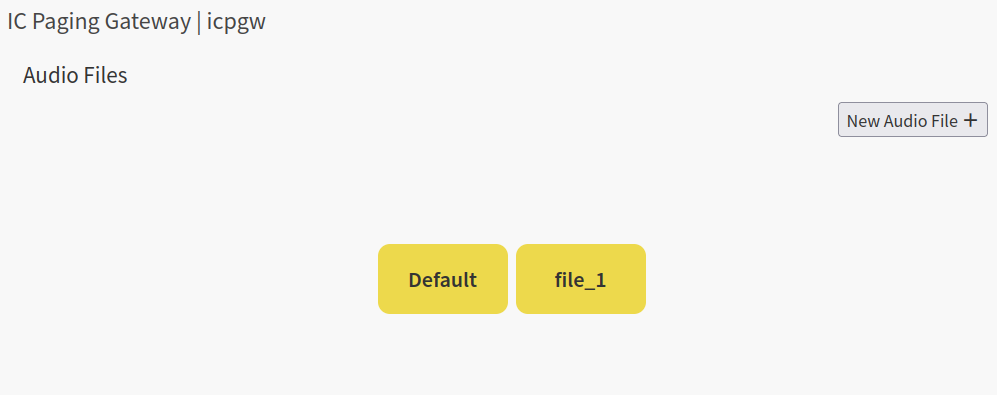
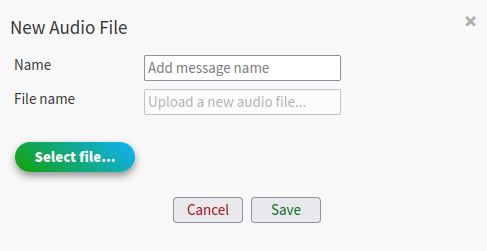
Audio Files
On Audio Files page you can add/delete/edit the audio files that you want to send as pre-recorded messages, also adding a name.
The file must be in mp3 format with a maximum size of 10MB.
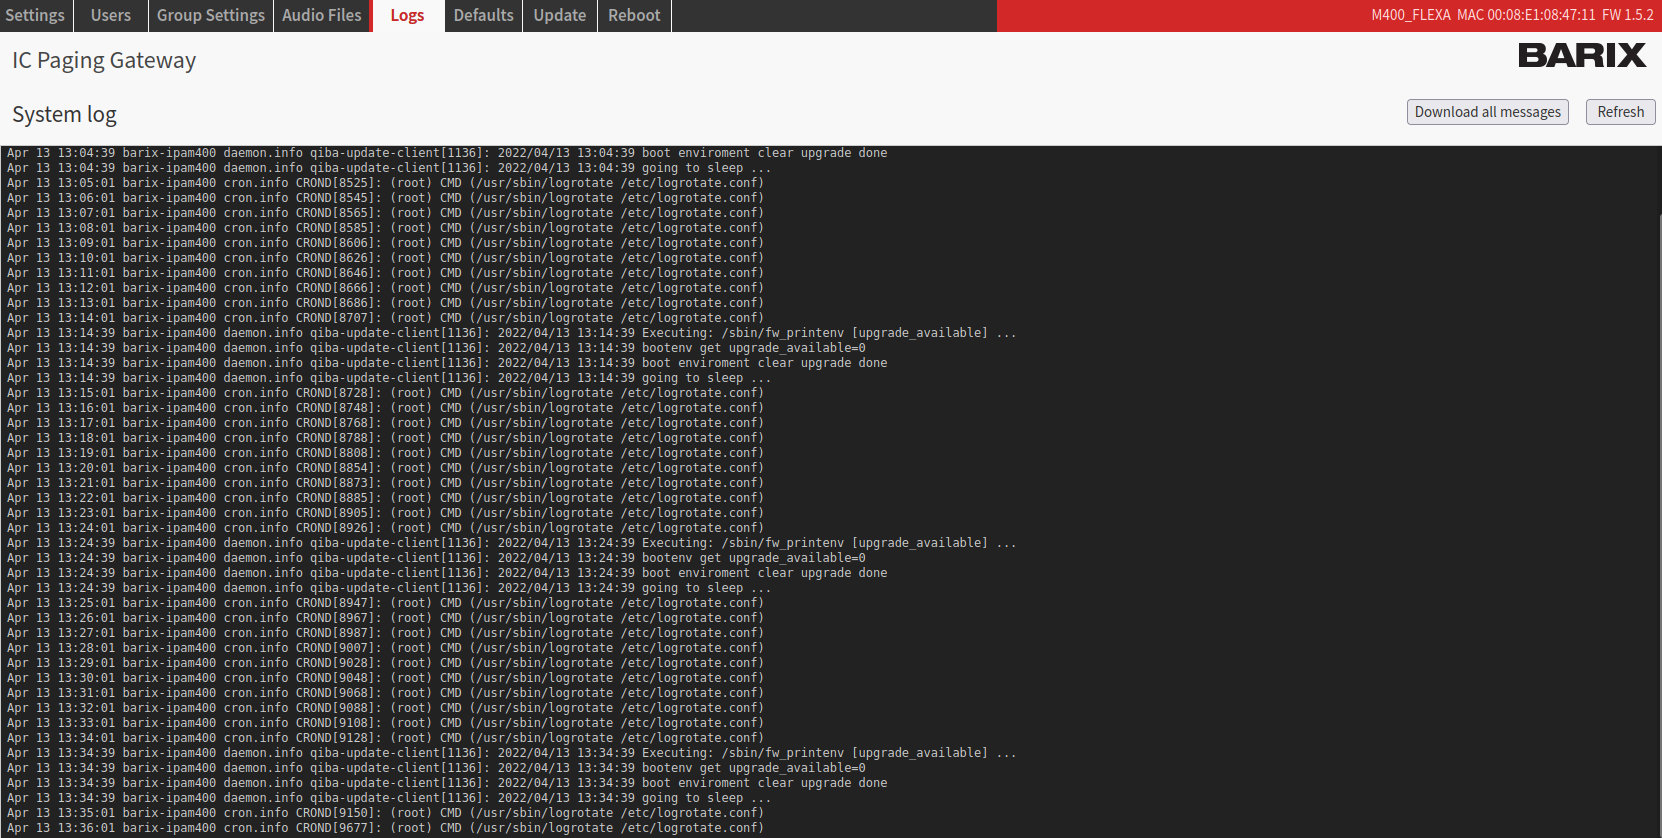
Logs
The Logs page displays the events occurring operation of the Paging Gateway device. Logs are useful for debugging issues, they give a detailed insight into every process within the OS. On the top-right corner it's possible to click the button “Download all messages” to download all log files.
When contacting the Barix support for an issue, it's useful to attach along with the communication the Log files downloaded and the status page screenshot. Do not forget to give a description as much detailed as possible about the steps made that led to the issue.
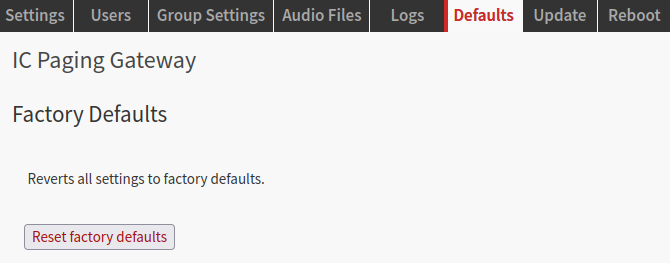
Defaults Page
Reset to factory defaults - Soft reset
The defaults page allows performing a soft-reset. Such operation reverts all settings except the network settings back to factory defaults (it doesn't perform a firmware downgrade, just a reset of the settings for the running application). The reset to factory defaults can be enabled or disabled from the settings page, under "Security Settings".
Reset to factory defaults – Hard reset
It is also possible to perform a hard reset. A hard reset will revert all settings to factory defaults including the network settings.
To perform a hard reset locate the reset button on the front panel of the Paging Gateway M400 device and keep it pressed for approximately 10 seconds using a sharp-pointed tool. The status led will blink green 3 times, informing that the reset operation is started. After a few seconds, the device will reboot with factory defaults. Reload the page after the operation is completed.
Rescue Image Process
In some occasions it's possible that the application faces some issues that cannot be restored with a hard reset to default. In this situation a rescue image process might solve.
-
If your Paging Gateway device is powered, shut it off.
-
Make sure the device is connected to Internet. For this process to work the device will attempt a connection to Barix Download server via HTTP (port 80); if successful it will download the rescue image from this server.
-
While the device is off, press the reset button.
-
Keep the button pressed while powering up the device
-
Keep the button pressed in for 34 seconds after the device is powered, then release.
-
When the rescue process starts the led blinks orange.
-
The device restarts and the LED will blink orange indicating a FW update/downgrade process is in progress.
-
When the LED will turn green (blinking or steady), reboot the device.
After this process the device will run the firmware image fetched from the download server, which normally corresponds to the last one released.
Update
Paging Gateway M400 offers the possibility to update the firmware of the device from this page.
Run always the latest firmware available from Barix as it might include bug fixes, improvements or new useful features. Check the latest firmware available from help.barix.com.
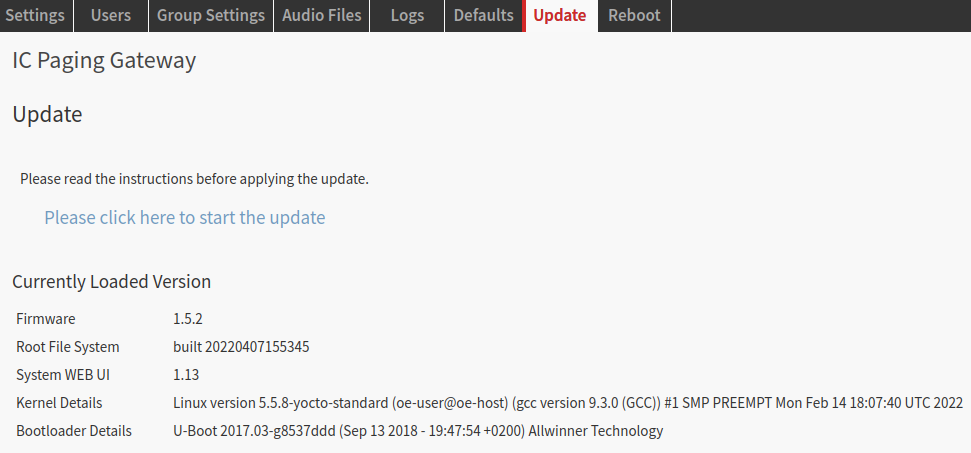
In the same page it’s possible to visualize the current firmware version running.
Update the firmware
|
1 |
Download the firmware from help.barix.com. The firmware is a .tar archive (e.g. update-core-image-barix-icpgw-2.0.2.tar). |
|
2 |
In the Update page click on “Please click here to start the update”, the system update page is accessed. 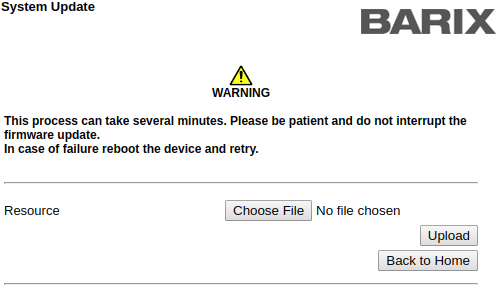
|
|
3 |
Click on “Choose File”, locate and select the corresponding TAR archive just downloaded. |
|
4 |
Click on “Upload”. A processing bar will show up indicating the upload process completion. Wait until the process is finished (don't disconnect the power supply during this operation). 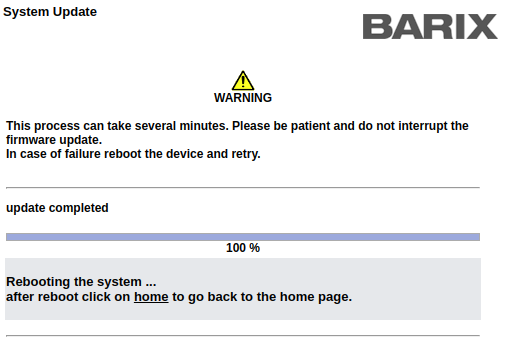
|
|
5 |
Once the upload is complete the device will reboot automatically. Wait ~2 mins and reload the page or click the home link to go back to the home page. If necessary, after the update, perform a hard reset of your browser to empty the cache and hard reload. (How to empty cache and hard reload). |
Reboot
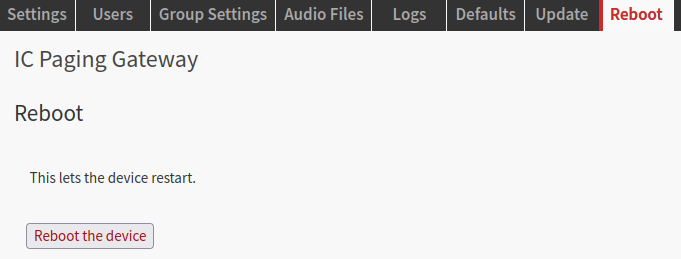
The reboot is the process of power cycling the device (ON → OFF → ON). It’s a complete power cycle. The reboot can be performed from the web user interface or from the reset button located on the front panel of the device.
Reboot - web interface
Click "Reboot the device" to restart the device. While restarting a screen showing a countdown of 10 seconds appears. At the end of the countdown wait approximately 20 seconds and then reload the web page or click on the text shown “click here to return to the home page”.
Reboot - button
The reboot of the device from the button is performed by pressing the Reset button located on the front panel of the Paging Gateway M400 device for ~3 seconds.
A long press of this button (10 seconds) will reset the device to factory defaults.
Paging
|
1 |
With a PC/mobile in the same network subnet of the device you can open the Paging page from Users page (Access URL) or using the Access URL provided by the QR code. |
|
2 |
The Paging page is opened. IMPORTANT: The browser asks to permit the microphone use; select the proper audio device. 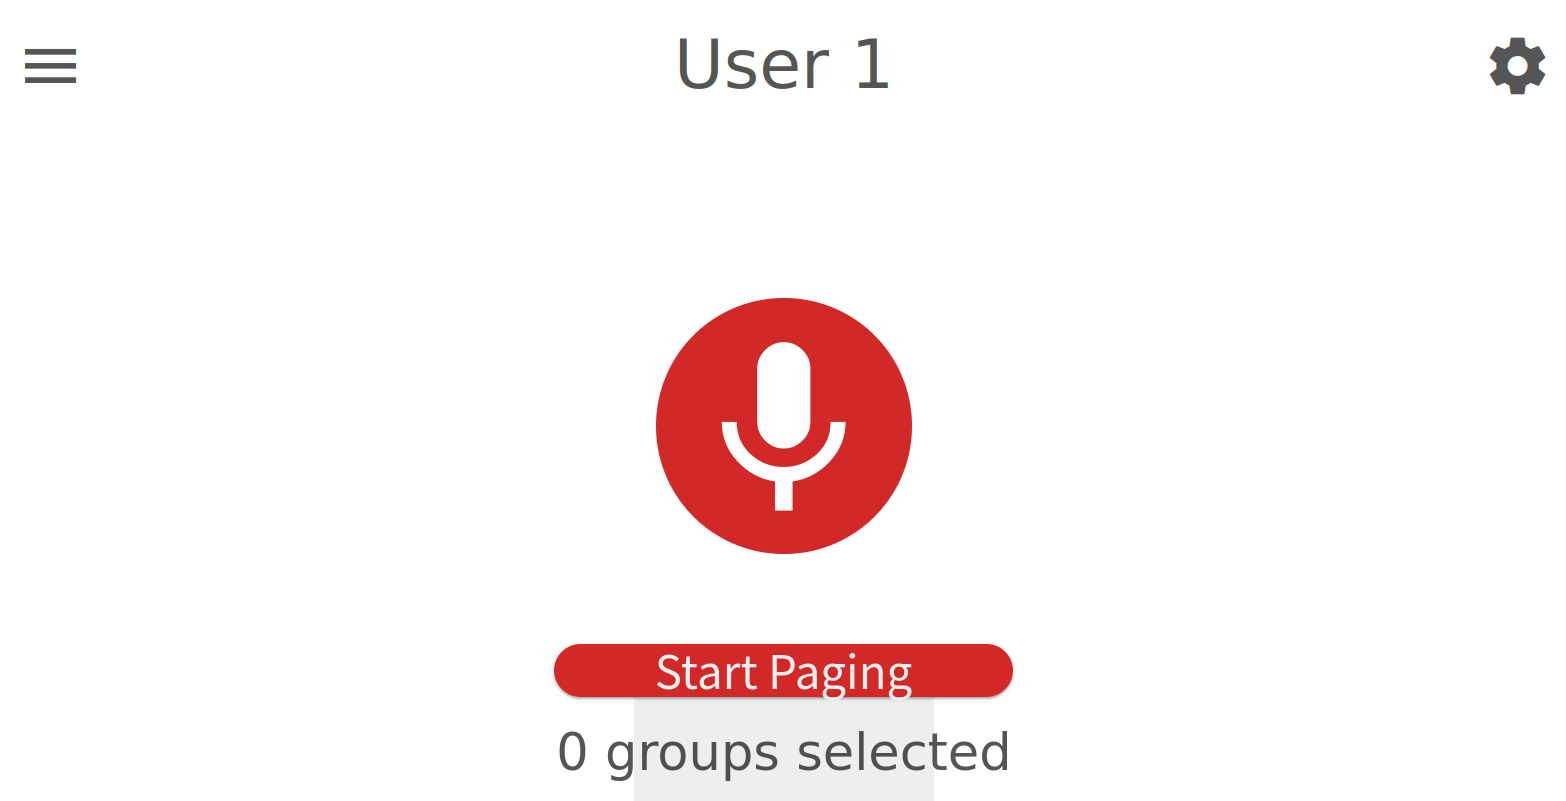
|
|
3 |
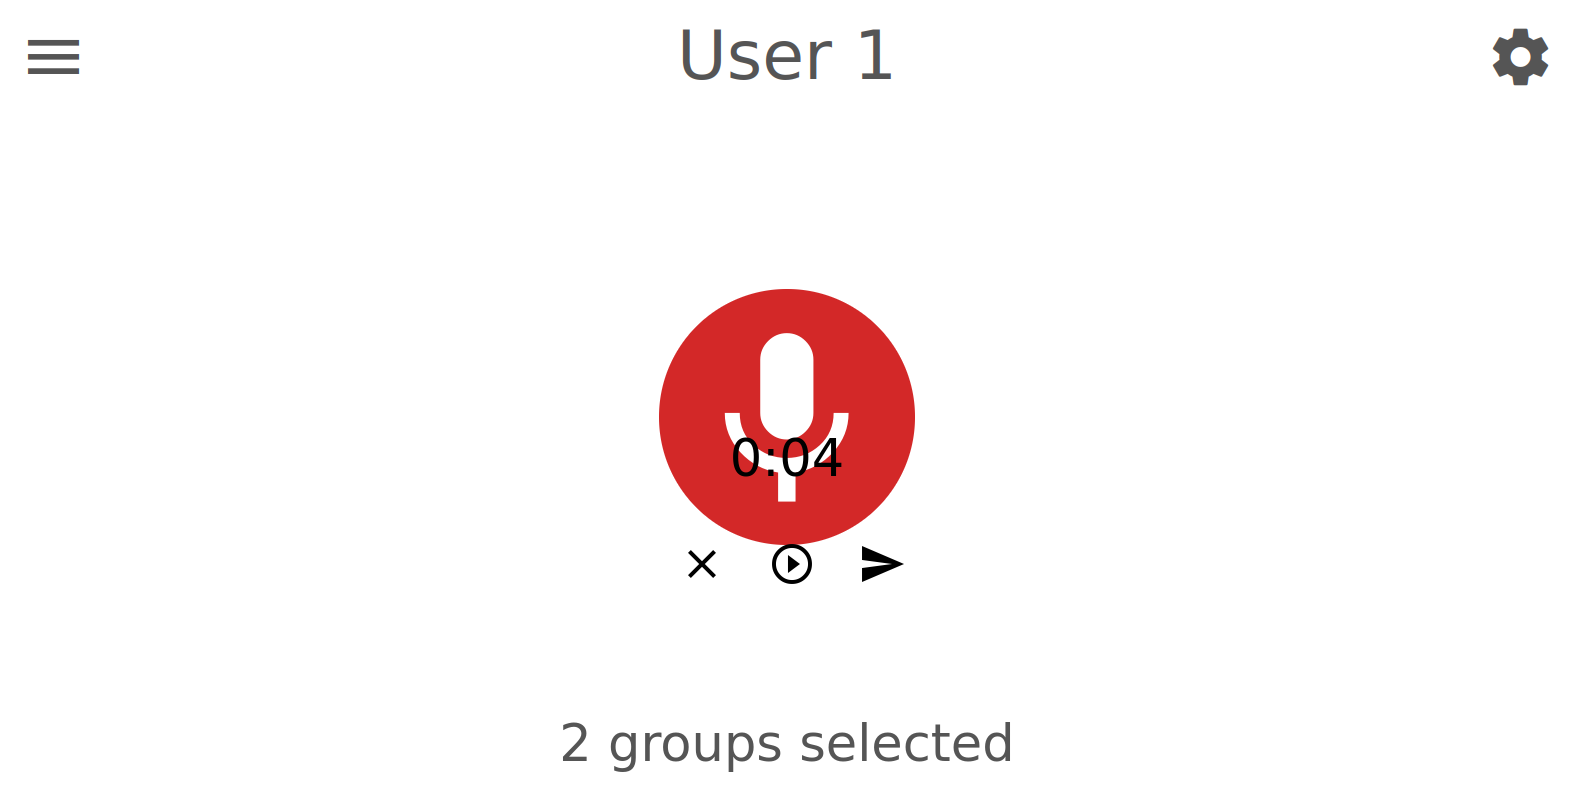
Click on top left Menu icon and select Paging Groups. 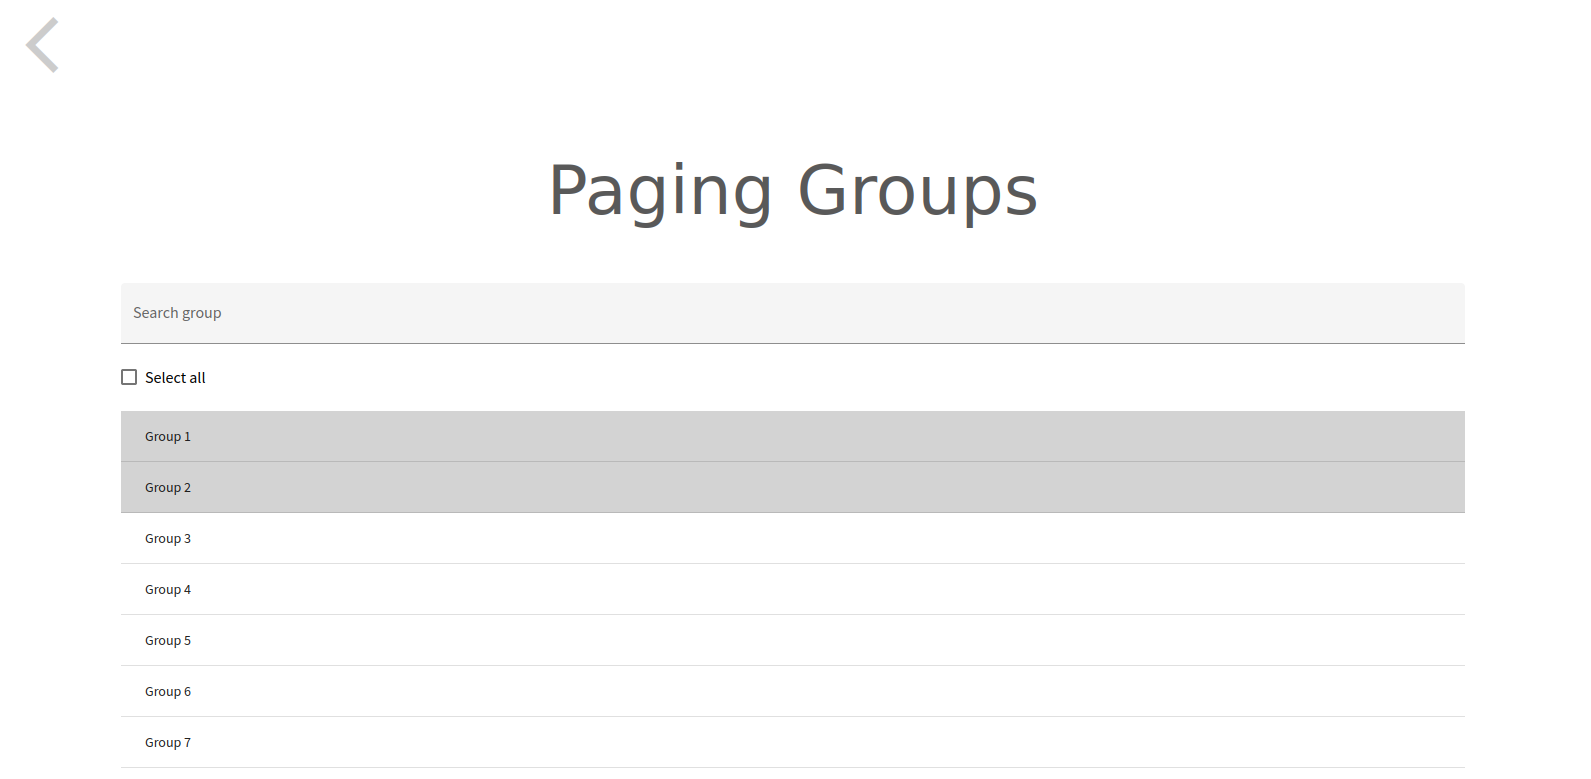
Select one Group / several Groups / All, then click on the back arrow (<) two times to go back to the Paging page. Click START PAGING and speak; you see the VU-Meter moving and you have your audio played on the analog output (headphone and RCA connectors) and on the IC Paging Client belonging to corresponding groups. 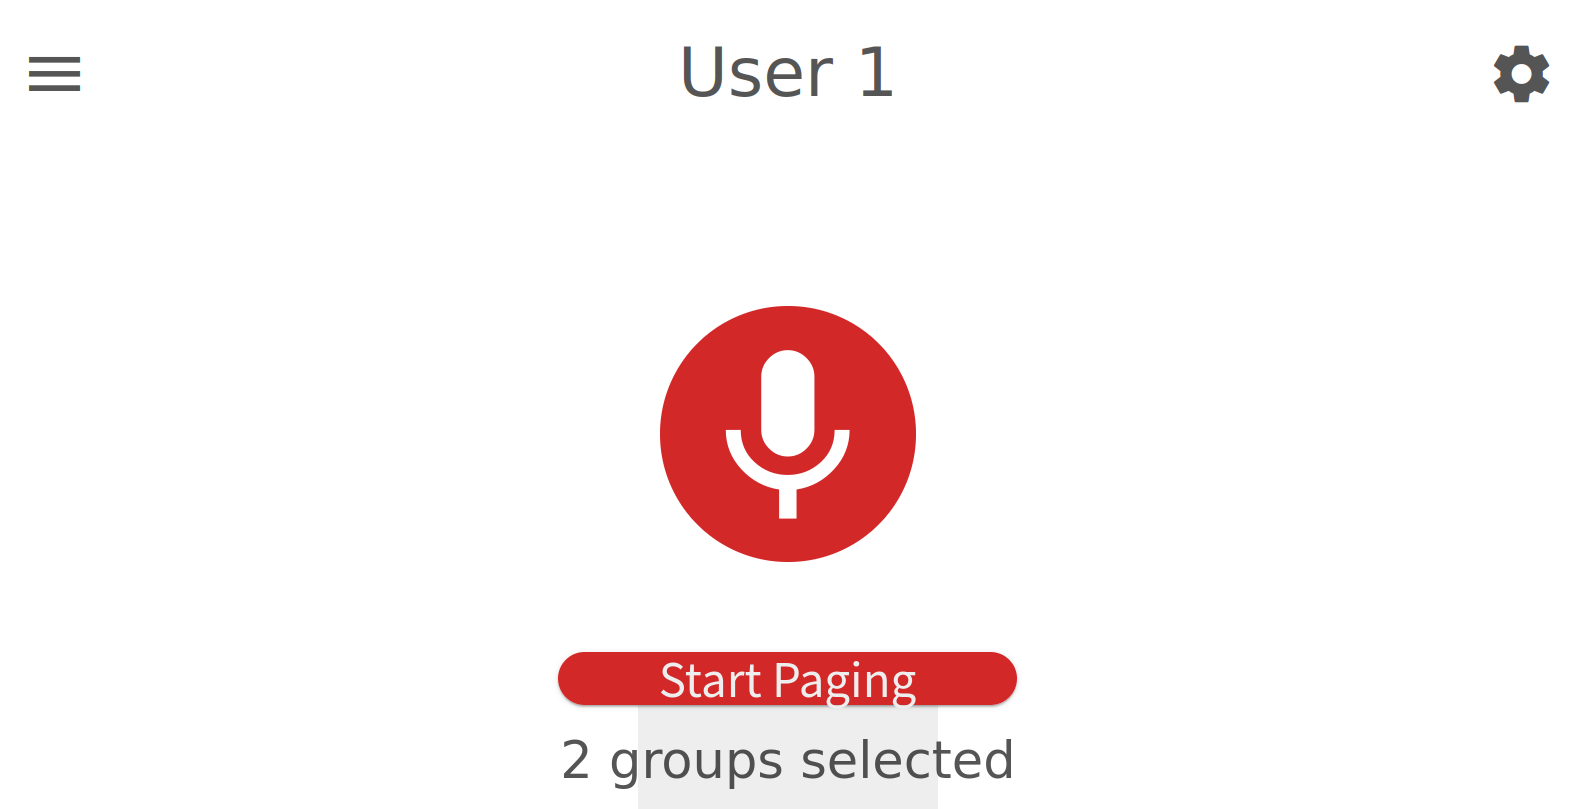
Click STOP PAGING to stop paging. 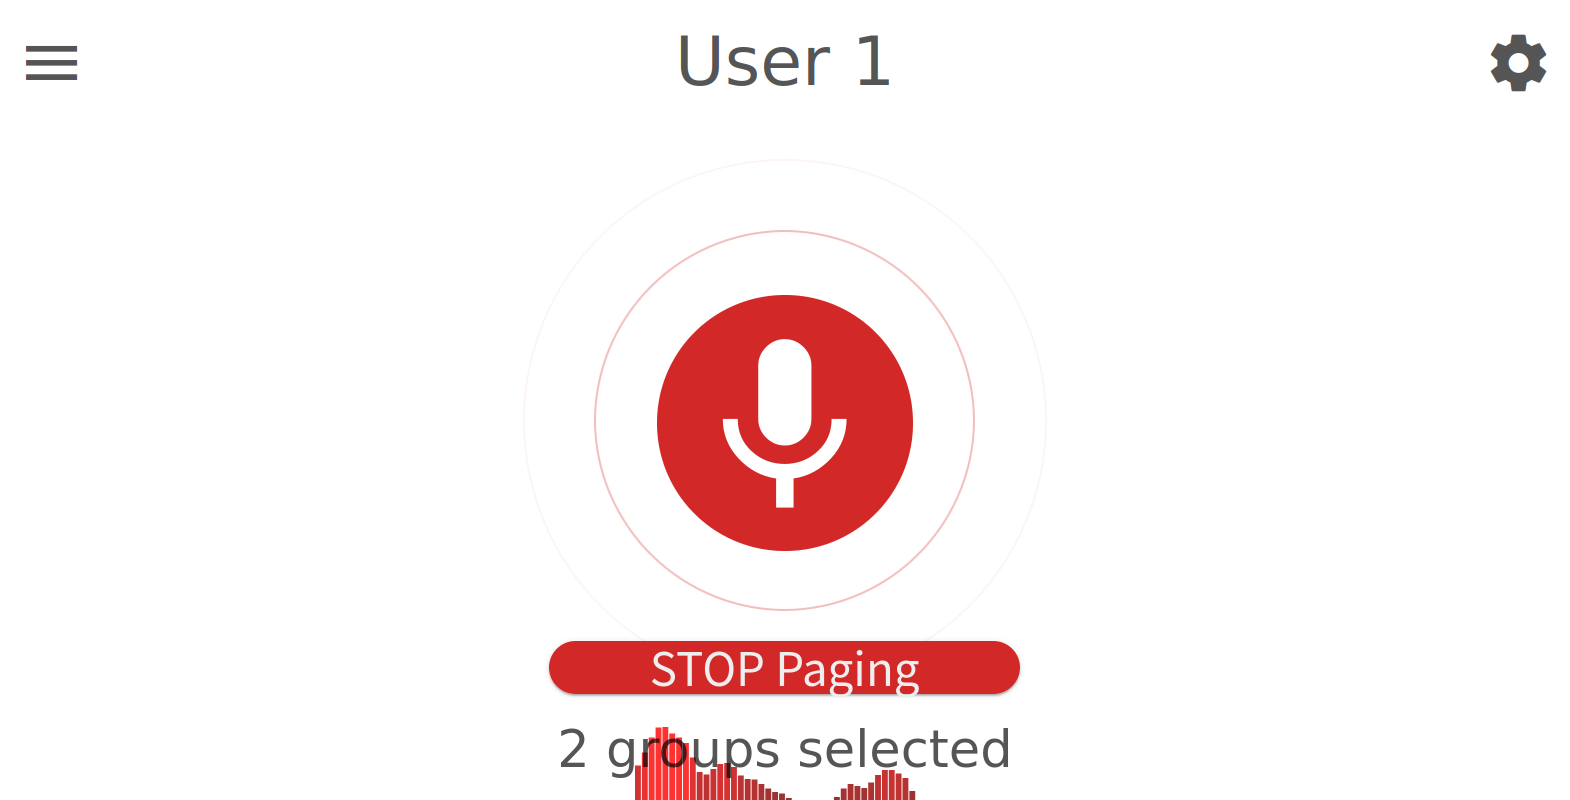
|
|
4 |
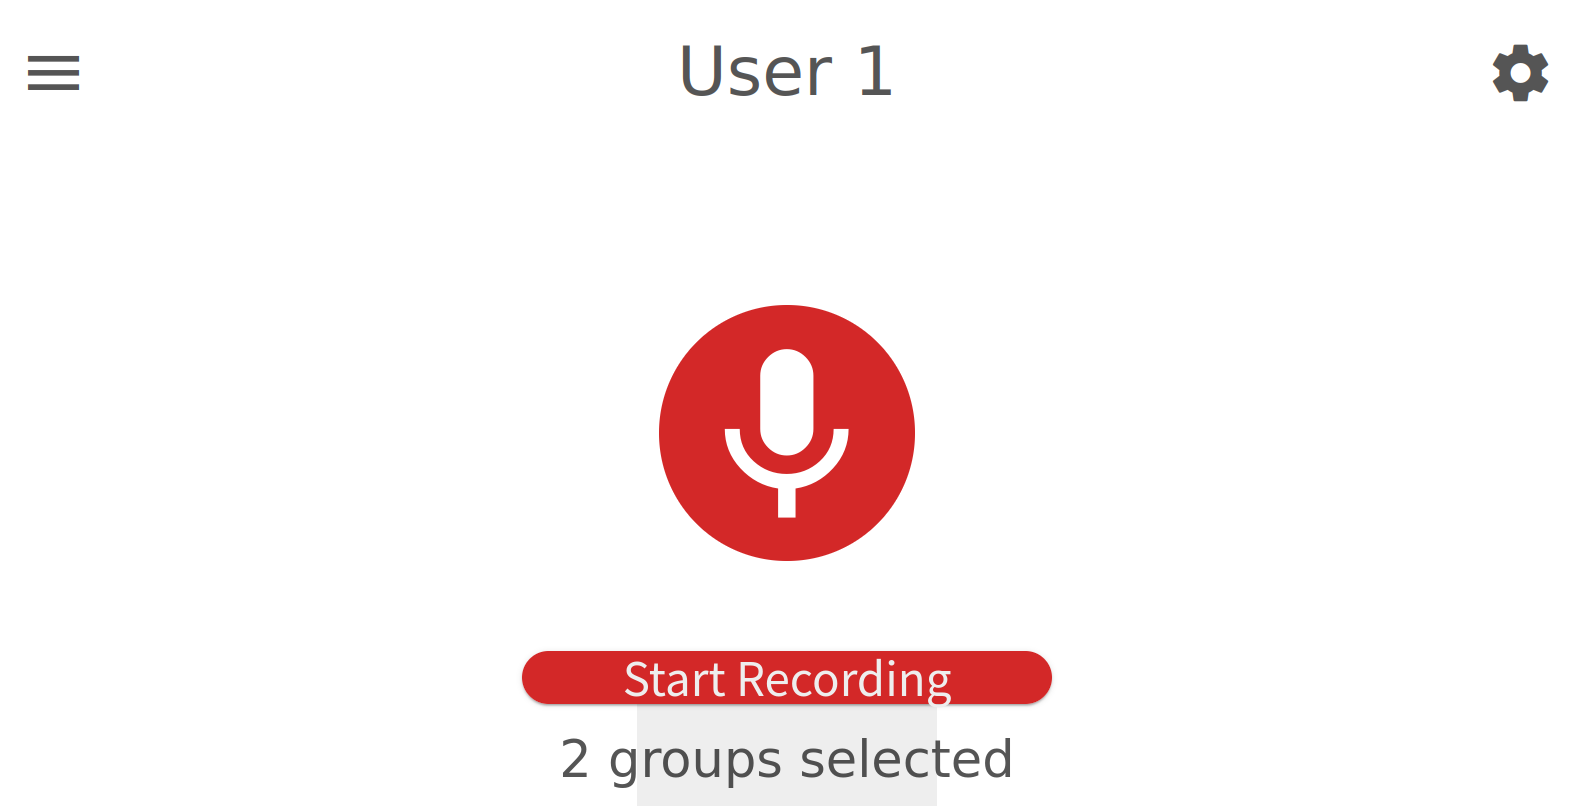
With the option Record Audio (click on the top right gear icon) you can pre-record an audio message, listen and then send to be played. 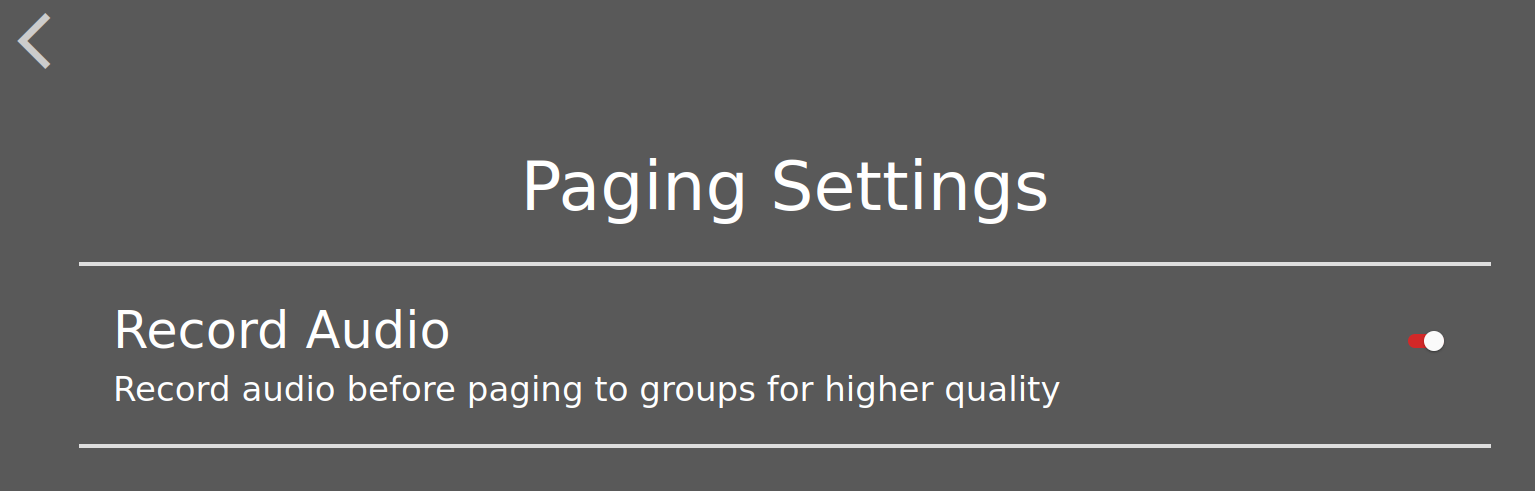
|
|
5 |
To send an audio message, click on top left Menu icon and select Device Messages. Select the message to send then click SEND. Press STOP to stop sending. You can play the message locally pressing the play icon on the right. 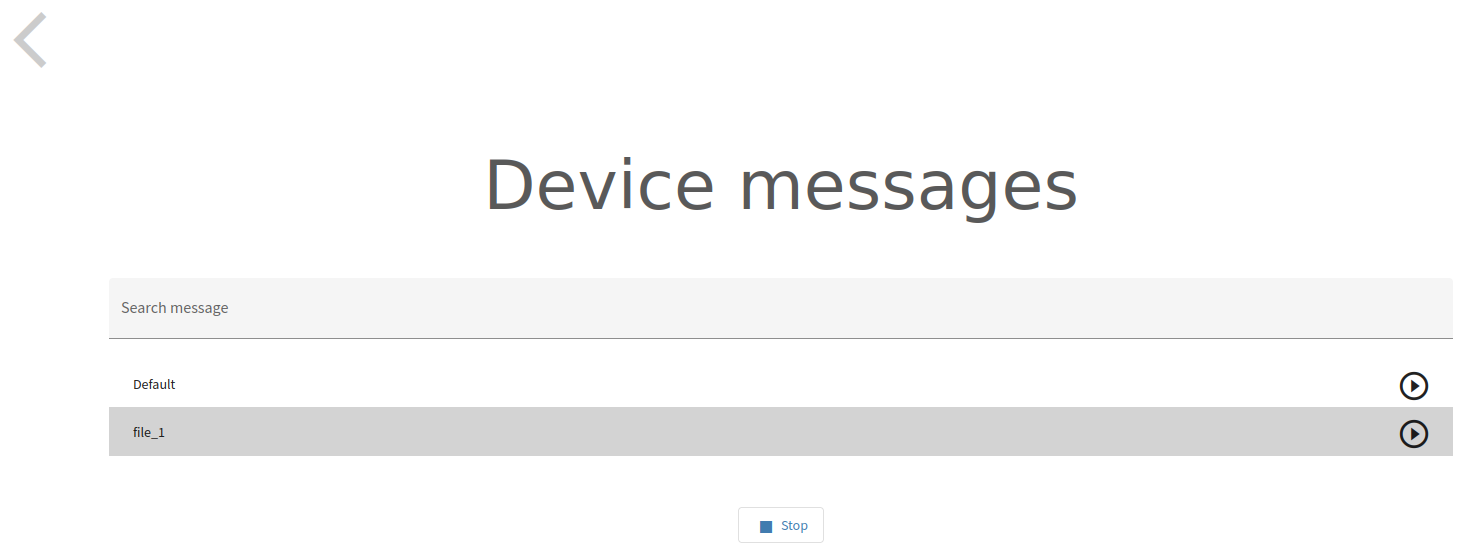
|
Hardware functionality
|
Front View 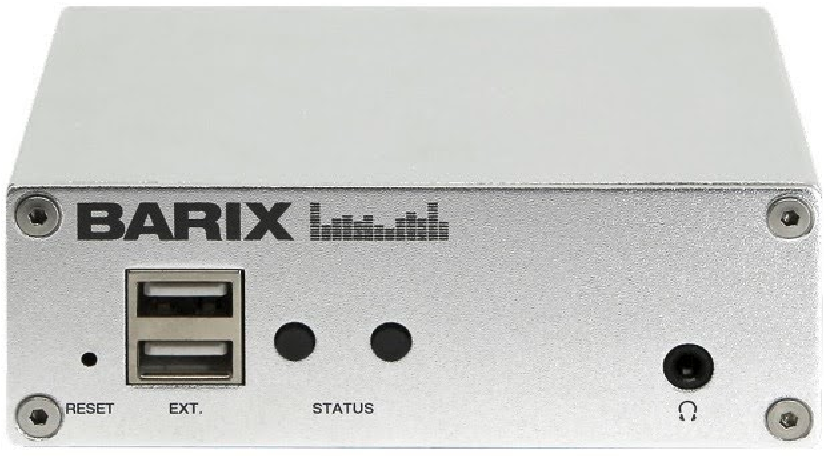
|
Rear View 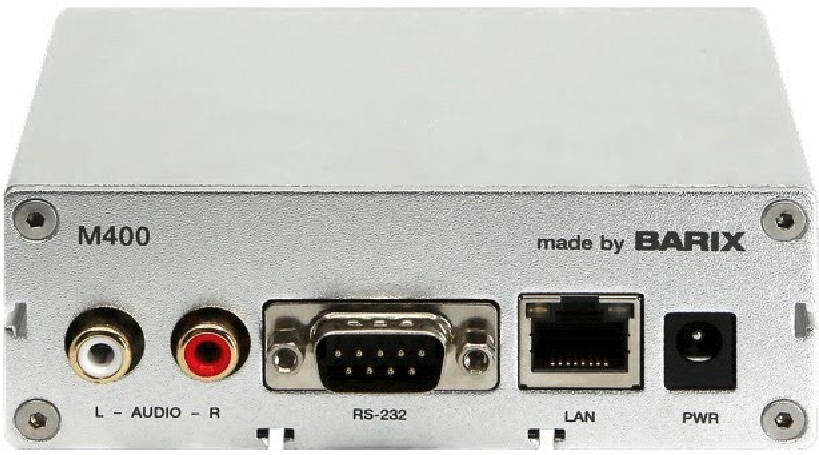
|
||
|
RESET button |
Short press while powered (1s - 9s) → Reboots the device. Long press while powered (10s - 19s) → Hard reset to defaults (including network settings). Press and hold for 30s while powering up → Rescue process triggered: device will connect to the Barix update server and install the latest firmware. |
Audio |
2x RCA audio output connectors - unbalanced. Nominal output: 0dBu. |
|
2x USB Ports |
USB ports - Currently not used by the Paging Gateway M400 application. |
RS232 |
Serial port - Currently not used by the Paging Gateway M400 application. |
|
LEDs (see table below) |
As per picture above:
|
10/100 |
Fast Ethernet network connection on RJ45. |
|
Headphone |
Reflects the main audio output on a 3.5 mm jack connector (TRS), used for headphone monitoring. |
Power |
Power connector, barrel style 6.5x1.5mm central positive. |
STATUS LED Behavior
|
Status LEDs description |
Left LED
|
Left LED
|
Right LED
|
Right LED
|
Comments |
|---|---|---|---|---|---|
|
Factory defaults setting (RESET button pressed >10s) |
|
GREEN(fast) |
OFF |
|
After 10s of holding RESET button pressed, LED1 starts blinking fast GREEN to indicate that the RESET button can be released and that the default factory settings will be applied (incl. Network settings). |
|
System not powered |
OFF |
OFF |
OFF |
OFF |
|
|
System in Rescue mode |
|
ORANGE |
OFF |
|
As soon as device enters rescue mode, LED1 starts blinking YELLOW. |
|
Downloading / Installing Firmware |
|
ORANGE |
GREEN |
|
|
|
System booting |
|
RED |
OFF |
|
LED1 blinks slowly during the boot up process. |
|
System ready |
GREEN |
|
(see lines below) |
(see lines below) |
Check the descriptions below to see how the LEDs are supposed to behave once the system is “ready”. |
|
Application not running |
GREEN |
|
RED |
|
|
|
Application running |
GREEN |
|
GREEN |
|
|
Compliance and further Information
This equipment has been tested and found to comply with the limits for a Class B digital device, pursuant to part 15 of the FCC Rules. These limits are designed to provide reasonable protection against harmful interference in a residential installation. This equipment generates, uses and can radiate radio frequency energy and, if not installed and used in accordance with the instructions, may cause harmful interference to radio communications. However, there is no guarantee that interference will not occur in a particular installation. If this equipment does cause harmful interference to radio or television reception, which can be determined by turning the equipment off and on, the user is encouraged to try to correct the interference by one or more of the following measures:
-
Reorient or relocate the receiving antenna.
-
Increase the separation between the equipment and receiver.
-
Connect the device into an outlet on a circuit different from that to which the receiver is connected.
-
Consult the dealer or an experienced radio/TV technician for help.
Safety and precaution recommendations apply. Find them in the download section at www.barix.com

Find your distributor on this list for more hardware.
For questions that are extending the documentation, feel free to contact us on:
International: +41 434 33 22 22
USA: +1 866 815 0866
Email: support@barix.com
All information and the use of this product including all services are covered under the Barix Terms & Conditions and our Privacy Policy. Please follow the Safety and Precaution Recommendations. Barix is a ISO 9001:2015 certified company. All rights reserved. All information is subject to change without notice. All mentioned trademarks belong to their respective owners and are used for reference only.