This document is a “How To” describing how to trigger InformaCast Fusion notifications on a Barix TPA400 using a Barix Barionet M44.
In this example, we’ll use a regular switch as “contact closure” connected to the Barionet M44. This switch will trigger an audio notification on a Barix TPA400 IP Speaker using the InformaCast Fusion platform.
Preparation
To perform the steps described in this “How To” document, you need:
-
Barix Barionet M44 running firmware V2.3.0 or later.
-
Barix IP Former TPA400 InformaCast licensed running IP Audio Client firmware V2.15.0 or later. The TPA400 will be the endpoint running as InformaCast Client.
NOTE: any other IP Audio CLient device works in the same way: Exstreamer M400, Exstreamer MPA400, Exstreamer MR400, Annuncicom MPI400. -
8ohm speaker to be connected with the TPA400.
-
Contact closure device. In this example, we’ll use a regular light switch to be connected with the Barionet M44.
-
POE network switch.
-
InformaCast Fusion server.
For the purpose of this document, InformaCast Fusion v15.0.1 was used.
Both Barionet M44 and TPA400 are POE devices, thus can be power supplied by the POE network switch.
Please read the Barix Barionet M44 “Quick Install Guide” HERE and the Barix TPA400 - IP Speaker “Quick Install Guide” HERE for more information about installing and accessing their web interface.
The communication protocol used between the Barionet M44 device and the InformaCast Fusion platform server is SNMP. Barionet M44 can send “SNMP Traps” to InformaCast Fusion that will act as “triggers” for notifications. This allows InformaCast to interact with the contact closures connected to M44 inputs and trigger notifications. InformaCast Fusion “sees” Barionet “SNMP Traps” as “M2M Input Ports”.
Below is a schematic that shows how the connections are established:
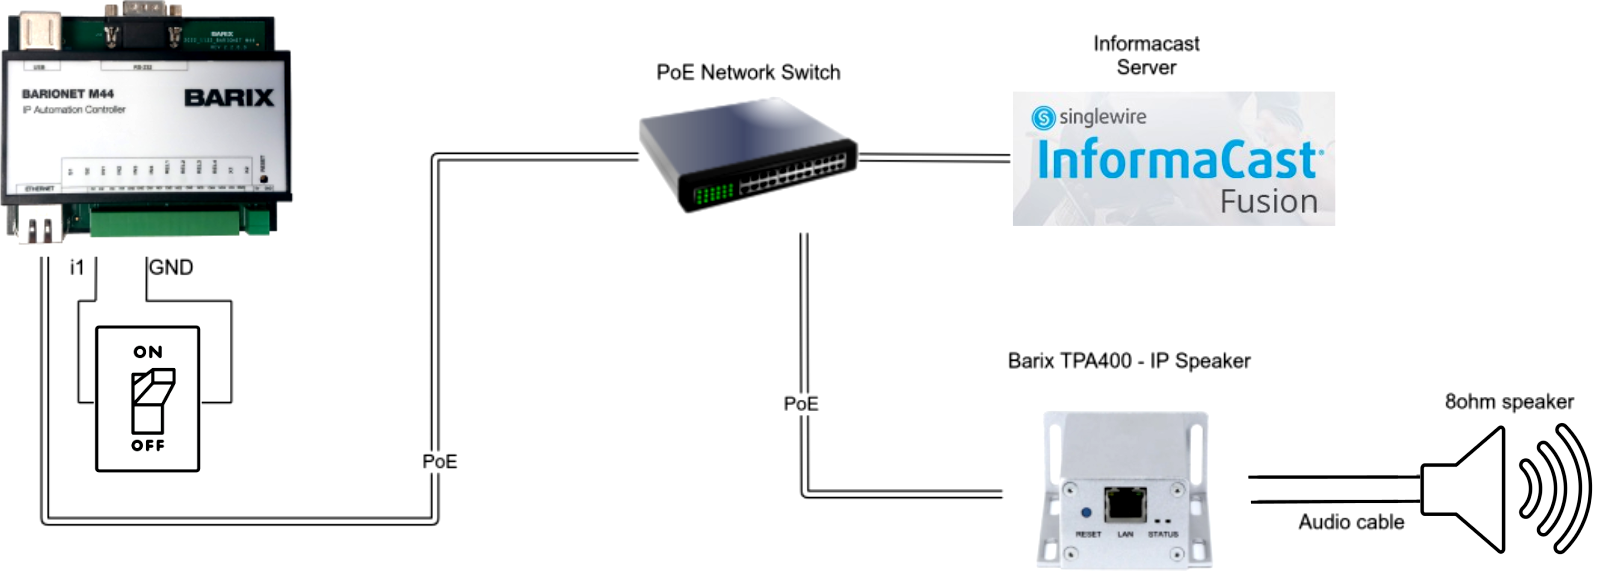
Contact closure connection with the Barionet M44.
-
For safety reasons connect the switch before powering ON the Barionet M44.
-
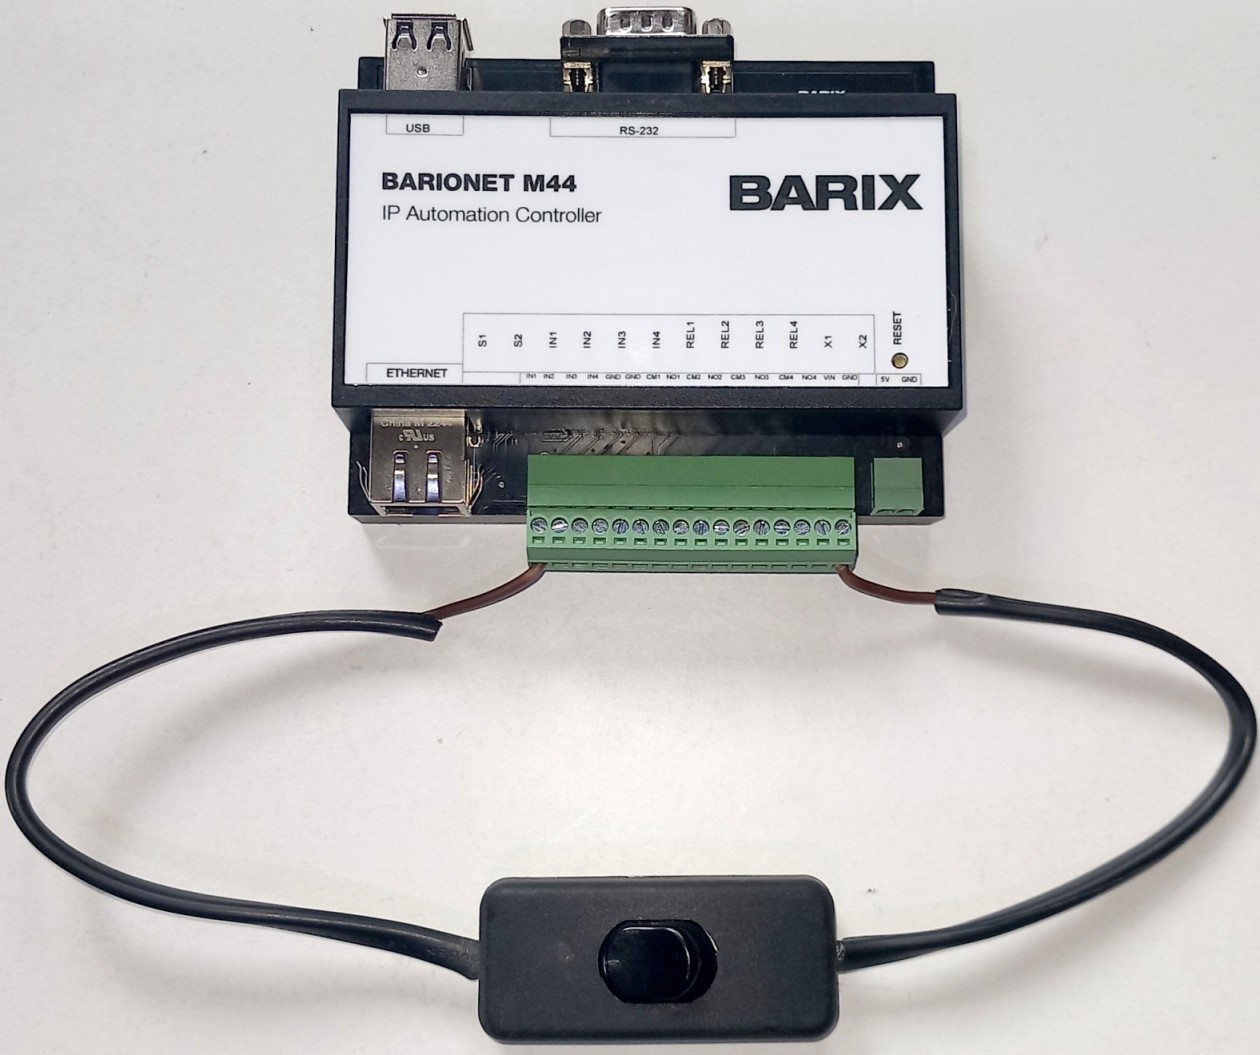
Connect the switch that will act as contact closure to activate the Barionet M44 Inputs.
In this example, we will activate the M44 Input1. To do so, use a wire to connect the switch between the Input1 (pin 1) and GND (pin 5/6/16) of the terminal block, as pictured below. Please refer to the Barionet M44 Quick Install Guide for more information about connecting other Inputs.
Barionet M44 Configuration
-
Connect the Barionet M44 to the POE Switch using a regular Ethernet cable. By default, the device is configured to run as a DHCP client. It will acquire an IP address at boot. Check the DHCP Lease table of your DHCP server to retrieve the assigned IP address according to the given MAC Address. Note the IP address. You can also use the “Barix Discovery Tool” available here https://help.barix.com/tools/discovery-tool to find the Barionet M44 IP address.
-
Access the web configuration of your Barionet M44 typing the IP address in the URL field of your browser. Enter the username and password (you should find the password printed on the button of the device, user = admin). Please refer to the Barionet M44 Quick Install Guide if necessary.
-
Locate the SNMP tab and enable SNMP clicking on the “Enabled” switch.
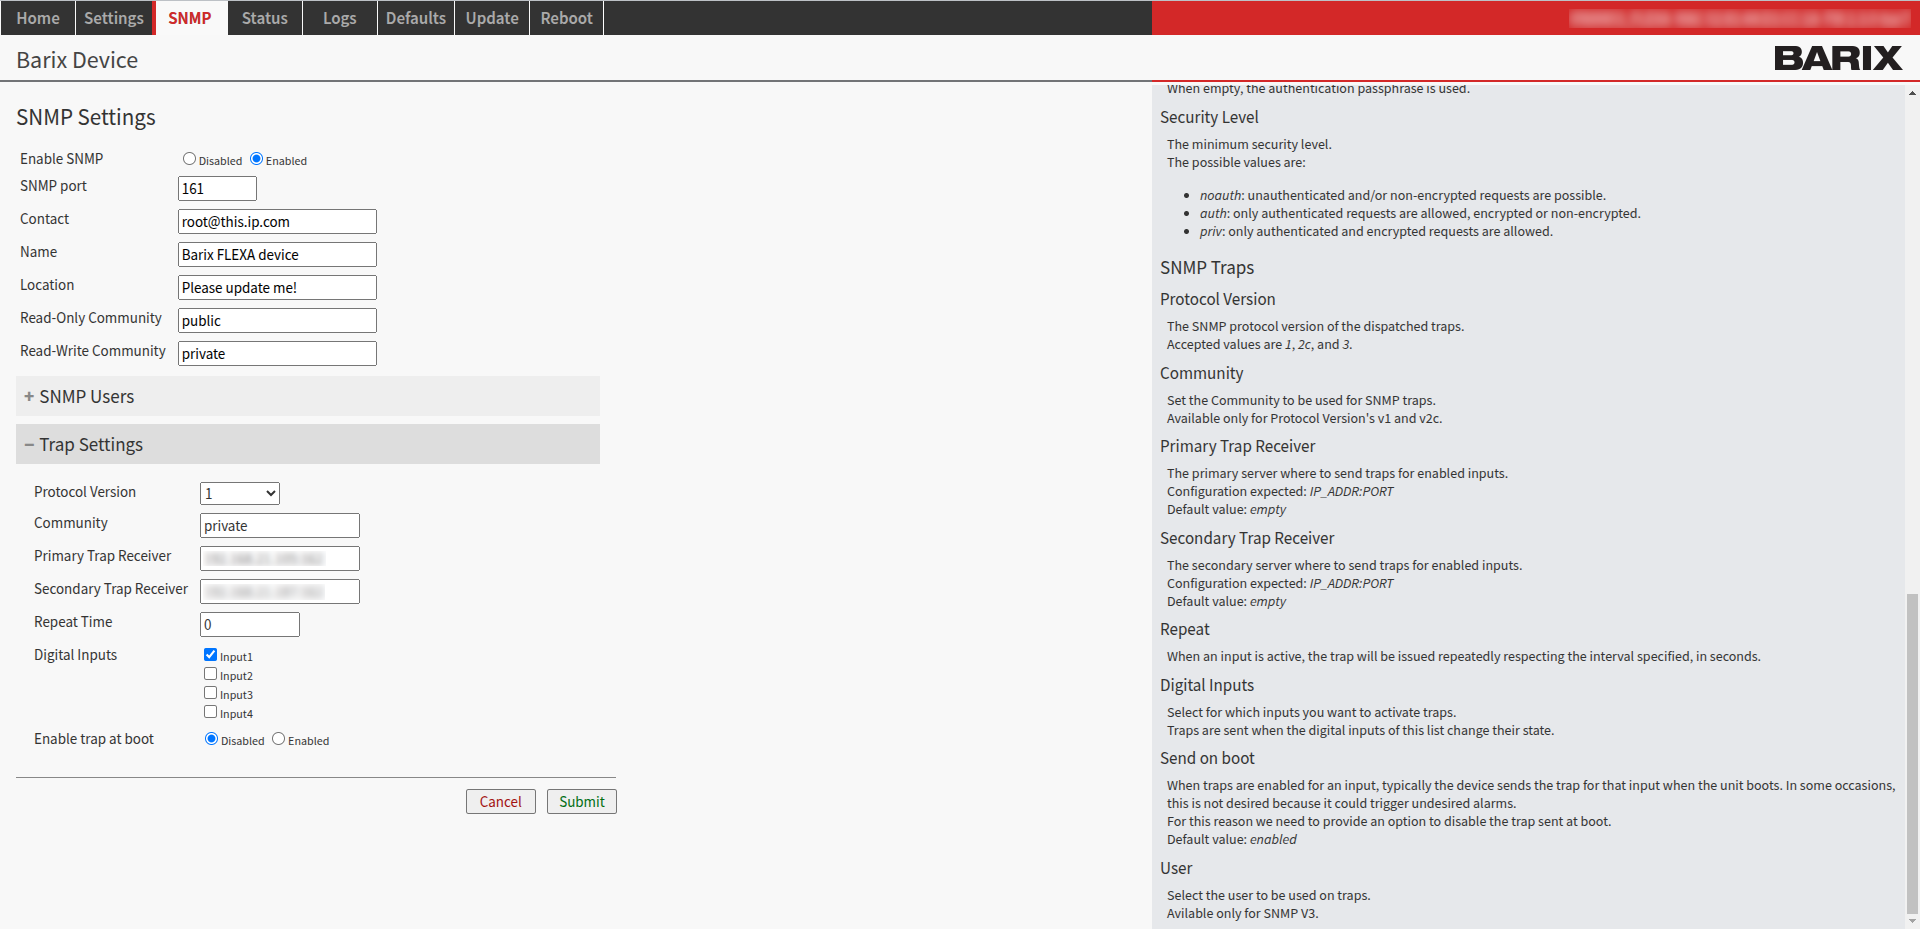
Fig.3 - M44 SNMP configuration -
Expand the “Trap Settings” field, pressing “+”
-
You must fill at least the “Community” field for the SNMP daemon to run.
The SNMP tab offers the possibility to set 2 Trap Receivers (Primary and Secondary) for redundancy purposes.
Set the configuration as follows:-
Protocol Version: select SNMP protocol version. According to SingleWire’s documentation InformaCast supports only SNMP v1 when dealing with Traps.
-
Community: Default: “private”. You need to set the same password on both Barionet AND InformaCast to be able to send SNMP Traps.
-
Primary Trap Receiver: enter the <IP address:port> of your InformaCast Fusion server (InformaCast Fusion uses port =162 as default).
For example, if your InformaCast Fusion server IP address is “192.168.00.06”, you should enter: “192.168.00.06:162” -
Secondary Trap Receiver: enter the <IP address:port> of your backup system if you have a redundant system.
-
Repeat Time: if you want traps to be sent repeatedly while an input is closed, specify a time interval.
SNMP traps are sent by contact closures connected to the digital inputs. Default value = 0, which means no repeated traps are sent, only one when the input is closed. -
Digital Inputs: select on which Inputs1 - 4 you want to activate traps. You can enable traps for the 4 digital inputs available. In this example, we’ll use Input1.
Traps are sent when the selected Inputs change their state. When a “contact closure” connected to the Input is opened/closed, it will send automatically a trap to InformaCast Fusion. -
Enable trap at boot: enable or disable the trap sent at device boot. Default value = disabled.
-
-
Click on “Submit” to apply the new settings.
-
Confirm that the switch is working properly. The Barionet M44 IN1 LED should turn BLUE when you turn the switch ON.
Make sure you set the Barionet M44 SNMP Protocol Version to “1” in order to be able to use Barionet M44 traps with InformaCast Fusion.
IP Former TPA400 Configuration
-
Connect the 8ohm speaker with the TPA400 using the terminal connector. Please mind the speaker polarity.
-
Connect the TPA400 to a POE switch using a standard Ethernet cable. By default, the device is configured to run as a DHCP client. It will acquire an IP address at boot and it will announce it through the speaker. Be ready to listen to the announcement and note it. You can also use the “Barix Discovery Tool” available here https://help.barix.com/tools/discovery-tool to find the TPA400 IP address.
-
Access the web configuration of the device typing the IP address in the URL field of the browser. Enter the username and password (you should find the password printed on the button of the device (user= admin)). Please refer to the TPA400 Quick Install Guide if necessary.
-
By default, the TPA400 runs the InformaCast client and should automatically register with the server if it is in the same network subnet. The automatic discovery process uses DHCP OPT150. If this is not available from the network, it is mandatory to provide IP Speaker with the manual address and path to register with the InformaCast Fusion server.
-
Locate the “Sources” tab. Source #1 is already configured as “InformaCast” (Source #2, as “Syn-Apps”) and set to ON.
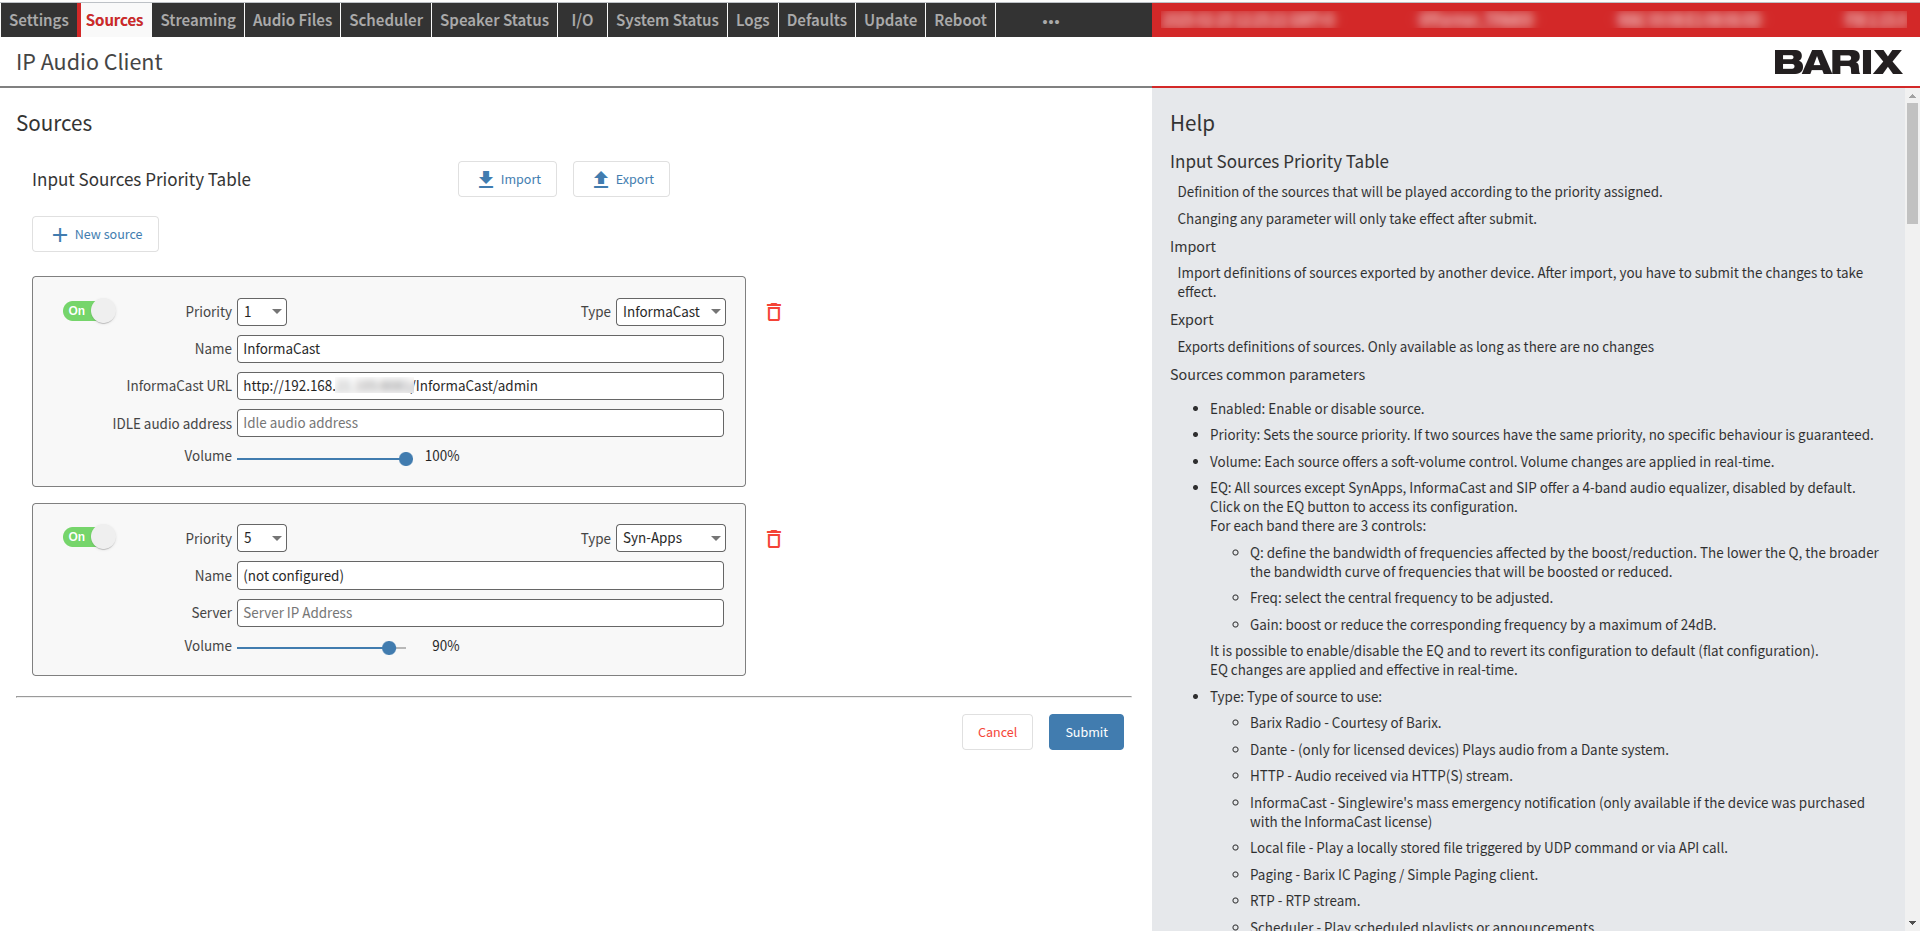
Fig.4 - TPA400 Sources
-
By default the “InformaCast URL” is empty, so the automatic registration process runs. If needed, it is possible to add the “InformaCast URL” manually. The URL has to be: “<http://<IP_InformaCast>:8081/InformaCast/admin”.
For example, if your InformaCast Fusion server IP address is “192.168.00.06”, you should enter: “http://192.168.00.06:8081/InformaCast/admin” -
It is also possible to set an “IDLE audio address”. IDLE audio is i.e., a background music stream playing via RTP from a local source while there are no received notifications from InformaCast. Unicast or Multicast are supported.
-
Once the InformaCast address is configured, click on the “Submit” button to apply the new settings.
Wait a few minutes until the device appears as IP-Speaker in the InformaCast Fusion platform (see next Chapter).
InformaCast Fusion Configuration
IP Speaker Configuration
-
Login to your InformaCast Fusion server using your credentials.
-
Go to Recipients ➡️ IP Speakers.
-
In the “List IP Speakers” field your TPA400 should be identified by its MAC Address.
-
Click the 🖉 pencil icon to edit the “IP Speaker Details” for your TPA400.
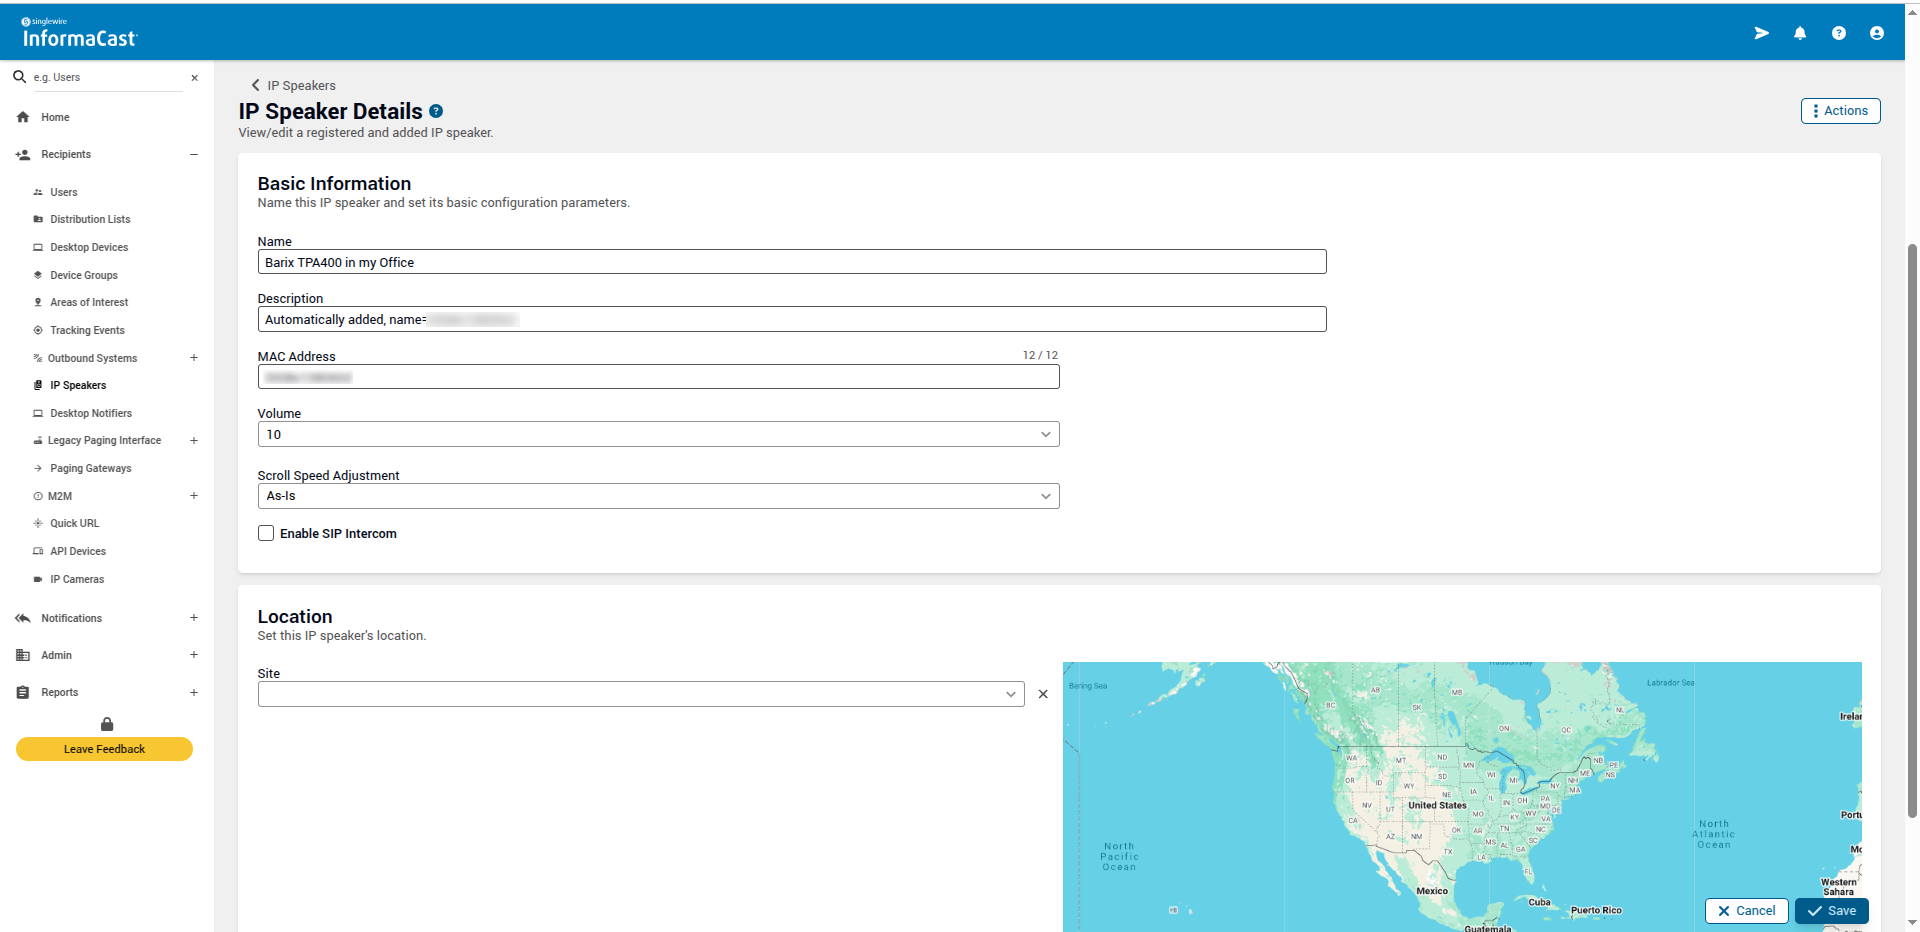
Fig.5 - IP Speaker Details
-
-
Here you can give some basic information about your TPA400 like “Name”, “Description” and set its “Volume”.
-
Click the “⠇Actions” button. You can, for example, test and reboot the device to check if it is working correctly
Let's select “Test” and click 🗸Save
Your TPA400 will play a test tone for 5sec confirming it’s registered in InformaCast Fusion. -
Click “🗸Save” to save your IP Speaker details.
Create a Device Group
In order to receive notifications, it is necessary to assign the TPA400 to a “Device Group” and include the group in a “Message Template”. You can select an already created “Device Group” and add the TPA400 or create a new one. To create a new “Device Group” follow these steps:
-
Go to Recipients ➡️ Device Groups ➡️ +Create Device Group
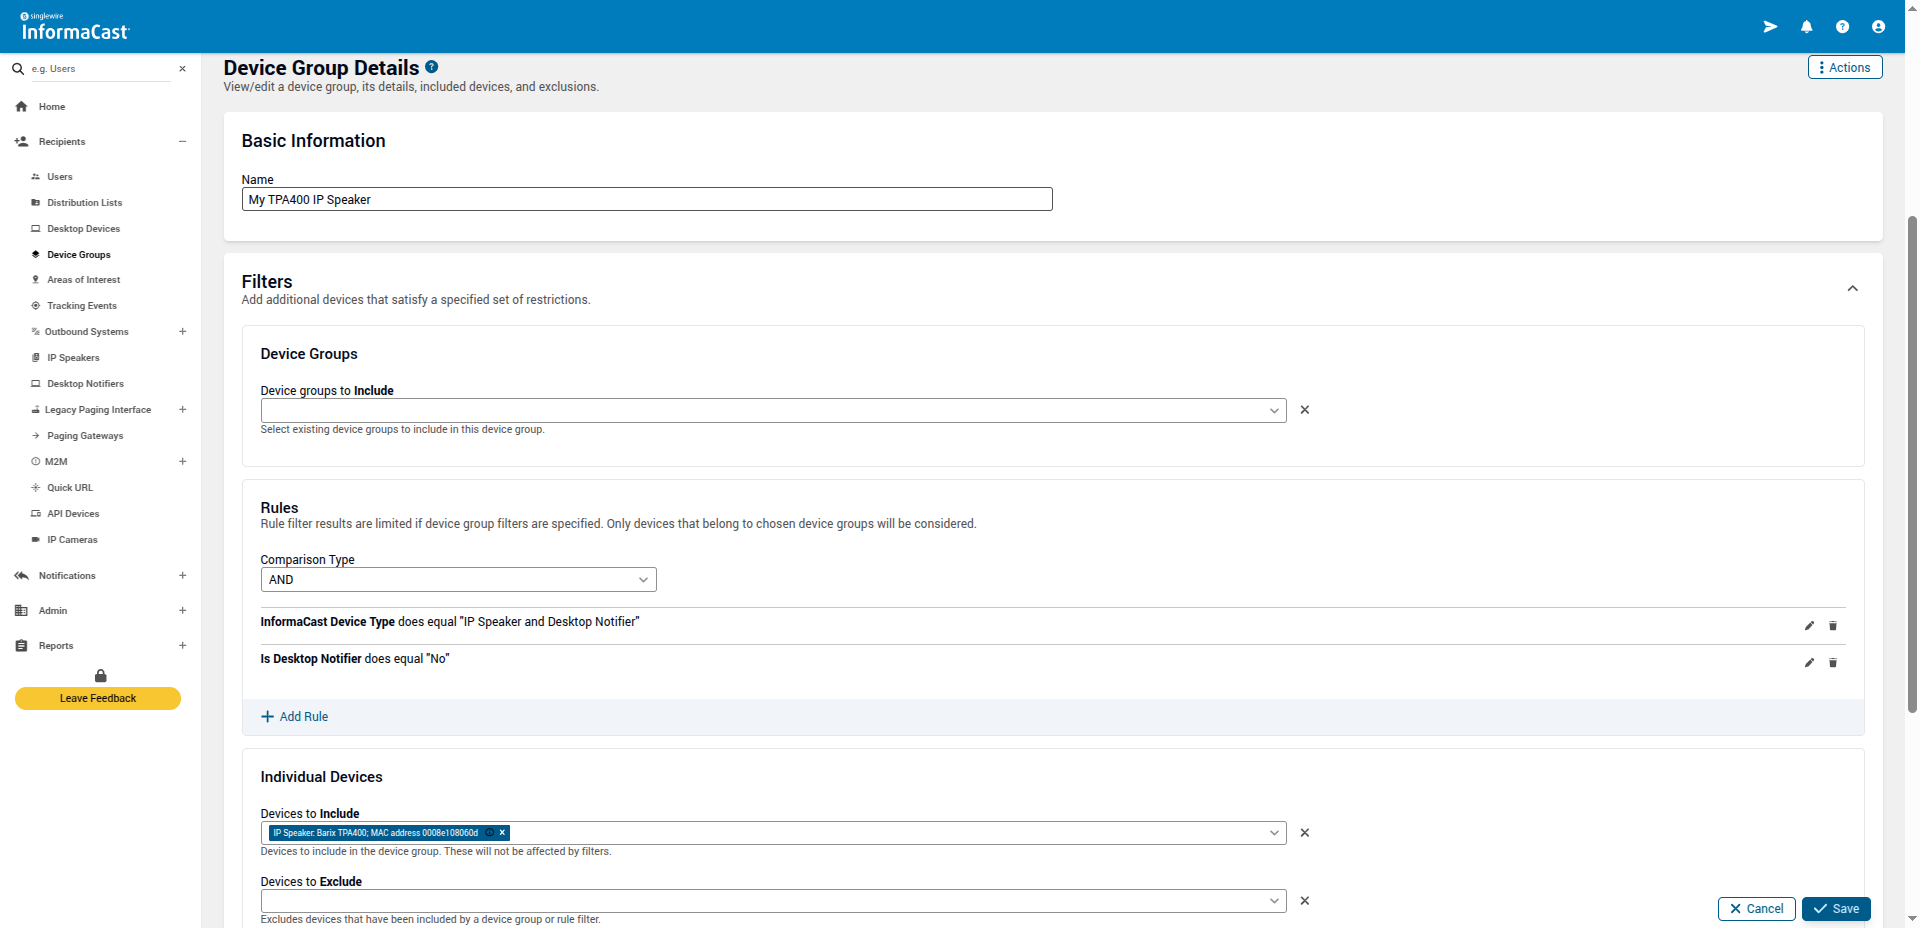
Fig.6 - Device Group Details. -
Give a name to the new Device Group (“Name” field is required). Let’s call it: “My TPA400 IP Speaker”.
-
Go to “Individual Devices” field and select your TPA400 from the dropdown list (you can also select an already created Device Group in “Device Groups to include”).
-
Save the Device Group clicking “🗸Save”
Create a Message Template
Create a “Message Template” to be sent as notification to the “Device Group” created above. The new message template, contains the content, recipients, and layout of your notifications. In this example, we’ll create an audio message that will be played by the TPA400 when the notification is sent.
-
Go to Notifications ➡️ Message Templates ➡️ +Create Message Template
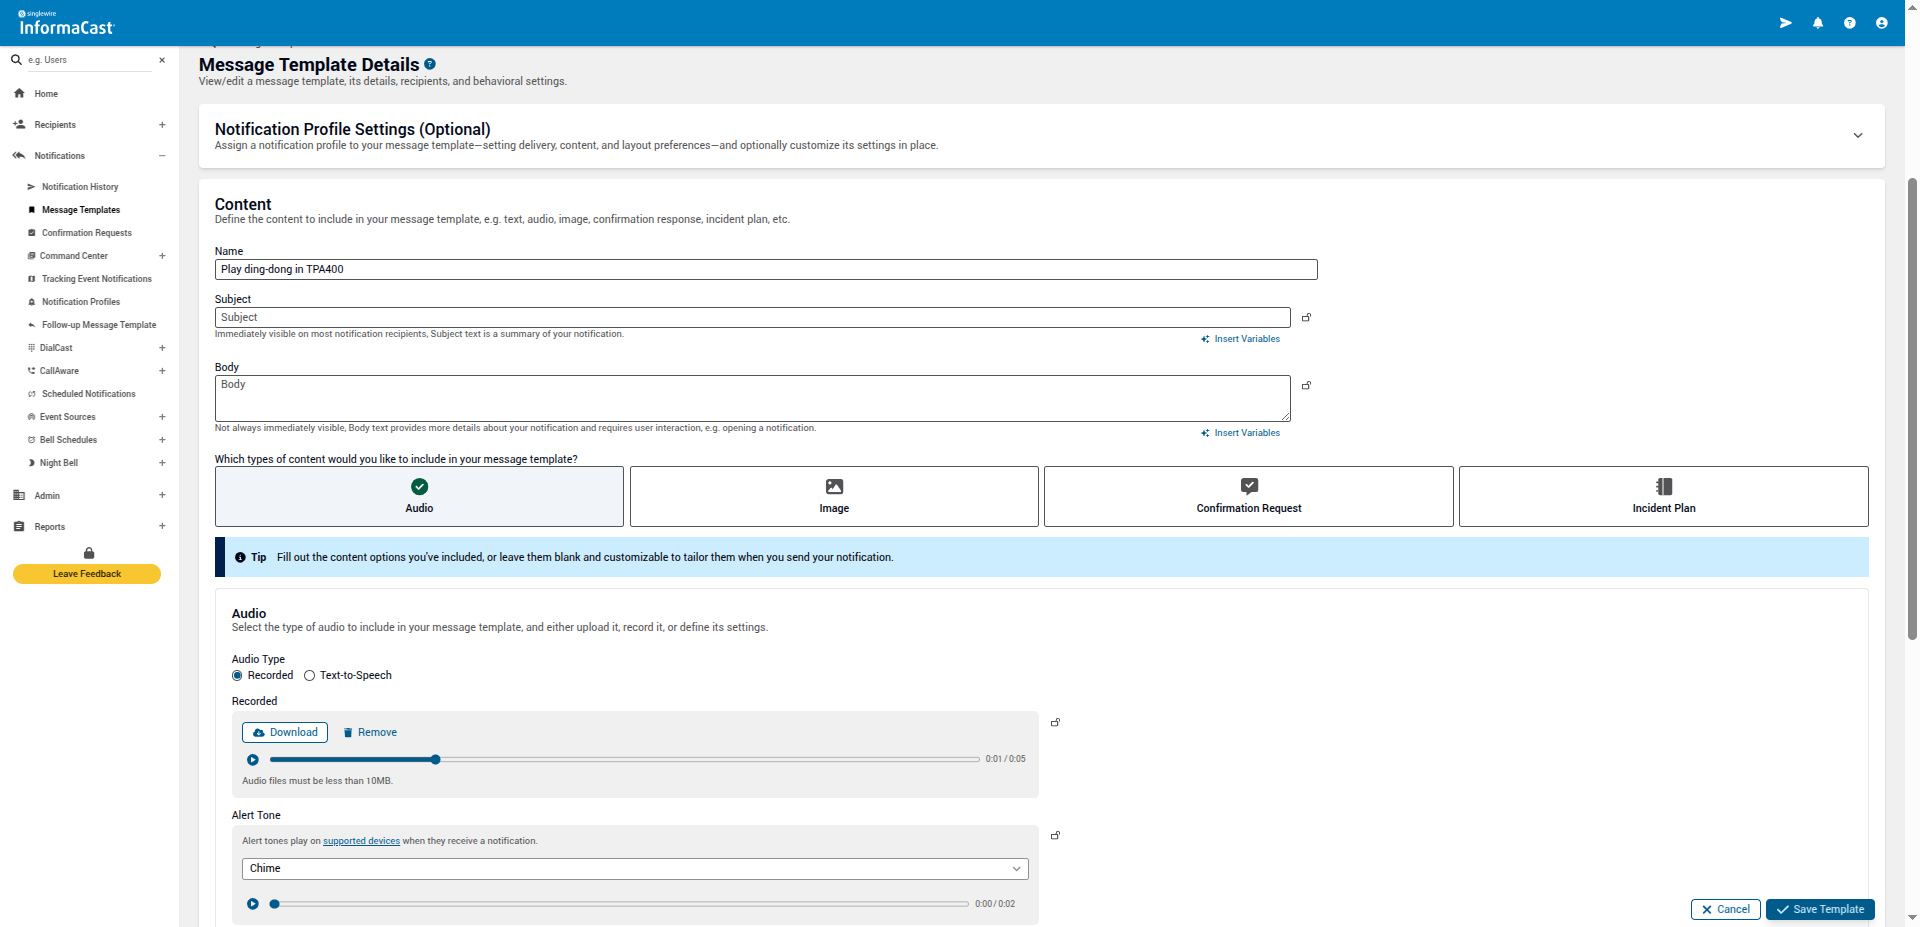
Fig.7 - Message Template Details
-
Give a name to your “Message Template”. Let’s call it “Play ding-dong in TPA400”
-
Go to “Which types of content would you like to include in your message template?” field and select “🗸Audio”.
-
Download an audio file to be played by the TPA400. In this example, we’ll download a “dingdong.wav” file. You can preview the audio file pressing ▶ play if necessary.
-
In the “Device Groups” field, select the previously created “My TPA400 IP Speaker”
-
Click on “🗸Save Template” to save your Message Template.
M2M Configuration with Barionet M44
Create a Contact Closure
InformaCast Fusion “sees” Barionet M44 SNMP Traps as “M2M Input Ports”. This allows InformaCast to receive triggers from the M44 contact closure inputs and initiate notifications. To configure “M2M Input Ports” in InformaCast Fusion, follow these steps:
-
Move to Recipients ➡️ M2M ➡️ Contact Closures
This window lists the available contact closures in InformaCast. These are the physical devices that will interact with the M2M Input Ports.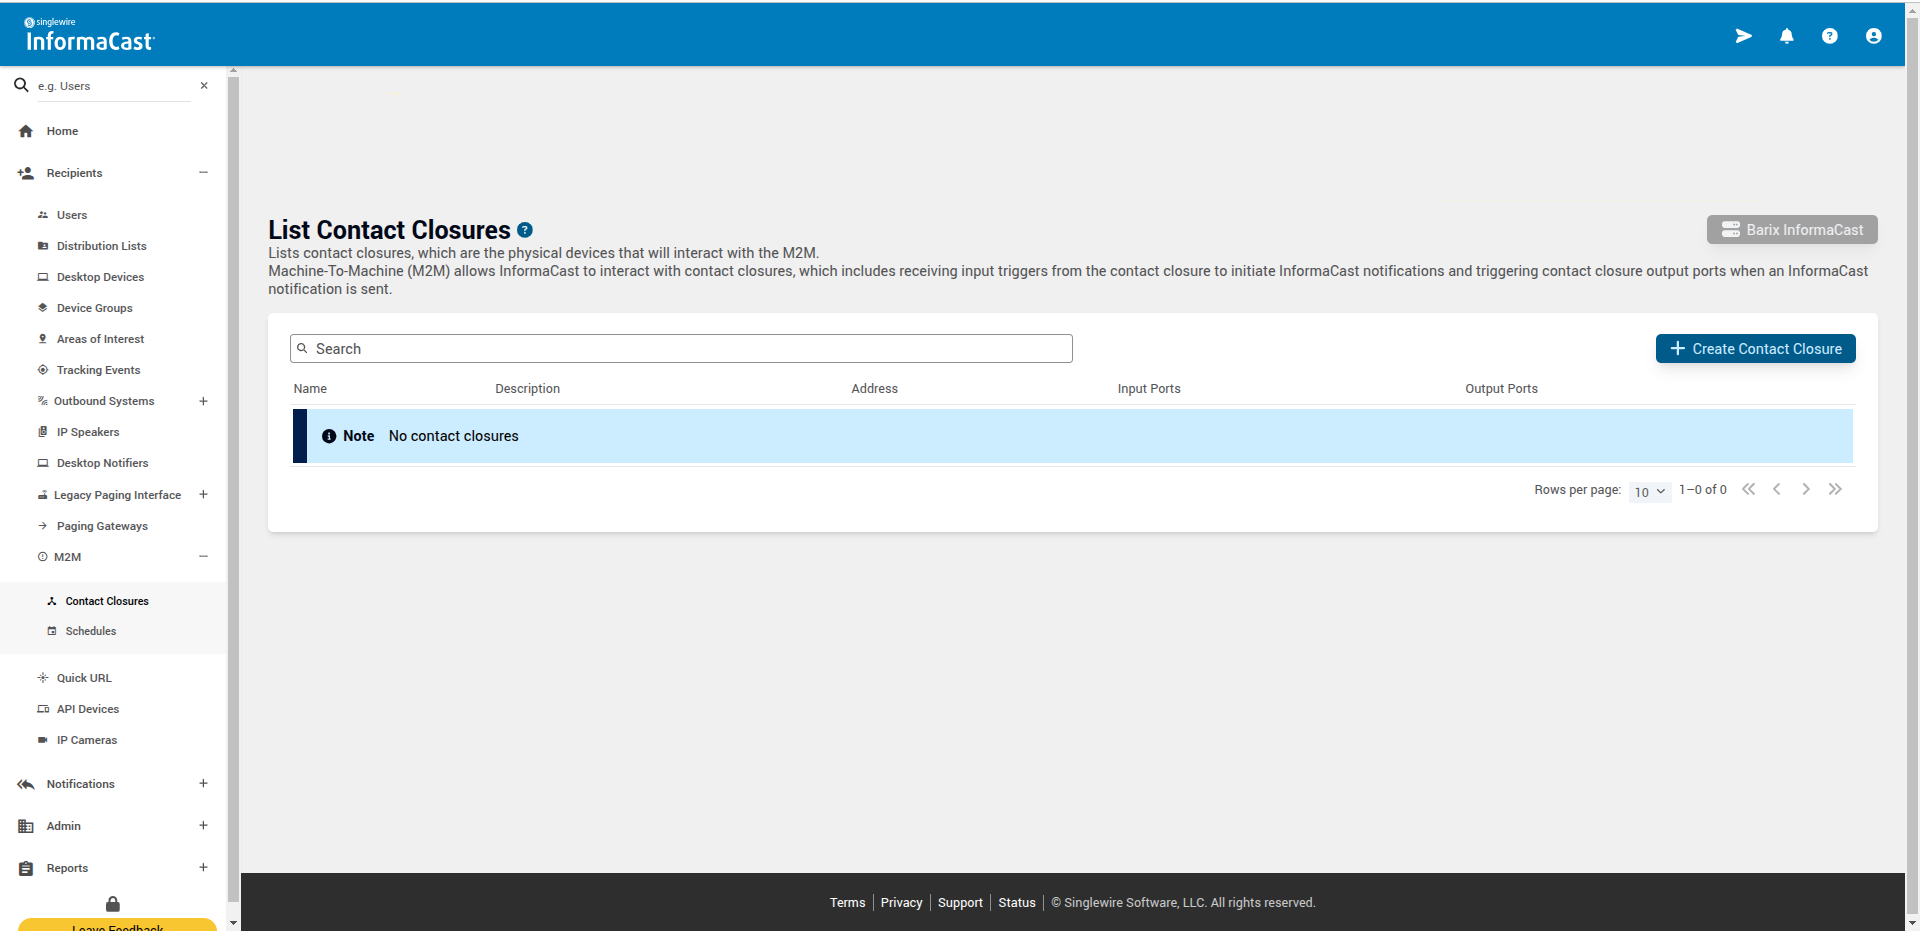
Fig.8 - List of Contact Closures -
Click on “+ Create Contact Closure”.
Here, you provide some information about the Barionet M44 which will act as a new “Contact Closure” to trigger InformaCast Fusion notifications.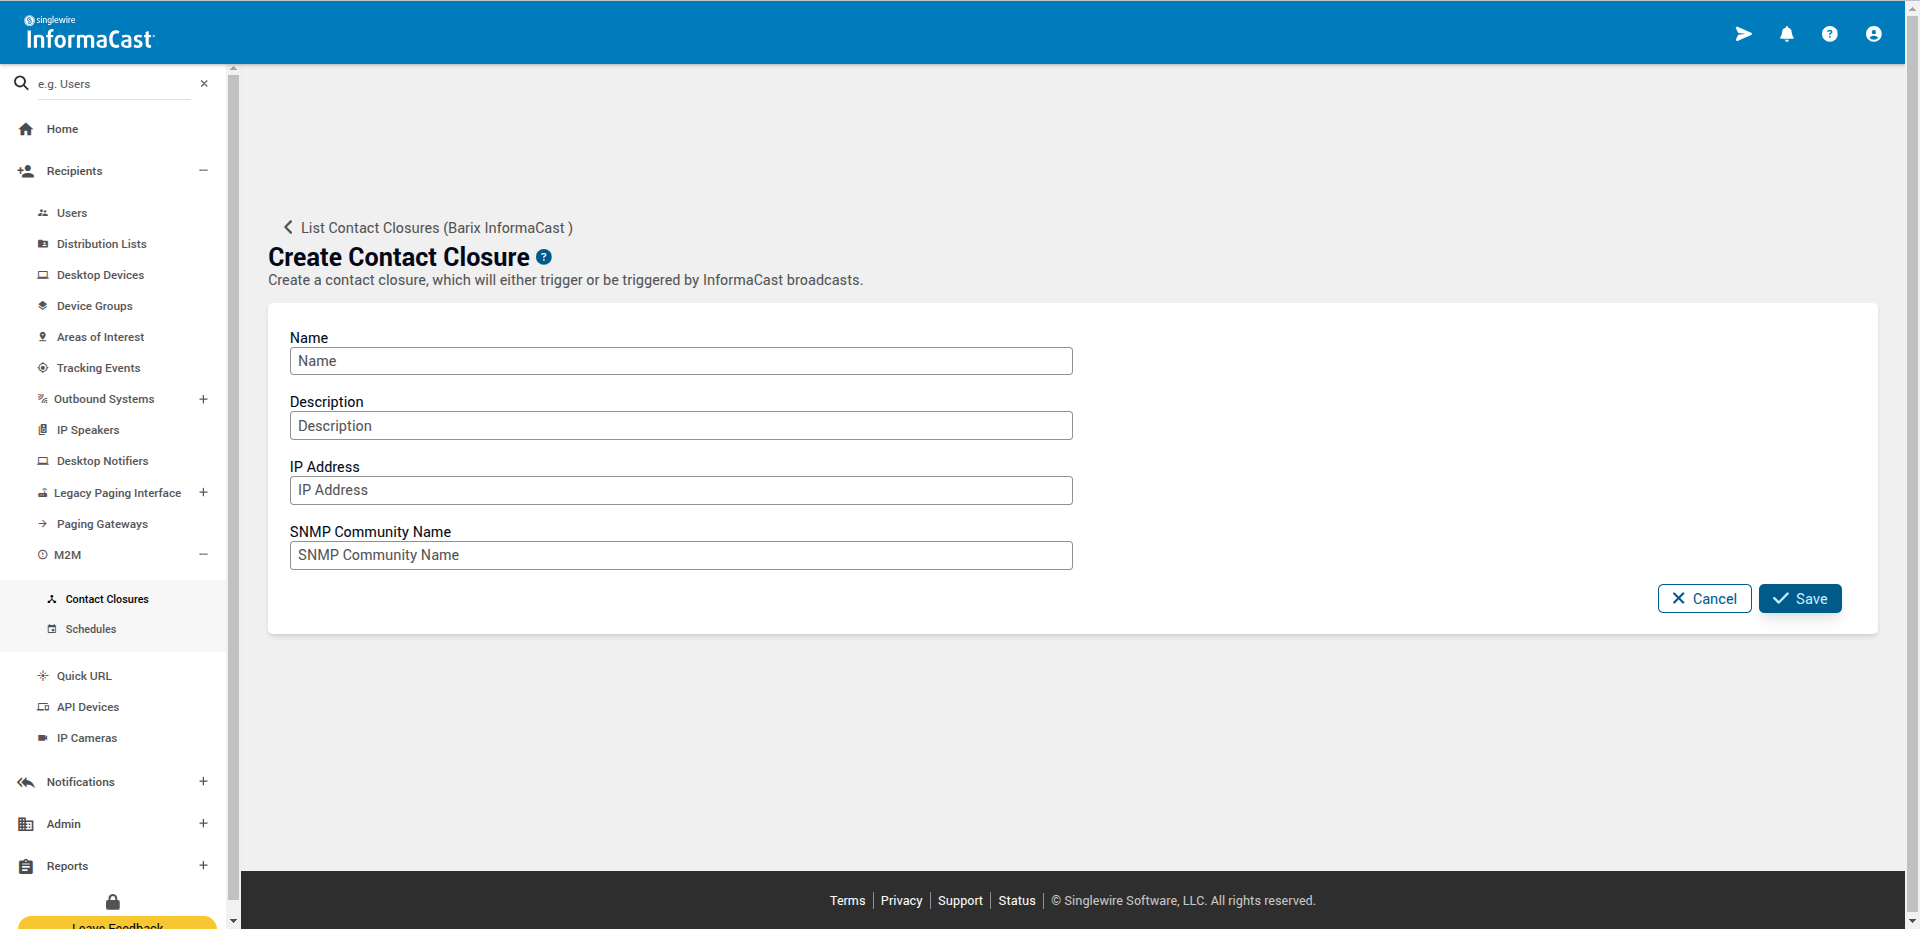
Fig.9 - Create Contact Closure
-
Provide some information about your new contact closure.
-
Name: give a name to your new contact closure.
-
Description: give a description for the contact closure.
-
IP Address: this is the IP Address of your Barionet M44 (see the “Barionet M44 Configuration” chapter).
-
SNMP Community Name: the name of the SNMP Community.
-
The “SNMP Community Name” MUST match the name provided in the “Community” field of the Barionet M44 “Trap Settings” Configuration.
-
Click on “🗸Save”.
The Input and Output ports configuration becomes available.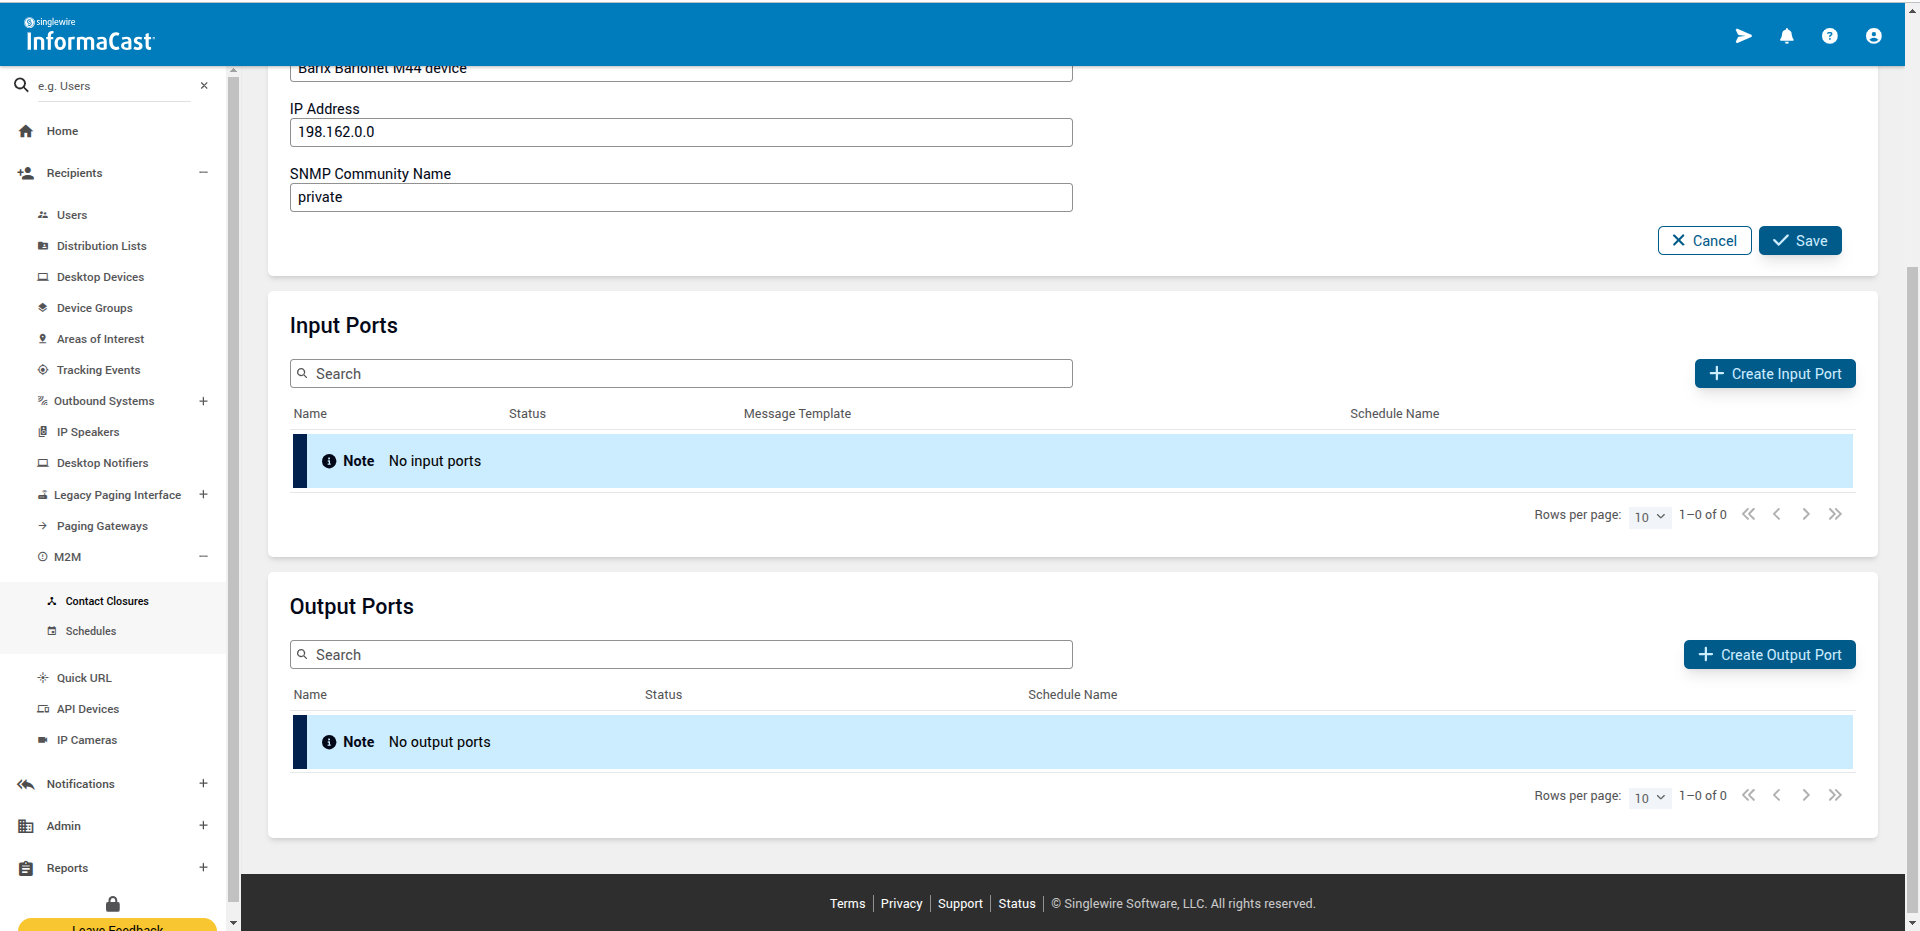
Fig.10 - Input and Output
Create an Input Port
-
Click on “+ Create Input Port”
When creating an “Input Port”, you can specify which input port will trigger a notification. You must provide the right OID (the “Object Identifier” which serves as an address to locate and identify specific objects within a network management system) and state change value. This allows InformaCast Fusion to trigger a notification when a contact closure connected to the input has been activated or deactivated, depending on your configuration.
You can find the OIDs for the 4 Inputs of the Barionet M44 at this link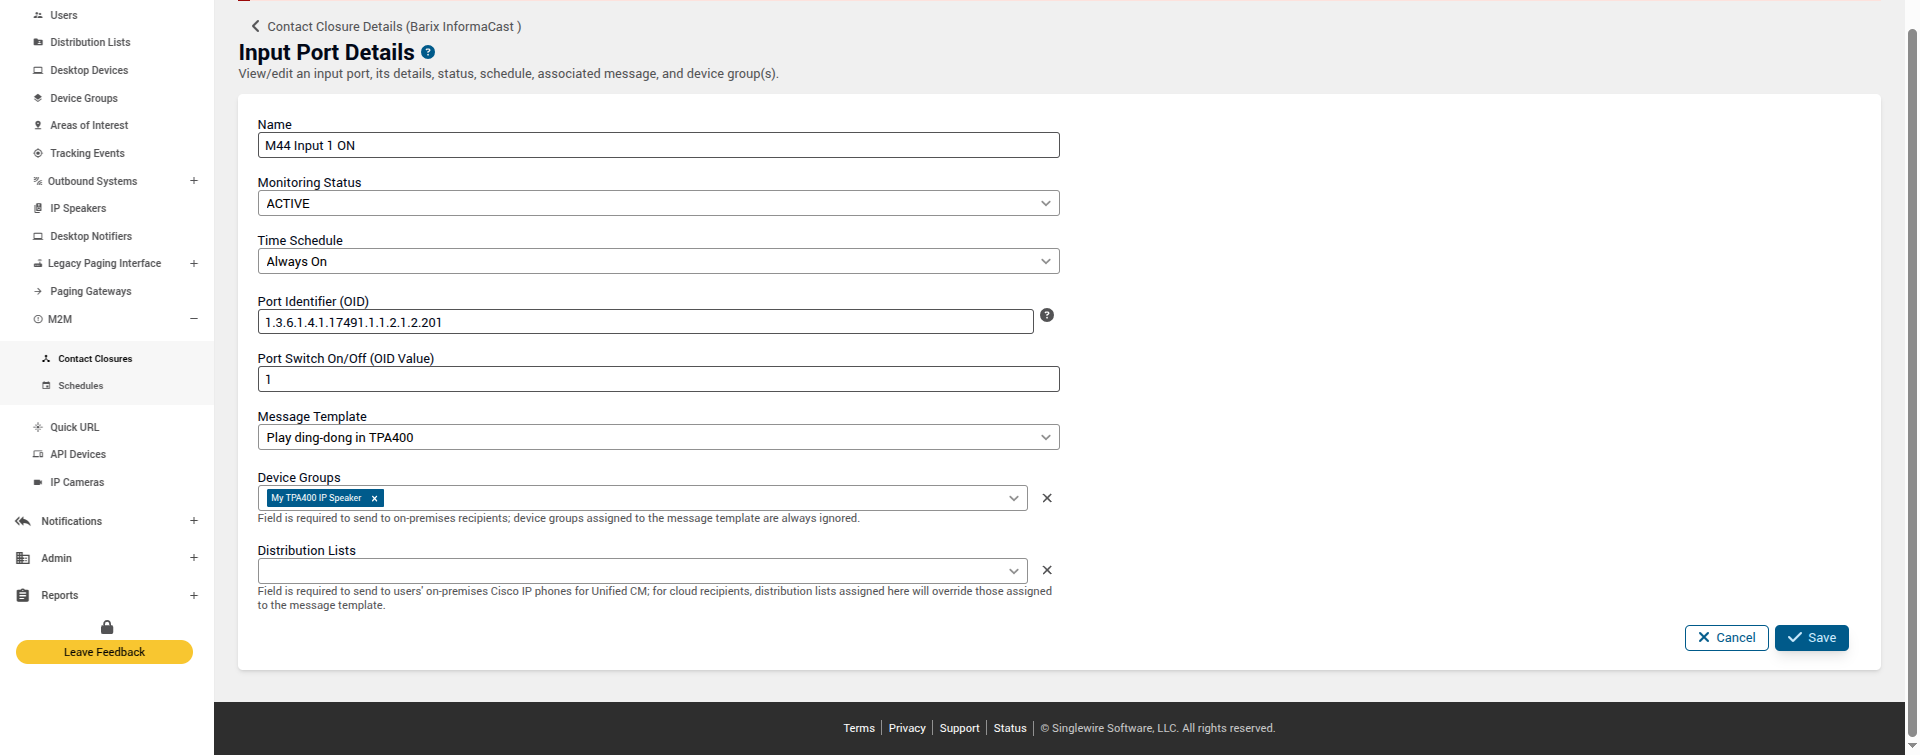
Fig.11 - Input Port Details -
Give details about your new Input Port.
-
Name: give a name to the port. Let’s call it: “M44 Input 1 ON”
-
Monitoring Status: default = ACTIVE
-
Time Schedule: default= Always On
-
Port Identifier (OID): enter the port identifier OID you want to use.
In this example, for the Barionet M44 Input1 we use the OID:1.3.6.1.4.1.17491.1.1.2.1.2.201 -
Port Switch on/off (OID Value): set the value to activate the input port.
Value = 1: the input will be activated when the switch is set to ON
Value = 0: the input will be activated when the switch is set to OFF. -
Message Template: Choose the message “Play ding-dong in TPA400” you created in the “Create Message Template” chapter.
-
Device groups: These are the group of endpoints already configured in InformaCast. Select the group “My TPA400 IP Speaker” that you created previously. This field is required to send to on-premises recipients.
-
Distribution Lists: default= empty
-
-
Once finished, click on “🗸SAVE”.
The first input port has been created.
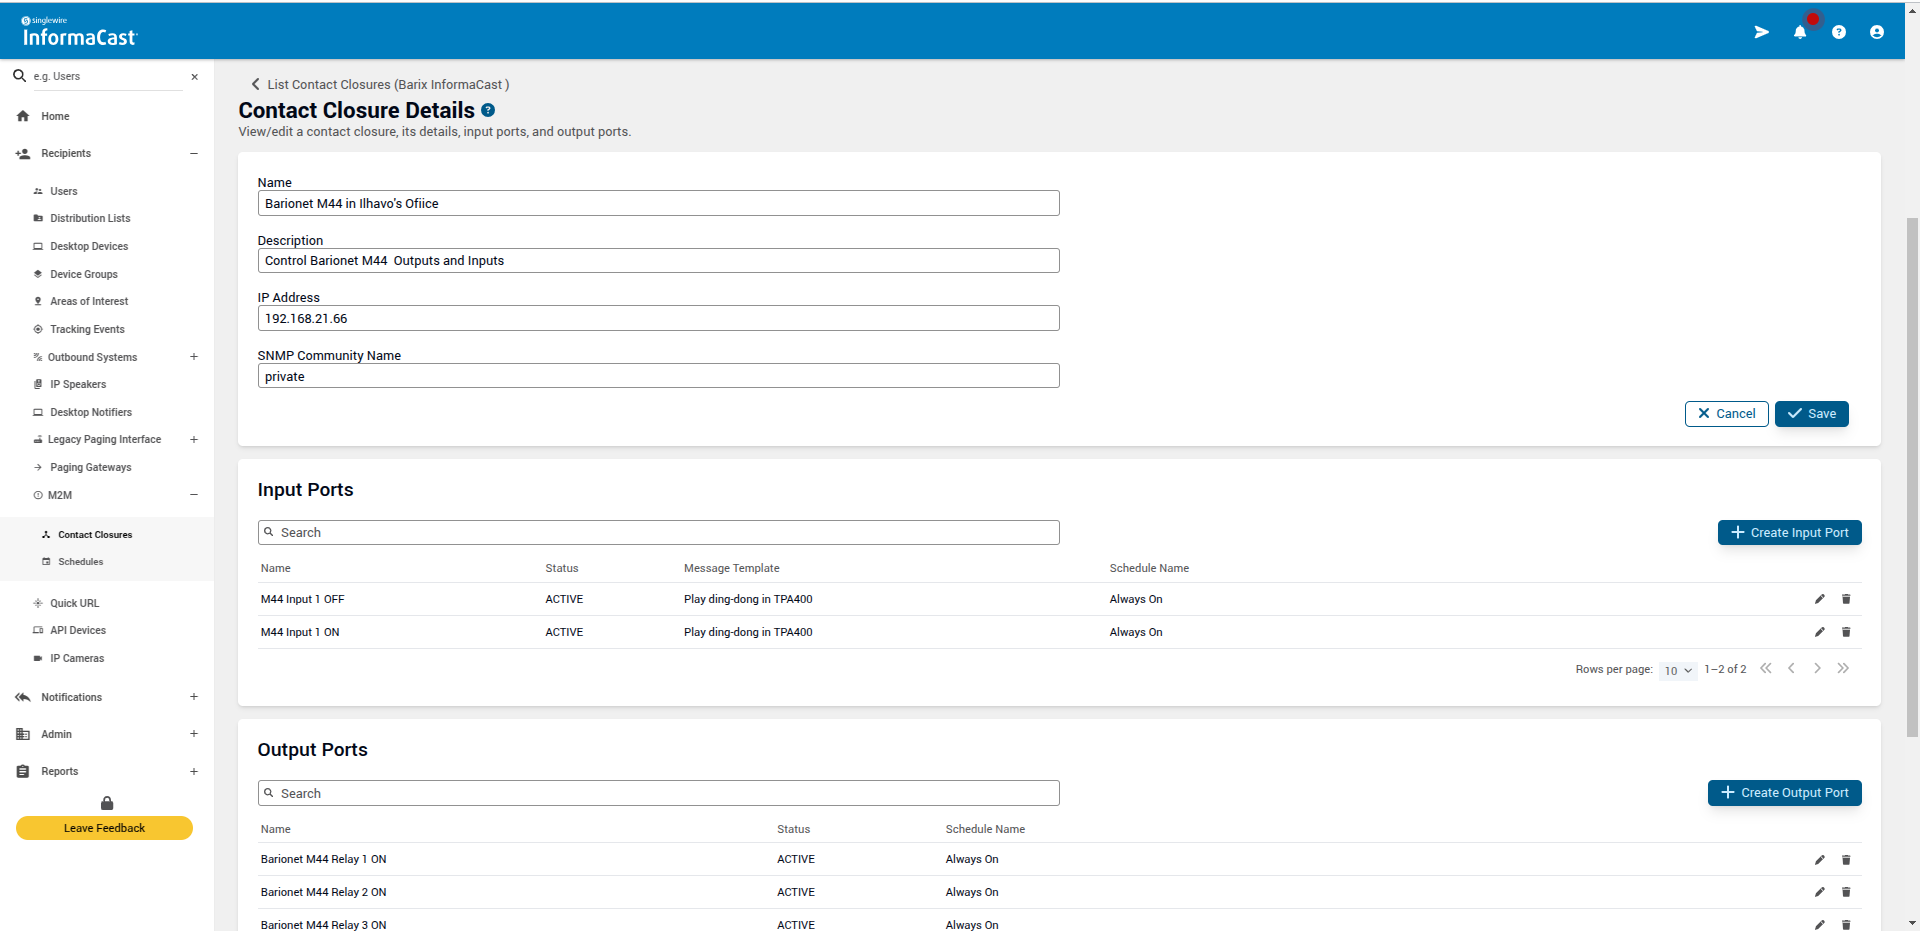
Repeat steps 1-3 in order to configure more ports. Barionet M44 offers 4 digital inputs that can be configured as Input Ports on InformaCast.
For more information about adding Contact Closures in InformaCast Fusion please refer to the InformaCast Fusion help here: https://documentation.singlewire.com/fusion/en/add-a-contact-closure.html
Trigger an InformCast notification
You are now ready to trigger an InformaCast notification using the Barionet M44.
-
Turn the switch ON to close the Barionet M44 Input1.
-
The Informacast Fusion platform will “see” the SNMP Trap from the Barionet M44 Input 1 and will trigger a notification.
-
The selected Message Template “Play ding dong in TPA” will be sent.
-
All recipient members included in the group “My TPA Office Group”, in this example our TPA400, will play the “dingdong.wav” file.
Troubleshooting Tips
Check the contact closure connection
Make sure the contact closure is correctly connected to the Barionet M44. In this example, when you turn the switch ON, the IN1 LED should light BLUE.
Update the Barionet M44 to the latest firmware
Update the firmware of your M44 device to the latest version available.
Read the Barionet M44 “Quick Install Guide” for a detailed description of the update procedure.
Be patient when updating the firmware. When the firmware is installed, the device will reboot on its own.
Check Barionet M44 traps configuration.
-
Make sure you are using SNMP “Protocol Version 1”.
-
Make sure you set the correct InformaCast Fusion IP address and port number as “Primary Trap Receiver”.
-
Make sure you selected the correct “Digital Inputs” you want to use.
Update the TPA400 to the latest firmware
Update the firmware of your TPA400 device to the latest version available.
Read the Barionet M44 “Quick Install Guide” for a detailed description of the update procedure.
Be patient when updating the firmware. When the firmware is installed, the device will reboot on its own.
Check the TPA400 “Speaker” status
Locate the “Speaker Status” tab in the TPA400 web interface. The “InformaCast” speaker status field should light green when a notification is sent.
-
If the status field lights green, the TPA400 is receiving the notification correctly. Please check the speaker connection with the TPA400.
-
If the status field does not light green, the TPA400 is not receiving the notification. Check the InformaCast Fusion configuration.
Check the InformaCast Fusion configuration
-
Make sure the TPA400 is registered in InformaCast Fusion.
-
Go to Recipients ➡️ IP Speakers. The TPA400 should be visible In the list with its MAC address.
-
If not, click “+Create IP Speaker” and follow the instructions do add the TPA400 using its MAC address.
-
-
Ensure that the correct OID value is being used in the M2M configuration (see InformaCast M2M OID Reference Page).
-
If an InformaCast M2M schedule is associated with the input port, make sure the contact closure was triggered within the schedule’s day/time parameters.
-
Make sure the correct TPA400 is included in “Device Groups” for the “Message Template” sent.
For technical assistance, send your queries at: support@barix.com or get in contact with your local distributor here: https://www.barix.com/buy/