Introduction
About IC Paging
IC Paging is a fully functional solution for building intercom and paging systems over IP-based networks that now supports the new Barix Annuncicom PS Touch 400 master station.
With IC Paging, BARIX devices can be easily configured and become part of the paging system in few minutes.
Being designed with a master/client architecture, the IC Paging application can be configured to run either as a master (called IC Master), or as client (called IC Client). The communication between the master and the client components of the paging system is implemented using the Barix IP protocol (BARP).
The IC Master station can control the IC Client's mode of operation, send broadcast paging messages to any or all of them, and activate their relays to drive different peripherals. Multiple masters can coexist and be configured within a system.
Also the in the package contained IC Graph software (Java based PC software) can be used as IC Master system/station.
The IC Client stations are typically used as door intercom stations or paging stations with background music playback. They can also be configured to initiate an intercom connection with up to two master stations.
Features
System:
-
master / slave architecture
-
BARP compatible: integrates seamlessly with other BARP applications like MP3_RTP_Streamer, IC Graph, BARP paging client
-
priority based audio messaging
-
easy WEB based configuration
-
multiple master configuration – “call all masters” and “call failover” scenarios
IC Master (Annuncicom PS Touch 400)
-
full or half-duplex mode of operation
-
hands-free mode for sending paging messages and half-duplex communication
-
48 zones keys + 8 groups/zones keys
-
PTT button with led
-
configurable audio messages priority
-
intercom (client call master)
-
caller ID display
-
configurable ringtones per client
-
till 8 configurable single or group target buttons
-
paging up to 56 devices
-
configurable unattended mode timeout
-
configurable call reject mode (for multi-master environment)
-
recordable unattended mode message
-
recordable custom message
-
control of local and clients volume
-
client background music (BGM) channel control
-
10/100 Mbit Ethernet connection supports automatic network configuration (DHCP / manual IP configuration)
-
HTTP / HTTPS web interface
IC Client
-
full or half duplex mode of operation
-
single or multimaster mode
-
playing paging messages
-
intercom to master
-
background music (BGM) playback and control
-
background music playback in mp3 format
-
AIPHONE door panels support
-
10/100 Mbit Ethernet connection supports automatic network configuration (BOOTP, DHCP, IPzator, and as well as manual static IP configuration)
IC Graph PC software
-
full or half duplex for Intercom mode
-
single or multimaster mode
-
playing paging messages
-
remote switching of client relay
Supported hardware
The IC Paging solution is designed to run on the following Barix devices:
-
Annuncicom PS Touch 400 Paging Station - with color touch screen display, PTT button and 48 zones + 8 groups/zones keys. It’s the perfect device to be run as an IC Master station.
-
Annuncicom 200 – can be used as a master or as a client. Provides mono BGM, intercom, door relay control and paging endpoint functionality. When used as a client, the available two wire interface allows the device to use the AIPHONE door stations in half-duplex mode.
-
Annuncicom 100 – can be used as a master or as a client. Provides mono BGM, intercom, door relay control and paging endpoint functionality.
-
Exstreamer 100, 105 – used as client. Provides stereo BGM and paging endpoint functionality.
-
Exstreamer P5 – used as client. Provides mono BGM and paging endpoint functionality combined with 5W amplified speaker output and Volume Source Control (VSC) port.
-
Exstreamer 110, 120 - used as client. Provides stereo BGM, door relay control and paging endpoint functionality. In addition, it has 2 lines LCD display and an IR port for remote control1.
-
Exstreamer 200, 205 - used as client. Provides stereo BGM and paging endpoint functionality. In addition, it has 2x25 W amplified speaker output and an IR port for remote control.
-
Annuncicom PS1 – this device can be used as a client or as a two buttons master, allowing to answer incoming intercom call requests and to page a predefined group of targets (Group key 1 Address Map from the web configuration page).
-
Annuncicom 60 – used as a client.
NOTE: other Barix devices not in this list may or “may not” work correctly with IC Paging application.
NOTE: M400, MPI400, MPA400 and TPA400 running IP Audio Client firmware (IPAC) can work as IC Paging clients (see IPAC manual https://help.barix.com/exstreamer4xx/ip-audio-client-user-manual-standard-mode ).
NOTE: when Annuncicom PS1 is used as a master, all features using the USB stick are disabled (i.e. customized station ringtones, unattended mode, recording unattended and custom messages).
Additional documents
Technical specifications for the supported devices can be found in the corresponding product sheet which can be downloaded from our site www.barix.com.
The IC Paging System has been developed in BCL and is distributed with its source code enabling users to further customize it if they wish to. For detailed technical information about the programming language please download the “Barix Control Language (BCL) Programmers Manual” from our website.
IC Paging ABCL Firmware
Barix provides the IC Paging solution as a prebuilt ABCL package containing the IC Master and IC Client applications. The IC Master and IC Client are guaranteed to work only when they are from the same ABCL IC Paging package. Using IC Master and IC Client from IC Paging packages with different versions may not work correctly, since new functionality are continually being developed.
About this manual
Chapter overview
This manual is divided into the following chapters:
Chapter Running IC Master describing the functionality provided by the IC Master, the key mapping and the usage of the web configuration UI.
Chapter Running IC Client giving an overview of IC Client usage and configuration.
Chapter Running IC Graph mentioning what is IC Graph and how to use the IC Graph master.
Chapter Implementing example paging system explaining how to create a simple intercom and paging system using BARIX IC Paging solution.
Chapter Additional information explaining how to rescue a device via the serial port, how to use the IC Paging in multimaster environment, and providing a quick reference to BARP address bitmap handling and BIN/DEC/HEX conversion.
Chapter Dictionary giving a short explanation of some of the most important terms used in this manual.
Running IC MASTER
Booting up PS-Touch IC Master
Power up the Annuncicom PS Touch 400 . If the SonicIP is enabled, you will hear the IP which the PS-Touch 400 got from your DHCP server.
At the end of boot process, the “Ready” message will be displayed for a short time.
If a different message is displayed please contact Barix support.
2.2 Annuncicom PS Touch 400 Layout
The Annuncicom PS Touch 400 Paging Station has color touch-screen display, flexible gooseneck microphone, loudspeaker, PTT button with led.
It supports 48 zones keys + 8 groups/zones keys.
Key layout for PS-Touch is shown in the web UI home page, as in Illustration 1:
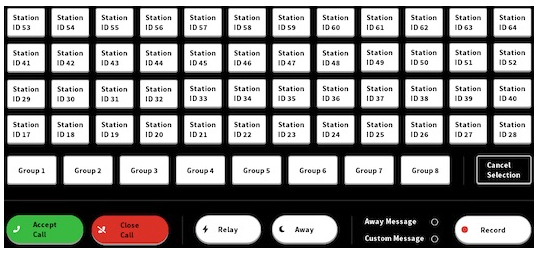
Illustration 1: IC Master keyboard layout
The key functions are the following:
Accept Call: accept an incoming call. PTT button in HDX mode (it lights yellow and shows Push to Talk).
In half duplex mode press and hold to answer incoming call and start talking, release to listen. If the hand-sfree mode is activated, then the talk mode can be voice controlled. In this case the voice activation level, and the time-out are configured via the web UI.
NOTE: closing the current call when there is a second incoming call is possible only in FDX mode. In HDX mode the key is used as a PTT, so in this case only rejecting the incoming call is possible.
Close Call: hang-up current call; pressing this key will cancel an incoming call (either in idle mode, or when the IC Master is in a call session with one client, and another client is calling).
Relay: trigger the connected client's relay (door open) for 5 seconds if a call is in progress.
Cancel Selection: clear current target/group selection.
Away: enable/disable “unattended mode” (it’s disabled also pressing “Close Call” and “Record” keys). Clients that try to call a master that is in unattended mode will have the 'unattended message' played to them and the call will be terminated once the message has been played.
Pressing and holding this key for 4 seconds will enter the master in “call reject mode”. When the master is in this mode, and a client calls in, instead of opening a call session and sending the unattended message, it will send a special message to the client informing that it is not available. In this case the client should call the next master in its list.
NOTE: if the IC Master does not cancel/answer the second call, the IC Client will continue ringing and hang-up automatically after a certain amount of time (configurable via the IC Client web UI).
NOTE: when the unattended mode is disabled from the web UI, pressing this key puts the master immediately in “call reject mode”.
Away Message: when selected allows to listen the unattended message locally.
Custom Message: when selected without any other selection allows to listen the custom message locally. When there are targets selected, the custom message is sent to the selected destination/s.
Record: record Custom or Away message. Keep pressed Record key and then press Away or Custom Message to record the corresponding message. Recording stops when Record key is released.
Group 1 - Group 8: select page to corresponding group. The address bitmap assigned to these keys are configured from the related IC Master web UI address map configuration page.
Station ID 1 – Station ID 48: select client ID 17-64.
PTT button (physical button under the display): this is the Push-To-Talk button for paging and when the hand-sfree mode is not activated. In hands-free mode, press the button once to activate the paging mode, and once again to stop it. The ring of the button lights red when paging is active.
Important note !!!
In HDX mode, Accept Call is used as PTT key (it lights yellow and shows Push to Talk); when pressed, the microphone of the IC Master is switched ON, the speaker turned OFF, while the mic of the IC Client is automatically switched OFF, and its speaker turned ON.
How to change Targets Keys names
To change targets keys names click the gear icon on bottom right, select the key and edit; then click on “Save” and on the green check button on bottom right.
NOTE: the key names are not reset applying factory default reset from web UI.
IC MASTER Web Home page
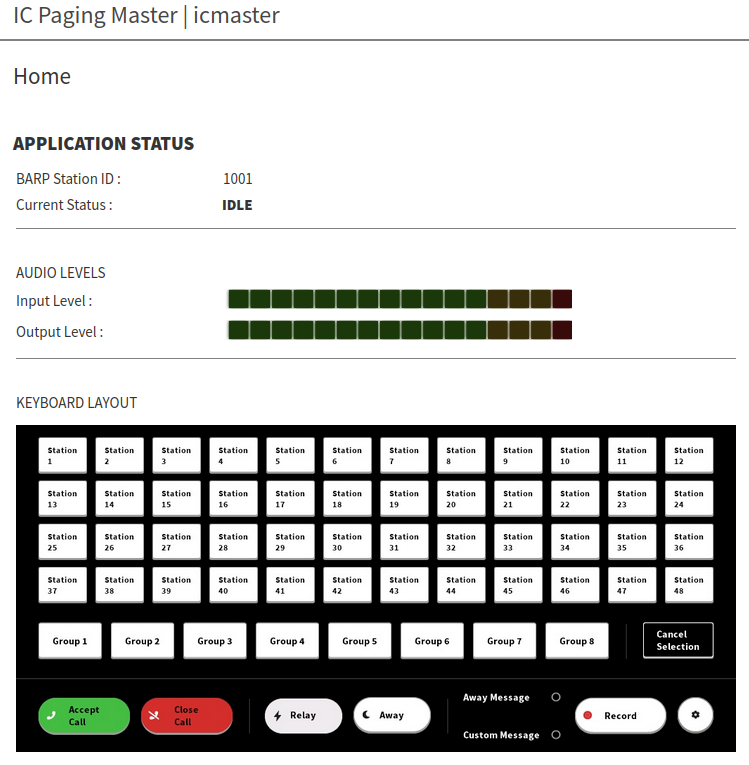
Illustration 2: IC Master home page
The device home page is dynamically auto-refreshed every second and shows some useful run-time application details.
Under the “APPLICATION STATUS” section is visible the BARP station ID and the current application status.
Under the “AUDIO LEVELS” section input and output audio levels are displayed, in dB.
The section “KEYBOARD LAYOUT” shows the layout of the keys, as supported and used in the current hardware.
From top left to bottom right, Station 1 → Station 48 correspond to ID 17 → ID 64.
IC MASTER Web Configuration pages
The configuration of the IC Master is very intuitive and easily done via the web UI. Example snapshots of the basic settings and advanced settings pages are shown on Illustration 3 and Illustration 7.
GENERAL SETTINGS
Device Alias
Define an alias for the device. Useful for distinguishing multiple devices on the same network and browser favorites. Need to reload page to view changes.
Default: "icmaster"
Audio Settings
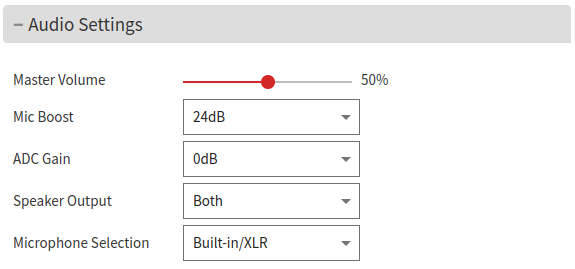
Illustration 3: PS Touch 400 Audio Settings
Master Volume
Main speaker volume.
Default: "50%"
Mic Boost
Select here the value for Mic Boost. It can be either "Off', or set between 24dB and 42dB.
NOTE: You might need to change this value when switching from Built-in/XLR to the external microphone.
Default: "24 dB"
ADC Gain
Choose a value between -4.5dB and +6dB for AD Converter gain.
Default: "0 dB"
Speaker Output
Select External connected, Built-in or both speakers.
Default: "Both"
Microphone Selection
Select External connected or Built-in/XLR microphone.
Default: "Built-in/XLR"
Network Settings
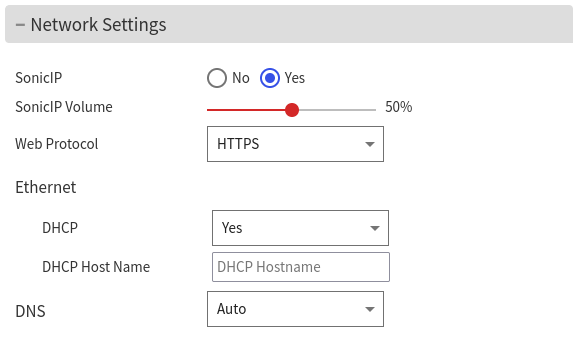
Illustration 4: PS Touch 400 Network Settings
SonicIP® Volume
Sets the volume at which the SonicIP® will be announced at boot.
Default: "50 %"
Web Protocol
Changing the web protocol from HTTP to HTTPS secures the web connection with the device web interface (web server) encrypting the communication. This parameter it is not affecting the HTTP audio stream functionality.
Default: "HTTP"
NOTE: After changing the protocol make sure to reload the page with the proper URL "http://" or "https://"
Ethernet DHCP
Enable "DHCP" for automatic assignment of IP address, Netmask, Gateway and Primary/Alternative DNS.
Select "Static" for manually assigning IP address, Netmask, Gateway and Primary/Alternative DNS.
NOTE: If set to "Static" all fields are mandatory (except Alternative DNS).
Default: "Yes"
Ethernet DHCP host name
When "DHCP" is selected as protocol, you can optionally set a DHCP host name to be sent in the DHCP request.
DNS
Select the method to define a Domain Name System.
Default: "Auto"
Primary DNS
Define manually the primary Domain Name System.
Alternative DNS
Define manually the alternative Domain Name System.
Time Settings
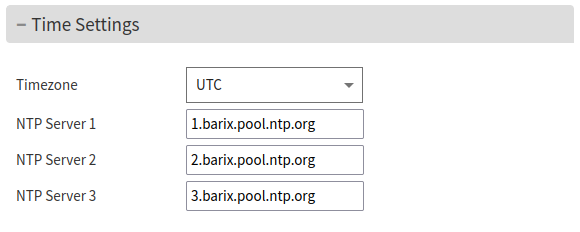
Illustration 5: PS Touch 400 Time Settings
Timezone
Select the timezone more appropriate to the device.
Default: "UTC"
NTP
Set up to 3 NTP servers for Internet time adjustment.
Security Settings
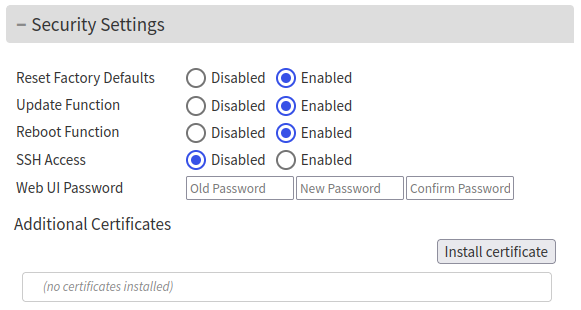
Illustration 6: PS Touch 400 Security Settings
Reset Factory Defaults
Enable or disable the "Reset Factory Defaults" feature from both web UI "DEFAULTS" tab and device front panel RESET button. In order to revert all settings to factory defaults click on the "Defaults" web UI page, or keep the Reset button pressed for more than 10 seconds.
Default: "enabled"
Update function
Enable or disable the WEB Update function of the device.
Default: "Enabled"
Reboot Function
Enable or disable the "Reboot" function with the RESET button and from the WEB UI REBOOT tab.
Default: "Enabled"
SSH
SSH might be useful in some support cases. Enable it only when Barix support asks you to do so, else leave it disabled to avoid having the device listening on the ssh port while operating.
Default: "Disabled"
Web UI password
This group of fields is visible as long as no password is set.
Enter the admin password (up to 16 characters) both in the "Password" and "Confirm Password" fields, then click the "Submit" button. After the restart you should close the browser window and open a new browser window. You will be asked to supply user name and password. Use the default admin user name and the password that you have just set in order to access the web UI.
Additional Certificates
Upload here additional Certificates (.crt) file that might be required to secure the connection with the device.
PAGING SETTINGS
BARP Settings
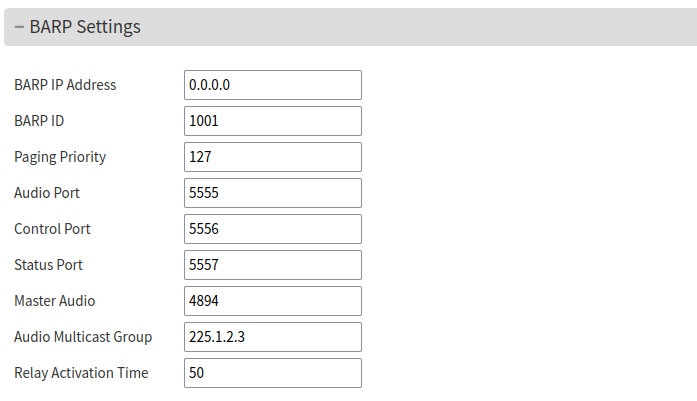
Illustration 7: PS Touch 400 BARP Settings
BARP IP Address
If set to 0.0.0.0 or an invalid multicast address, then BARP messages are broadcasted.
In any other case, BARP messages are multicasted.
Default: “0.0.0.0”
BARP ID
Enter here the BARP system ID of this master station. The ID is used from the clients to identify the source of the control messages in multimaster environment.
Default: “1001”
Paging Priority
Enter here the priority of the audio messages sent by this master station. This setting is useful in multimaster environment when a client receives audio messages from many masters simultaneously. In this case the client will play the stream with the highest priority.
The priority must be in the range [1-254]. Priority "0" (the highest) is reserved for emergency priority port,
priority "255" (the lowest) is reserved for BGM.
Default: “127”
Audio Port
UDP port at which paging audio packets will be sent. Clients should be configured with the same port.
Default: “5555”
Control Port
UDP port to which all control messages from master will be sent. Clients should be configured with the same port.
Default: “5556”
Status Port
UDP port at which all status messages from clients/masters are received. All clients and masters should be configured with the same port.
Default: “5557”
Master Audio
Additional audio port used by master during intercom call.
Default: “4894”
Audio Multicast Group
Multicast group address for paging the audio.
Default: “225.1.2.3”
Relay Activation Time
Time duration (ms) for the relay activation. This time is sent to the client.
Default: “50 ms”
Audio Settings
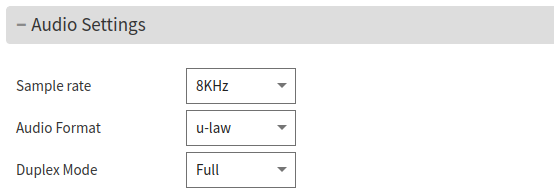
Illustration 8: PS Touch 400 Audio Settings
Sample Rate
Frequency of capture and playback. Valid options are 24KHz or 8KHz.
Default: “8KHz”
Audio Format
Codec of capture and playback. Valid options are u-law or a-law.
Default: “u-law”
Duplex Mode
Choose the desired mode of communication.
Default: "Full"
Paging Stations Custom Ringtones
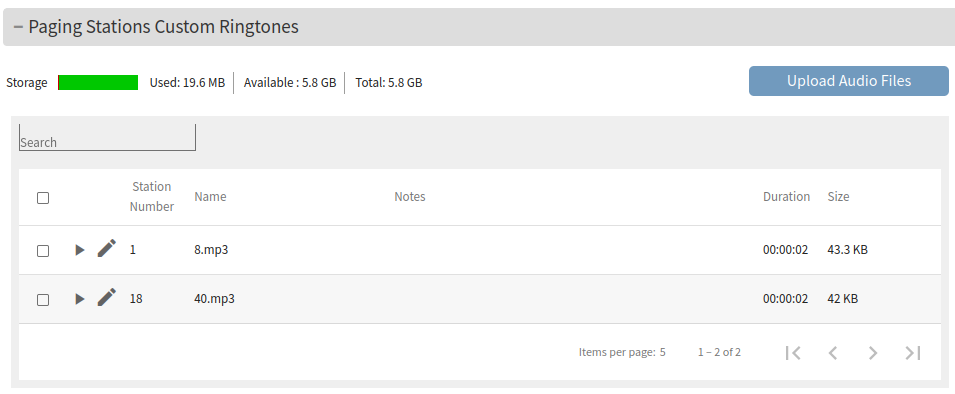
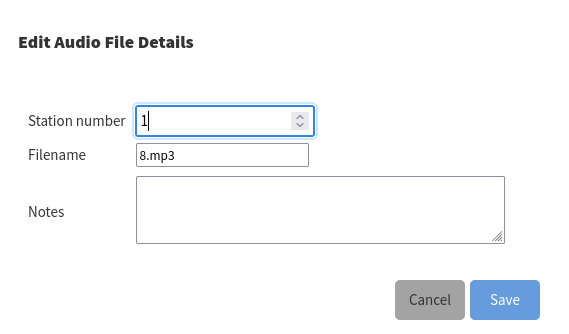
Illustration 9: PS Touch 400 Paging Stations Custom Ringtones
Upload audio files to be available to be played as ring sound on incoming call.
You can edit the name of the file and the calling Station number (ID).
To delete the file just select it with the square; the trash icon will compare on the top right angle.
Supported audio formats: mp3, wav, ogg and zip.
Please take into consideration that the maximum upload size is 256MB.
There's a "play" button near each audio filename that allows to play it immediately. It will play the file until the end, unless one presses the "stop" button.
NOTE: Please always press "stop" to ensure proper operation.
Groups
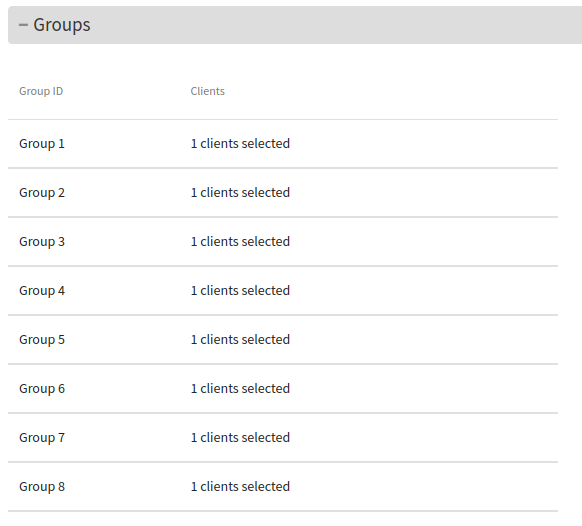
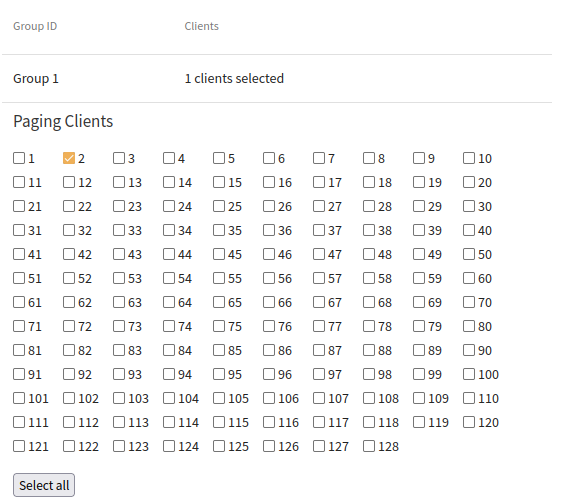
Illustration 10: PS Touch 400 Group Settings
Select here, by ID, the IC Client devices you want to add to a Group.
UPLOADING BACKGROUND IMAGE
On Paging Settings / Touch Panel Background Images it’s possible to upload a background image.
Prepare the background image using your favorite picture tool (ex. PhotoShop, GIMP, Paint, etc) taking into account the following information.
-
The image size has to be 1024x600 pixels, exported in JPG format and not more than 2MB.
-
The status text box at the top of the screen has a size of 464x84 pixels, and is located at coordinates (x=287, y=37) counting from the top left corner of the image; it cannot be moved, so design your background image in a way so that the text box does not cover a significant part from it.
-
The dark gray horizontal separator under groups buttons (x=0, y=491), the two vertical separators at the sides of Relay and Away buttons (x=331, y=519 and x=613, y=519) and the vertical separator on the left of Cancel Selection button (x= 867, y=410) cannot be hidden or moved.
-
Once uploaded, the background image cannot be deleted by resetting to factory defaults; if you like to remove it, then you can prepare a fake image in size 1x1
pixels, and upload it. -
If the image is broken, or not in the proper format, the panel may display "Picture display error!" message; nn this case correct the picture, and repeat the upload again.
SYSTEM STATUS
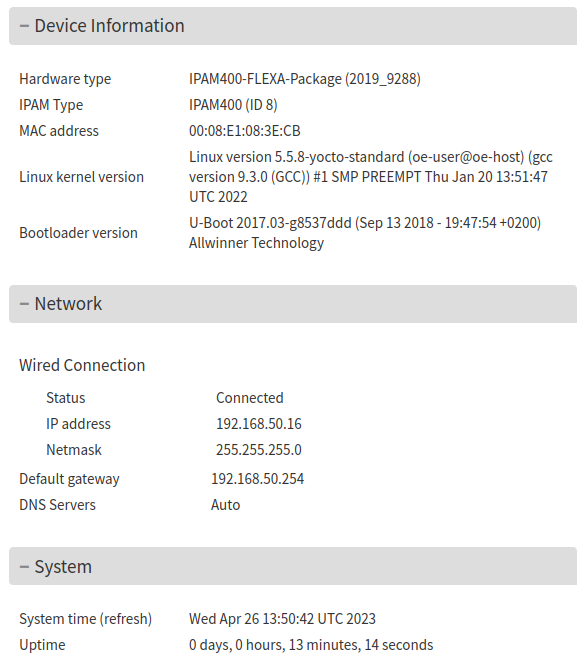
You can see here the summary about system information of PS Touch 400.
LOGS
The Logs page displays the events occurring operation of the Paging Gateway device. Logs are useful for debugging issues, they give a detailed insight into every process within the OS. On the top-right corner it's possible to click the button “Download all messages” to download all log files.
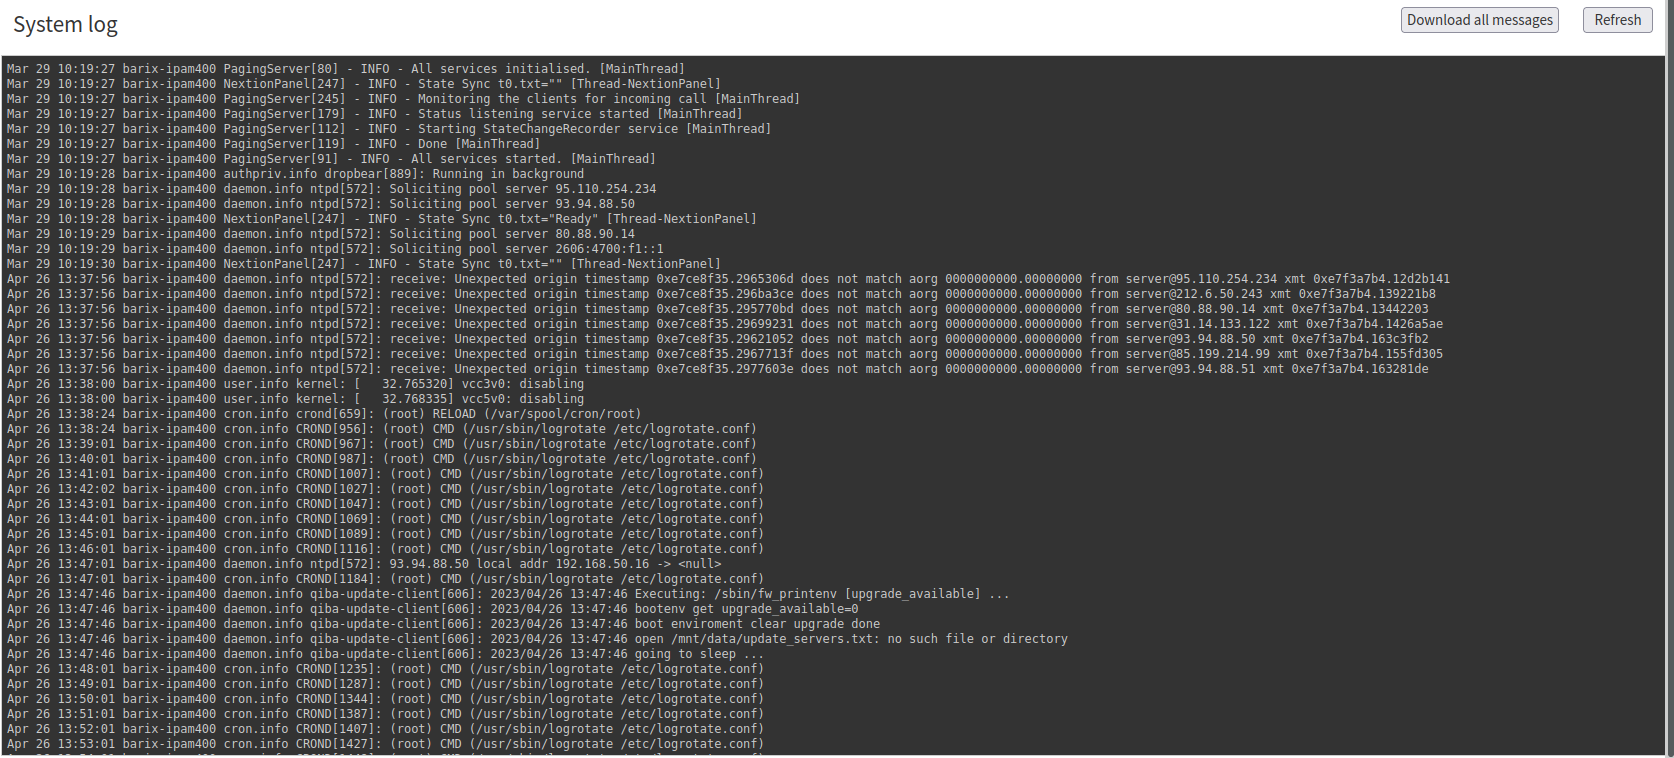
Illustration 12: PS Touch 400 Logs page
NOTE: When contacting the Barix support for an issue, it's useful to attach along with the communication the Log files downloaded and the status page screenshot. Do not forget to give a description as much detailed as possible about the steps made that led to the issue.
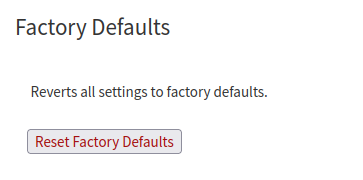
DEFAULTS
The Defaults page allows performing a soft-reset. Such operation reverts all settings except the network settings back to factory defaults (it doesn't perform a firmware downgrade, just a reset of the settings for the running application). The reset to factory defaults can be enabled or disabled from the settings page, under "Security Settings".
UPDATE
PS Touch 400 offers the possibility to update the firmware of the device from this page.
In the same page it’s possible to visualize the current firmware version running.
NOTE: Run always the latest firmware available from Barix as it might include bug fixes, improvements or new useful features. Check the latest firmware available from help.barix.com.
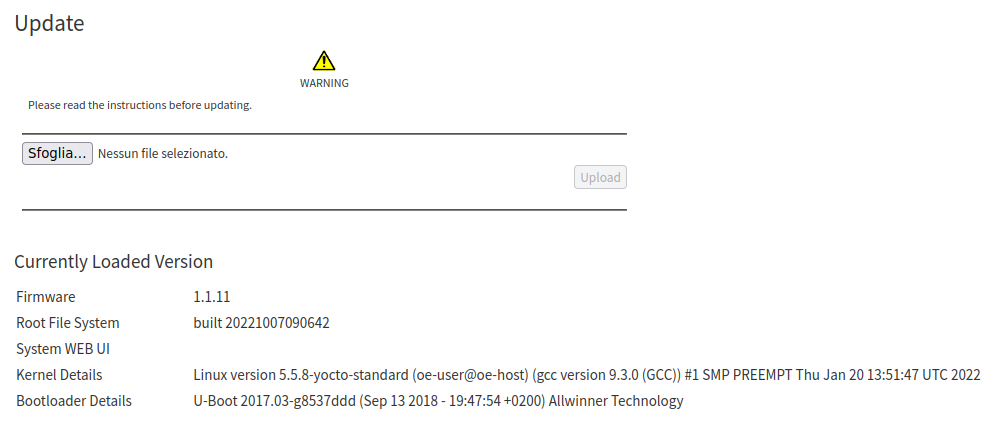
Illustration 14: PS Touch 400 firmware update page
Update the firmware
|
1 |
Download the firmware from help.barix.com. The firmware is a .tar archive (e.g. update-core-image-barix-icpaging-master-1.1.11.tar). |
|
2 |
In the Update page click on “Please click here to start the update”, the system update page is accessed. 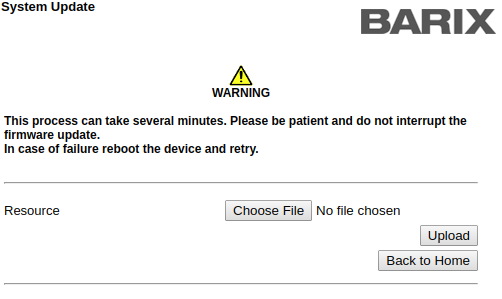
|
|
3 |
Click on “Choose File”, locate and select the corresponding TAR archive just downloaded. |
|
4 |
Click on “Upload”. A processing bar will show up indicating the upload process completion. Wait until the process is finished (don't disconnect the power supply during this operation). 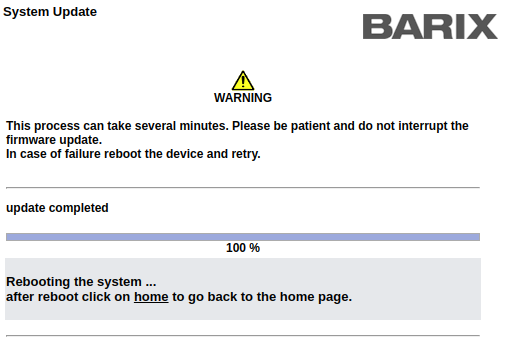
|
|
5 |
Once the upload is complete the device will reboot automatically. Wait ~2 mins and reload the page or click the home link to go back to the home page. If necessary, after the update, perform a hard reset of your browser to empty the cache and hard reload. (How to empty cache and hard reload). |
REBOOT
The reboot is the process of power cycling the device (ON → OFF → ON). It’s a complete power cycle.
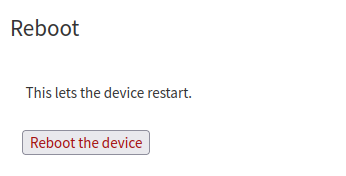
Illustration 15: PS Touch 400 Reboot page
Editing keys
On PS Touch 400 you can now move and hide/show some of the screen buttons.
-
To activate the key editing mode touch an empty space on the touch panel and hold it for 5 seconds; the “Edit mode! Long press (5s) to save changes, 20s to
restore to panel defaults” message will appear on the screen. -
To move a button, just touch it and move it around.
-
To hide a button, just touch and hold (without moving) it for 3 seconds; the button will be shown with 40% brightness, meaning that it will be hidden when the
changes are saved. -
To unhide a button, just press and hold a button with reduced brightness until it shows with 100% brightness.
-
To save the changes, touch the screen on a free space, and hold it for 5 seconds; the buttons configuration will be stored on the device and reloaded after a
successful start. -
The original configuration is not restorer with Factory Default Reset; to restore the original configuration, touch the screen on a free space and hold it for 20 seconds.
Legal Information
© 2023 Barix AG, Zurich, Switzerland.
All rights reserved.
All information is subject to change without notice.
All mentioned trademarks belong to their respective owners and are used for reference only.
Barix and IC Paging are trademarks of Barix AG, Switzerland and are registered in certain countries.
For information about our devices and the latest version of this manual please visit www.barix.com.