Annuncicom PS Touch 400 IC Paging EVO Quick Install Guide
Package content
Annuncicom PS Touch 400
XLR gooseneck microphone
About IC Paging Evo
IC Paging Evo is a fully functional application for building intercom and paging systems over IP-based networks. IC Paging Evo merges Barix IC Paging and Simple Paging solutions into a single application where you can easily select the solution that best suits your needs. This way, Barix devices, including the new PS Touch 400 Master Station, can easily be configured and become part of a paging system in just a few minutes.
Although similar, Barix IC Paging and Barix Simple Paging applications have different features and can work differently depending on your needs. Please visit https://www.barix.com/product/ic-paging/ and https://www.barix.com/product/simple-paging/ for more information.
The communication between the master and the client components of the paging system is implemented using the Barix IP protocol (BARP).
Set up the PS Touch 400
The PS Touch 400 has a color touch-screen display, a flexible gooseneck microphone, 5W built-in loudspeaker and a PTT (push-to-talk) button with LED light ring. It can be powered over PoE or an optional 24VDC, 15W power adapter. The device's display layout and Web Interface depend on the application being used. The default application is “Simple Paging”. Please read the “Changing the current Application” chapter to learn how to change the application in use.
To start the PS Touch 400 follow these steps:
Attach the provided microphone to the connector located on the top of the device.
Connect the PS Touch 400 to your PoE switch (or PoE adapter) using a regular Ethernet cable . If PoE is not available to power the device use an optional 24VDC, 15W power adapter.
By default, the device is configured to run as a DHCP client. It will acquire an IP address at boot, and it will announce it through the built-in loudspeaker.Be ready to listen to the IP address announcement and note it.
You can also use the “Barix Discovery Tool” available here https://help.barix.com/tools/discovery-tool to find the PS Touch 400 IP address.
Booting the PS Touch 400 with Simple Paging application
When shipped from factory, the PS Touch 400 default application is “Simple Paging”. During boot, the display shows the message: “Initializing the Simple Paging client”.
When the boot process ends, the message changes to: “Ready for paging”.
The display turns Off after a few seconds of inactivity. Just touch it to turn it On again. Display inactivity timeout can be adjusted with the Web Interface.
In your web browser, enter the IP address you retrieved previously.
Login to the PS Touch 400 Web Interface using “admin” as username and the password printed on the back of the device and on the supplied stickers.
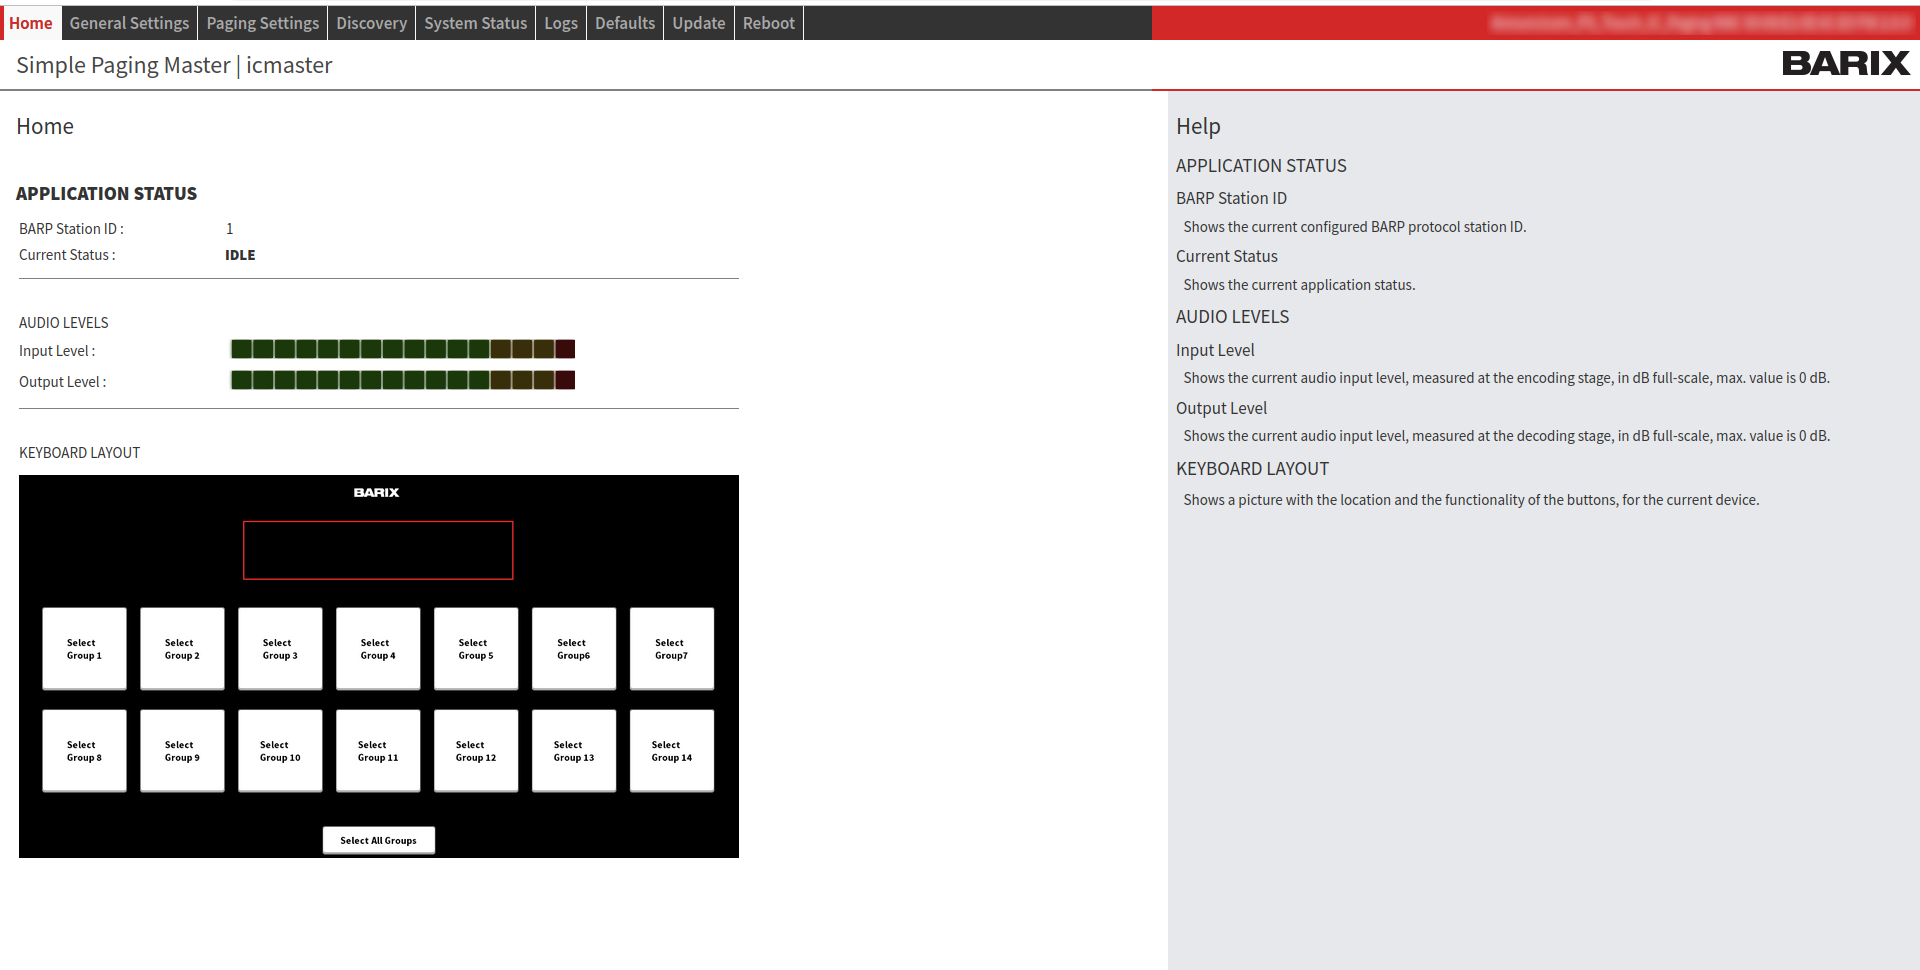
The Home page shows some useful information and the PS Touch 400 keyboard layout for the Simple Paging application.

Fig.1 - Simple Paging Home Page
APPLICATION STATUS: shows the BARP station ID and the current application status.
AUDIO LEVELS: Used for real time check of Input and Output audio levels.
KEYBOARD LAYOUT: This is the keyboard layout for the Simple Paging application.
Simple Paging button functions
Button | Function |
|---|---|
Group 1 ➡️ Group 14 | Select the corresponding Group(s) to be paged. |
Select All Groups | Select all buttons light blued for paging. |
PTT button | Physical Push-To-Talk button.
|
For more information about the Simple Paging application, please read the IC Paging Evo User Manual.
Changing the current application
To change the current application being used with the PS Touch 400 follow these steps:
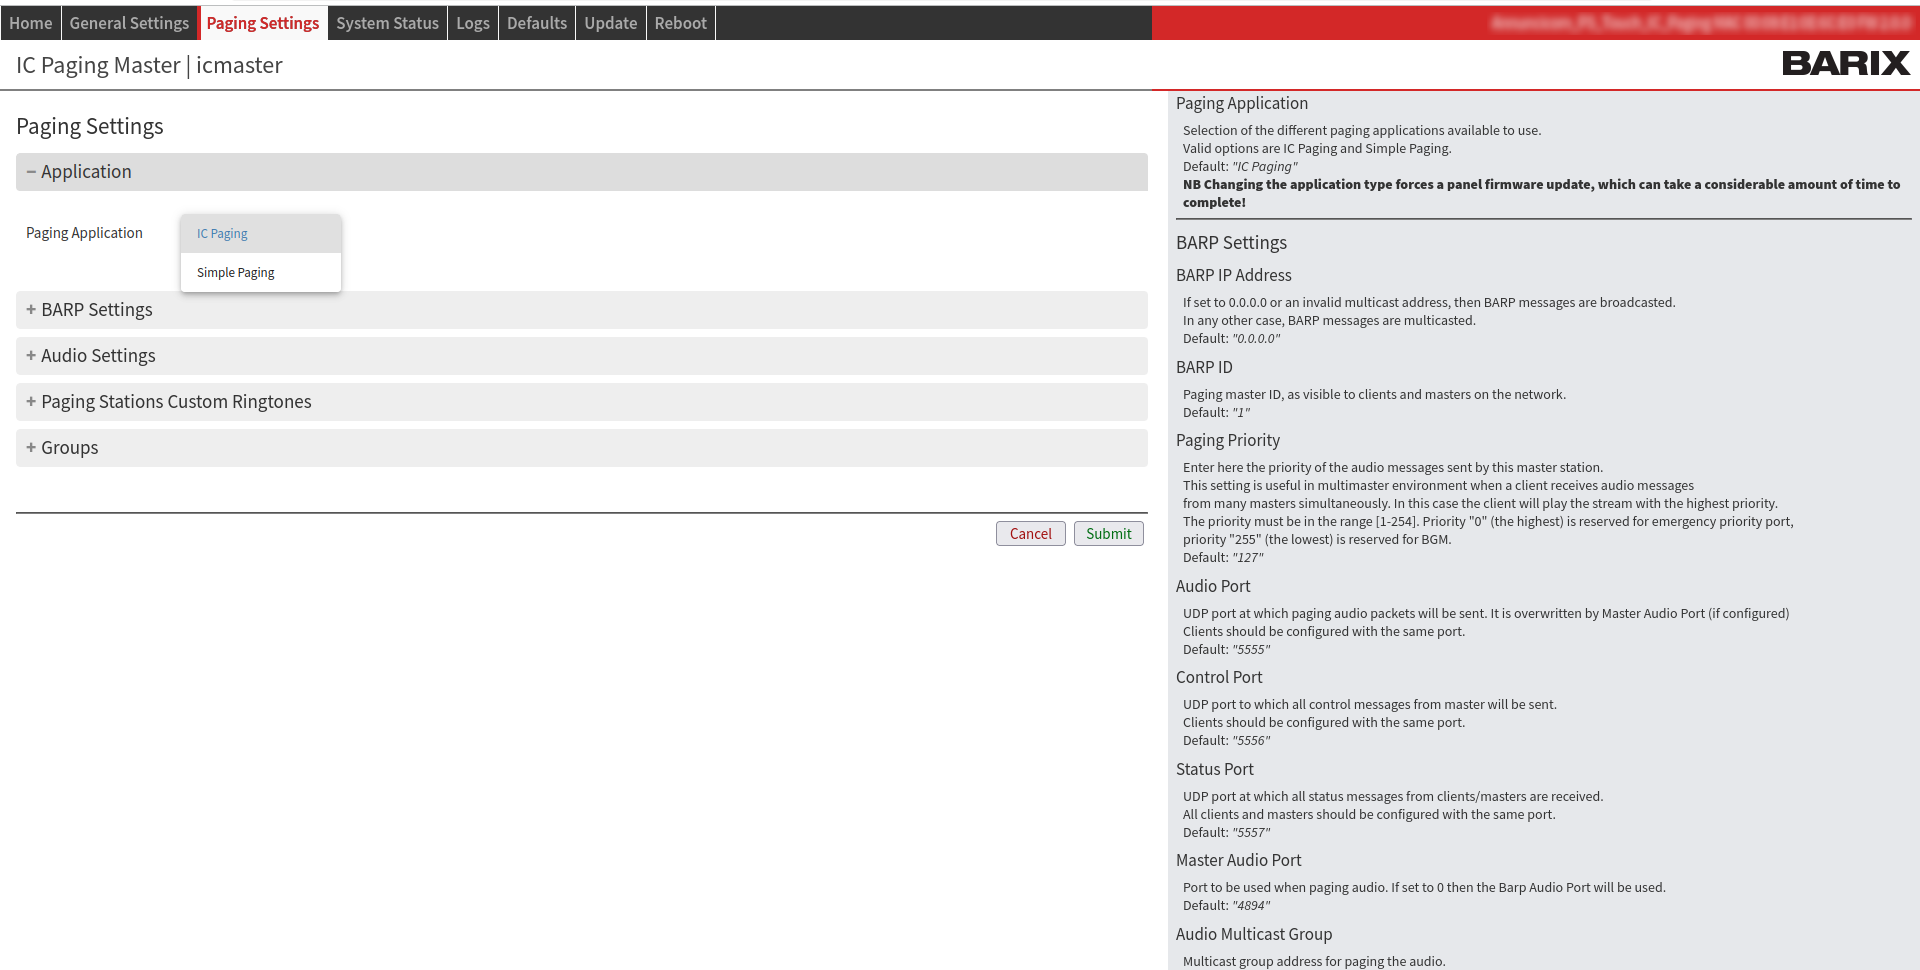
In the Web Interface go to: Paging Settings ➡️ Application ➡️ Paging Application.

Fig.2 - Paging Application selection
From the drop-down list select “IC Paging” or “Simple Paging” accordingly.
Click the Submit button.
Please wait until the device loads the application and reboots. The procedure can take some minutes.
DO NOT interrupt the process or reboot the device to avoid permanent damage.
Booting the PS Touch 400 with IC Paging application
Please use the procedure described above to change the current application to IC Paging if necessary.
During boot, the display shows the message: “Initializing the IC Master”.
When the boot ends, the message changes to: “Ready for paging”.
In your web browser, re-enter the PS-touch 400 IP address if necessary.
Login to the PS Touch 400 Web Interface using the same username and password as previously done.
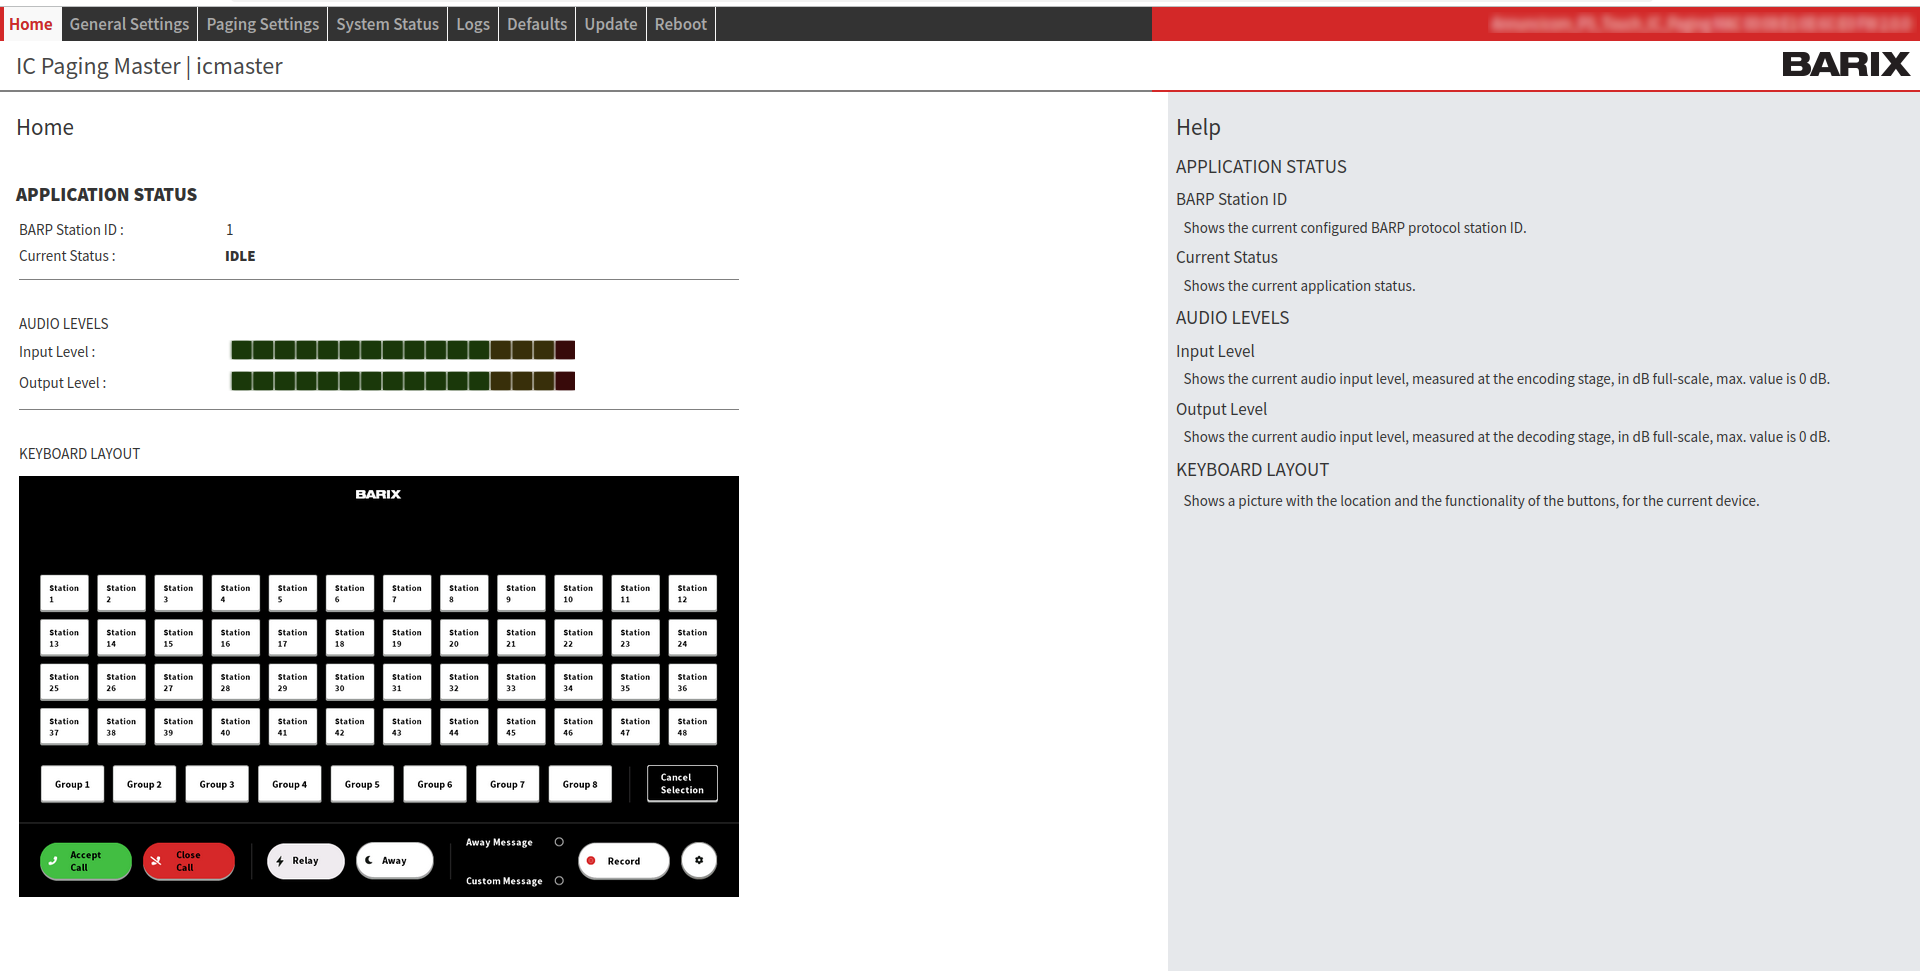
The web home page shows some useful information and the PS Touch 400 keyboard layout for the IC Paging application.

Fig.3 - IC Paging Home Page
APPLICATION STATUS: shows the BARP station ID and the current application status.
AUDIO LEVELS: Used for real time check of Input and Output audio levels.
KEYBOARD LAYOUT: This is the keyboard layout for the IC Paging application.
IC Paging Key functions
Key | Function |
|---|---|
Station 1 ➡️ Station 48 | Select the target station(s) to page. |
Group 1 ➡️ Group 8 | Select to page the corresponding target Group(s). |
Cancel Selection | Clear current target/group selection. |
Accept Call | Accept an incoming call. Light yellow (Active Call) when the call is accepted. |
Close Call | Hang-up current call; pressing this key will also cancel an incoming call. |
Relay | Triggers the connected client's relay (door open) for the Relay Activation Time if a call is in progress.
|
Away | Enables/disables the Away and Call Reject “unattended” modes. When the Away mode is enabled, any client attempting to call the master will hear the recorded “Away Message”, after which the call is automatically terminated. To activate this mode:
In the Call Reject mode, instead of playing the unattended message or opening a call session, the master sends a special signal to the client indicating that it is unavailable. In this case the client should call the next master in its list. To activate this mode:
|
Away Message | Allows to listen the unattended message locally. |
Custom Message | Opens the messages tab (16 messages). Allows listening the selected message locally when there is no target selection. When targets are selected, the selected message is sent to the selected destination/s. |
Record: | Record Custom or Away messages.
|
⚙ (settings icon) | Use to access the “Single Target Buttons Name Configuration Page”.
|
PTT (Push-To-Talk) Button | The physical button under the display.
|
In HDX when pressed, the microphone of the IC Master is switched ON, the speaker turned OFF, while the mic of the IC Client is automatically switched OFF, and its speaker turned ON.
Rename Target Station button name
Target buttons are used to page individual stations/ zones depending on your configuration. To easily identify stations/ zones you can rename buttons as follows:
On the PS Touch 400 touch display press the ⚙ gear icon.
Press a “Station” button.
Use the keyboard to type the name you want to assign.
Press SAVE.
Press the green check button.
NOTE: Key names are not reset when applying the Factory Reset function.
For more information about the IC Paging application, please read the IC Paging Evo User Manual
Reboot / Reset to Factory Defaults
Reboot
Using the “Reset” button:
Use a pointed tool to shortly press the “RESET” button on the back panel of the device.Using the Web Interface:
Go to the “Reboot” tab.
Click on the “Reboot the device” button.
Wait a few minutes until the process ends.
Factory Defaults
Go to the “Defaults” tab.
Click on “Reset Factory Defaults”.
Wait a few minutes until the process ends.
All settings will be reverted to the factory defaults except “Network settings” and key “names”.
Any uploaded or recorded audio files will be deleted.
The page will be automatically reloaded after reboot is finished. Login the Web Interface using “admin” as username and the password printed on the back of the device and on the supplied stickers.
If the IP Address of the device changed after reboot, please insert the new URL in the browser.
The “Reboot”, “Reset Factory Defaults” and “Update” buttons will be grayed (not working) if disabled from the Security Settings page.
Hardware Reset
A local user can completely reset the device to factory defaults (Hardware Reset), including Network settings. To do so, press the “RESET” button in the back panel of the device using a pointed tool during approximately 10 seconds.
Update
To update the PS Touch 400 to the latest firmware version follow these steps:
Go to https://help.barix.com/pstouch/ and download the latest update package for the device to your local drive.
Click on “Update/Browse” and select the Firmware Update image file (.tar) from your local drive.
Click on “Upload” and wait until the update completes.
Note: this operation can take several minutes. Do not interrupt the update process nor power off the device while updating, to avoid permanent damage to the device.
Once the update process has finished successfully, the device will reboot and the new firmware will be started.
In case of failure, please reboot the device and retry.
Compliance and further Information
This equipment has been tested and found to comply with the limits for a Class B digital device, pursuant to part 15 of the FCC Rules. These limits are designed to provide reasonable protection against harmful interference in a residential installation. This equipment generates, uses and can radiate radio frequency energy and, if not installed and used in accordance with the instructions, may cause harmful interference to radio communications. However, there is no guarantee that interference will not occur in a particular installation. If this equipment does cause harmful interference to radio or television reception, which can be determined by turning the equipment off and on. The user is encouraged to try to correct the interference by one or more of the following measures:
Reorient or relocate the receiving antenna.
Increase the separation between the equipment and receiver.
Connect the device into an outlet on a circuit different from that to which the receiver is connected.
Consult the dealer or an experienced radio/TV technician for help.
Safety and precaution recommendations apply. Find them in the download section at http://www.barix.com

Find your distributor on this list for more hardware.
For questions that are extending the documentation, feel free to contact us on:
International: +41 434 33 22 22
USA: +1 866 815 0866
Email: support@barix.com
All information and the use of this product including all services are covered under the Barix Terms & Conditions and our Privacy Policy. Please follow the Safety and Precaution Recommendations. Barix is a ISO 9001:2015 certified company. All rights reserved. All information is subject to change without notice. All mentioned trademarks belong to their respective owners and are used for reference only.
