This document is a “How To” describing how to control Barionet M44 Relays using the InformaCast Fusion broadcast notifications platform.
Preparation
To perform the steps described in this “How To” document, you need:
-
Barix Barionet M44 running at least Flexa firmware V2.3.0 or newer (check here)
-
InformaCast Fusion server
-
POE network switch
For the purpose of this document, InformaCast Fusion version v15.0.1 was used.
The Barionet M44 is a POE device, thus can be power supplied by the POE network switch.
Please read the Barionet M44 Quick Install Guide for more information about installing and accessing the web interface.
The communication protocol used between the M44 device and the InformaCast Fusion is SNMP. Barionet M44 can receive “SNMP SET” commands from InformaCast Fusion to trigger Relays. This allows InformaCast Fusion to interact with contact closures, triggering contact closure output ports connected to the M44 when a notification is sent. InformaCast Fusion “sees” Barionet’s M44 Relays as “M2M Output Ports”.
Barionet M44 Configuration
-
Connect the Barionet M44 to the POE Switch using a regular ethernet cable. By default, the device is configured to run as a DHCP client. It will acquire an IP address at boot. Check the DHCP Lease table of your DHCP server to retrieve the assigned IP address according to the given MAC Address. Note the IP address. You can also use the “Barix Discovery Tool” available here https://help.barix.com/tools/discovery-tool to find the Barionet M44 IP address.
-
Access the web configuration of your Barionet M44 typing the IP address in the URL field of your browser. Enter the username and password (you should find the password printed on the button of the device, user = admin). Please refer to the Barionet M44 Quick Install Guide if necessary.
-
Locate the SNMP tab and enable SNMP clicking the “Enabled” switch.
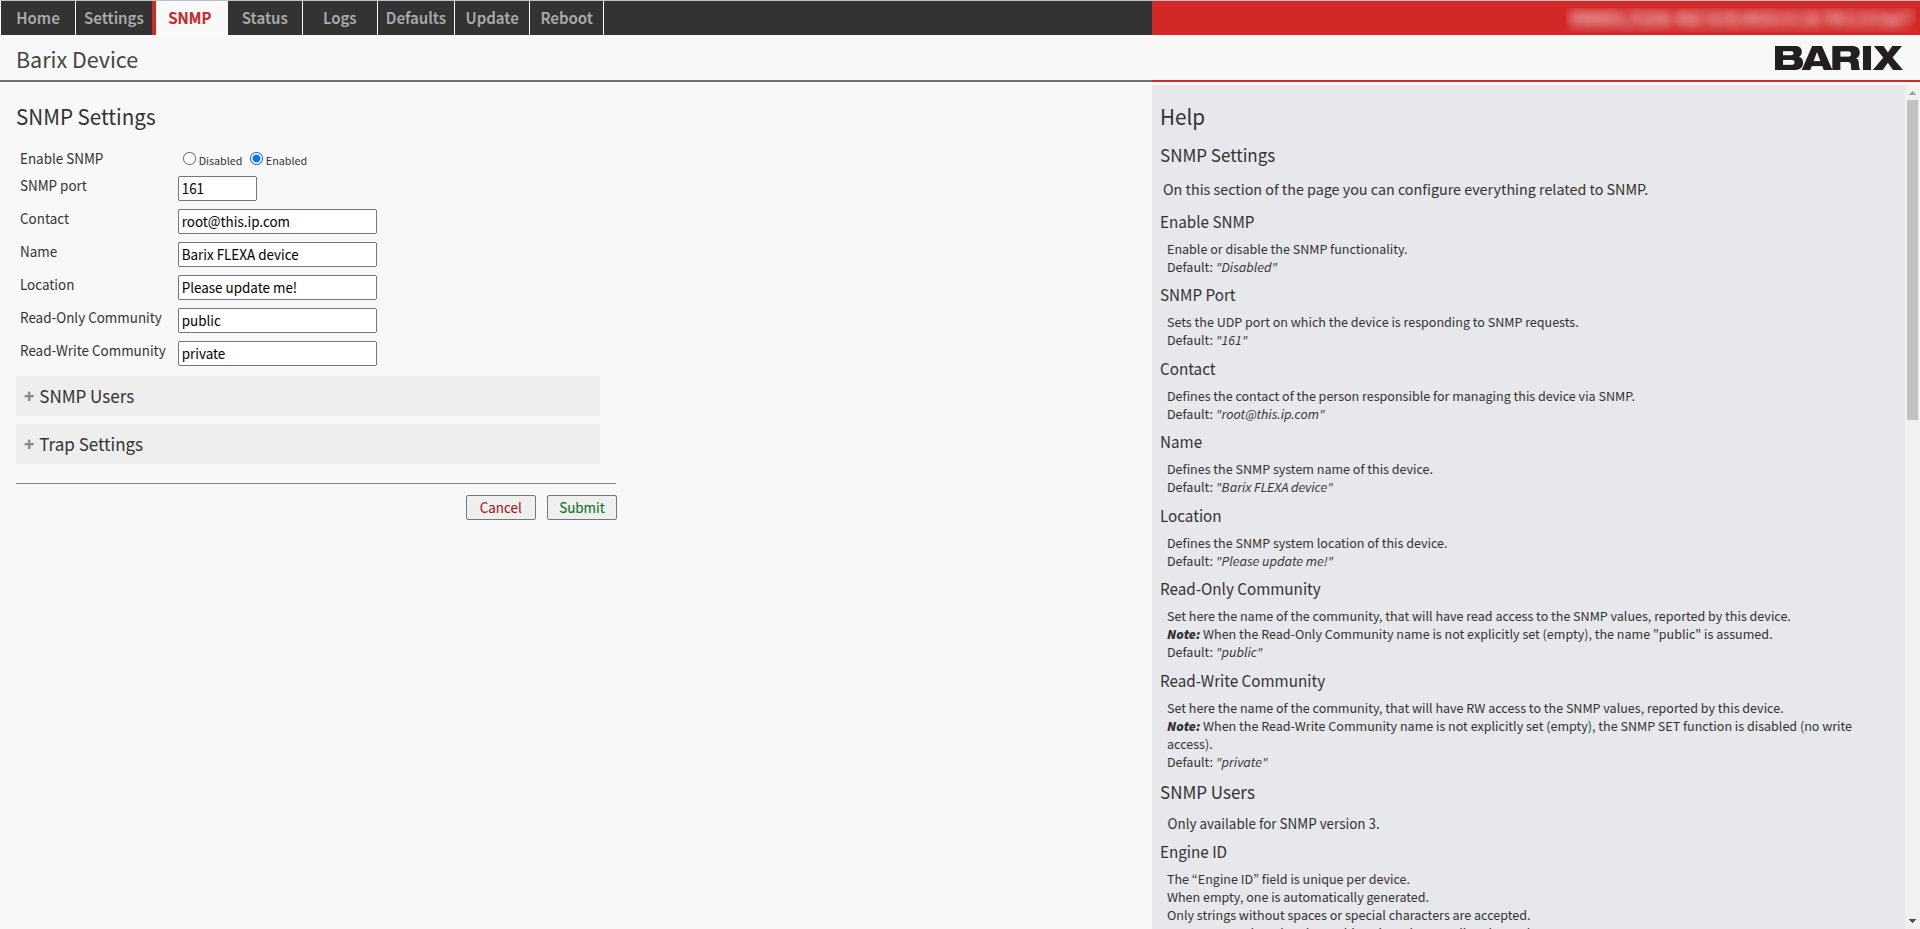
Fig.1 - M44 SNMP configuration.
-
You must fill at least the “Read-Only” and “Read-Write” Community fields for the SNMP daemon to run. To control relays the “read/write” community string is the important one to consider. Other fields are also present but not mandatory.
-
SNMP port: Sets the UDP port on which the device is responding to SNMP requests. Default: “161”.
-
Contact: The contact of the person responsible for managing this device via SNMP. Default: “root@this.ip.com”.
-
Name: Defines the SNMP system name of this device. Default: “Barix FLEXA device”.
-
Location: Defines the SNMP system location of this device. Default: “Please update me!”.
-
Read-Only Community: Default: “public”.
-
Read-Write Community: Default: “private”. You need to set the same password on both Barionet AND InformaCast to be able to set the relays from InformaCast.
-
-
Click on “Submit” to apply the new settings.
InformaCast Fusion Configuration
Create a Contact Closure
InformaCast Fusion “sees” Barionet’s M44 Relays as “M2M Output Ports”. This allows InformaCast to trigger M44 contact closure output ports when an InformaCast notification is sent. To configure “M2M Output Ports” in InformaCast Fusion, follow these steps:
-
Login to InformaCast Fusion server using your credentials.
-
Move to Recipients ➡️ M2M ➡️ Contact Closures
This window lists the available contact closures in InformaCast. These are the physical devices that will interact with the M2M Output Ports.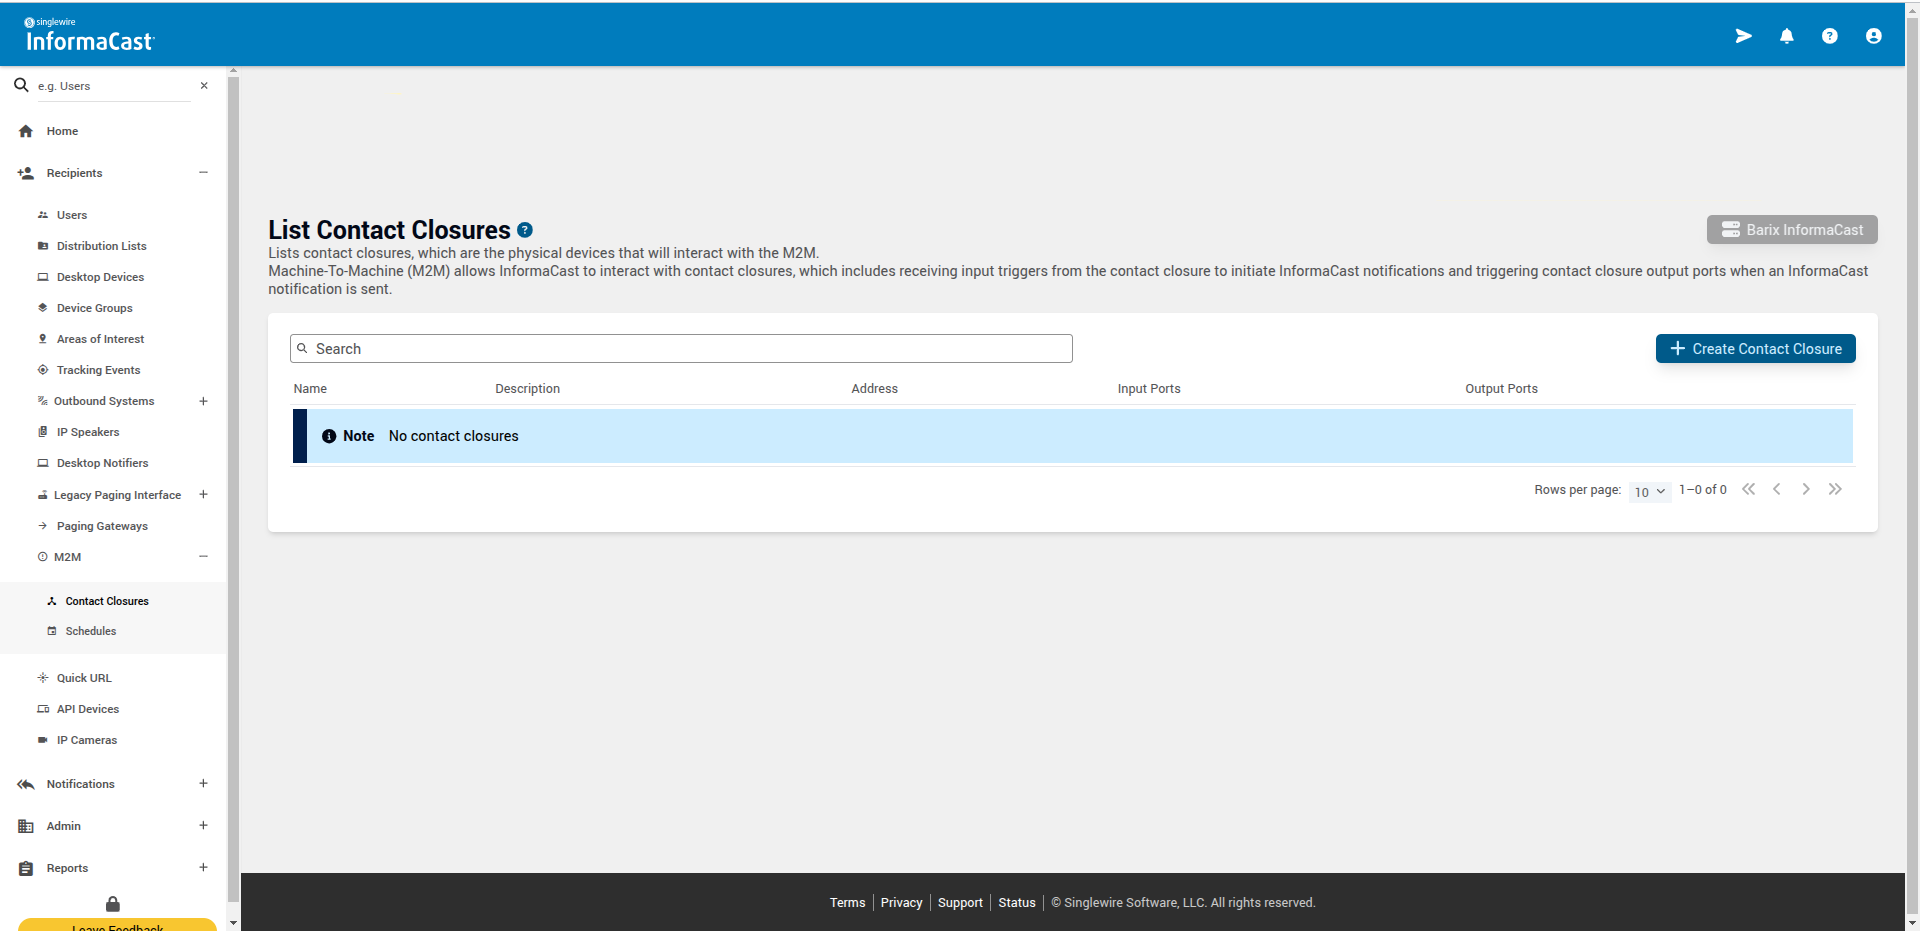
Fig.2 - List of Contact Closures
-
Click on “+Create Contact Closure”.
Here, you provide some information about the Barionet M44 which will act as a new “Contact Closure” to be triggered by InformaCast broadcasts notifications.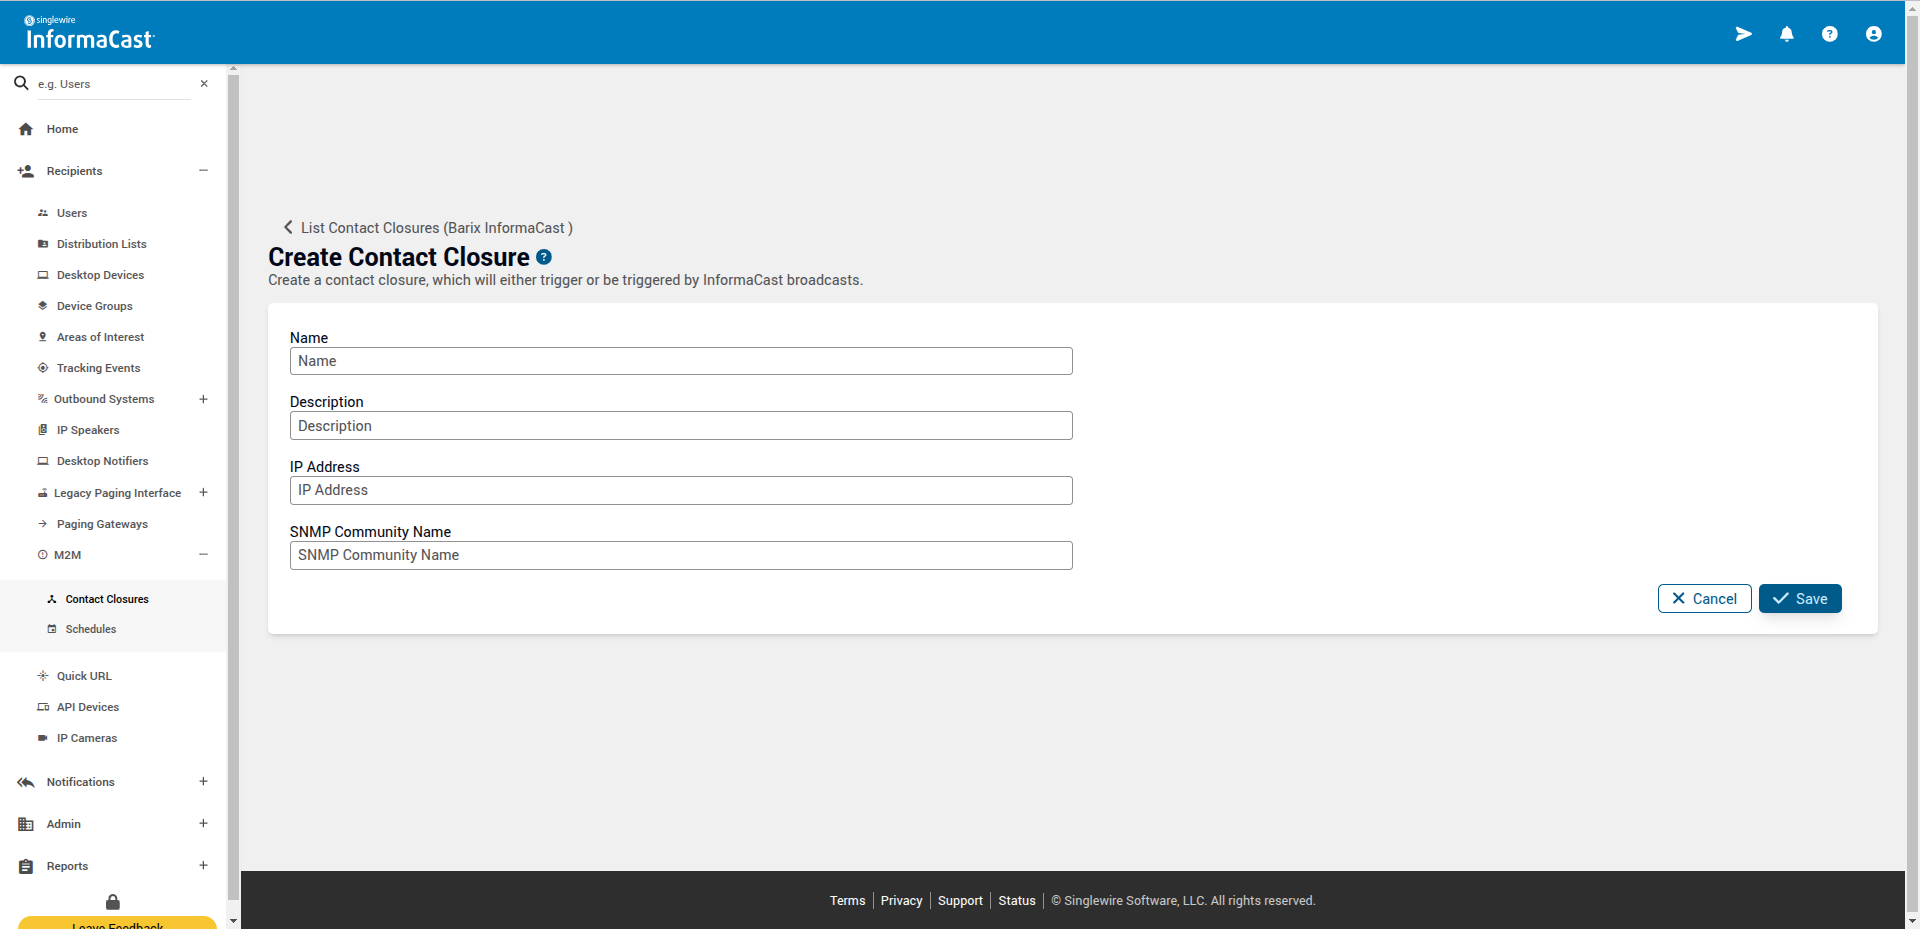
Fig.3 - Create Contact Closure
-
Provide some information about your new contact closure.
-
Name: give a name to your new contact closure.
-
Description: give a description for the contact closure.
-
IP Address: this is the IP Address of your Barionet M44 (see the “Barionet M44 Configuration” chapter).
-
SNMP Community Name: the name of the SNMP “Read/Write” Community set on the Barionet M44.
-
The SNMP “Community Name” MUST match the name provided in the “Read-Write Community” field of the Barionet M44 Configuration.
-
Click on “🗸Save”.
The Input and Output ports configuration becomes available.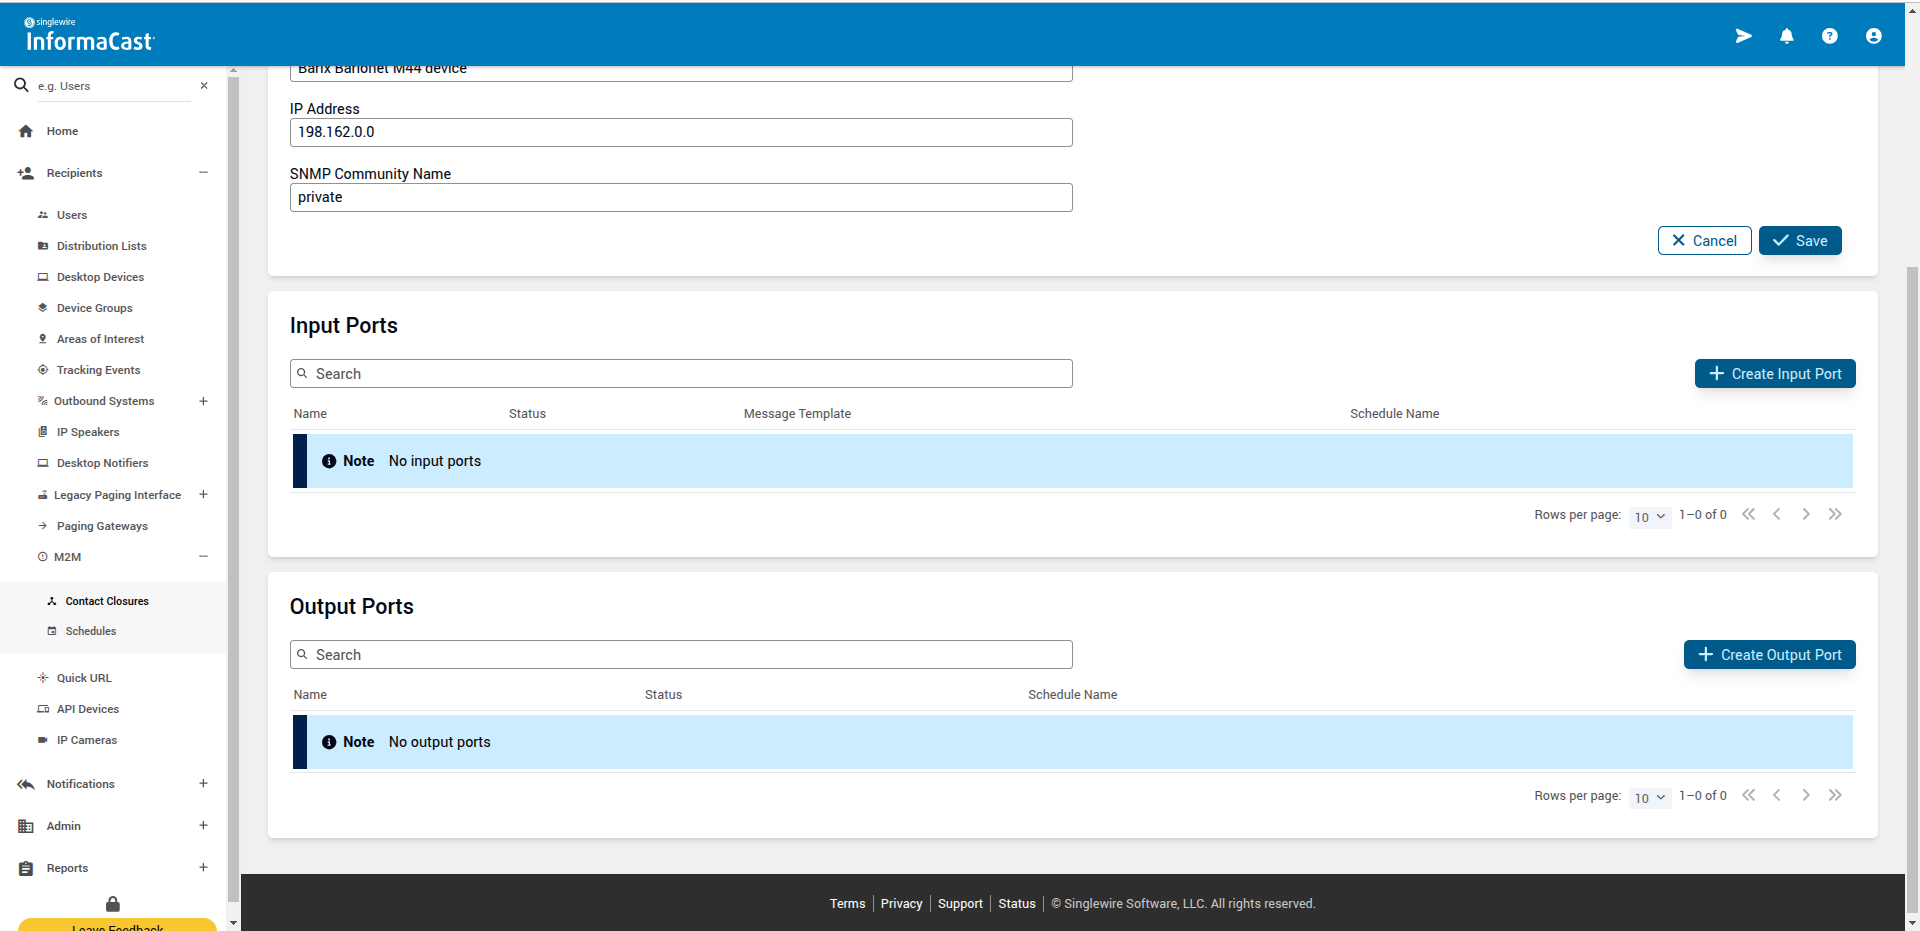
Fig.4 - Input and Output
Input Ports are used as “Activators” or “Triggers”, thus devices that can initiate notifications. I.e. close a digital input on the BM44 and configure it to send a notification to a group of devices / users.
Output Ports are used as “Recipients” or “Endpoints”, thus devices that can be part of a larger group and can receive a notification. I.e. when a notification is initiated by a digital input, Informacast controls BM44 relays to lock doors or light up sirens.
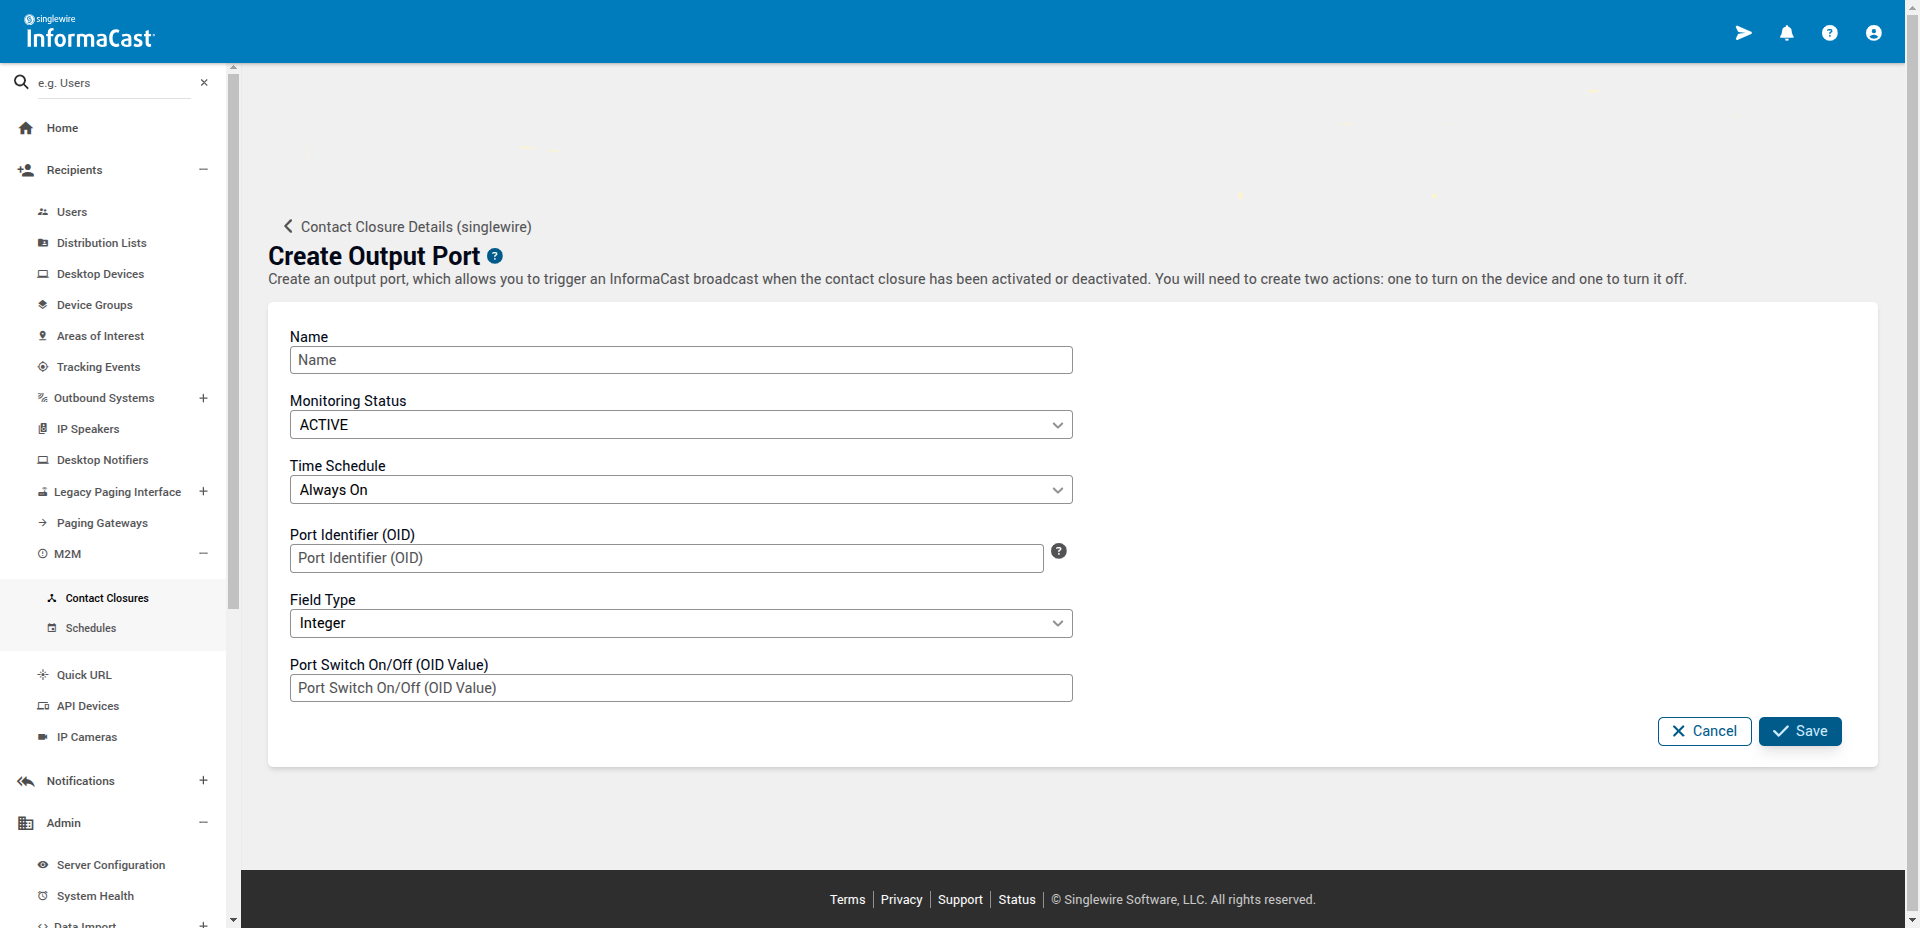
Create an Output Port
-
Click on “+Create Output Port”
When creating an “Output Port”, you can specify which port you want to trigger when sending a Message Template. You must provide the right OID (the “Object Identifier” which serves as an address to locate and identify specific objects within a network management system) and state change value.
You can find the OIDs for the 4 Outputs (the 4 Relays) of the Barionet M44 at this link
-
Give details about your new Output Port
-
Name: Give a name for the Output Port
-
Monitoring Status: default= ACTIVE
-
Time Schedule: default = Always ON
-
Port Identifier (OID): enter the port identifier OID you want to use.
For example, OID:1.3.6.1.4.1.17491.1.1.2.1.2.1will trigger Barionet M44 Relay 1. -
Field Type: select “INTEGER” for the OID field type of the M44.
-
Port Switch On/Off (OID Value):
-
OID value for ON = 1
-
OID value for OFF = 0
-
-
You have to create an “Output Port” for switching the relay state to ON (OID value=1) and another for switching the relay state to OFF (OID value=0).
-
Click 🗸Save.
Repeat steps 1-3 to add another Output Port to specify a different Relay state or to configure another Relay.
Create a Device Group
The new Output Port(s) created will be the new Barionet M44 endpoint(s). In order to send notifications we need to assign it to a “Device Group” and include the Group in a “Message Template” in InformaCast Fusion. To create a new “Device Group” follow this steps:
-
Locate Recipients ➡️ Device Groups ➡️ +Create Device Group
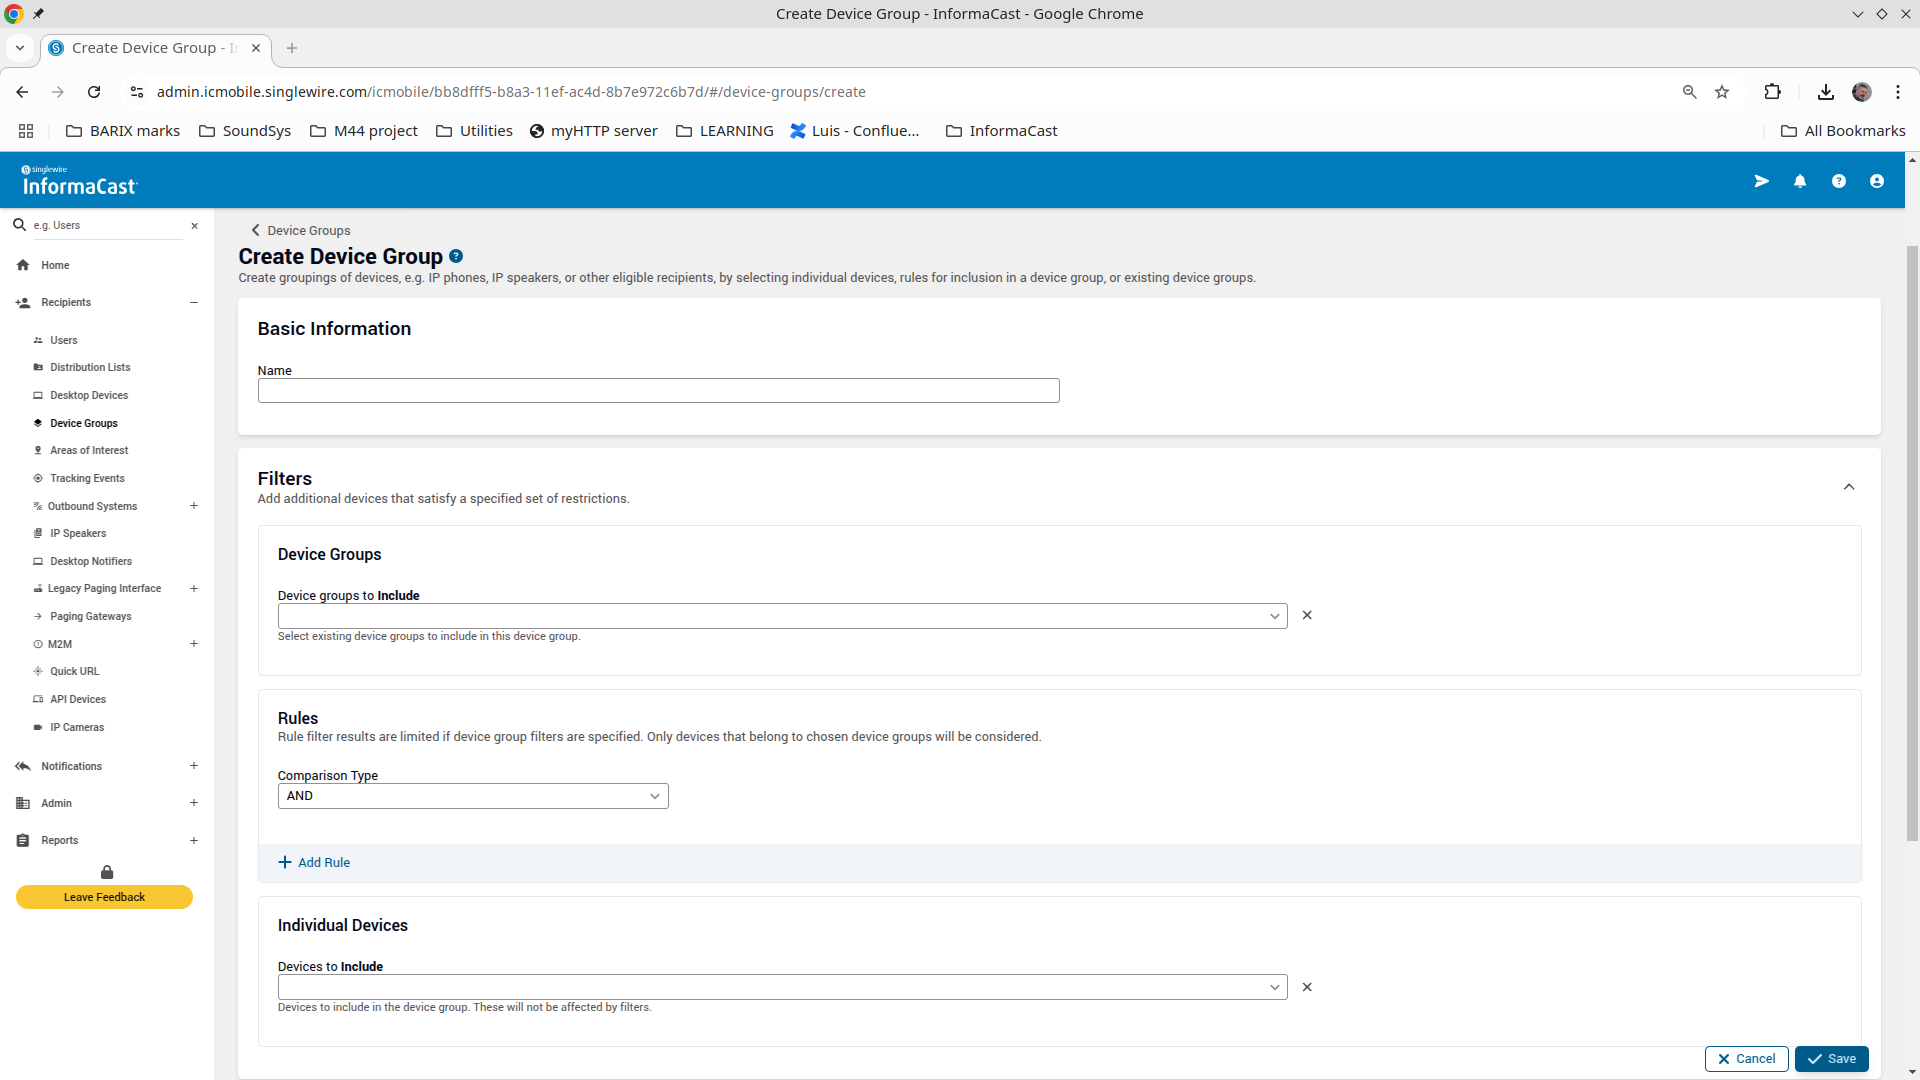
Fig.6 - Create Device Group -
Give a name do the new Device Group (“Name” field is required).
-
Select existing “Device Groups” to include in the new group, or select “Individual Devices” (the Output Ports you create in step 6.) from the dropdown list.
-
Save the Device Group clicking 🗸Save
-
Refer to InformaCast Fusion Help about “Device Groups” here: https://documentation.singlewire.com/fusion/en/about-device-groups.html for more information.
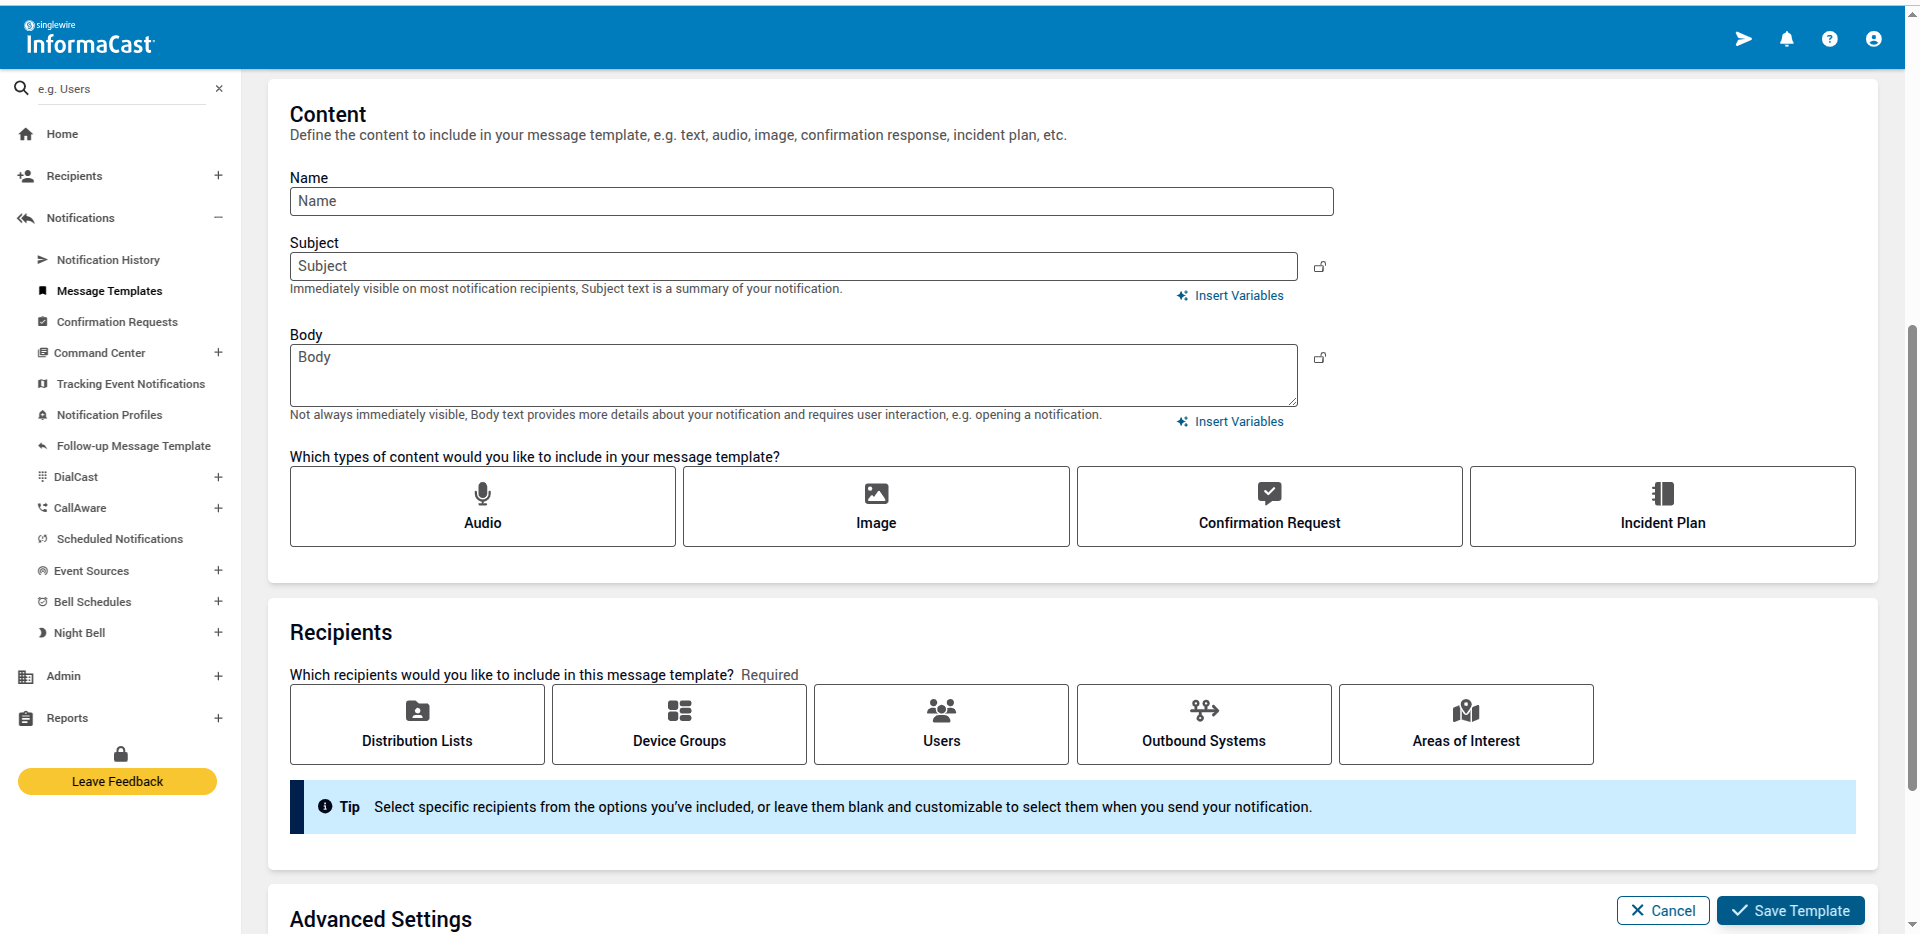
Create a Message Template
Create a “Message Template” to be sent as notification to the “Device Group” created above or edit an existing template to include the new M2M Output Port(s) of the BM44. The new message template contains the content, recipients, and layout of your notifications. In this example, we’ll activate/deactivate the M44 Relays (according to the Output Port created above).
-
Go to Notifications ➡️ Message Templates ➡️ +Create Message Template
-
Give a name to your “Message Template”.
-
In the “Recipients” field, select “Device Groups”.
-
Select the “Device Groups” you created as endpoints from the dropdown list.
-
Click on “🗸Save Template” to save your Message Template.
Send a Message Template notification
Once done, send the “Message Template” to the Barionet M44.
-
Go to Notifications ➡️ Message Templates.
-
Click the ➡️ (send notification) icon of the “Message Template” you created previously.
-
Click the “🗸SEND” button.
The relays will activate or deactivate accordingly.
Refer to InformaCast Fusion Help about “Message Templates” here: https://documentation.singlewire.com/fusion/en/about-message-templates.html for more information.
Troubleshooting Tips
If the Barionet is not sending or receiving SNMP packets, check the following:
Verify M2M Field Type
In case the Output Ports are not activating Relays, check that the “Field Type” of the Output Port is set to “INTEGER” on the InformaCast Fusion M2M configuration as described in the previous chapter.
Verify Barionet’s Network Configuration
Go to Status→Network
Check that the network configuration on Barionet M44 is applied correctly, especially when using a static IP configuration. If ”IP Address”, “Netmask” and “Default Gateway” properties are not configured correctly, the Barionet M44 will not be able to reach the InformaCast Fusion server.
If you are not sure how to configure these fields, check with your network administrator.
Verify Network Communication with a Network Packet Capture tool
Use a “packet capture” software to check whether there is SNMP traffic between the InformaCast Fusion server and the Barionet.
See below an example using Wireshark. Note that the filter used, “IP.src”, is the InformaCast Fusion server IP address.
NOTE: you may need to enable port mirroring on your switch to be able to see packets exchanged between the 2 hosts.

Verify Relay operations with SNMP SET commands
Simulate on the Barionet M44 localhost the same commands sent by InformaCast using an SNMP tool.
Below, you can see an example using the MIB Browser tool.
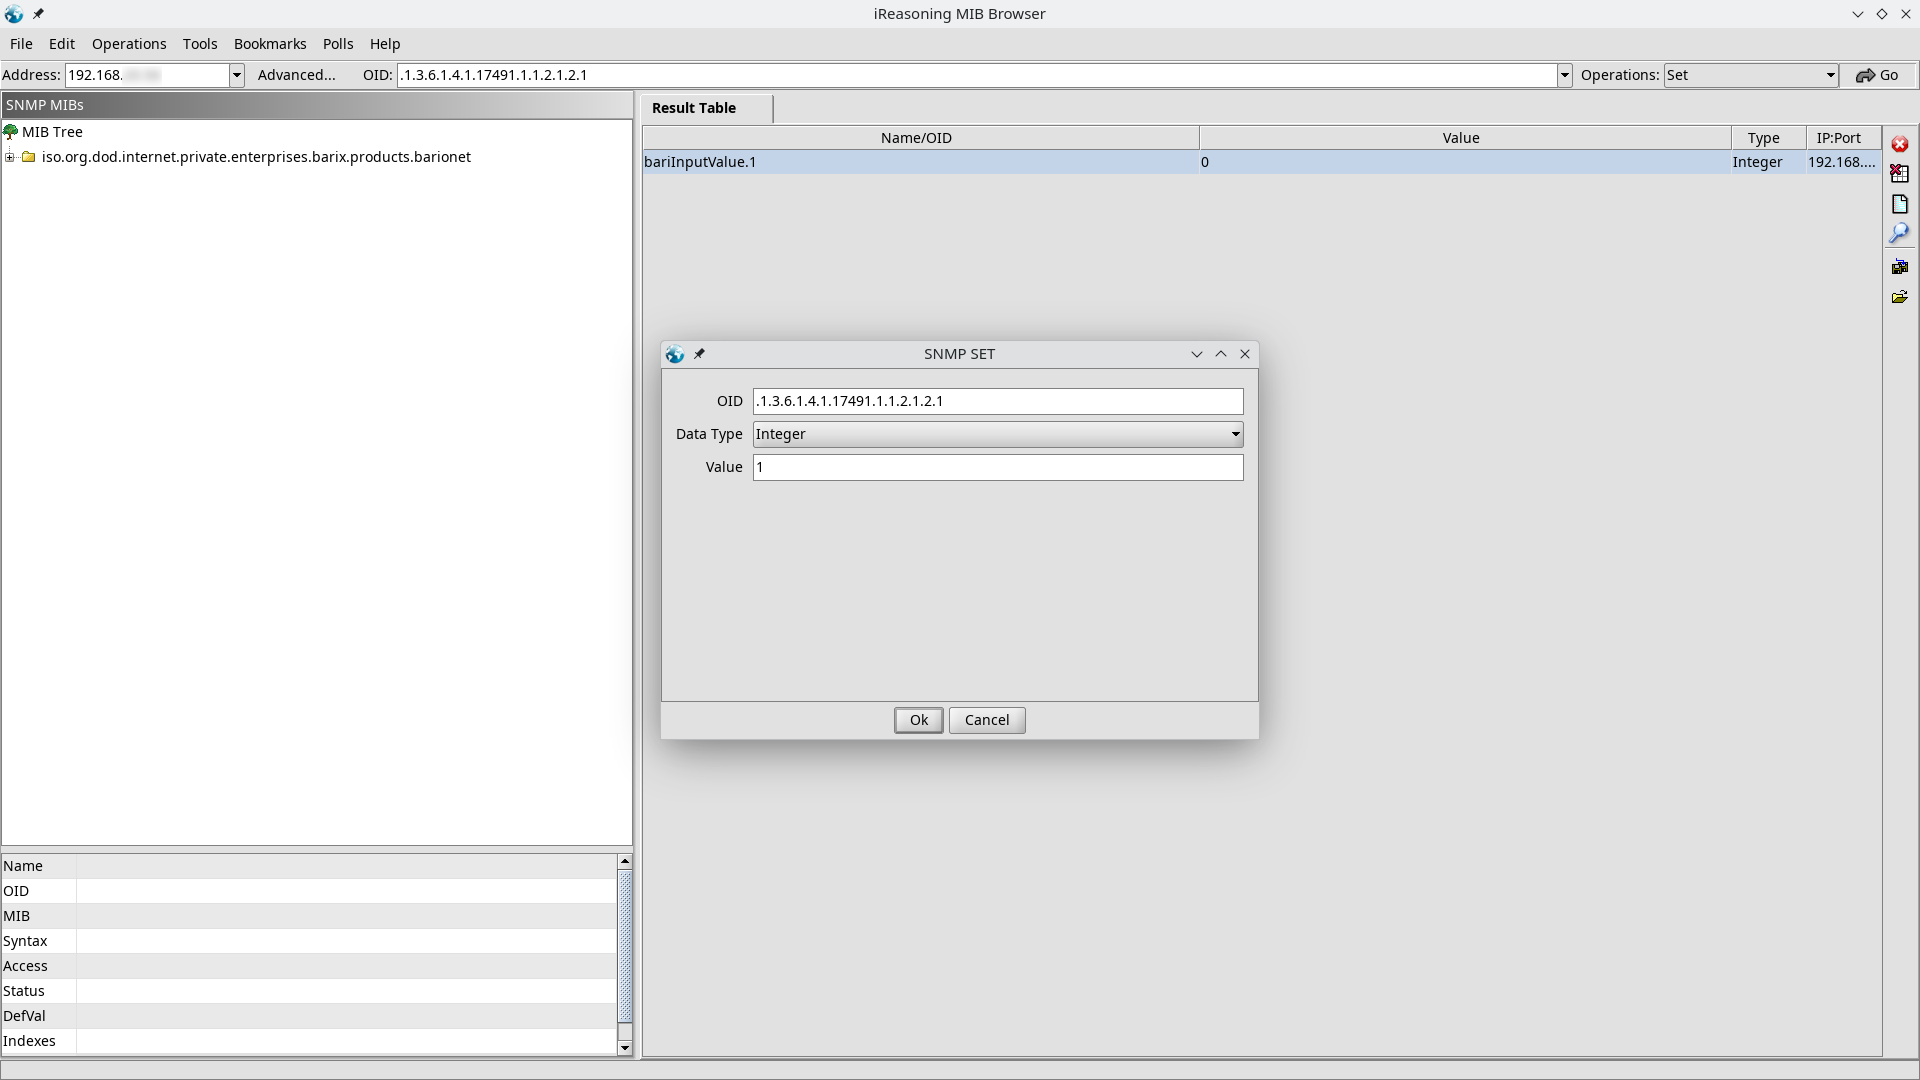
Using MIB Browser, if you want to close Barionet M44 Relay #1 do as follows:
-
Start MIB Browser.
-
Address: enter the IP Address of your Barionet M44.
-
Click on “Advanced” and setup the port, community string according to the configuration applied to your Barionet M44
-
OID: enter the OID you want to use (you can also do this in the step 5).
-
Operations: select “Set” from the dropdown list and click on “Go”.
-
In the “SNMP SET” window, apply these settings:
-
OID:
1.3.6.1.4.1.17491.1.1.2.1.2.1 -
Data Type:
Integer -
Value:
1
-
-
Click “OK”.
-
The command should return a “Set Succeeded” message. You should hear a ‘click’ from the Barionet M44 and see its REL1 LED light on.
You can then try to open Relay1 using the same “OID” and state “Value” = 0.
Use the same procedure for the following Relays using the corresponding OIDs.
Verify Barionet M44 System Logs
Check the system logs to see if any error is reported. Logs can be found in the LOGS tab on the Barionet M44 web configuration. Click on “Download All Messages” to fetch the archive to analyse the logs.
Update the Barionet M44 to the latest firmware
Update the firmware of your M44 device to the latest version available.
Read the Barionet M44 “Quick Install Guide” for a detailed description of the update procedure.
Be patient when updating the firmware. When the firmware is installed, the device will reboot on its own.
Reset the Barionet M44 to factory defaults
In some cases, it may be necessary to perform a reset to defaults of the Barionet M44 to restore working conditions.
Read the Barionet M44 “Quick Install Guide” for a detailed description of the update procedure.
For technical assistance, send your queries at: support@barix.com or get in contact with your local distributor here: https://www.barix.com/buy/