Package content and Prerequisites
-
MA400 SIp Opus Codec Device
-
Molex 8 pin female connector
Material that might be needed:
-
Ethernet cable
-
PoE capable switch, or PoE injector
-
8 Ohm Speaker
-
Push button to be used as digital input
-
Headphones
Safety Precautions
Please make sure to first read the safety information in order to avoid hazards.
Setup the Device
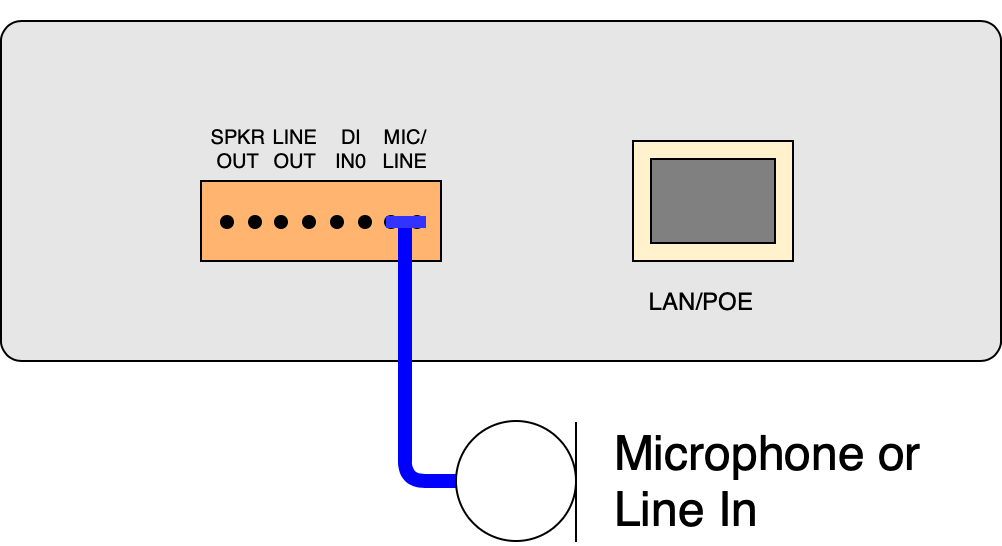
Step 1
Connect your mono audio source (Line Out equipment or a microphone) to the Line/Mic pins of the Molex connector.
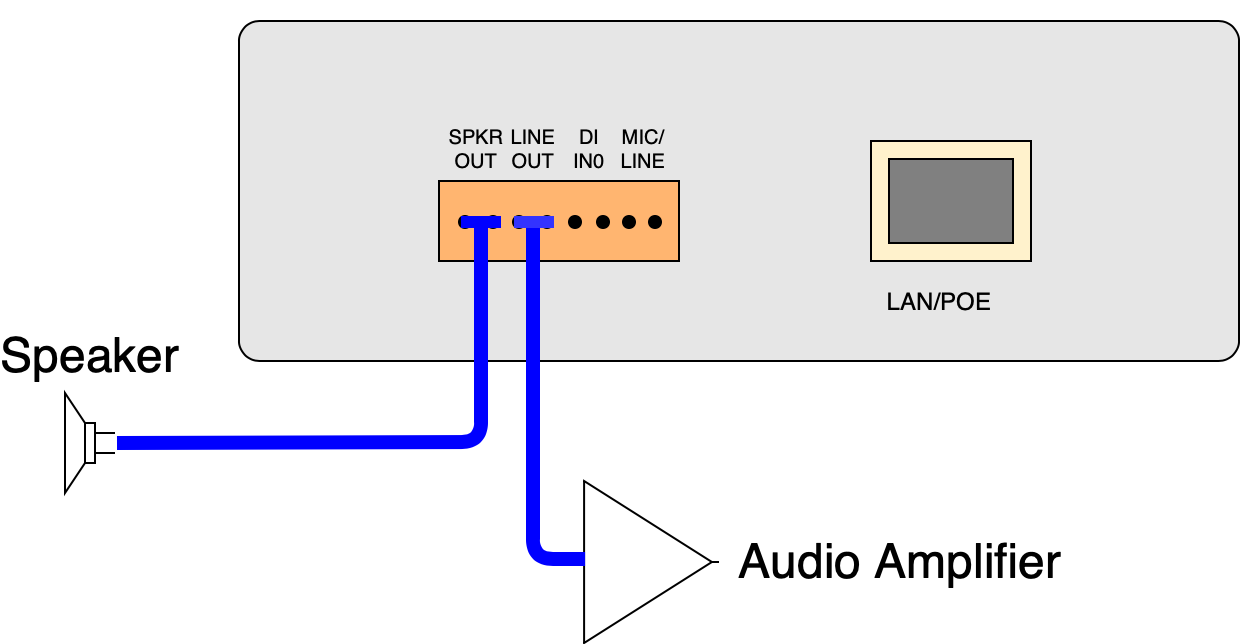
Step 2
Connect your mono audio output (Line In equipment or a speaker) to the SPKR OUT or LINE OUT pins of the Molex connector.
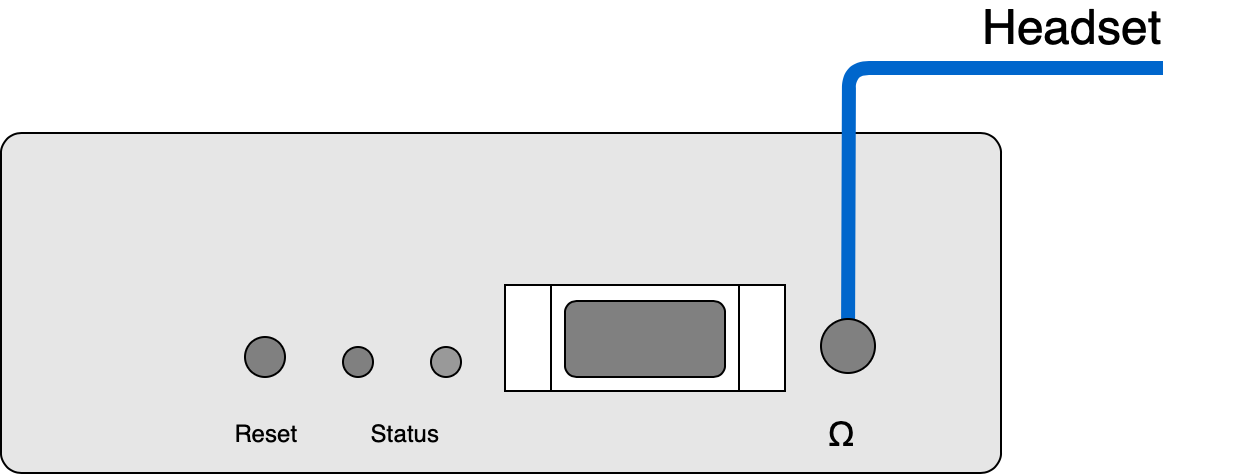
Step 3
Connect a headset to the connector on the front panel to listen to the IP-Address of the device.
Step 4
Connect a push button to DI/IN0 pins of the Molex connector.

Step 5
Connect the MA400 SIP Opus Codec to your network via a PoE switch using a standard Ethernet cable. If you do not have a PoE switch, then connect the Ethernet cable to the PoE output of the injector, and the LAN input of the PoE injector to your network.
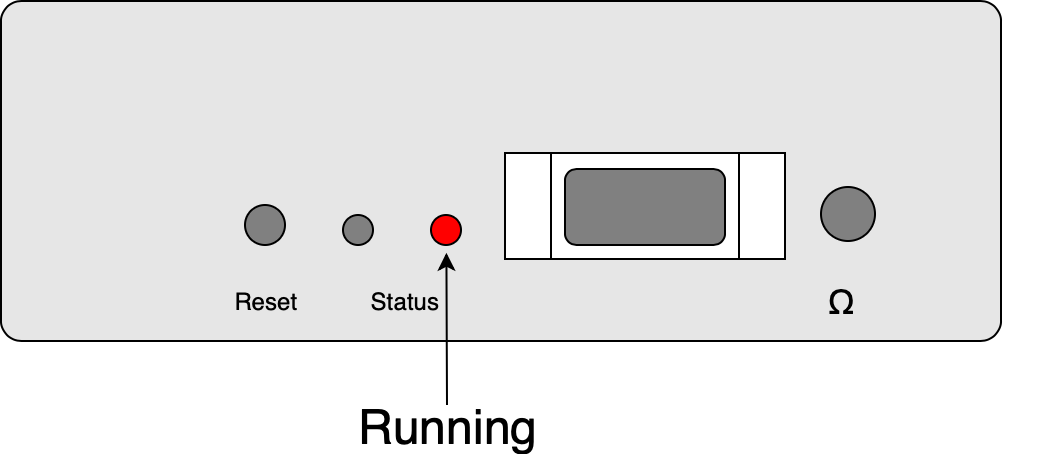
At the time you plug the LAN cable to the PoE switch, or you power on the PoE injector, the device status LED 1 will start blinking red, and the IP address will be announced. At the end of the boot process, LED1 shall be steady red, and LED2 shall be off, indicating that the device is not yet registered.
Get your SIP account details ready
Contact your SIP provider, (or ask your network administrator to do it) and ask for the following details:
-
SIP server name or IP address (mandatory)
-
SIP user ID (mandatory)
-
SIP user password (mandatory)
-
SIP Authentication User ID (optional, only if used)
-
SIP proxy (if used)
After collecting these data, open the device web page on the IP address you have noted during the device boot, then navigate to the SIP account setting by clicking on the SETTINGS, then Advanced Settings → SIP Account. Enter the data in the relevant fields shown in the picture below:
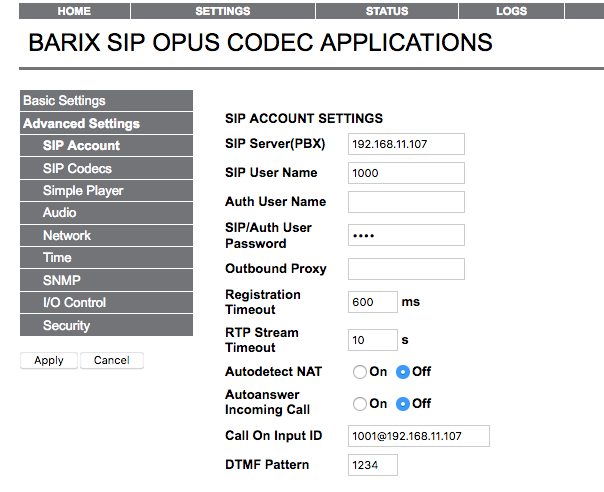
After entering the required data, click on the "Apply" button, and wait for the SIP OPUS Codec application to be restarted. If the data are correct, and the device registers successfully to the SIP server, LED2 shall be steady green, showing that the device is registered.
TODO: add a picture showing LED1 red, and LED2 green
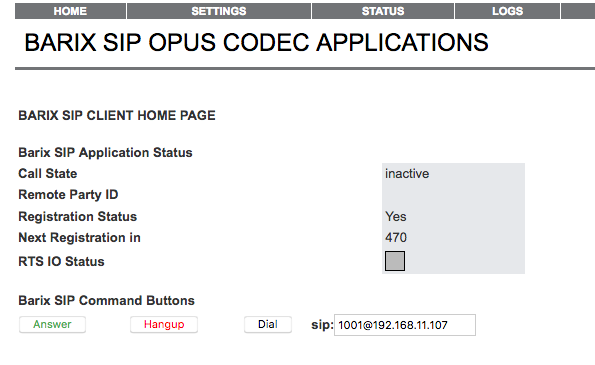
The web page shall show "inactive" as "Call State". and "Yes" as "Registration Status"
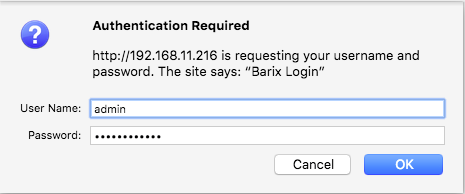
NOTE: The device web page might be protected by a password. If your browser shows "Authentication Required" pop-up box, then enter "admin" as "User Name", and type the password, delivered with your device (marked as "PW" on the small sticker below the device).
Using the SIP OPUS Codec
Making a call
...from the web interface
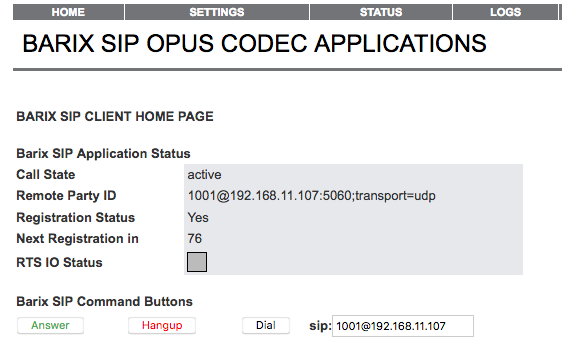
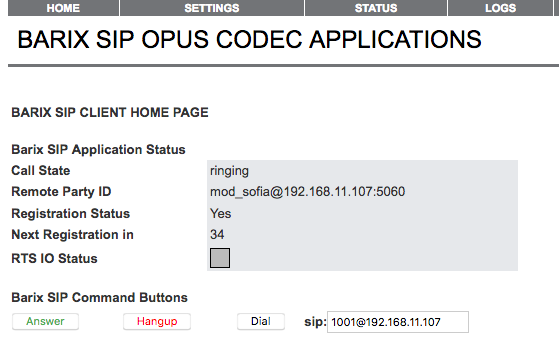
Open the home page of the device. If you haven't configured from the Advanced Settings→SIP account page, then you can enter on Barix SIP Command Buttons section the ID of the remote peer to be called. The ID must be in the format: SIP-ID@sip.server.name (for example: 1001@192.168.11.107). Next, click on the "Dial" button to initiate the call. The call Status shall change to "ringing", then to "active" once the call is accepted by the remote peer.
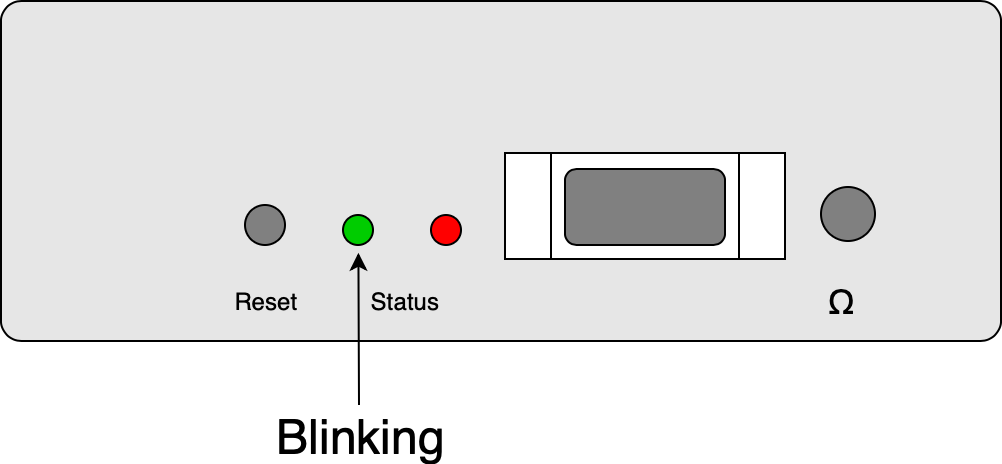
Once the call is established, LED2 on the front panel of the device shall start blinking green indicating there is active call.
To close the call, click on the "Hangup" button.
...using the digital input
If you have connected a push button to the DI/IN0 pins of the Molex connector, and you have set a valid Call On Input ID, it shall be enough just to press the button, and your device will starts the call. You can press the button again to cancel the call. Please note that the Call On Input ID (on SIP Account section) must be already configured and saved, or the device will not be able to dial. Press the digital input button again to close the call.
NOTE: Once the call is established, LED2 shall be blinking green to indicate the active call state.
LED1 red, and LED2 blinking
Receiving a call
... from the web interface
Open the home page, and while the device is ringing, just click on the "Answer" button, The device LED2 shall start blinking green, indicating that there is active call.
... using the digital input
While the device is ringing, just push the digital input button to answer the call. To close the call, press the button again.
... using the auto-answer feature
Go to the SETTINGS→Advanced Settings–>SIP Account on the web page, and set the "Autoanswer Incoming Call" to "On". Click "Apply" and wait for the application to restart.
Now when you dial your device from another SIP phone, it shall automatically pick-up the call.
Listening to RTP/HTTP Stream
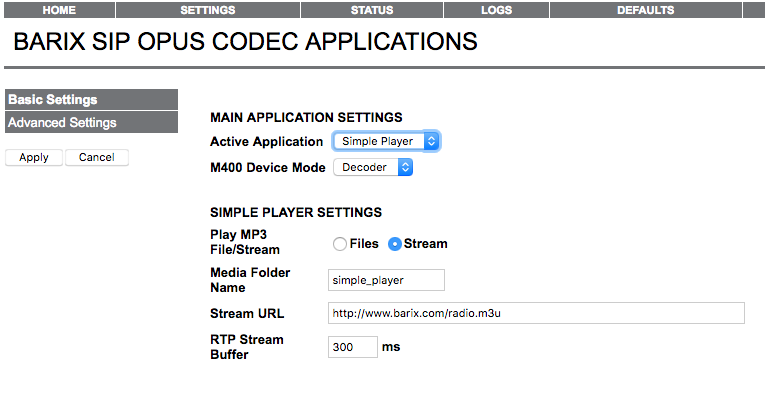
Open the device web page, then go to SETTINGS→Basic Settings, and set the "Active Application" to "Simple Player". Configure the desired Stream URL, then click the "Apply" button. The device will stop the SIP Opus Client, and start the Simple Player application. When the Simple Player connects to the URL, the device LED2 shall start blinking green, indicating there is an active playback.
Reset
Through the Web UI
Access the Web UI with the password on the back of the device. Go to the DEFAULTS tab and click on "Reset Factory Defaults" button. The device will reboot and the settings are restored to default.
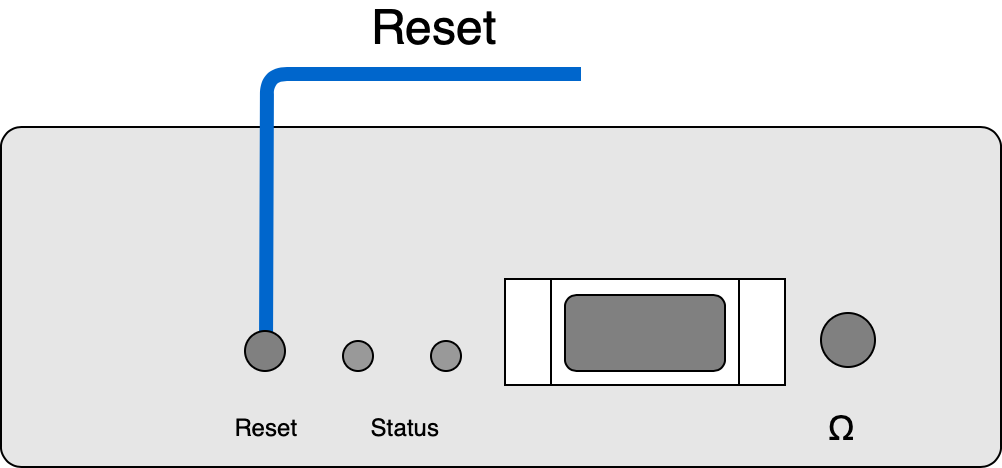
Through the Hardware Button
Push the reset button on the front panel for at least 10 seconds until LED1 is blinking green. Release the reset button, the device will restart and the settings are restored to default.
Compliance and further Information
This equipment has been tested and found to comply with the limits for a Class B digital device, pursuant to part 15 of the FCC Rules. These limits are designed to provide reasonable protection against harmful interference in a residential installation. This equipment generates, uses and can radiate radio frequency energy and, if not installed and used in accordance with the instructions, may cause harmful interference to radio communications. However, there is no guarantee that interference will not occur in a particular installation. If this equipment does cause harmful interference to radio or television reception, which can be determined by turning the equipment off and on, the user is encouraged to try to correct the interference by one or more of the following measures:
-
Reorient or relocate the receiving antenna.
-
Increase the separation between the equipment and receiver.
-
Connect the device into an outlet on a circuit different from that to which the receiver is connected.
-
Consult the dealer or an experienced radio/TV technician for help.
Safety and precaution recommendations apply. Find them in the download section at www.barix.com

Find your distributor on this list for more hardware.
For questions that are extending the documentation, feel free to contact us on:
International: +41 434 33 22 22
USA: +1 866 815 0866
Email: support@barix.com
All information and the use of this product including all services are covered under the Barix Terms & Conditions and our Privacy Policy. Please follow the Safety and Precaution Recommendations. Barix is a ISO 9001:2015 certified company. All rights reserved. All information is subject to change without notice. All mentioned trademarks belong to their respective owners and are used for reference only.