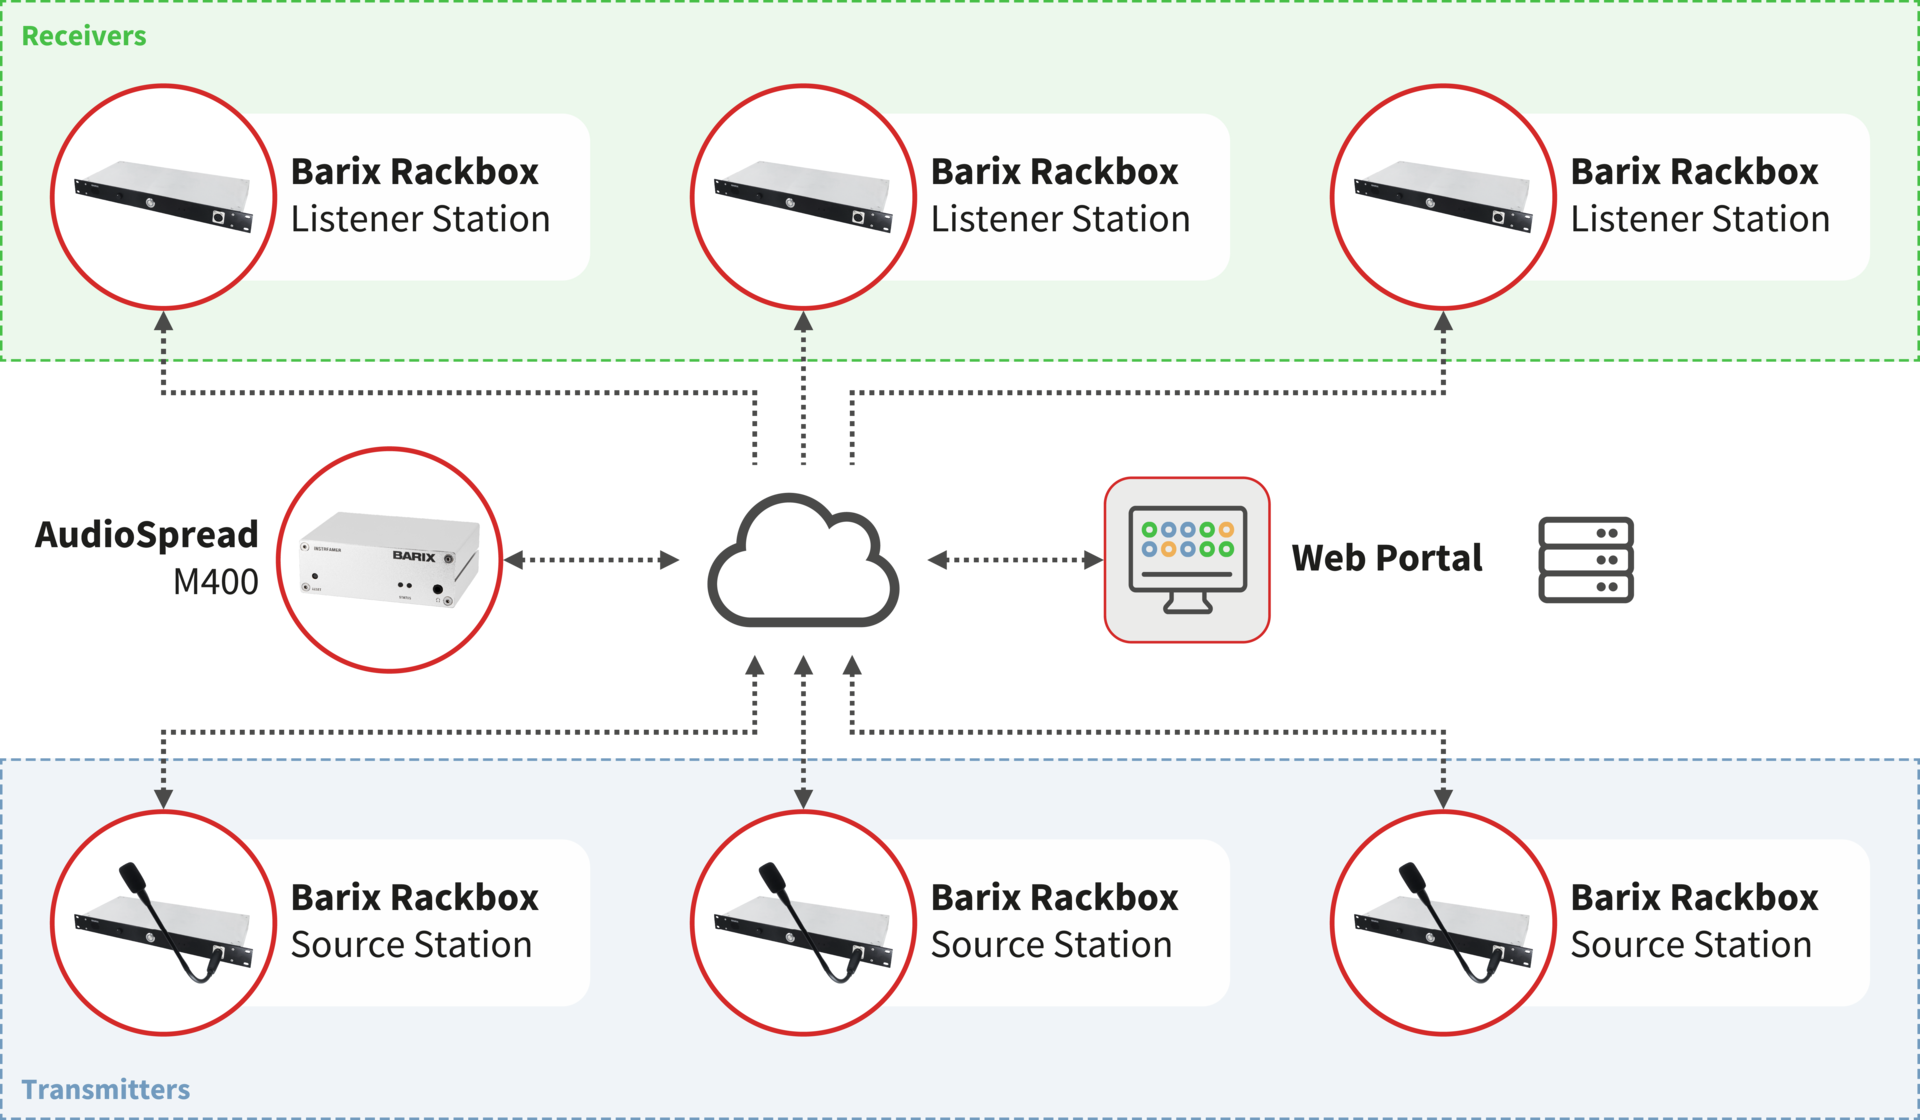
What is RBMS?
The "RackBox management server" (RBMS) is intended to manage all devices in terms of operation and functionality, showing the devices in a world map. Once RackBox is configured, its operation is totally independent from the RBMS. If by any chance the units cannot establish communication with the RBMS, the devices continue work with the last configuration received. For the first configuration the communication must be established between the devices and the RBMS to setup RackBox units properly.
RBMS Specifications
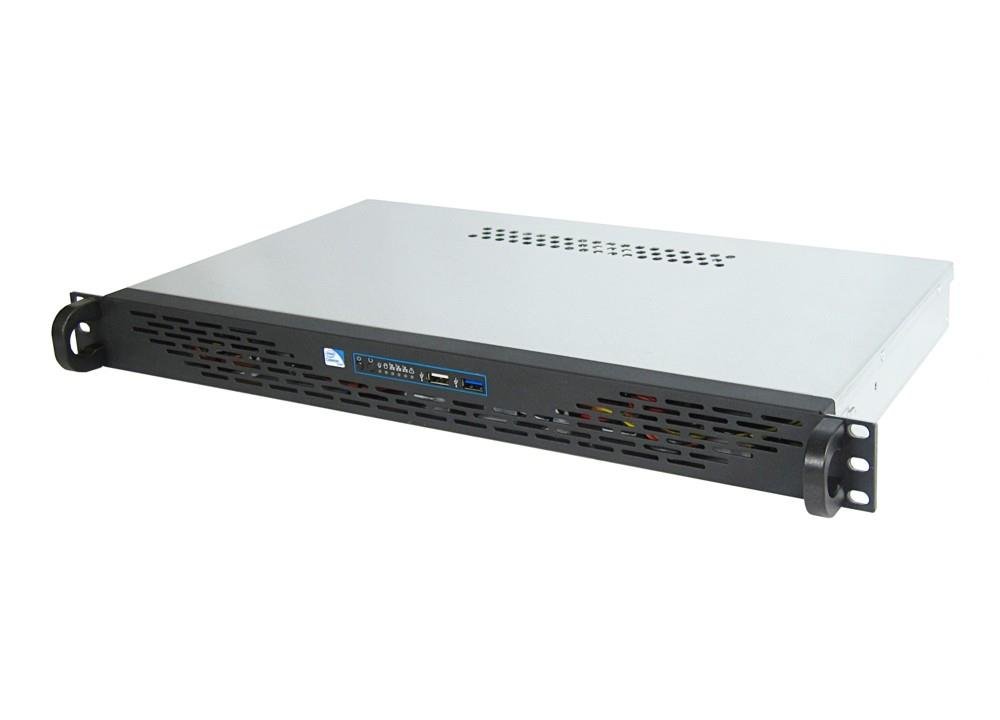
Chassis - 19" 1U rack-mount server-chassis / black - IPC 1U-K-125L
-
internal installation-capabilities for two 2,5" harddisks/ssd's or one 3,5" harddisk (when using a 3,5" harddisk there is no room left for installation of an expansion-card in the system)
-
supports installation of one expansion-card via an optional riser-card with extender (please see "accessories" below)br> - dimensions (WxHxH): 480mm x 250mm x 45mm
Mainboard - Gigabyte GA-J4105N-H
-
slots: 1 x PCI-Express x1 Rev 2.0 slot (usable with optionally available riser-card)
-
RAM: two slots for DDR4 2400/2133 SO-DIMM modules up to a maximum of 16GB
-
form-factor: mini ITX
-
SATA Controller: 2-channel SATA3 / 6.0GBit/sec.
-
NVMe PCIe Gen2 x2 M.2 SSD slot (for 2242, 2260, 2280 SSD modules)
-
graphics: intel HD-Graphics / D-Sub VGA and HDMI 2.0a connectors (with HDCP 2.2 and HDR)
-
audio: onboard Realtek ALC887
-
LAN: onboard Realtek RTL8111G gigabit network-card
-
4 x USB 3.1 Gen1 connectors (2 x at the rear, 2 x internally)
-
4 x USB 2.0 connectors (2 x at the rear, 2 x at the front-panel)
-
1 x serial-port (RS-232)
CPU - Intel J4105 Quad-Core Celeron / 4x1.5GHz / 4M L2 Cache
-
Quad Core / 4 x 1,5 GHz
-
intel Celeron "Gemini Lake" micro-architecture
-
4M L2 cache
-
10W TDP
RAM - 8GB Kingston RAM DDR4-2400 S0-DIMM
Hard Disk - 250GB Samsung M.2 Solid State Drive PCIe 3.0 x4 SSD
Power Supply - 150W Fortron FSP150-50TNF FlexATX power-supply
-
with active PFC
-
fanless
RBMS Network Configuration
-
Connect the power chord to the back of the rack.
-
Plug an USB Mouse & Keyboard and an video output (HDMI, D-SUB, DVI) all in the rear ports.
-
Once you have everything connected, boot up the device. You’ll be entering inside the Ubuntu machine, that is running a CentOS Server inside a Virtual Box machine.
Both OS have the same password: redfox
Is mandatory to connect everything in the back of the device once you may damage the device if you connect any other kind of device... DO NOT USE the front USB ports.
Network Configuration
The RedFox Server is configured with Ubuntu 19.10 as main operating system and CentOS in a Virtual Box that is the actual server. To simplify some massive updates that may appear, we used this configuration for an easy system update avoiding return the server to repair or the like.
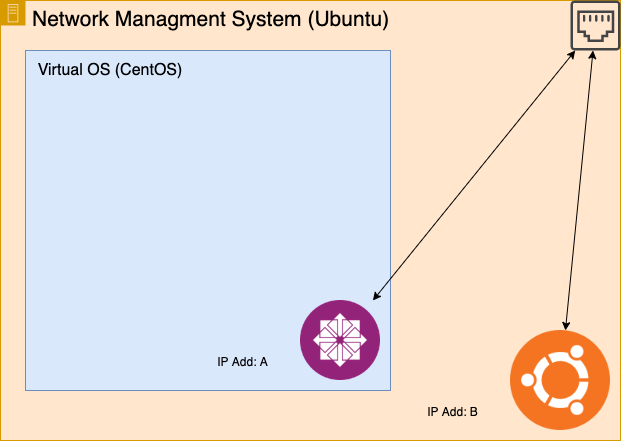
Is mandatory change the dynamic IP Address of the CentOS virtual machine to a static one. Make sure that both machines (Ubuntu & CentOS) are configured with DIFFERENT IP Addresses. Portal IP is represented above by IP Add: A.
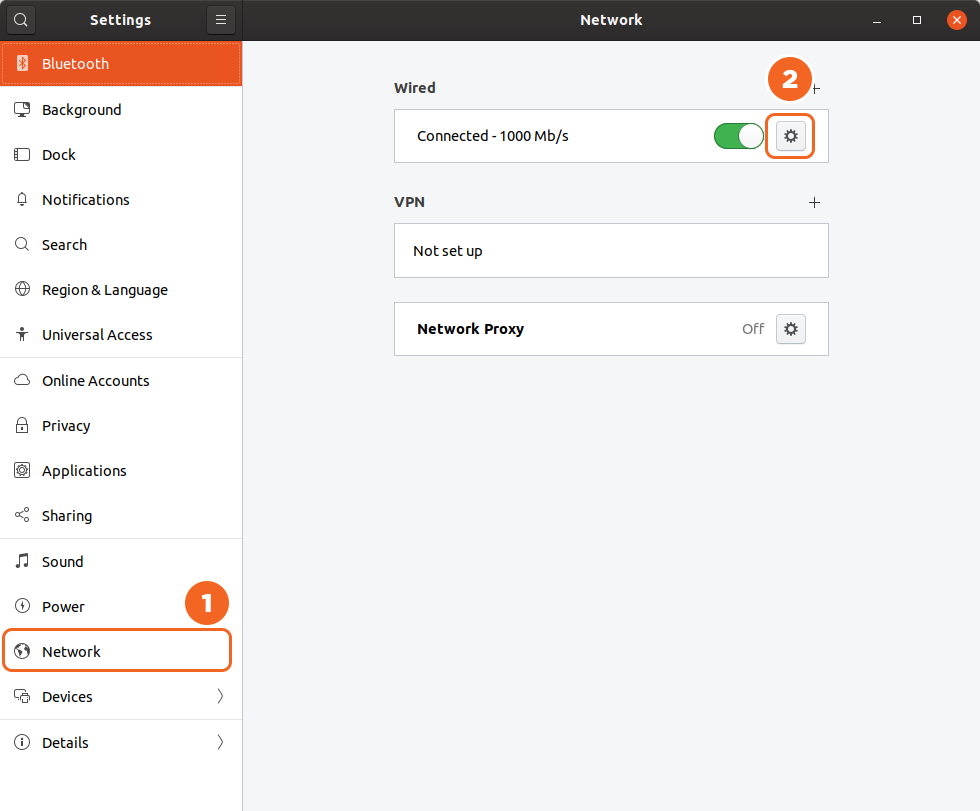
Both machines are configured with dynamic IP’s. In order to change that to an fixed IP please follow the step-by-step guide below:
-
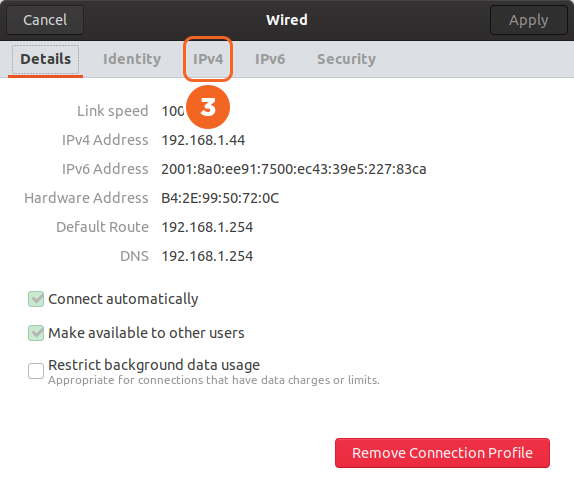
In the settings menu, select Network then click on the gear-wheel to manage the wired connection.
-
In the next window choose IPv4.
-
Then select the radio button to Manual to apply the desired network parameters.
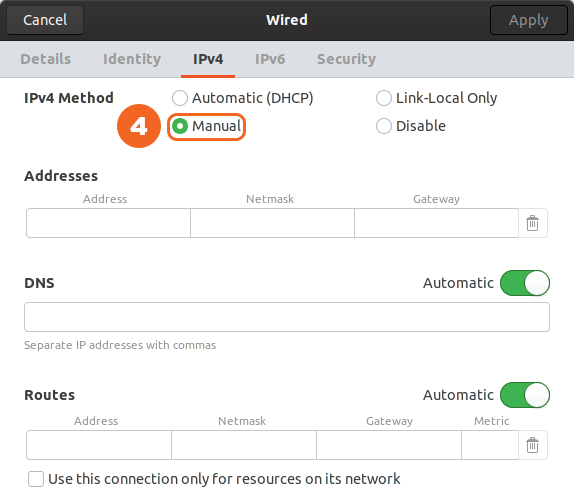
Please make sure that the selected IP is not being used by any other device within the network.
In the CentOS side the configuration is the same as in the Ubuntu since both machines have graphic UI. So, to configure the CentOS network you simple need to open the virtual box (already running) and configure it over the UI repeating the same process used to explain the configuration from the Ubuntu perspective present on this manual.
If you change CentOS IP (Portal) note that the USB sticks for the first setup of RackBox Stations could fail without apparent reason.
Portal Layout
The UI is presented in different ways, depending on the access level of each user. However, in this document, there will be provided an explanation of all the possible fields and views which an user with the role “Admin“ will see to cover all the possible configurations and actions.
Login Page
This is the first page that you will see and in order to enter the portal you must insert valid credentials. You can sign up to the portal, but you need to know it's IP Address on the network to access it once it's not available online. If you sign up you'll be a simpler viewer of the system due to security reasons, these means you need to contact RBMS administrator to give you different permissions.
.png?cb=38c14960a1b4482b73c11a0826547cb7)
Default Admin Login:
Email: jr@barix.com
PW: redfox
Landing Page - Map
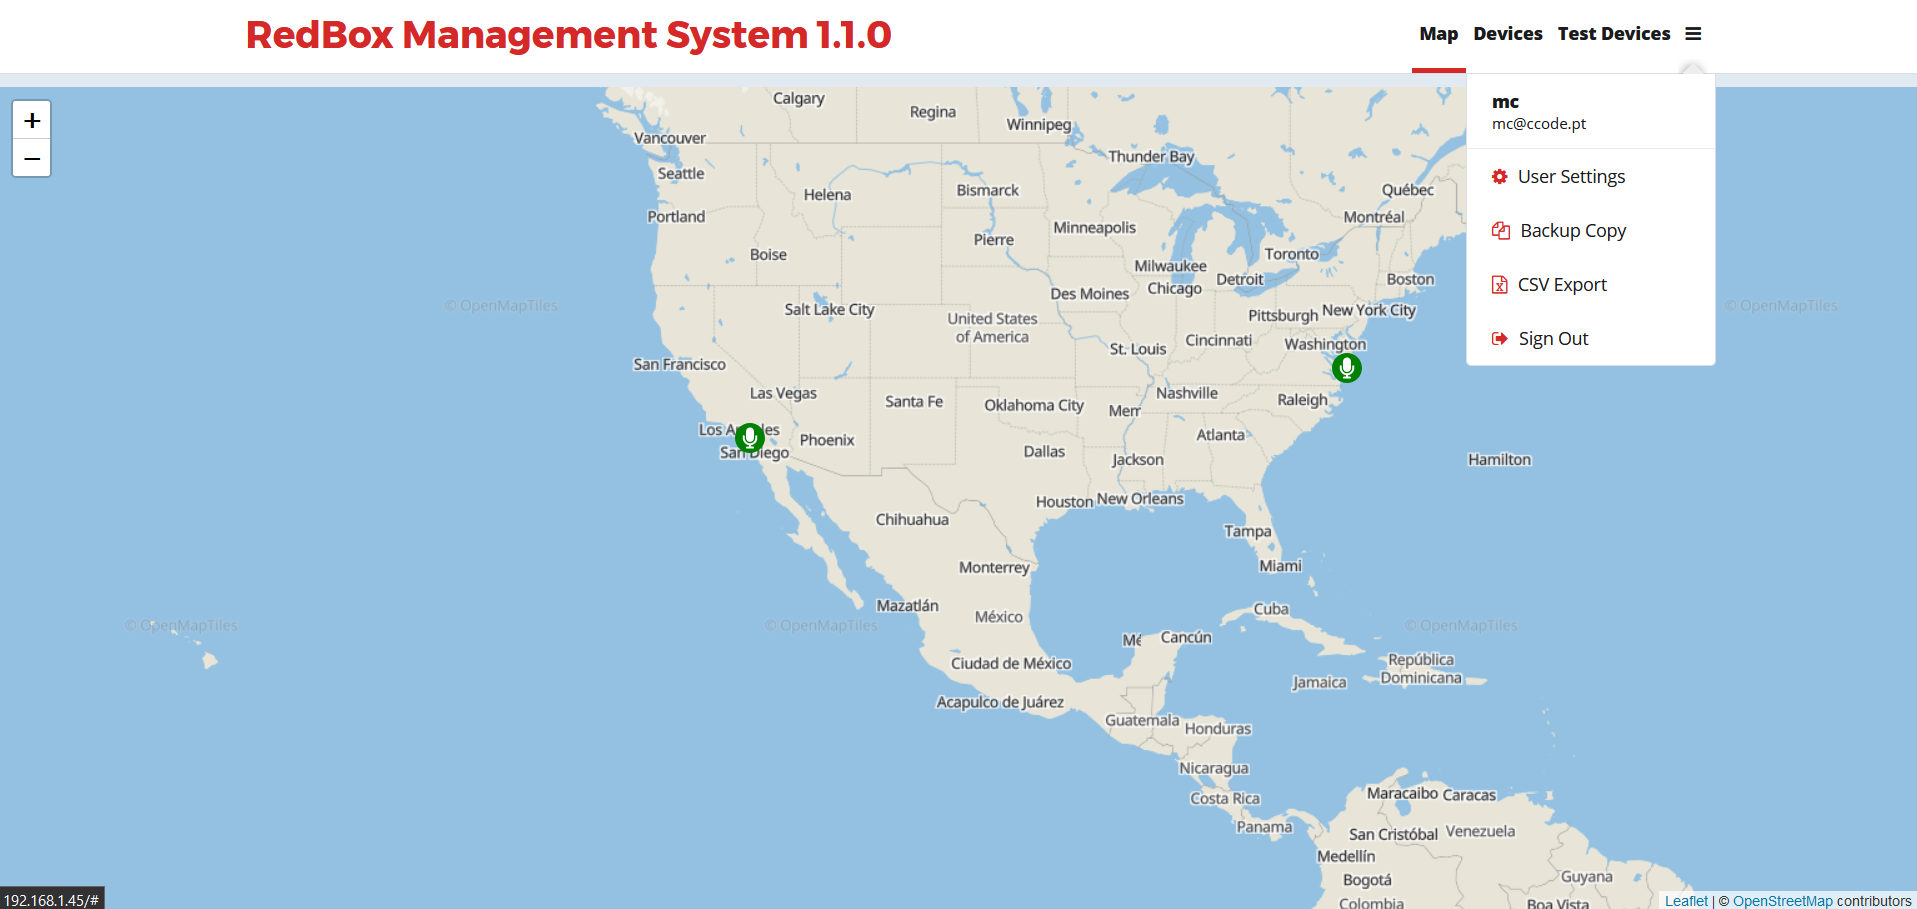
The portal has a landing page that could be seen below, on the landing page could be seen a map with all the devices registered and spread around the world. You can also see different tabs that will take you to different sections and configurations of the system.
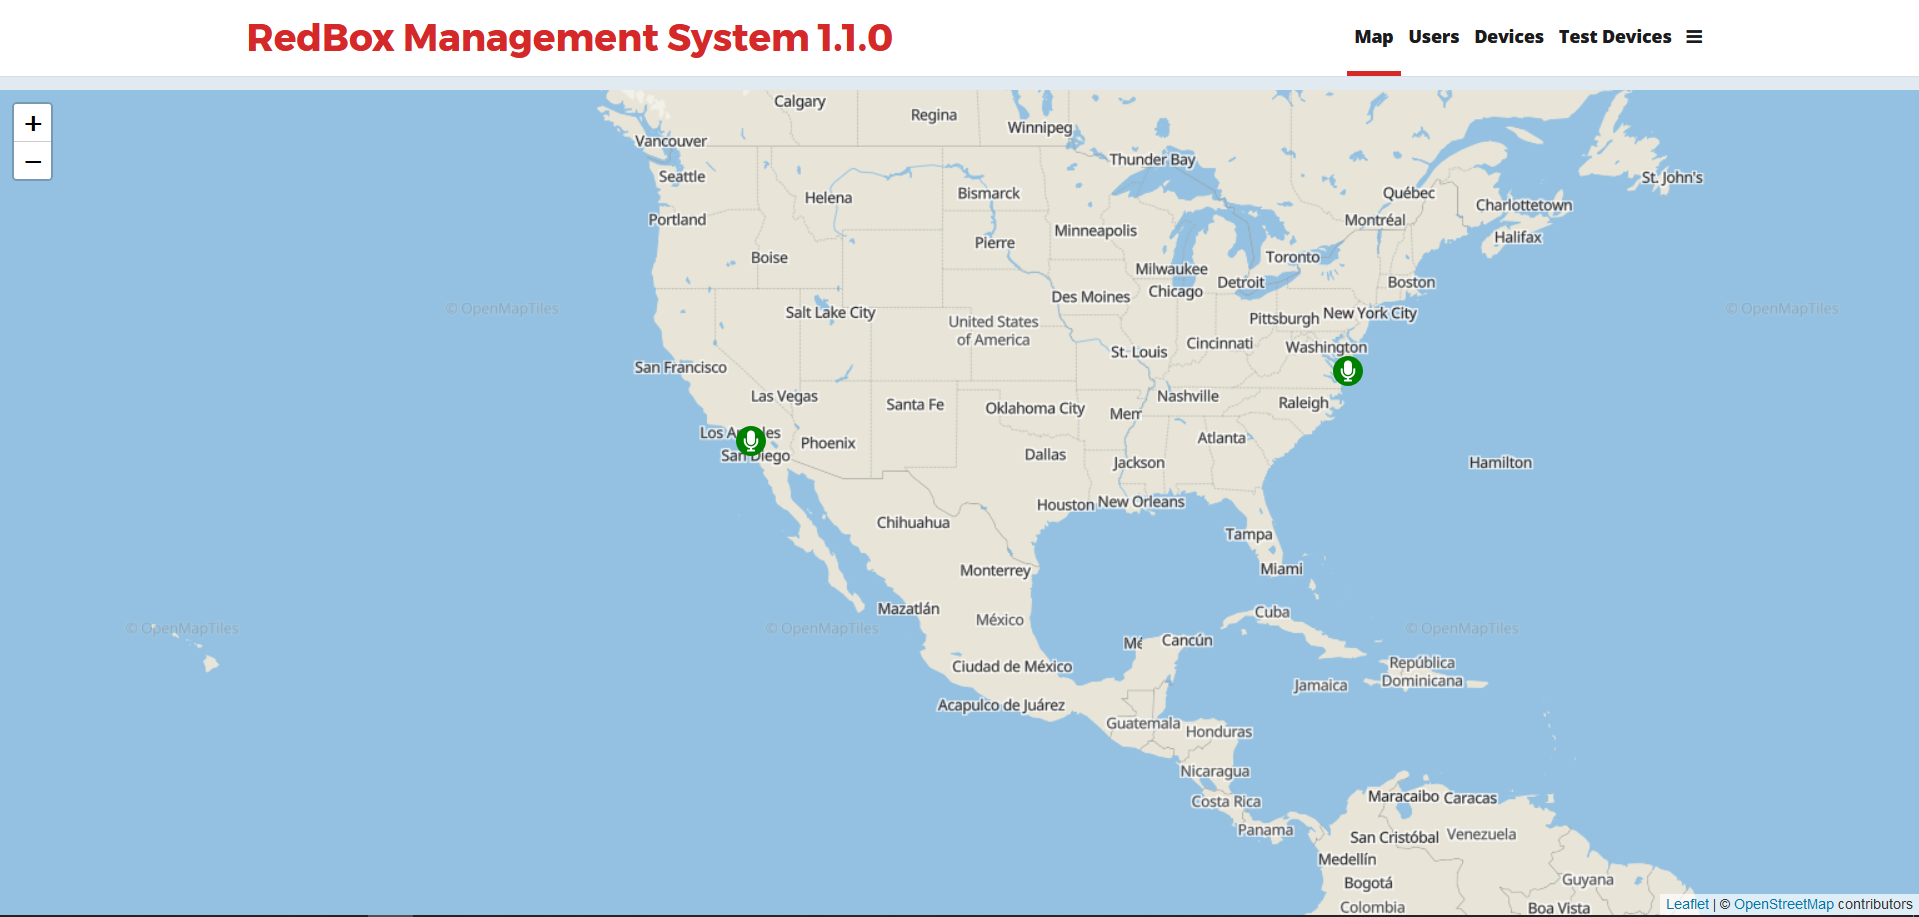
Here you can have an overview of the system, by means of a map with all the devices that are configured by the RBMS. In the landing page you're able to click on each device and go directly to it's configuration. Some fields cannot be changed without move the unit to test mode mainly to avoid communication problems once the units are using fixed IP Addresses. All the remaining configurations are able to be changed, like the naming, location and others. Please check an example below.
Users Page
In the Users section you can see all registered users as well as add a new one, reset passwords and change some information. Below could be seen some of the actions available in the users page.
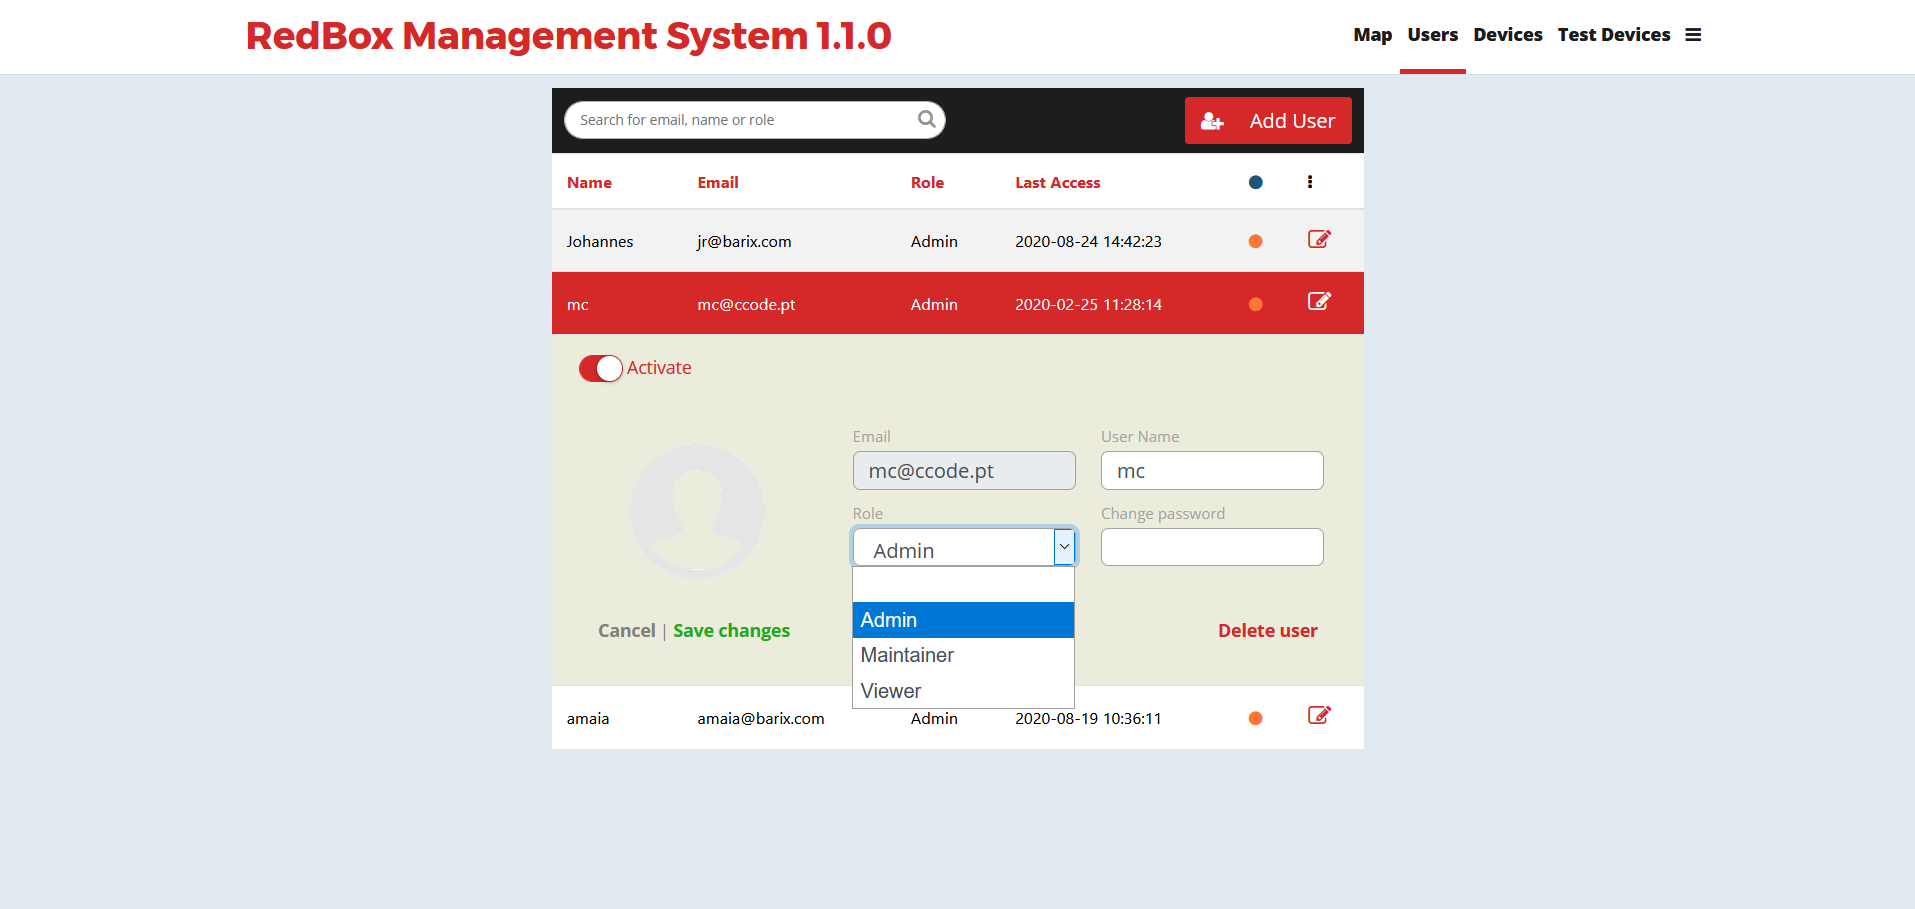
When a new user is created a role must be specified, below you can see the different options:

|
Admin Can see, edit and perform any action available in the RBMS, mainly a admin can add, delete and change users and also update the RBMS firmware. An admin can also issue OTA updates to the RackBox units. |
|
Maintainers Maintainers can basically install devices, configure them and make them available for testing when necessary. They can also create backups of the system and export some information. |

|
Viewer Can only view the map, devices and their configuration but cannot change anything. Can also perform backup copy of the server if necessary. |
Devices Page
In this page you can see the devices that were already configured, check their configuration, status and modify some parameters per device if necessary.
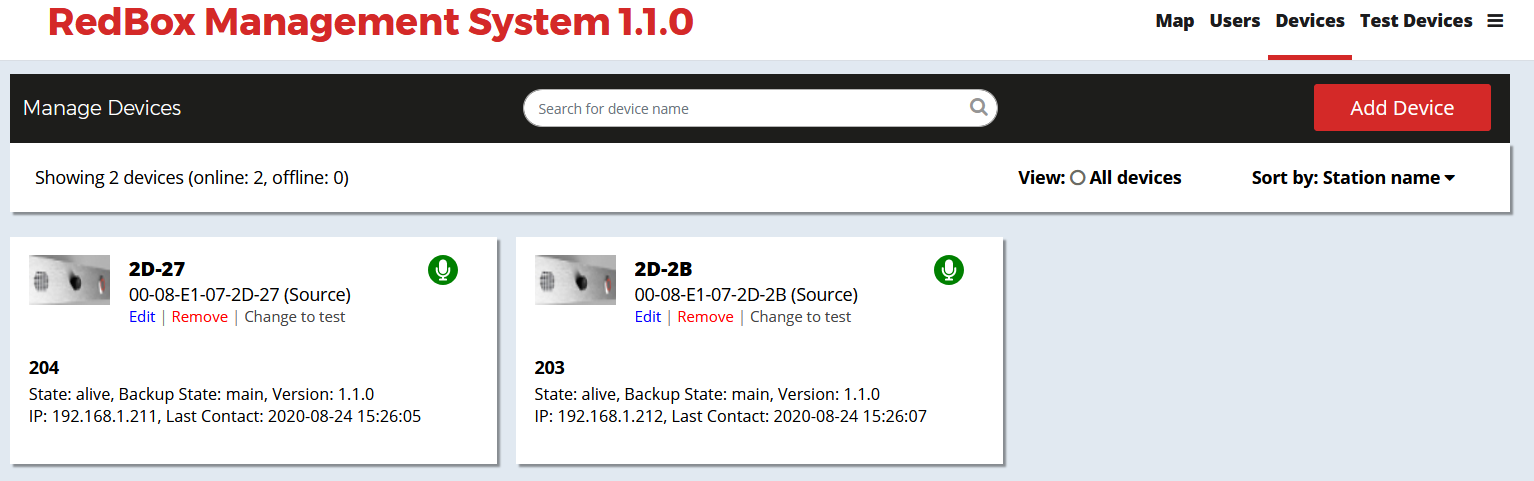
You can use filters by name, address and device status to look for some specific devices. It is possible edit the configuration (except network configurations) of each device. To change the network configurations of any device it needs to be moved to "test devices" to then receive a new configuration, for that you must use the option "change to test" or simply "remove". The device will be shown at "test devices" in order to receive a configuration again.
If you modify any parameter, you must reboot the device manually and the new configuration will take effect after for security reasons and to keep the device operationl.
Add Device Manually
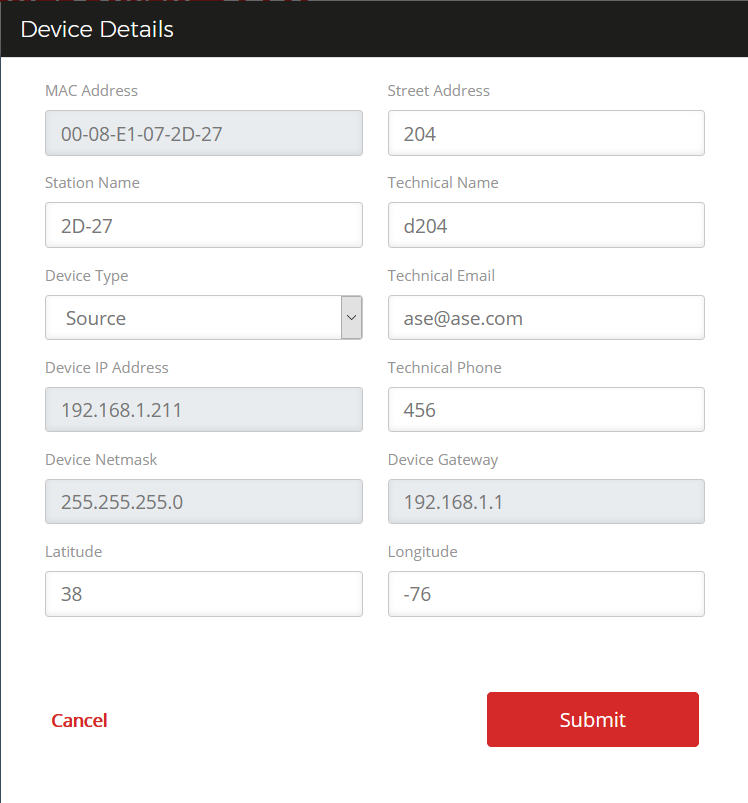
If you wish to insert a device manually, you just need to select “Add Device“. Then a pop-up window will be shown to insert the information of the device such as Network Configuration (IP, Netmask & Gateway), Device Type, Latitude and Longitude, and so on.
(1).png?cb=d4def5bb3fec24975bd77a93273f0391)
Test Devices Page
Here you can see all devices that contacted the RBMS and are in test mode, meaning that they were not configured by any user. To proceed you need to select "add configuration" to go the pop window where you can fill all the required information as explained in the exact previous point.
.png?cb=77acb550f182e9223c0161bb1b564743)
Advanced Options
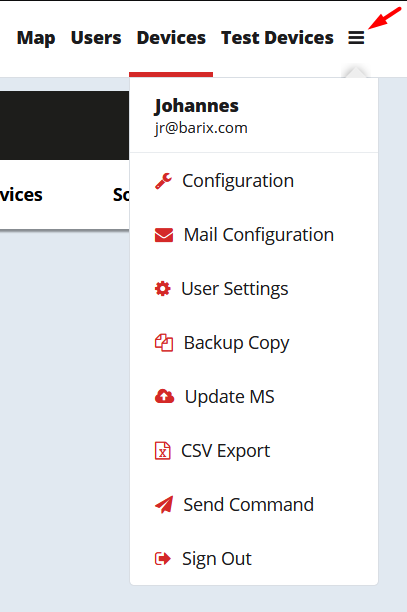
For more options you can find the drop down menu composed by three horizontal lines above each other on the top right corner of the webUI. Several configurations can be found such as stream configurations, alerts, user settings, backups and updates. Each one will be explained below following the order top bottom.
Configuration
In the configuration option you can configure mainly the streams and other fields as explained in the next image.
.png?cb=7125658de2ff93679f109913c03b6a33)
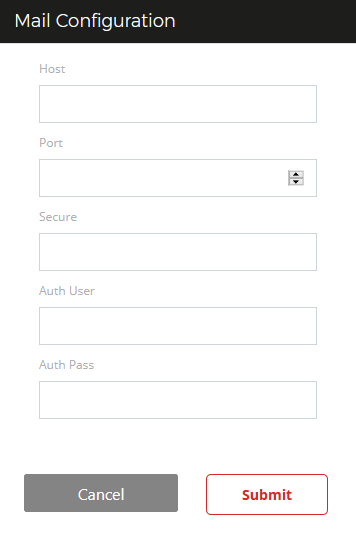
Mail Configuration
Here can be configured the email server that will be responsible to send all the alerts and necessary information.
|
Host
|
|
Port The network port where the communication go out and in.
|
|
|
Secure
|
|
|
Auth User
|
|
|
Auth Pass Password to make the authentication into the service provider |
User Settings
On this tab you can change your email, user name and password.
.png?cb=b2635f778c8464aa93084ab874a4b1ec)
Backup Copy
This feature is quite important to copy the database. This allows the user to restore it if needed.
It will create a zip file of the portal configurations. For that you need a FAT32 formatted USB stick plugged only on the front USB ports. The USB stick needs to have a file RackBox.dat to be able to perform the backup & copy. The file contains the following code:
redbox.dat
{ "type" : "backup" }
To perform this operation successfully you need to unlock the virtual machine to allow the USB stick be mounted by the virtual OS. We strongly suggest to do it locally by connecting a monitor, a keyboard and a mouse on the available rear ports of the RBMS. Then unlock Ubuntu and the virtual machine. Plug in the USB stick on one of the front USB ports of the RBMS and access the RBMS IP Address to perform the backup & copy operation.
After this action is successfully finished you’ll see a green pop-up appearing on the top right corner as confirmation.
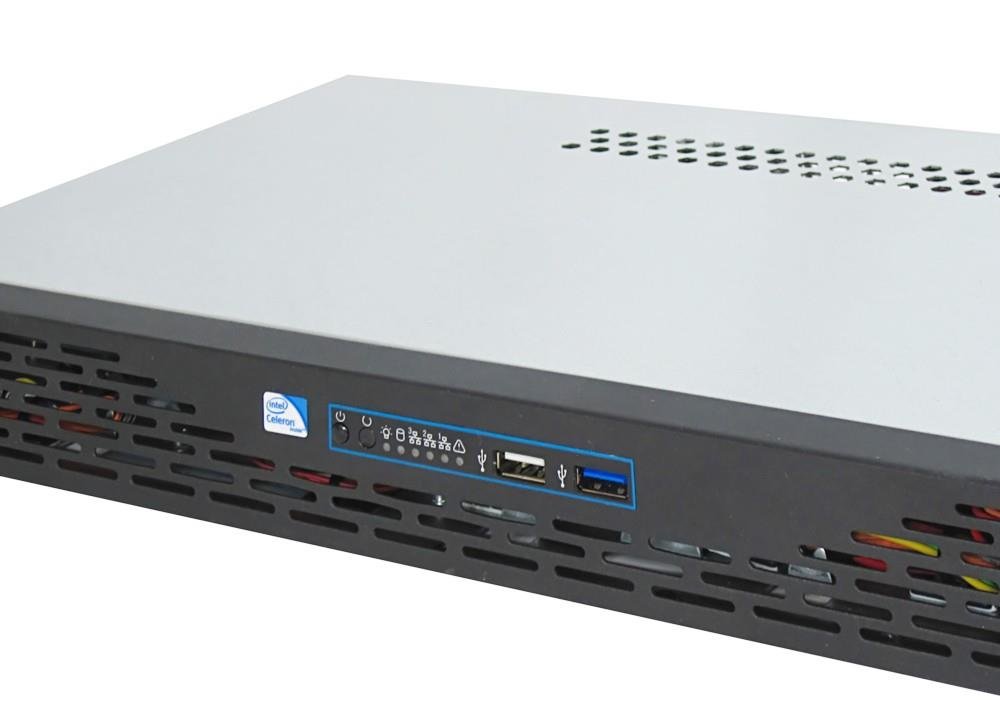
Please use only the front USB ports to backup with a storage volume FAT32 formatted! Any kind of additional device or volumes with different formats may crash the server.
Update MS
The update option will let you upload a file to update the portal through it. The file will be provided by Barix over email or download.
.png?cb=d297c14375bcc43d256733ff06598c59)
CSV Export
This option will export a CSV file where basic information about the units managed by the RBMS will be saved to be exported. An example below.

Send Command
This feature allows OTA updates to all RackBox devices (or a specific one) connected and reachable by the server. For that you just need to enter the update file (needs to be a complete image .tar image). Then select the device or all devices which will receive the update and press send.
Please note that RackBox devices will reboot after an update.
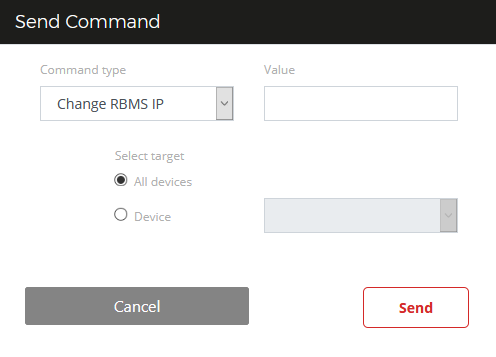
With this function you can also warn all the RackBox devices if the IP of the RBMS changes for some reason. To do so, you just need to insert the new IP Address of the RBMS, choose all the units or just a specific one and press send.
Do not change the RBMS IP Address without use the "send command" to warn all the rackbox devices about RBMS new IP Address. Only then you can change the IP Address of the RBMS.
We recommend to setup the backup server with the same IP Address and same data instead of send command function.
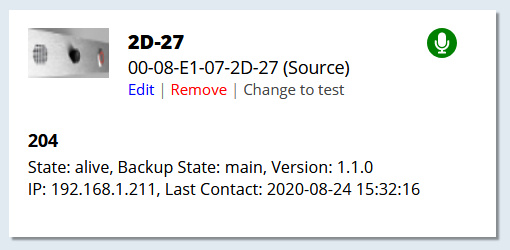
Symbols Meaning
The RBMS landing page shows a map with symbols marking the units that are spread around the world. Below you can find a table that explains the meaning of each symbol that may appear in the map, depending on the situation.
|
|
The device is alive and it’s a Source type. |
|
The device is alive and it’s in test mode. |
|
The device is not alive and it's Source type. |
|
|
The device is alive and it’s a Destination type. |
|
The device isn’t alive and it’s in test mode. |
|
The device is not alive and it's Destination type. |
How to restore database backup file
How to restore a copy of the main server database to a new or backup server if necessary. Assuming that step <4.1.6.4. Backup Copy> is done, you should start to verify if the servers are running at least the version 1.0.7. The restoring functionality is only supported since that version.
-
Go to the destination RBMS
-
Login into the virtual machine:
-
user: redfox
-
password: redfox
-
-
Plug the USB stick with the file RackBox.dat on the front usb ports.
-
Open a terminal and execute the following instructions:
su                  (password is "redfox")
mkdir /tmp/db_restore
cd /tmp/db_restore
ls -lh /run/media/redfox/        (select the PEN name)
cp /run/media/redfox/<PEN_Name>/dump.zip /tmp/db_restore
unzip dump.zip
cd dump
mongorestore --db mgmt --verbose mgmt
The database restore is complete.
Compliance and further Information
This equipment has been tested and found to comply with the limits for a Class B digital device, pursuant to part 15 of the FCC Rules. These limits are designed to provide reasonable protection against harmful interference in a residential installation. This equipment generates, uses and can radiate radio frequency energy and, if not installed and used in accordance with the instructions, may cause harmful interference to radio communications. However, there is no guarantee that interference will not occur in a particular installation. If this equipment does cause harmful interference to radio or television reception, which can be determined by turning the equipment off and on, the user is encouraged to try to correct the interference by one or more of the following measures:
-
Reorient or relocate the receiving antenna.
-
Increase the separation between the equipment and receiver.
-
Connect the device into an outlet on a circuit different from that to which the receiver is connected.
-
Consult the dealer or an experienced radio/TV technician for help.
Safety and precaution recommendations apply. Find them in the download section at www.barix.com

Find your distributor on this list for more hardware.
For questions that are extending the documentation, feel free to contact us on:
International: +41 434 33 22 22
USA: +1 866 815 0866
Email: support@barix.com
All information and the use of this product including all services are covered under the Barix Terms & Conditions and our Privacy Policy. Please follow the Safety and Precaution Recommendations. Barix is a ISO 9001:2015 certified company. All rights reserved. All information is subject to change without notice. All mentioned trademarks belong to their respective owners and are used for reference only.