BaViDi user guide
The scope of this document is to give a thorough introduction on BaViDi, the Barix Video Display controller. At the end of this guide the user will be able to run a basic setup and display content on the connected display.
BaViDi is the Barix Video Display controller. A device capable to display web content, stored locally or fetched from the network, and to control the connected display using HDMI-CEC (Consumer Electronic Control)
Package Content
BaViDi
Power Adapter - USB to barrel (for easy connection to TV’s USB port)
HDMI cable (50cm)
Quick Install Guide
Hardware Overview
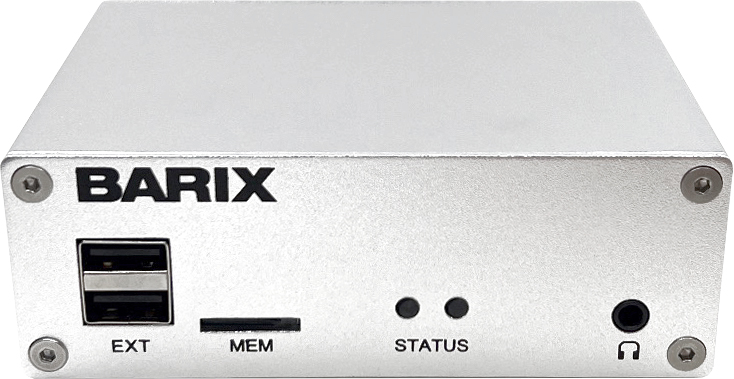 |  | ||
EXT | 2x Type A USB ports | VIDEO | HDMI Interface with CEC support. Video output resolution: 1920x1080 (option to extend up to 3840x2160) |
MEM | microSD card slot | LAN | 10/100Mbps interface with POE support (IEEE 802.3af) |
STATUS |
| SYS | 8P8C connector for: serial interface, 24VDC input, relay output 30VDC 1A. See pinout details below |
Headphone | 3.5mm trs headphone output | PWR | 3.5x1.5mm barrel connection 5V 2A inner positive (USB adapter cable included) |
SYS Connection Pinout
Pinout colors exposed in the following table relates to 8P8C connections following the ANSI/TIA-568-B standard
Pin 1 (wo) | REL1 COM |
Pin 2 (o) | REL1 Normally Open - 30VDC / 1A |
Pin 3 (wgr) | RS-232 RxD |
Pin 4 (bl) | +24VDC input |
Pin 5 (wbl) | GND |
Pin 6 (gr) | RS232 TxD |
Pin 7 | NC |
Pin 8 | NC |
Serial interface default settings:
9600 baud, 8 data bits, no parity and 1 stop bit (other supported baud rates: 19200 and 115200)
Content Preparation
BaViDi uses a browser to display web content. Content must be arranged into folders, where each folder contains the content to be displayed and all the corresponding resources (videos, images, css, js). Each folder represents a web page that BaViDi can display.
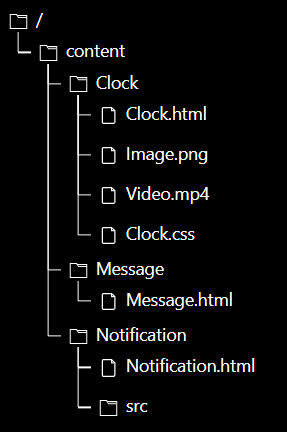
Below is an example of content prepared for BaViDi on a PC:
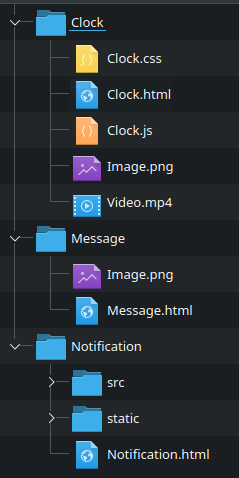
As visible, each folder contains resources that are used by the html page to be displayed. How the resources are handled is clearly scoped in the html file of each web page.
For BaViDi there is no difference having css / js embedded into the html file or referenced to external src, whether this is saved in the same folder of the html file or in a sub-folder where the html file is located.
To simplify operations it is useful to name the folders and the html files with the same name using Capitalized words. (e.g. Clock/Clock.html - Message/Message.html - Notification/Notification.html)
Content Locations
BaViDi can display content from:
Internal memory: content in this case is stored in the local memory. It is possible to upload content via USB.
TF Card: content is stored on a TF card, when this is inserted into BaViDi the content becomes available and can be displayed. The content is not copied in the local memory it stays on the TF card.
Network: It is possible to display content stored elsewhere on the internet. I.e. it is possible to display a website. In this case BaViDi doesn’t store anything locally but simply renders content just like a web browser would do.
When a display command is issued BaViDi looks first in the content copied into the internal memory, if it cannot find it there it will look into the TF card folder.
Upload Content via USB
Uploading content via USB is one of the easiest way to copy the content into BaViDi’s internal memory.
BaViDi mounts USB pen-drives formatted as exFAT / NTFS / EXT4
The content must be compressed in a .zip file and the zipped folder must be named ‘content.zip’. This folder must be placed into another folder in the root path of the pen-drive called ‘content’.
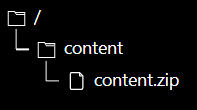
Inside content.zip are compressed the resources prepared as described in the content preparation chapter.
When the USB is plugged into one of BaViDi’s USB ports the files compressed into content.zip are copied into the internal memory of the device.
Assuming that content.zip contains the file structure that we exposed in the previous chapter ‘content preparation’ we will end up by having in Bavidi the following files and folders:
TF Card
BaViDi mounts TF Cards formatted as exFAT / NTFS / EXT4
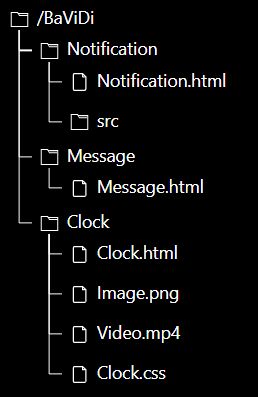
BaViDi allows the possibility to mount a TF Card with content already stored in it. The content will never leave the TF Card. The content on the TF Card must be arranged into a folder named ‘content’ saved in the root path of the TF Card. Below is an example that resembles the content prepared in the chapter Content Preparation:
Content on the TF Card doesn’t have priority over content loaded in the local memory. If content with the same name is present on the TF Card and in the local memory, it will be displayed the one in the local memory.
Commands
BaViDi supports a set of commands for the user to interact with the device, retrieve information, display resources etc. The scope of this chapter is to explain every command supported in detail. Commands can be received via APIs, see the Control APIs chapter to know how to send commands to BaViDi.
The commands are ASCII characters starting with a leading capitalized letter, they can be followed by a comma separator and one or more parameters, the end of the command is indicated by the presence of either a carriage return or line feed (CR: 0x0d, LF: 0x0a):
COMMAND,PARAMETER_1 PARAMETER_2[CR]LF]
Example:
D,Clock/Clock.html[CR][LF] → This command instructs BaViDi to display the content specified in the parameter, which is the path of the same after it has been preloaded in the device.
BaViDi acknowledges commands with replies (i.e. V returns the Version and the MAC of the device) or with an OK. If the command is not correct BaViDi replies with an error: Incorrect command.
Following is the list of commands supported in BaViDi with detailed explanations
System Commands
System commands are used to retrieve SW Version, MAC and set the time on the device.
V
Description: Retrieves the version of the SW followed by the MAC Address.
Parameters: none
Response: v,1.0.0.0,0008e1a377cf
Device replies with the v command, first parameter is the SW version followed by a comma and second parameter is the MAC Address,
Example:
→ V[CR][LF]
← v,1.0.0.0,0008e1a377cf
T
Command Description: Sets the time
Parameters: YYYYMMDDHHMMSS
The parameter must contain the year, month, day, hour, minute and second. no spaces allowed.
Response: OK | Incorrect Command
Example:
→ T,20221102110009[CR][LF]
← OK
CEC Control Commands
BaViDi supports HDMI-CEC (Consumer Electronic Control), a standard delivered to allow HDMI interconnected devices to control each other. BaViDi can control displays connected supporting the CEC feature.
CEC must be enabled on the connected screen in order for the following commands to work. Note that each TV manufacturer may name the CEC implementation with a proprietary name. At this page are available the trade names used by the most known manufacturer of displays.
C,ON
Command Description: Wakes up the connected display from a standby condition.
Parameters: ON
Response: OK | Incorrect Command
Example:
→ C,ON[CR][LF]
← OK
C,STBY
Command Description: Puts the connected display in standby mode.
Parameters: STBY
Response: OK | Incorrect Command
Example:
→ C,STBY[CR][LF]
← OK
C,AS
Command Description: Switches the screen HDMI input to display the one where BaViDi is connected
Parameters: AS
Response: OK | Incorrect Command
Example:
→ C,AS[CR][LF]
← OK
C,QUERY
Command Description: Queries the TV to provide the current status via HDMI-CEC
Parameters: QUERY
Response: Full details of the connected display
Example:
→ C,QUERY[CR][LF]
←
Driver Info:
	Driver version             : 5.18.10
	Available Logical Addresses: 4
	Physical Address           : 1.0.0.0
	Logical Address Mask       : 0x0010
	CEC Version                : 2.0
	Vendor ID                  : 0x000c03 (HDMI)
	OSD Name                   : Playback
	Logical Addresses          : 1 (Allow RC Passthrough)

	  Logical Address          : 4 (Playback Device 1)
	    Primary Device Type    : Playback
	    Logical Address Type   : Playback
	    All Device Types       : Playback
	    RC TV Profile          : None
	    Device Features        :
		None

	System Information for device 0 (TV) from device 4 (Playback Device 1):
		CEC Version                : 1.4
		Physical Address           : 0.0.0.0
		Primary Device Type        : TV
		Vendor ID                  : 0x4d5354
		OSD Name                   : Tx, OK, Rx, Timeout
		Menu Language              : ita
		Power Status               : On

	Topology:

	0.0.0.0: TV
	    1.0.0.0: Playback Device 1
Display Content Commands
These are probably the most important commands since they allow to specify which content has to be displayed on screen when the command is received. Content to be displayed must be available either:
In the local memory (loaded via USB)
In the TF Card inserted in BaViDi
On the network reachable by BaViDi
See the previous chapters about content preparation and management. The naming of folders and of the html files is important for the following commands to work correctly.
D,RESOURCE_FOLDER/RESOURCE_FILE
Command Description: Displays the specified resource
Parameters: RESOURCE_FOLDER/RESOURCE_FILE
The parameter in this case specifies the path to the html file that must be displayed. It is mandatory to specify the folder name where the html file is saved followed by a forward slash and the name of the html file itself.
Response: OK | Incorrect Command
Example:
→ D,Clock/Clock.html[CR][LF]
← OK
In this example when BaViDi receives this command will look into the folder where content is being loaded and will search for a folder called ‘Clock’, if it is there it will look inside of it for the html file specified, in this case 'Clock.html' - If it fails in finding the content in the local memory it will look into the TF Card (if present). If it fails to find the content also on the TF Card BaViDi will show on screen a page informing the user that the Path to the file is not available or is incorrect.
U,RESOURCE_URL
Command Description: Displays the content of the specified URL. It is supposed that BaViDi in this case has network access and the resource of the url is reachable by the device.
Parameters: RESOURCE_URL
The parameter in this case specifies the URL of the content to be displayed. Content will not be downloaded onto the device, BaViDi will use the http protocol to retrieve the content resources and display.
Response: OK | Incorrect Command
Example:
→ U,https://www.barix.com/[CR][LF]
← OK
In this example when BaViDi receives this command will connect with the specified URL and will display the content available. - If it fails in reaching the URL BaViDi will show on screen a page informing the user that the URL is not reachable
X,RESOURCE_URL
Command Description: This command is a combination of 2 commands: ‘C,AS’ followed by ‘U,RESOURCE_URL’ - When BaViDi receives this command it executes first ‘C,AS’ to switch the screen HDMI input to the BaViDi’s one and immediately after will send the U command to show the content specified by the URL parameter.
Parameters: RESOURCE_URL
The parameter in this case specifies the URL of the content to be displayed. Content will not be downloaded onto the device, BaViDi will use the http protocol to retrieve the content resources and display.
Response: OK | Incorrect Command
Example:
→ X,https://www.barix.com/[CR][LF]← OK
Y,RESOURCE_FOLDER/RESOURCE_FILE
Command Description: This command is a combination of 2 commands: ‘C,AS’ followed by ‘D,RESOURCE_FOLDER/RESOURCE_FILE ’ - When BaViDi receives this command it executes first ‘C,AS’ to switch the screen HDMI input to the BaViDi’s one and immediately after will send the D command to show the content specified by the resource file parameter.
Parameters: RESOURCE_FOLDER/RESOURCE_FILE
The parameter in this case specifies the path to the html file that must be displayed. It is mandatory to specify the folder name where the html file is saved followed by a forward slash and the name of the html file itself.
Response: OK | Incorrect Command
Example:
→ Y,Clock/Clock.html[CR][LF]
← OK
N
Command Description: Retrieves the list of pre-loaded resources (not the ones on the TF Card)
Parameters: none
Response: List of resources
Example:
→ N[CR][LF]
← Clock, Notification, Message
Control APIs
Bavidi can be controlled via 2 main interfaces:
Web API: allows to receive HTTP requests with the commands passed as URL parameters
RS232 Serial Interface: allows to use the RS232 interface to receive the commands
BaViDi has a command handler that listens continuously on the 2 above mentioned interfaces.
Web API
BaViDi requires the validation of an ‘appkey’ that is used to authenticate the requests received from web clients. Contact Barix at support@barix.com for obtaining the appkey to be used on your device.
Request URL schema:
http://<BAVIDI_IP>:8080/?appkey=<appkey>&command=COMMAND,PARAMETER
Example:
http://192.168.100.26:8080/?appkey=afsGtsr562&command=Y,Clock/Clock.html
See the Commands chapter for all commands supported by BaViDi
Please note the following commands are not supported at the time when this manual is written by the Web API:
V - T - C,ON - C,STBY - C,AS - C,QUERY - N
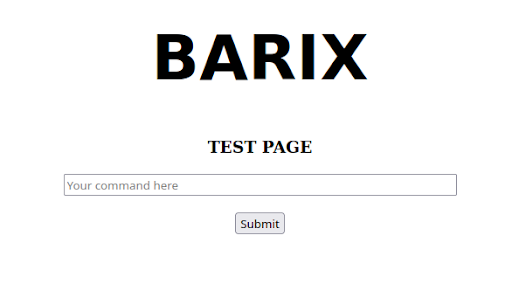
If a browser is used to send the requests described above, BaViDi will provide a ‘test page’ from where it is possible to send commands using the provided text input field. In this case is enough to enter the desired command and press ‘Submit’.
Serial Interface
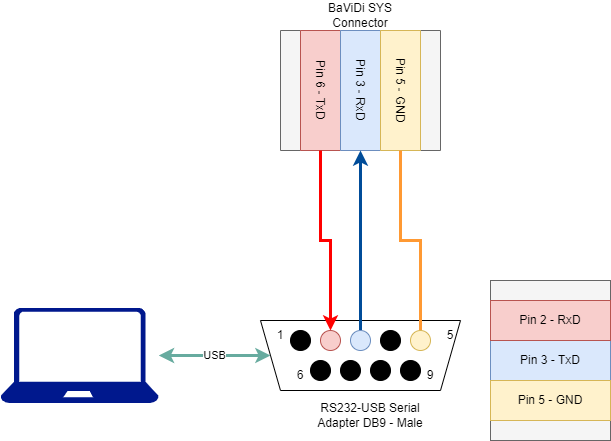
BaViDi offers an RS232 serial interface on the SYS connector providing Tx on pin 6 and Rx on pin 3 (gnd on pin 5). See the connection pinout for more details.
In order to access the serial interface on BaViDi from a PC connected via RS232 serial adapter it is necessary to close a jumper on the BaViDi board. To access the jumper the board has to be removed from the case by undoing the 4 screws on the back panel.
The jumper is located between the SYS and the LAN connector.
Follow the below connection scheme to connect the BaViDi’s RS232 interface to a RS232-USB serial adapter connected to the PC:
BaViDi supports all the commands detailed in the chapter Commands when they are received via the serial interface.
Example: serial communication using Putty on Windows
In the following example Putty will be the program used to access the Serial Interface on a Windows based PC:
Power off BaViDi. Open the case to remove the PCB inside and close the Jumper located between the SYS and the LAN connectors - MAKE SURE TO DO THIS WHILE BAVIDI IS NOT POWERED. Power up BaViDi only when all the connections are done and BaViDi is back in its case.
Connect the USB of the serial adapter to the PC and the DB9 to the RS232 interface of BaViDi, make sure connections are correct as per above schematic. At this point Power up BaViDi.
Identify to which COM port the serial adapter is connected, to do this:
Open the ‘device manager’
Look for Ports (COM and LPT)
Open the drop down, the Serial Adapter and the corresponding COM port are visualized

Windows device manager
Open Putty and click on Serial on the left side bar. In the window that opens set the COM port to the one found in step 1 and:
baud rate: 9600
data bits: 8
stop bits: 1
parity: none
flow control: none
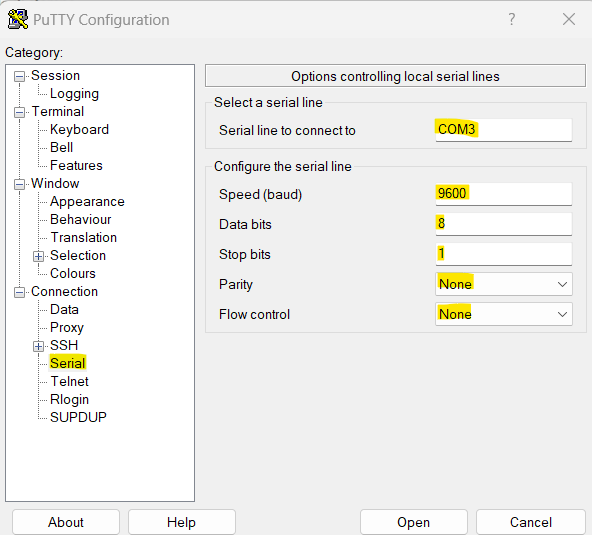
Go back to the Session tab and select 'connection type: Serial and then Open.

Once you open the session a new serial terminal opens up. Send the ‘V' command to test if the bidirectional communication works. BaViDi should reply with the version of the sw and the MAC address, if this doesn’t happen it means that there is something in the configuration or in the wiring that is not done right.