
Safety Precautions
Please make sure to first read the safety information in order to avoid hazards.
The UX8 is a USB IO Extension for IPAM based Barionet devices. It provides a simple way to increase the number of contact closures with:
-
(8x) Dry Input Contact
-
(8x) Relay outputs with NO and NC positions
Package Content and Accessories
-
Barionet UX8
-
Terminal Blocks
Compatibility Matrix
Barionet UX8 is compatible with the following Barionet head-end units:
|
BARIONET 50 |
NOT COMPATIBLE |
|---|---|
|
BARIONET 100 |
NOT COMPATIBLE |
|
BARIONET 400 |
NOT COMPATIBLE |
|
BARIONET 1000 |
NOT COMPATIBLE |
|
BARIONET M44 |
COMPATIBLE |
|
BARIONET M82 |
COMPATIBLE |
UX8 specifications
|
Rating |
Value |
|
Inputs |
8 × dry-contact inputs, 0–15 V (voltage-free contact closures); also readable as counters and analog values through the I/O address map |
|
Relays |
8 × Form C (SPDT changeover): common (CM), normally-open (NO) and normally-closed (NC) brought out per relay |
|
Relay maximum load |
30 V DC, 1 A |
|
Power |
Supplied by the Barionet head unit over the USB connection.
|
|
Connection |
USB Type-B "HOST" connector, cabled to a USB port on the Barionet |
|
Reset |
A reset button performs a hardware reset of the UX8's on-board microcontroller |
|
Units per head unit |
Up to 4 (on both the M44 and the M82) |
Connecting and addressing UX8 units
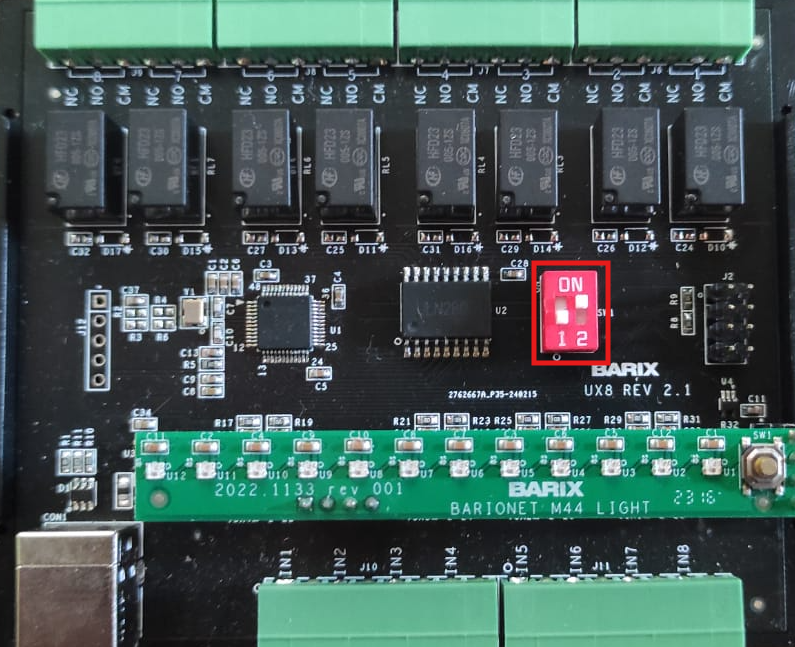
Each UX8 carries a two-position DIP switch (SW1) that sets its address, so the head unit can tell several modules apart. Give every attached UX8 a different address.
A single UX8: just connect the USB cable at both ends and power up the Barionet. One module uses the default Address #1 and needs no switch change.
Two or more UX8: before connecting them, open each case, set its DIP switch to a unique address as in the table below, close the case, connect all modules to the Barionet's USB ports, and then power up the Barionet.
|
UX8 address |
Switch 1 |
Switch 2 |
|
Address #1 |
OFF |
OFF |
|
Address #2 |
OFF |
ON |
|
Address #3 |
ON |
OFF |
|
Address #4 |
ON |
ON |
Addresses #1 and #2 are set exactly as shown in the Barix UX8 figures; addresses #3 and #4 follow the same pattern (the two switches encode the address in binary, with switch 2 as the least-significant bit), allowing up to four modules on one head unit.
Important connection notes:
-
The Barionet's USB ports must be enabled for a UX8 to be detected (USB enable, I/O address 1207 — see the "Developing Flexa Applications" part).
-
A UX8 is detected at boot. Connect and address your UX8 modules before powering the Barionet; hot-plugging one afterwards requires a reboot before it is recognized.
-
Which UX8 units are present can be read at I/O addresses 60007–60010 (units 1–4), and their relays, inputs, counters and analog values occupy the UX8 ranges of the address map.
-
When connecting more than 2x UX8 to a single Barionet adopt an externally powered USB hub. Barionet USB port provide a limited amount of current (500mA) and can’t power more than 2 UX8 extensions. Keep USB cables as short as possible.
Functionality
The Barionet UX8 is immediately identified by the head-end Barionet device to which is connected to and seamlessly extends its IO capabilities. The IOs provided by UX8 appear as part of the file system just like the built-in IOs of the head-end Barionet unit.
See also https://help.barix.com/barionet/io-addresses
Connections
HOST
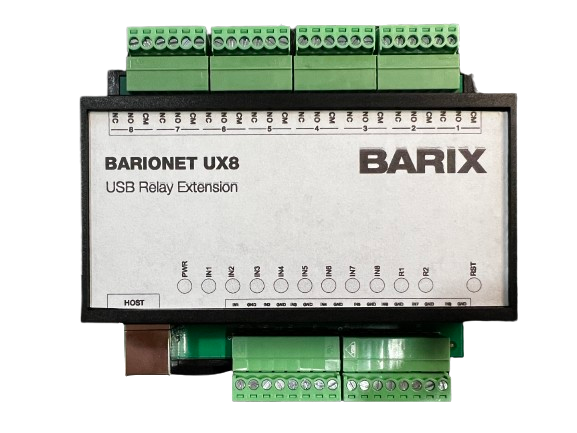
(1X) HOST supporting USB connections
The connector on the Barionet UX8 is a USB Type B connector
|
Pinout |
Description |
|---|---|
|
1 |
VCC (+5V) |
|
2 |
D – (Data -) |
|
3 |
D + (Data +) |
|
4 |
GND |
INPUTS
0-15V Dry Input Contact Closures
|
Pinout |
Description |
|---|---|
|
IN1 |
Dry Input Contact #1 |
|
GND |
Ground |
|
IN2 |
Dry Input Contact #2 |
|
GND |
Ground |
|
IN3 |
Dry Input Contact #3 |
|
GND |
Ground |
|
IN4 |
Dry Input Contact #4 |
|
GND |
Ground |
|
IN5 |
Dry Input Contact #5 |
|
GND |
Ground |
|
IN6 |
Dry Input Contact #6 |
|
GND |
Ground |
|
IN7 |
Dry Input Contact #7 |
|
GND |
Ground |
|
IN8 |
Dry Input Contact #8 |
|
GND |
Ground |
RELAYS
Max. Load supported: 30VDC - 1A
|
Pin |
Description |
|---|---|
|
#1 CM |
Relay #1 common |
|
#1 NO |
Relay #1 normally open |
|
#1 NC |
Relay #1 normally closed |
|
#2 CM |
Relay #2 common |
|
#2 NO |
Relay #2 normally open |
|
#2 NC |
Relay #2 normally closed |
|
#3 CM |
Relay #3 common |
|
#3 NO |
Relay #3 normally open |
|
#3 NC |
Relay #3 normally closed |
|
#4 CM |
Relay #4 common |
|
#4 NO |
Relay #4 normally open |
|
#4 NC |
Relay #4 normally closed |
|
#5 CM |
Relay #5 common |
|
#5 NO |
Relay #5 normally open |
|
#5 NC |
Relay #5 normally closed |
|
#6 CM |
Relay #6 common |
|
#6 NO |
Relay #6 normally open |
|
#6 NC |
Relay #6 normally closed |
|
#7 CM |
Relay #7 common |
|
#7 NO |
Relay #7 normally open |
|
#7 NC |
Relay #7 normally closed |
|
#8 CM |
Relay #8 common |
|
#8 NO |
Relay #8 normally open |
|
#8 NC |
Relay #8 normally closed |
RESET
The reset button performs an hardware reset of the MCU onboard the UX8.