Introduction
About this document
This document explains the Barix Simple Paging Solution: the main system concepts and how to set up and use it. A simple worked example shows the steps involved to set up and use a Barix Simple Paging system. The document also details the configuration options available for installation in more complex environments.
About the Barix Simple Paging Solution
The Barix Simple Paging Solution enables users to make public address announcements to up to 14 individual target groups, each of which can have one or more paging zones. Target selection can be made dynamically, combining individual groups, or paging to all zones. Announcements can be made from Barix Annuncicom Paging Stations (PS1 / PS Touch), or from smart devices (iPhones, iPads, Android phones and tablets), using the freely available Barix Simple Paging App.
Features
The Barix Simple Paging solution works out of the box; key features are:
• Make announcements from Paging Stations, or using a smart device when on the move;
• Superior audio quality;
• Mobile paging restricted to authorized users;
• Multiple Paging Stations;
• Paging Stations indicate when Zones are busy with announcements from other devices;
• Supports simultaneous paging to independent targets;
• Dynamic status indication to make maintenance easy;
• Modular and easily expandable;
• Supports Background Music playback via multicast stream for low network traffic;
• Emergency Notification priority (highest priority page), interrupts normal announcements and Background Music
• Optional chime before paging announcements;
• Supports multiple mobile paging configurations (e.g. one set of Groups for the Principal, another for Security);
• Uses existing network infrastructure; no need for expensive, dedicated wire runs;
• A variety of hardware endpoints to suit each area in a facility;
• Independent volume setting for each Paging Zone;
• System secured using passwords.
System Overview
System diagram
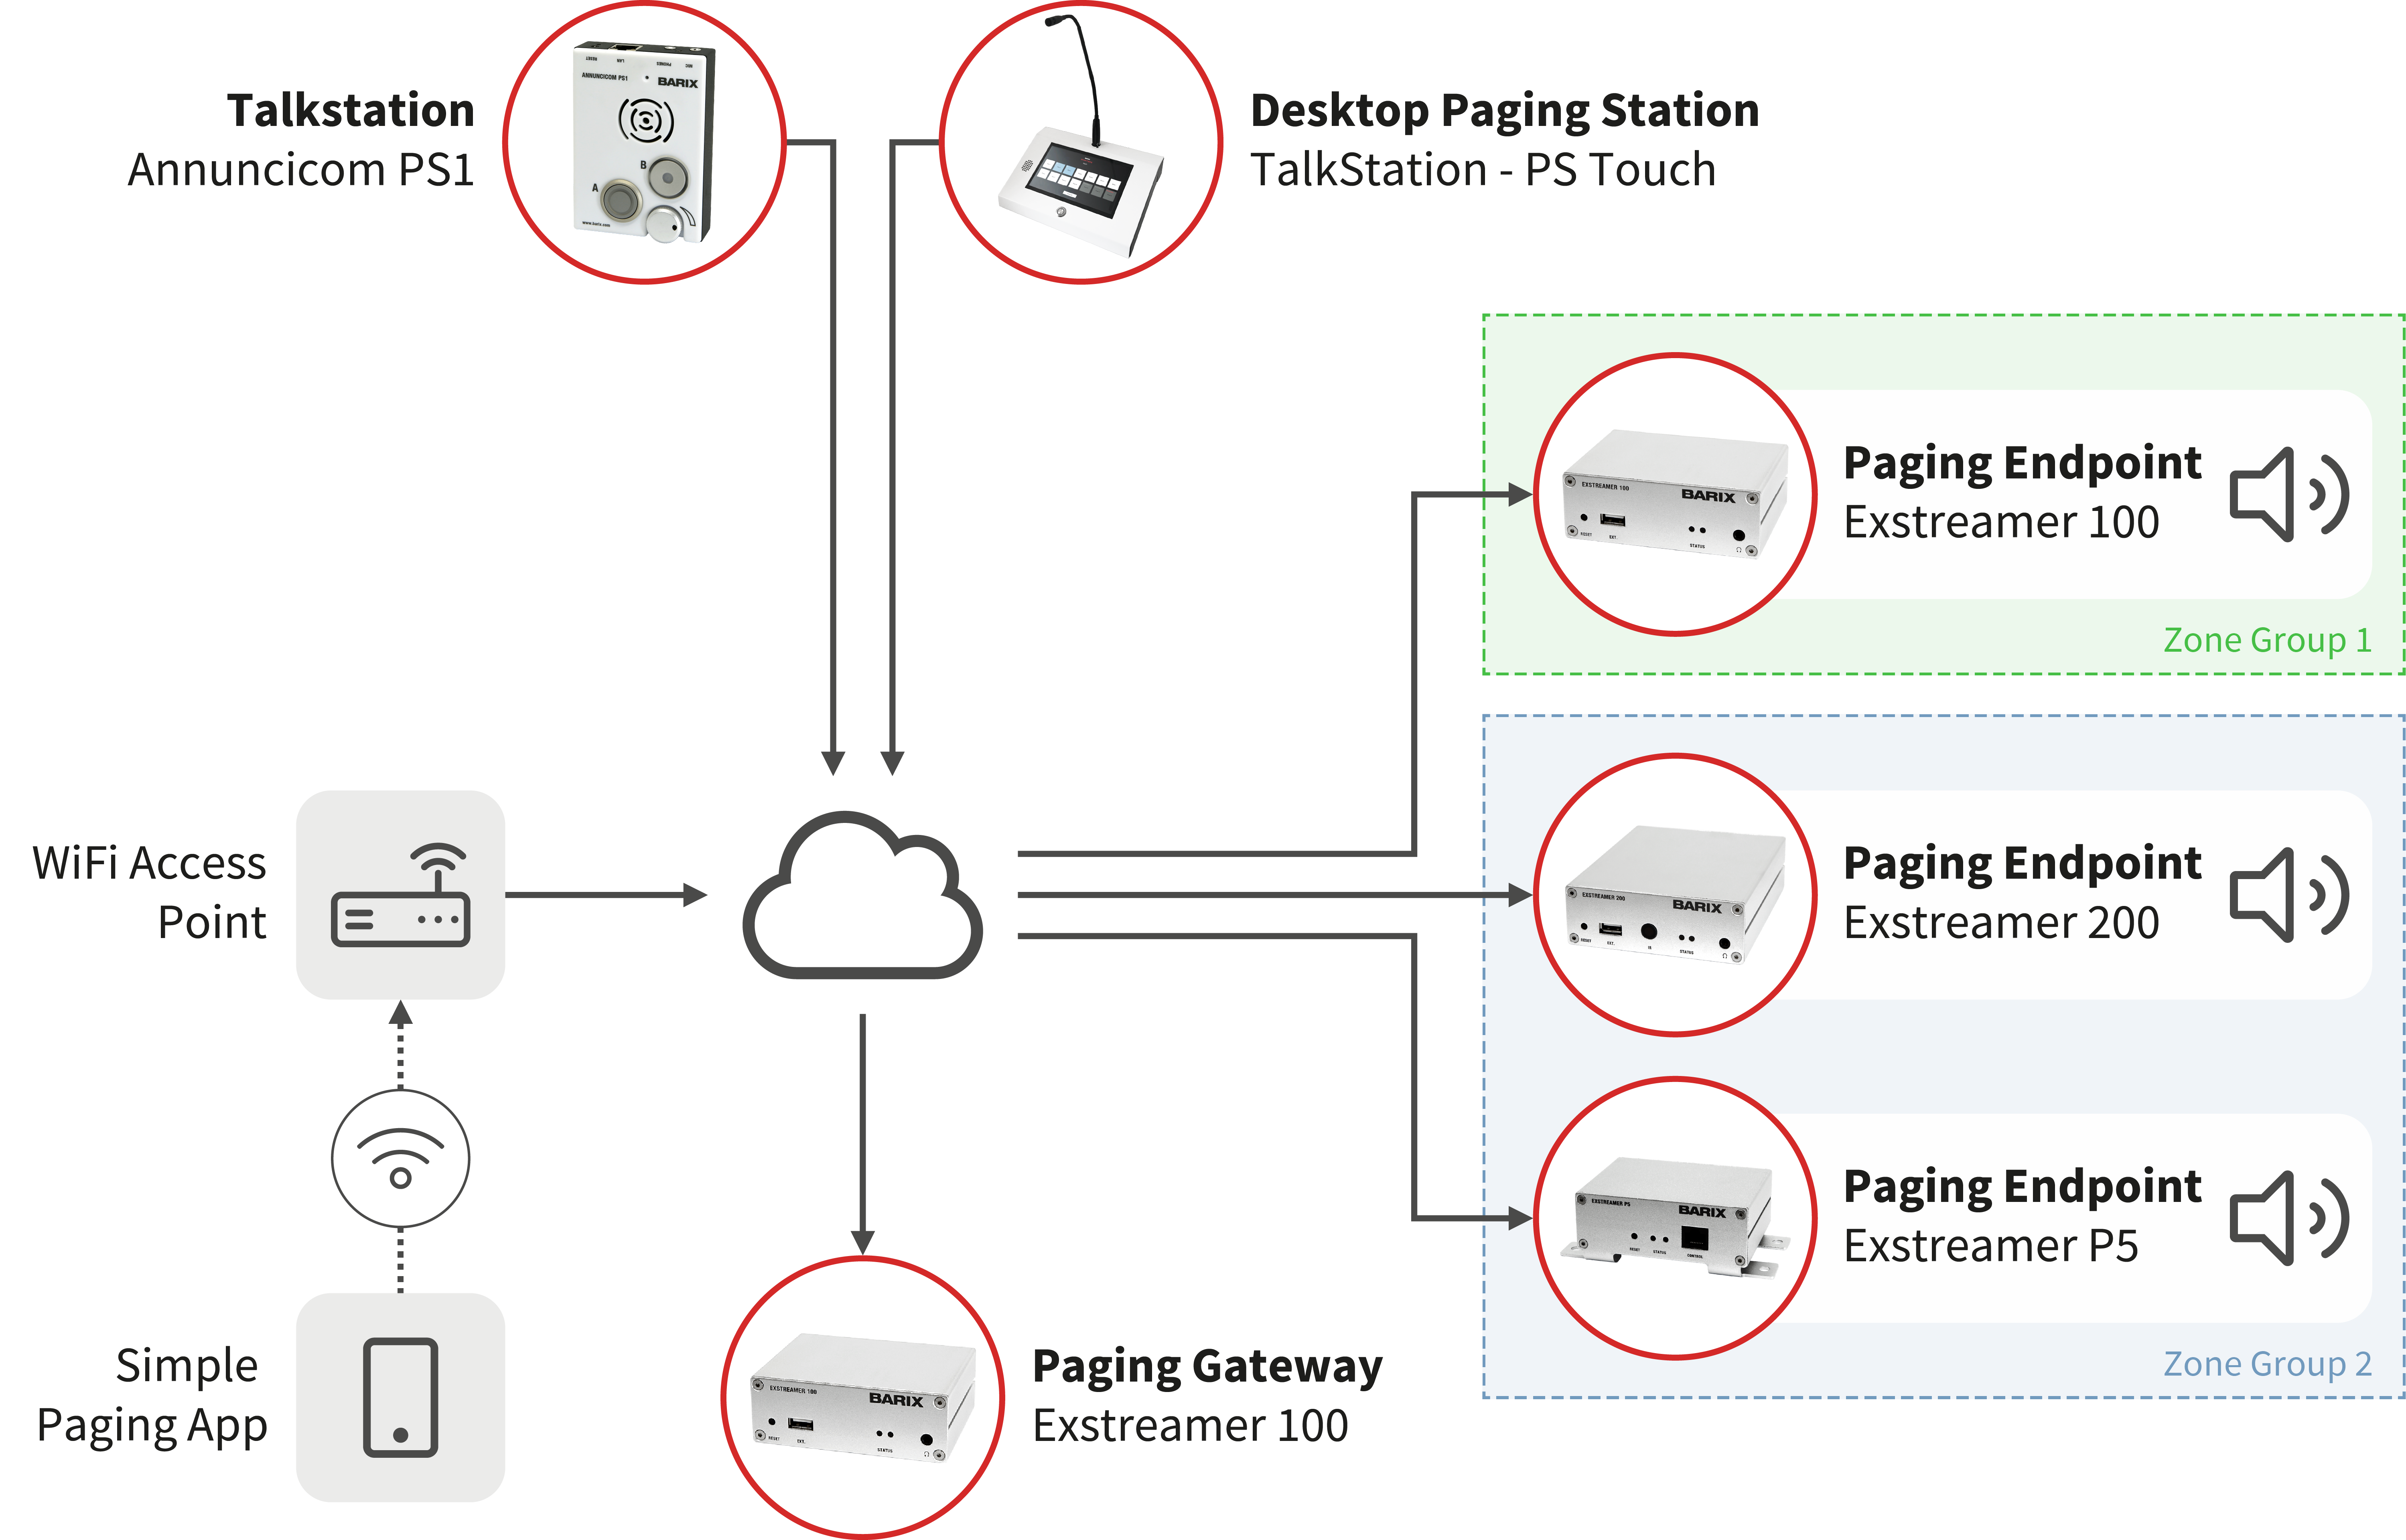
System components
The Barix Simple Paging solution is based on a number of Barix devices that come ready to use, enabling to you set up a paging system in minutes.
Paging Stations are devices where a public address announcement (page) can be made from. They can be Barix desktop units, or a smart device for paging when you are on the move.
Announcements are relayed to Paging Endpoints, also known as Paging Zones.
Simple Paging supports up to 14 distinct target Groups, consisting of 1 or more Zones; Paging Groups can be addressed individually, or dynamically combined to belong to a custom Paging Group relevant to the announcement
being made at the time.
In case a smart device is used, the system also need a Paging Gateway device, which acts to interface the smart device into the Simple Paging solution; the Gateway is a standard Barix Exstreamer 1xx with the Simple Paging
Gateway firmware loaded.
The Simple Paging solution requires that all devices are on the same LAN subnet, and when mobile paging is required, a WiFi connection to this subnet must be provided.
Use on VLANs is also supported.
By default, the system uses DHCP for IP addressing and broadcast for audio streams, keeping bandwidth use to a minimum; multicast addresses can also be configured for both Paging announcements and
background music if required.
Supported hardware
|
Barix hardware |
Paging Station |
Paging Zone |
Paging Gateway |
|---|---|---|---|
|
Annuncicom PS Touch |
X |
|
|
|
Annuncicom PS1 |
X |
|
|
|
Annuncicom 60 |
X |
|
|
|
Exstreamer 1xx |
|
X |
X |
|
Exstreamer 2xx |
|
X |
|
|
Exstreamer P5 |
|
X |
|
Table 1: Device by function
|
|
Annuncicom PS Touch |
Annuncicom PS1 |
Annuncicom 60 |
Exstreamer 1xx |
Exstreamer 2xx |
Exstreamer P5 |
|---|---|---|---|---|---|---|
|
Mic In (Bias) |
Condenser (13 Volt bias ) |
Electret |
Electret |
|
|
|
|
Built in Mic |
Gooseneck (XLR connector) |
X |
|
|
|
|
|
Headphone out |
|
X |
X |
X |
X |
|
|
Speaker Out |
Built in 2W |
Built in 1W |
1 x 5W |
|
2 x 25W |
1 x 5W |
|
Line Level Output |
|
X |
Mono Balanced |
Stereo Unbalanced |
Stereo Unbalanced |
|
|
PoE |
X |
X |
X |
|
|
X |
|
Display |
0.1” Touch (1024x600 pixel) |
|
|
X |
|
|
Table 2: Device hardware features
Steps to setting up a customized PA system
-
Out of the box;
-
Connected;
-
Make announcements from any Paging Station to all Paging Zones;
-
Configure: specific Paging Groups can be set up for both fixed and mobile announcements, allowing targeted public address announcements to be made (5).
Optionally, there are a few advanced configuration features that may be required in more complex network environments.
Getting Started
Connecting the devices
Every Barix device comes packed with a Quick Installation Guide, which shows how to physically connect them up. Once all components are in place, the system is ready to use.
All Simple Paging devices must be either on the same subnet, or the same VLAN as broadcast messages are used by the system to exchange status and control messages.
Depending upon the devices to be used, physical set up will typically involve connection of the device to network, power, and amplifiers/loudspeakers.
Depending upon the model, Exstreamer Paging Zones can be connected directly to loudspeakers, or in to some form of amplification system; for example an existing PA system.
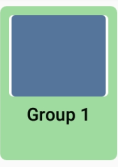
Out of the box, the Simple Paging Solution is pre-confgured with all devices set in Group1.
This means that after the physical installation, an announcement can be made that will automatically be heard everywhere when paging to Group1.
Paging Stations also serve as endpoints, playing out announcements addressed to them; this means that they will also replay any announcement from another Paging Station, in this default configured state.
The default configuration is designed as a way to easily verify that everything is connected correctly. Before doing any further configuration work, validate the hardware by paging from the different Paging Stations.
Making your first announcement from a fixed Paging Station
Paging from PS1
The PS1 Master has two buttons on the front; "A" and "B". By default button "A" is pre-confgured to Group1. Button "B" is not configured.
Press and hold button "A" while talking: you will make an announcement to all Zones; releasing button "A" will end the announcement.
By default the PS1 will play an attention chime when the paging button is first pressed; wait until this has finished before speaking.
Paging from PS Touch
The PS Touch has two rows of buttons mapped as shown.
By default all Zones are available in Group1 and no other Groups are configured.
Below the layout with two groups configured.
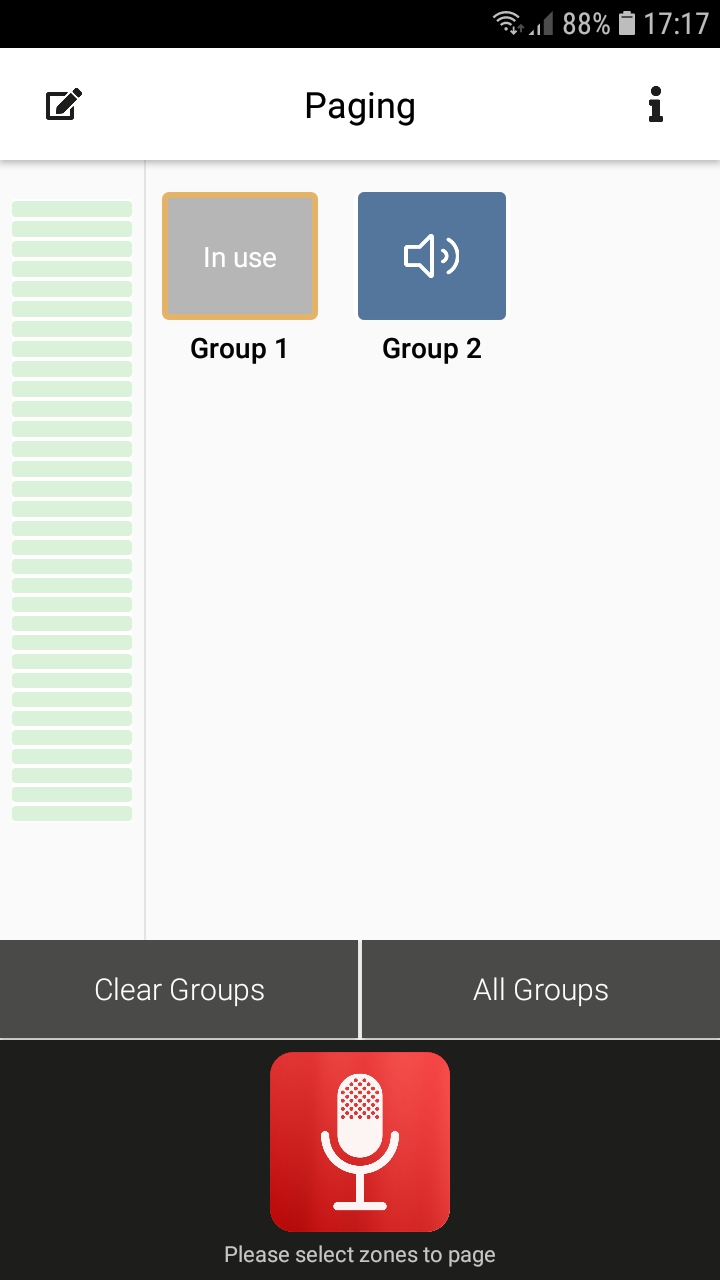
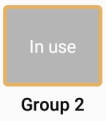
Select one or several Groups (or All Groups with the button on the bottom - selected buttons light blue) and press the physical PTT button (the ring on the button lights red) and the chime is played; the selected Groups buttons become yellow with the "In use " indication; start speaking after the chime is played.
The Groups buttons become yellow with the "In use " indication also if a call is made from another Master Station.
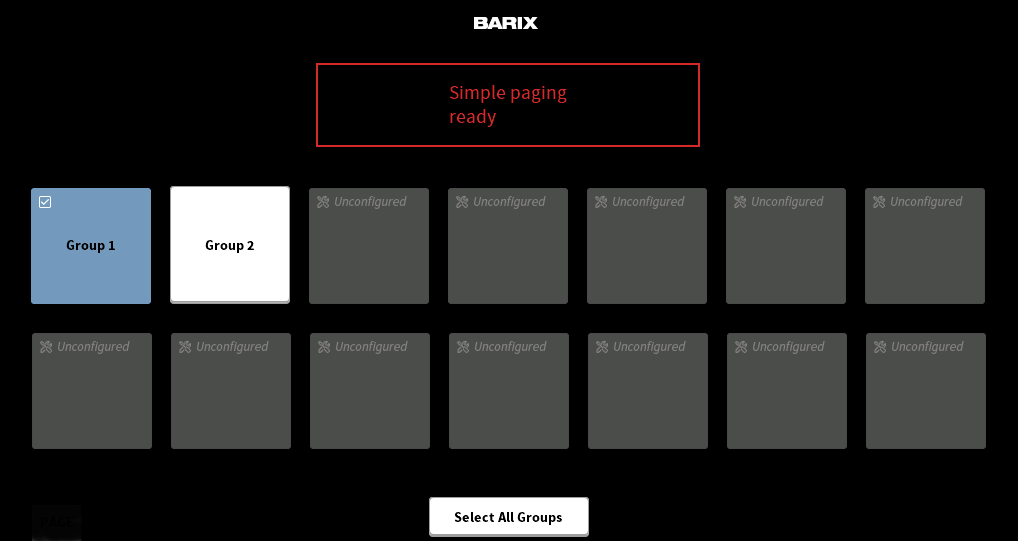
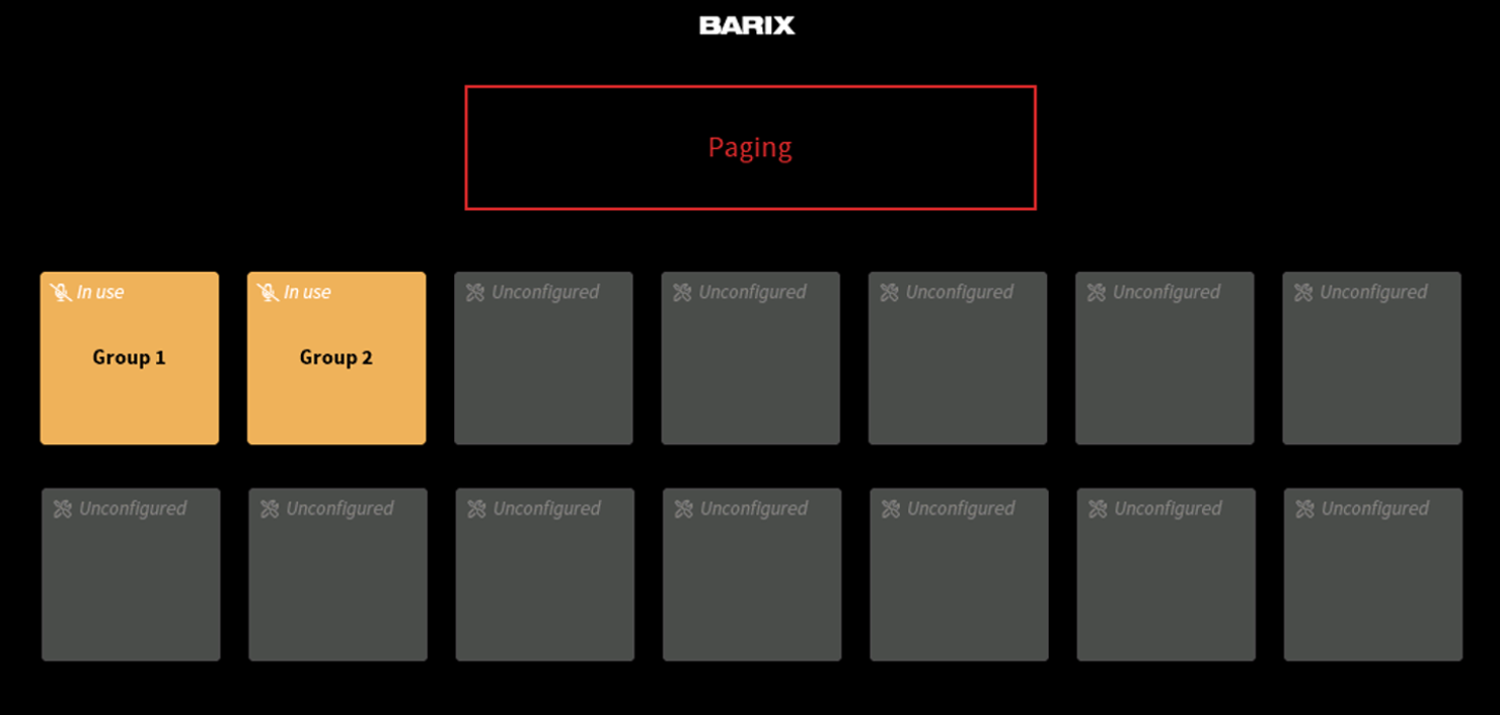
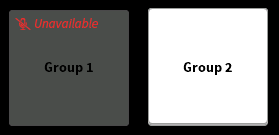
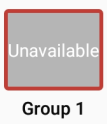
If a Zone becomes unreachable (e.g. device disconnected from the network) the Group button lights dark gray with the "Unavailable" indication.
Make your first announcement from an iPhone or iPad
Prerequisites
The Barix Simple Paging App is free to download from the Apple App store and Google Play and requires iOS 6.0 and Android 7 or later.
To make announcements from the App, you must have a Paging Gateway device installed and configured with the Paging Groups that you want to use.
Connecting to the system
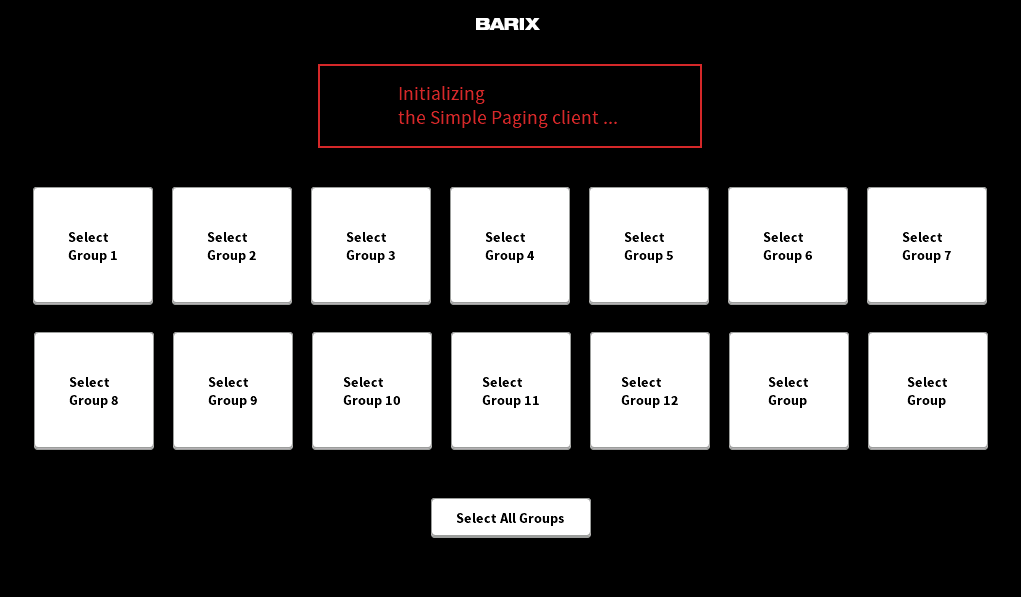
Select the correct WiFi network on the smart device, and then start the Simple Paging App; on startup the App will automatically search the network for the Gateway device.
The Paging Gateway is the interface between the smart device and the Simple Paging system; it must be present on the network to enable paging from smart device.
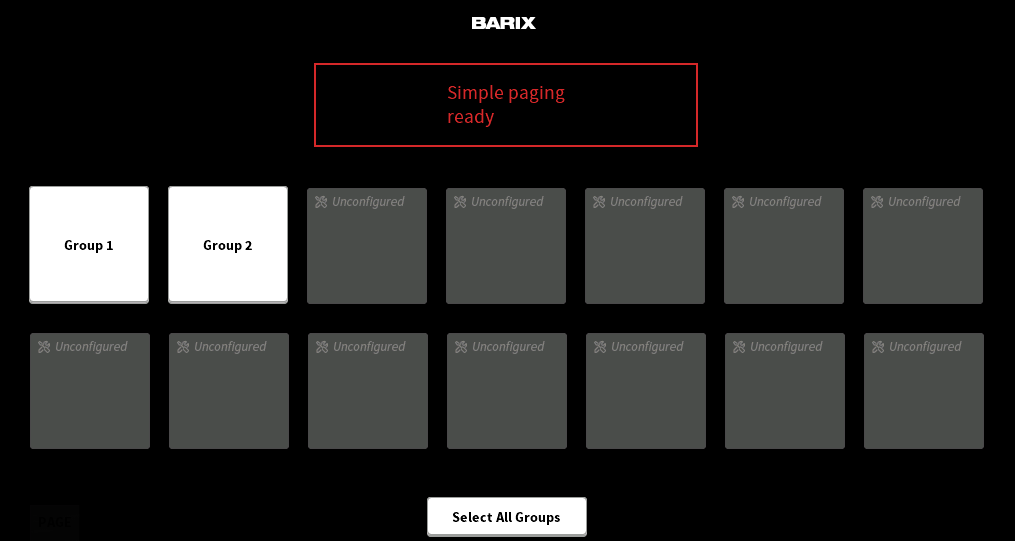
When the Gateway is found by the Simple Paging App, it will automatically show the Groups available for paging; before any configuration is done, all devices are automatically created in a default 'Group 1'.
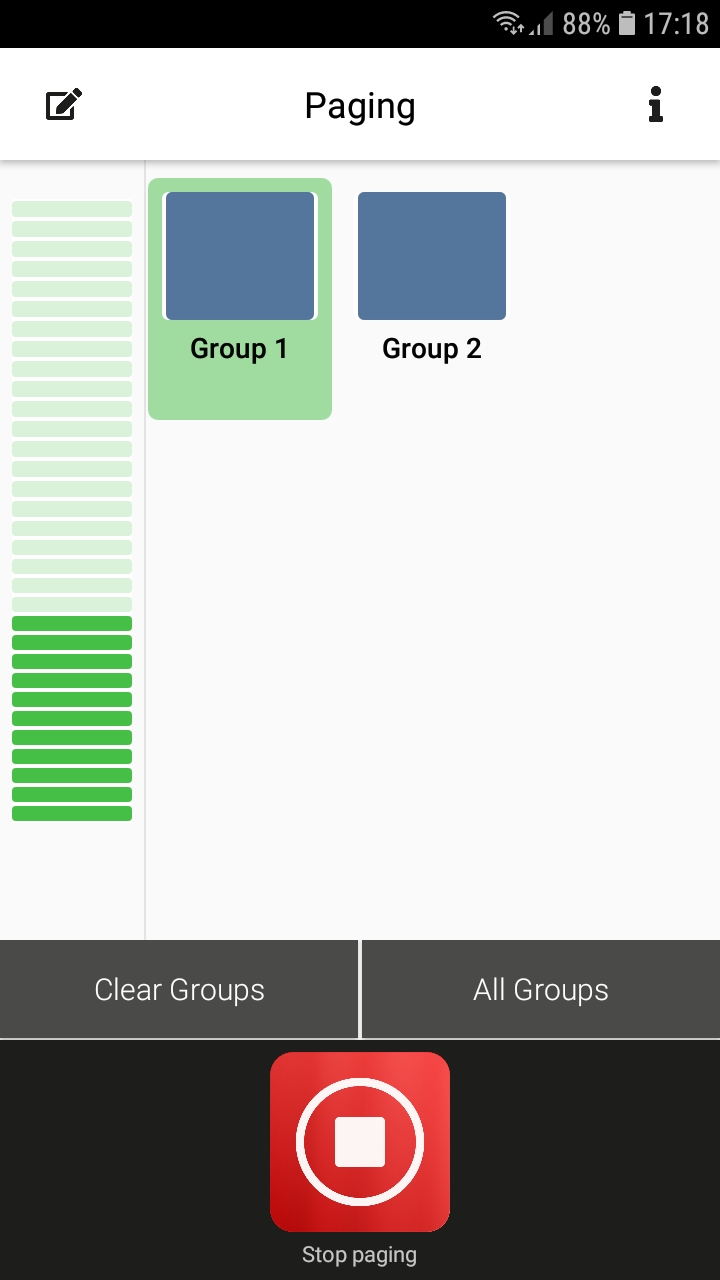
Paging from Smart Devices
To make an announcement, tap the "Group" icon; tap the microphone icon then start talking.
The selected Groups buttons becomes rounded by green; start speaking after the chime is played.
By default all Zones are in Group1 and the announcement will go to all Zones.
To end the announcement, tap “Stop Paging”.
Note: You cannot page to a smart device.
The Groups buttons becomes rounded by yellow with the "In use " if a call is made from another Master Station.
If a Zone becomes unreachable (e.g. device disconnected from the network) the Group button lights dark gray with the "Unavailable" indication.

With the button "All Groups" you can select all groups with one tap only.
"Clear Groups" cancels the selection.
Paging Groups
If the paging needs are as simple as 'Page to All', no further configuration is required, but if more flexible paging is needed, Paging Groups need to be defined.
Bespoke Groups can be setup on all Paging Masters and on the Gateway for smart devices.
When paging from a PS Touch or smart device, one or more Paging Groups can be selected as the target for the announcement.
On the PS1 two individual Groups can be defined, on the PS Touch and the Gateway 14 Groups can be defined.
Paging Groups can be defined using either the Simple Paging configuration tool, or directly on the device using the web UI; the configuration tool allows you to set up your Simple Paging solution from a single place, simplifying
the work to be done and requiring much less time. Group configuration using the web UI is explained later in this document.
Secure mobile paging: set a password on the Gateway device
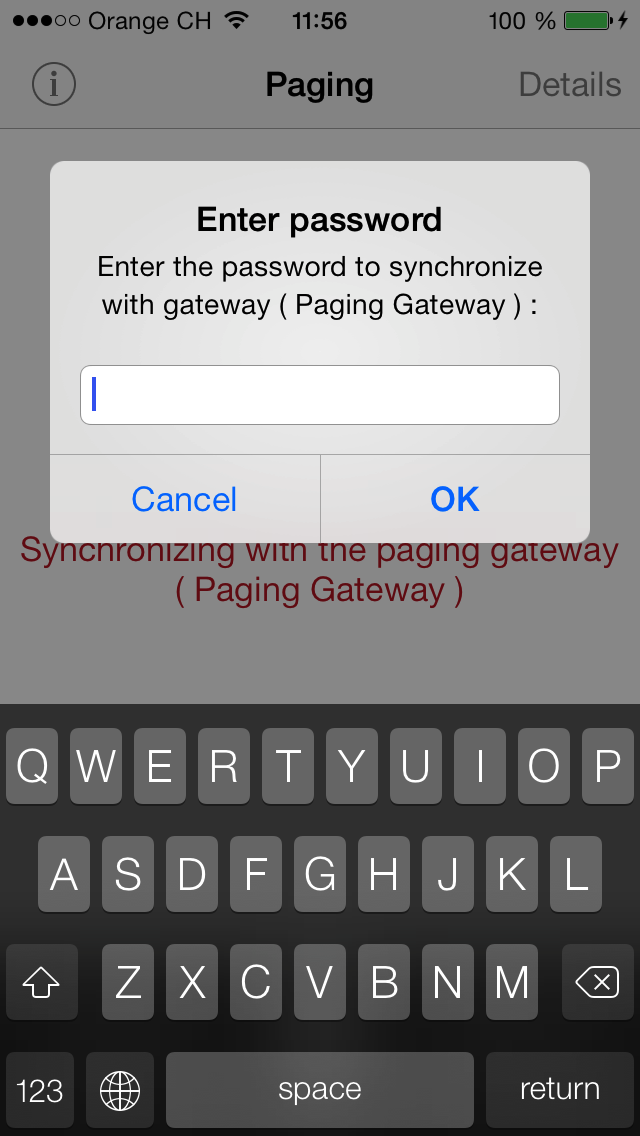
Since the Barix Simple Paging App is freely available, it is important to protect the paging system from misuse, by setting an access password; this is done on the Paging Gateway web UI.
From the Gateway's web UI click on “Configuration”, then “Advanced Settings”, then “Security”.
Enter a sensible password into the box and click “apply”; the Gateway will reboot.
This password controls:
-
access to the Gateway UI;
-
access to the Gateway from the Barix Simple Paging app: needed to make announcements.
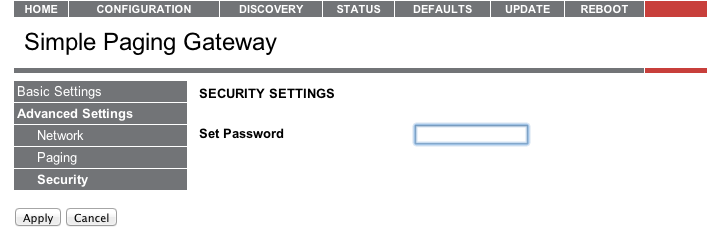
The Gateway will prompt for a UserID / Password whenever you try to access the web UI; the UserID should be left blank, only the password needs to be entered.
After a Gateway password is set, all smart devices will be forced to enter the same password before being allowed to connect to the Paging Gateway; the password is stored in the App and only needs to be entered once.
Paging to a Group
After Groups have been configured, you can now page to these groups by selecting them on the Master or in the App.
On a PS Touch or App any combination of groups can be dynamically selected.
By default Barix Master Station will make chime both locally at the Master and remotely at the selected paging targets.
Live audio will only be sent from the Master once this chime has played.
If the chime is not required, it can be disabled (see section "Advanced Settings: Paging").
Integration with Background Music and Emergency Notification systems
Many Public Address systems also incorporate zoned background music playback (BGM) and the requirement for an Emergency Notification override; Barix Simple Paging supports both of these features at the device level,
enabling the system to play out e.g. relaxing music in the Spa and workout tunes in the Gym.
Audio Volume:
Typically Emergency messages are required to be at a higher volume than BGM or standard Paging announcements, with Simple Paging, each audio source has its own associated volume.
Audio Format:
The incoming audio for BGM and Emergency Audio must be contained in an RTP stream in a Barix supported audio format: mp3, PCM, G.711 uLaw/aLaw.
Audio Source Priority:
Emergency audio has the highest priority and will override any other audio source.
A Paging message has middle priority – will interrupt BGM playback, but in turn be dropped if an Emergency Announcement is streamed.
Background Music has the lowest priority and only plays if no other source is active.
Refer to chapter "Device Configuration via Web Interface" for details of how to configure individual Simple Paging devices to support these services.
Using Simple Paging
The Simple Paging solution supports simultaneous announcements from different Masters and at the same time provides a number of features for reporting status and potential issues.
Below is an overview of the actions and notification features.
Making Announcements
|
Step |
Action |
PS Touch |
PS1 |
App |
|
1 |
Select Group(s) |
Press each of the target Group buttons to select: selected buttons light blue |
Press and Hold “A” or “B” button: the "A" button flashes green |
Tap target Groups: selected buttons become rounded by green |
|
1.1 |
Select All Groups |
Press "Select All Groups" |
Not supported |
Press "Select All" |
|
2 |
Make Announcement |
Press and hold “Page” button (PTT): the ring on the button lights red |
Keep button pressed (PTT) |
Tap Red Microphone button |
|
3 |
End Announcement |
Release PTT button |
Release Button |
Tap Red Microphone button |
|
4 |
Clear Group selection |
Press each selected Group button again
|
No action necessary |
Either: 1. Press each selected Group button Or 2. Press the 'Clear Groups' |
System Feedback
|
Meaning |
PS Touch |
PS1 |
App |
|---|---|---|---|
|
System Idle |
"Simple Paging Ready" |
Solid Green on "A" |
Groups Icons |
|
Group(s) selected |
Groups buttons light blue |
|
Groups buttons rounded by green |
|
Sending Page |
"Paging" |
Flashing Green on "A" |
|
|
Incoming page |
Groups buttons become yellow with the "In use " indication; "Buzz" when Group is selected indicates the Group is blocked. |
Flashing Red on "A" 'Buzz' when Group is selected indicates the Group is blocked. |
|
|
Device(s) in Group Busy |
Groups buttons become yellow with the "In use " indication; "Buzz" when Group is selected indicates the Group is blocked. |
Flashing Red on "A" "Buzz" when Group is selected indicates the Group is blocked. |
|
|
Device(s) in Group Offline |
Groups buttons light dark gray with the "Unavailable" indication. |
Flashing Red on "A" |
|
Simple Paging App options
The App has a number of helpful features not needed in normal operation.
Multiple Paging Group profiles
By setting up several Paging Gateways on the system, it is possible to support Profiles for different User Groups.
For example the Principal and the Security Department may need one set of privileges, 1st Grade teachers a different one.
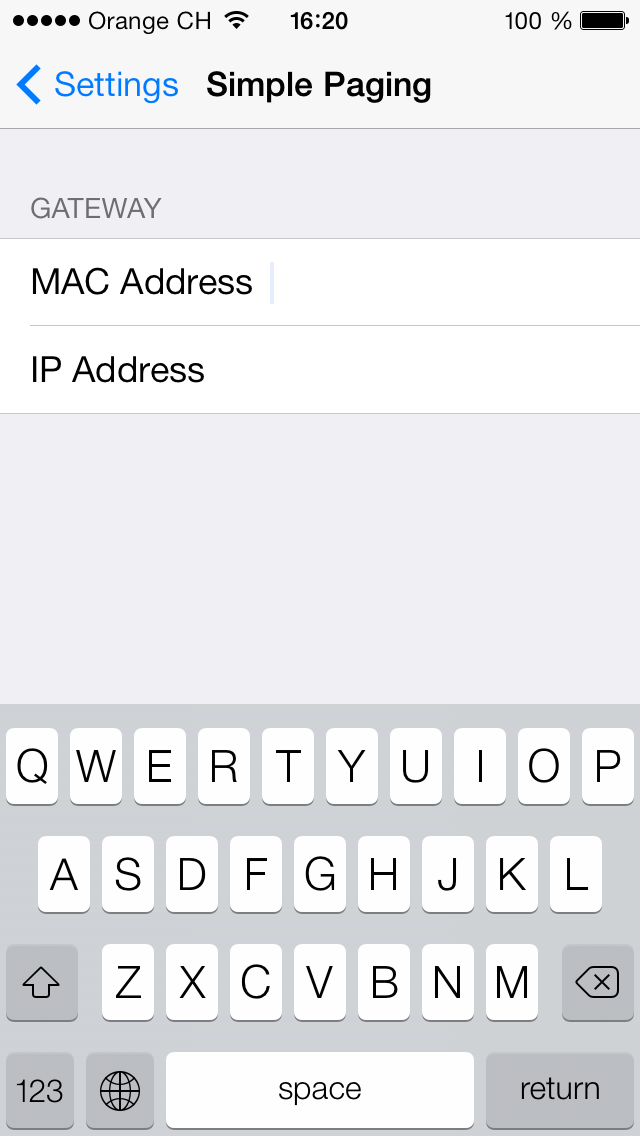
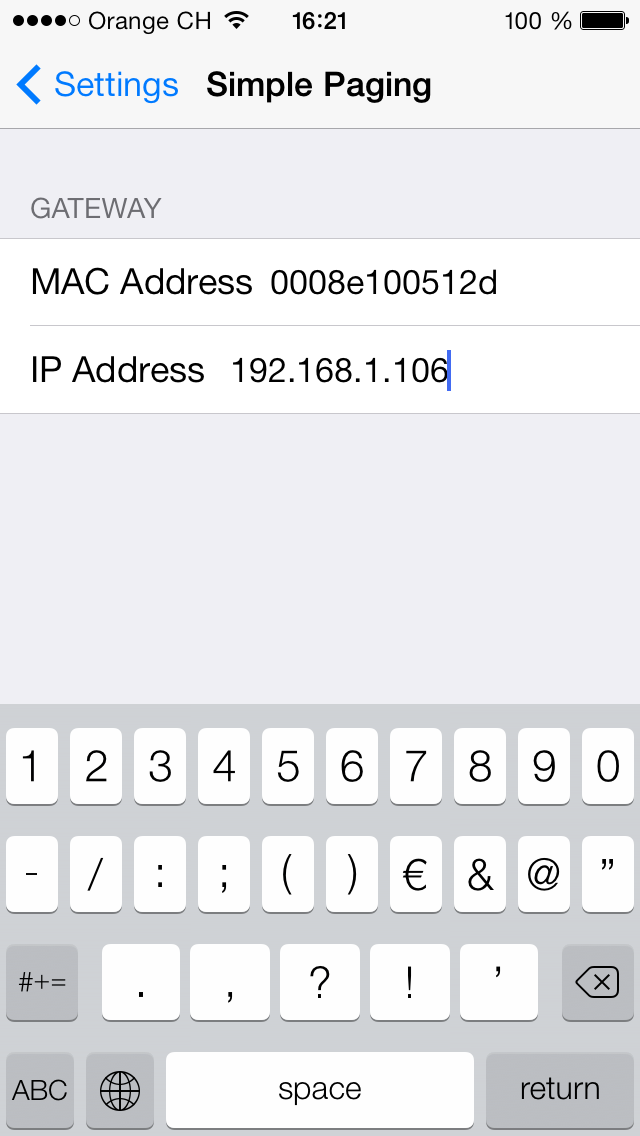
Each smart device can be tethered to a specific Paging Gateway, by configuring the Gateway's MAC and IP addresses in the Simple Paging Settings option via the 'Settings' tab.
Assigning different passwords for each Gateway ensures that Users stay in their assigned Profile.
This mechanism also allows the Simple Paging system to be on a different subnet to the WiFi; the Paging Gateway bridges all of the necessary control and audio signals between the app and the devices.
|
|
|
Unset, the app will search and attempt to connect to any Gateway |
By defining a particular Gateway, the App locks to it on startup |
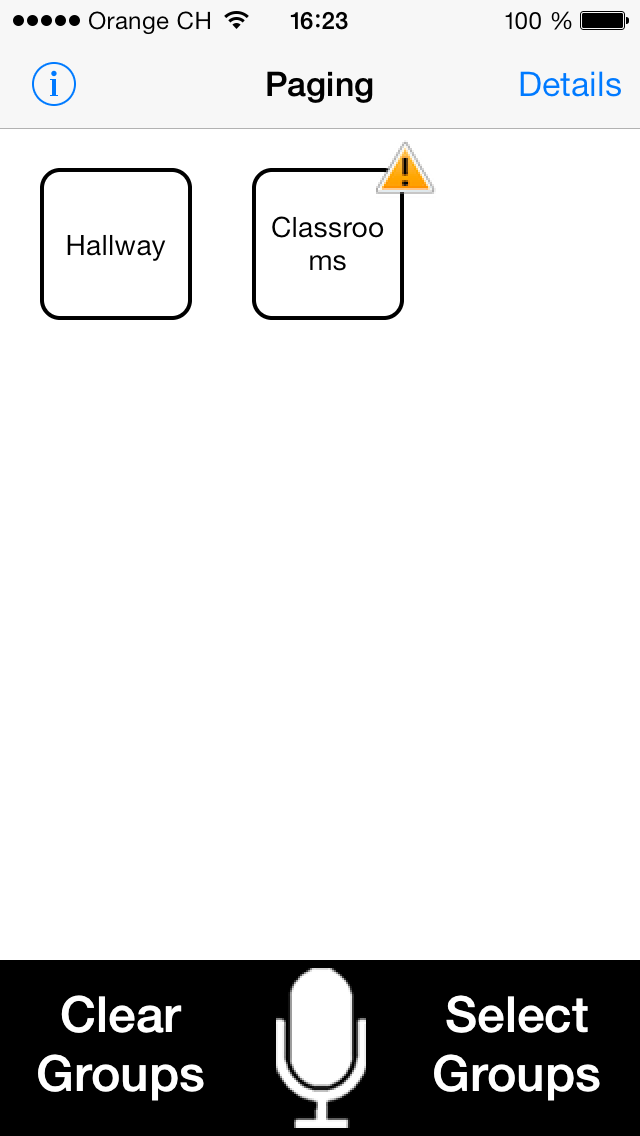
Detailed status drilldown
If a Group shows busy, or a device in error, it is possible to identify which device is affected.
From the 'Paging' screen, tap the 'Details' button in the top right corner: a list of groups will appear.
In the list of groups, those marked with red are either busy or off-line, those marked with green are ready to be paged to.
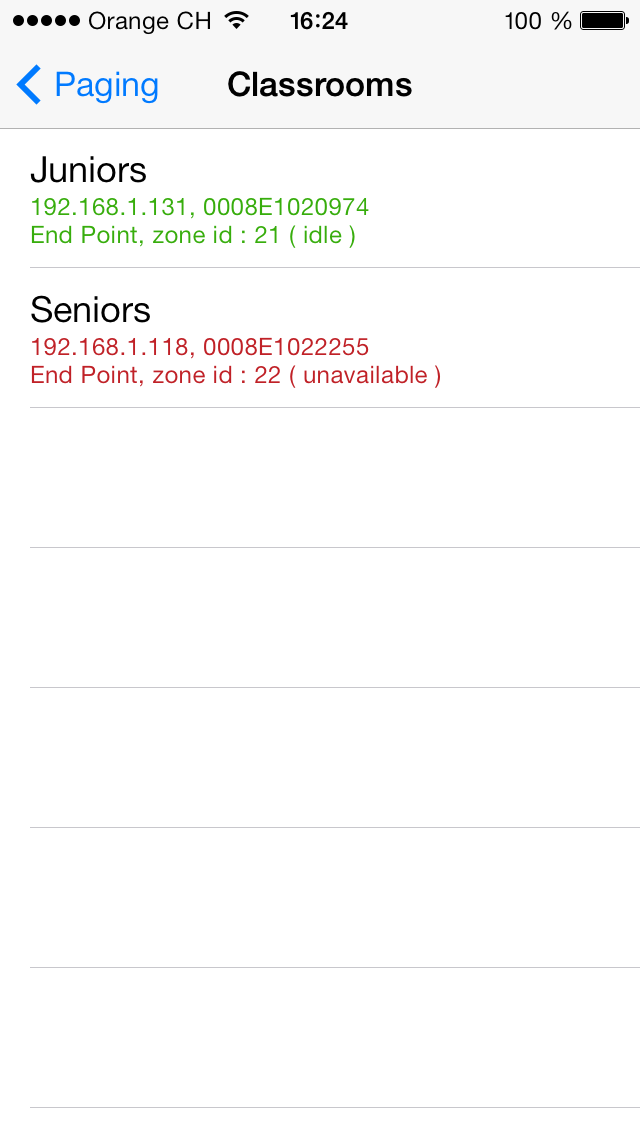
Tapping on a Group will produce a list of Zones in the Group; the Zones listed are also marked in green or red for easy identification of any issues.
Each Zone is clearly identified in the first line by its Zone Name, followed in line two by the IP address and unique MAC address.
The Third line shows the type of device, it's Zone ID, and its status; it's here that the source of the problem can be identified.
|
|
|
App showing warning for a Group. Tap on the warning icon. |
Details of Paging Zones within Group, showing the problem. |
Paging to Group(s) in 'Warning' state 
It is possible to select and make a paging announcement to a Group that is showing the warning icon.
The message will be sent to all Paging Zones in the Group that are NOT affected.
It is the responsibility of the user to make sure they understand which Zones will not receive the message.
When users see the warning icon, they should warn their IT Support, so that the problem can be investigated and fixed.
Changing the default IP address and Port used for the audio messages
The Paging Gateway interfaces the audio from smart devices into the Simple Paging System, refer to the Web UI configuration section “Advanced Settings: Paging“ of this document for more information.
Limitation
The current release of the Simple Paging App supports a maximum of 32 Paging Zones.
Simple Paging Configuration Tool
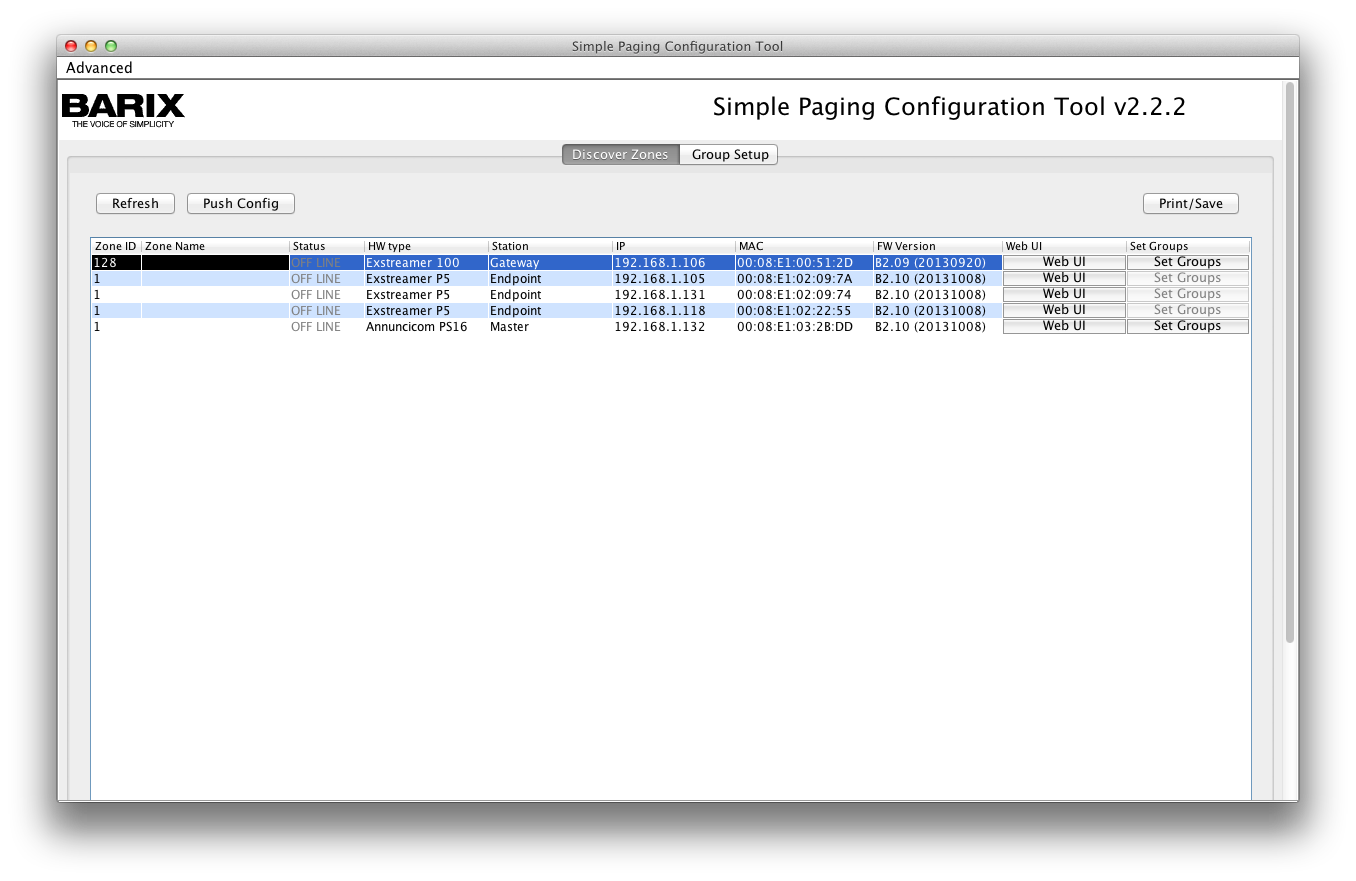
You can download the Simple Paging Configuration Tool from the Barix download page.
Unzip the package and double-click on the file “ConfigTool.jar”, or run the file from a command line “java -jar ConfigTool.jar”.
The tool will start and automatically discover all online Barix Simple Paging Solution components on the network; if no devices are shown, try changing the network interface that the tool is using by clicking on
the “Advanced / Network Interface” menu, then selecting the appropriate network interface.
In the example below there are 3 Paging Zones available: one unit is in Group 1 "Hallway" and two devices in Group 2 "Classrooms".
Explaining Paging Zone Names and IDs
Every Simple Paging device has an “address” called the “Zone ID”, which is used within the system to identify them, send audio to them and to exchange status information. Out of the box every device has a Zone ID of 1,
and all Masters are setup to have a Paging Group 1 that talks to devices with the ID of 1.
This means that when devices are connected up for the first time, a Paging Announcement, made to Group 1 will go to all Paging Zones and all other Paging Stations.
Optionally, a Zone Name can also be assigned to each Zone; this name is used in the Web UI, Config Tool and App to refer to the Zone to make it easier to remember.
-
Creating different Paging Groups is simply a case of telling each Paging Station “this Paging Group consists of the following IDs”, and assigning the IDs to the relevant devices.
-
Many devices can share the same Zone ID if required, the result is that these devices will always make announcements at the same time – useful if you have 3 Paging Endpoints in a long corridor, for instance (see Note).
-
A Zone ID can be included in multiple Paging Groups.
-
If a device must be individually addressable, it needs a unique Zone ID assigning to it.
-
All of the Barix Simple Paging devices share information, which allows them to understand what other components are present and display status information about the system as a whole.
The example uses the following IDs and names for the devices.
|
Zone ID |
Zone Name |
Device |
Group |
|---|---|---|---|
|
10 |
Administration |
PST ouch |
|
|
128 |
Paging Gateway |
Exstreamer 100 |
|
|
11 |
Assembly Hall |
Exstreamer 200 |
Group 1 Hallway |
|
21 |
Juniors |
Exstreamer 200 |
Group 2 Classrooms |
|
22 |
Seniors |
Exstreamer 200 |
Group 2 Classrooms |
The Zone ID can be any integer from 1 to 127; the ID=128 is reserved for the Gateway and should not be used by any other device.
The Zone Name is a 15 character string allowing use of characters, numbers and blanks.
Note:
-
When using multiple Paging Stations (masters) in one installation, then each station needs an unique ID below 127 (or 128, if no gateway is used); make sure you address these correctly.
-
If several devices share the same ID, if one of the device is offline, the corresponding group button is marked as “Unavailable”; select and call it is in any case possible.
Assigning Zone Names and IDs with the configuration tool
On startup the tool automatically finds and reports all Simple Paging devices on the network.
The fields in the columns Zone ID and Zone Name are editable; click on the cell and enter the desired ID or Name.
One or more devices can be edited; modified fields not yet sent to devices are shown in blue.
Once all changes are made, click "Push Config"; the new settings will then be sent to the devices, which will automatically reboot to activate them.
To abandon changes before sending them to the devices: clicking “Refresh” will reload the current settings from all devices.
During the update the tool will report the devices going off-line and then being available again with their new ID and Name.
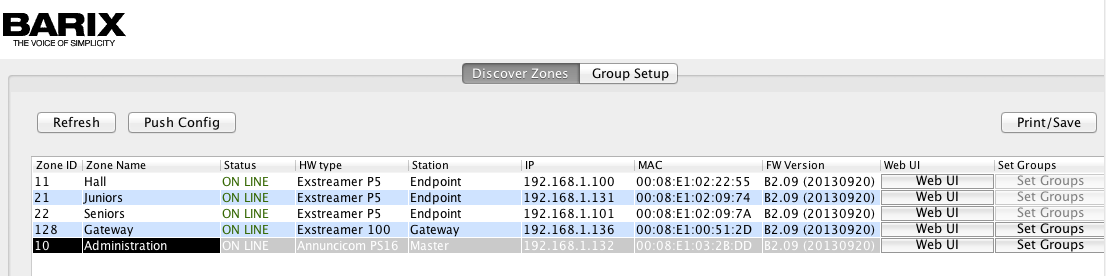
Setting the Zones / IDs for our example above, the tool will now display as below.
Setting up Paging Groups
Once the Zone IDs have been allocated, Paging Groups can be set up; this is done by adding one or more IDs to a Group; the process is the same for both Paging Heads and Paging Gateways.
Groups defined on the Gateway automatically appear on connected smart device running the App.
Any Zone can be used in one or more Groups; there is no practical limit to the maximum number of devices in a Group.
Defining Paging Groups using the configuration tool
With the tool running in the “Discover Zones” view, either click on the “Set Groups” button on the right hand side of the relevant device's entry, or change to the “Group Setup” view by clicking on the tab above the device
information and then select the desired Master from the drop down list box.
This example uses the group setup for the Gateway.
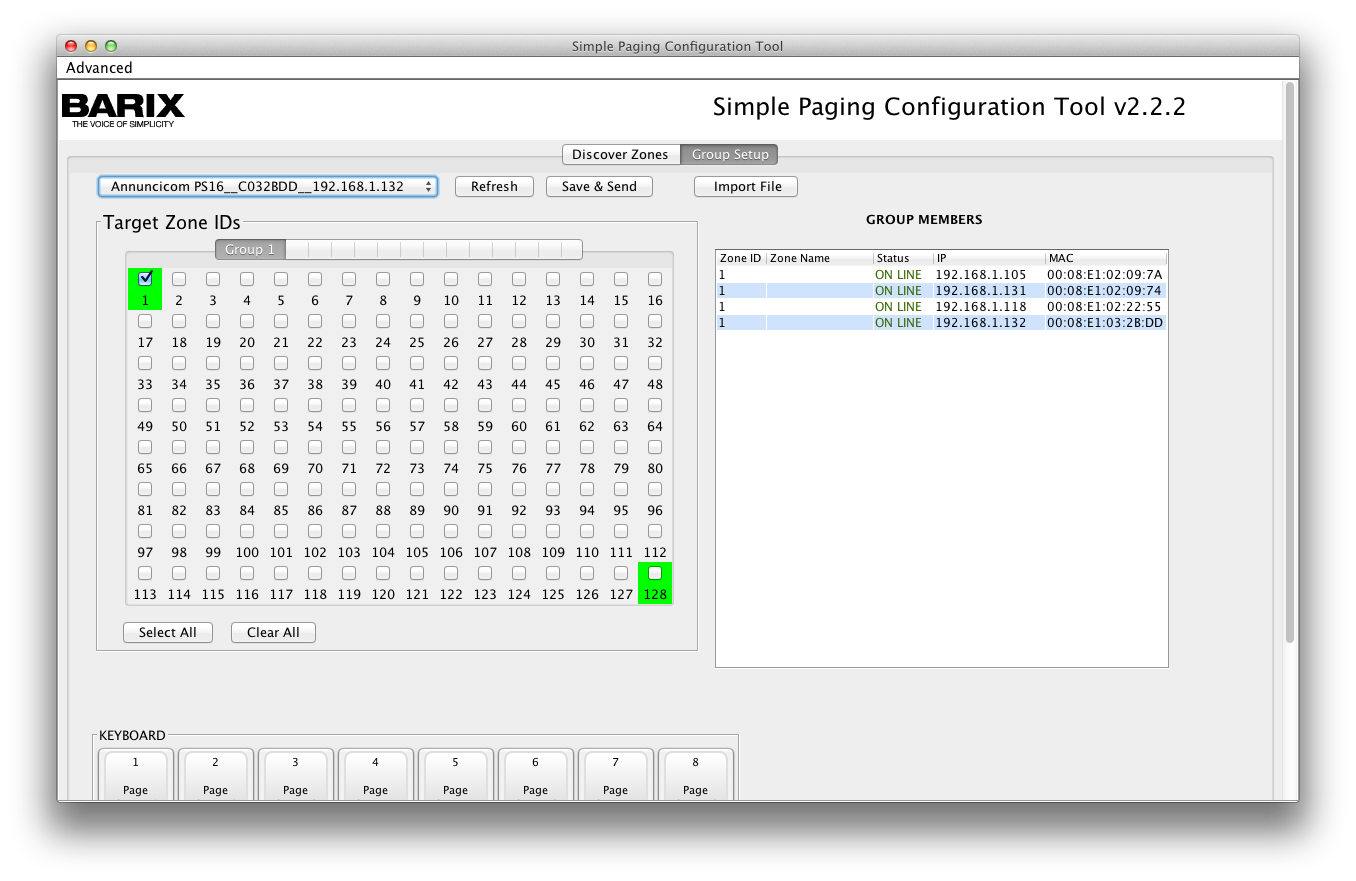
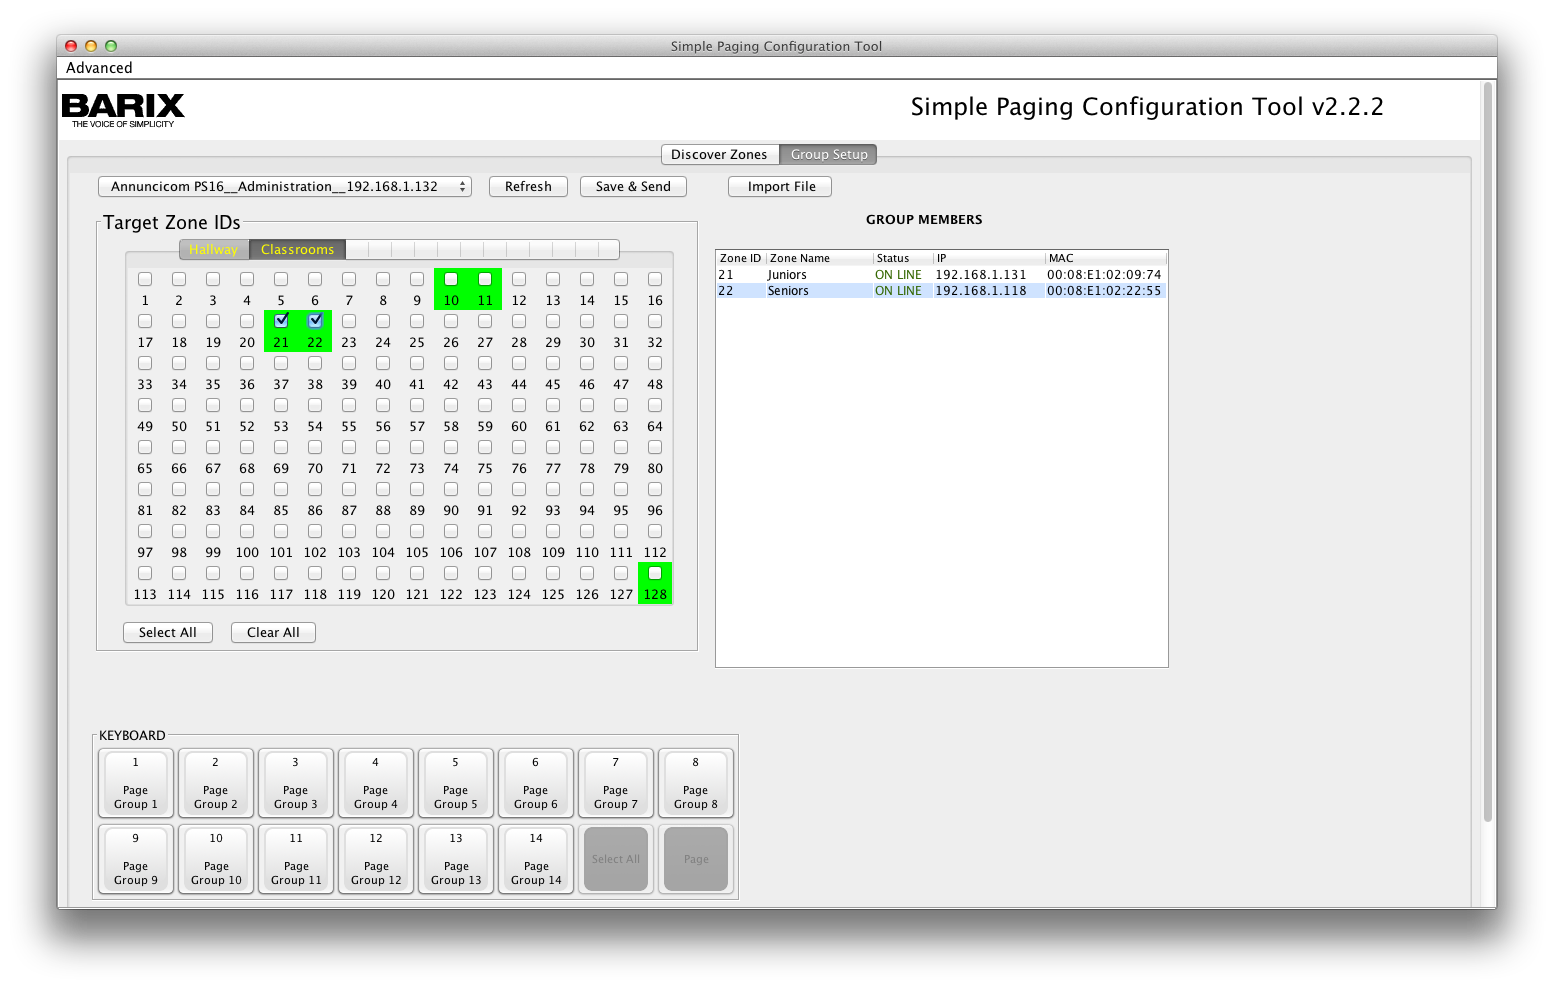
The tool switches to the Group Setup view, showing a matrix with 128 IDs on the left and current Group members on the right. IDs highlighted in green are active on the network.
Above the matrix is a series of Group tabs, by default only "Group 1" is set; first select the Group to define by double clicking on its tab and giving it a name, then simply click on the IDs in the matrix to add them to the
Group; as IDs are added, all devices with that ID appear in the “Members” box to the right.
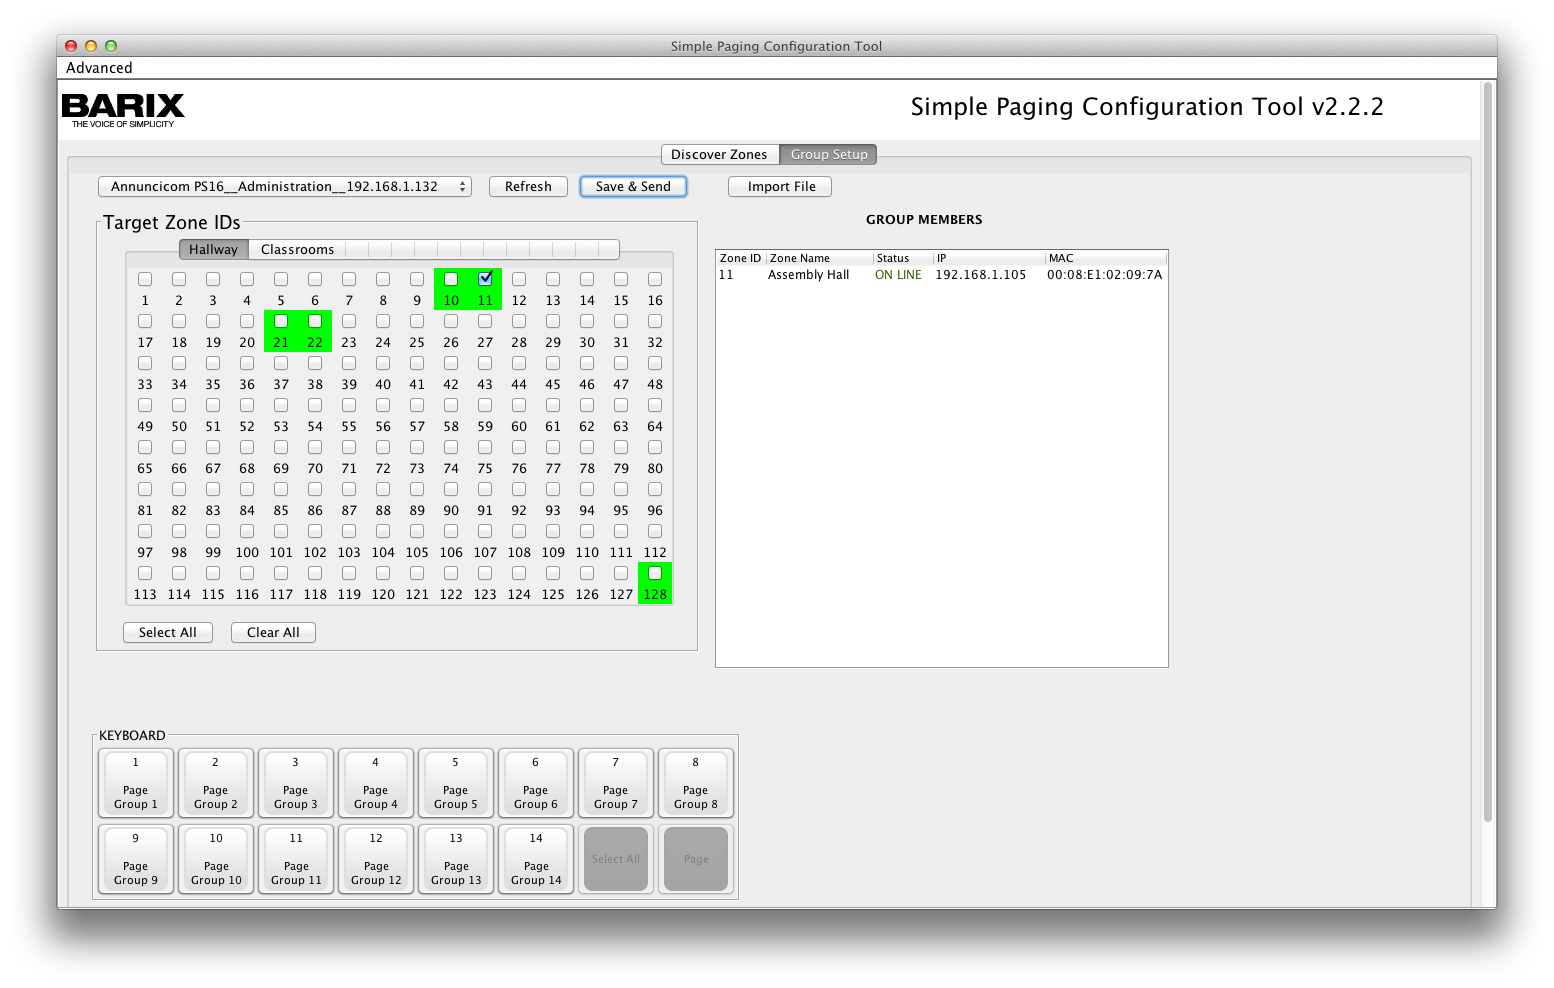
To setup the system in the worked example, first select the Gateway, then double click on "Group 1" and set the name to “Hallways”, then tick ID=11 in the Matrix.

Then select the second group tab, name it “Classrooms” and select ID=21 and ID=22 in the matrix; the Group Setup on the configuration tool should now look like below.
Click on “Save & Send”; the configuration file will be saved locally, then sent to the device, which will reboot to save and activate the changes.
To set the same configuration on the PS Touch, select it from the Master pull-down list on the "Group Setup" tab, then click “Import file” and select the file just saved; after it loads, click “Save & Send”.
The device will reboot and have the same Group configuration.
Each Master can also have completely independent groups if required.
Simple Paging Configuration Tool features
"Advanced menu": Network Interface selection
Many PCs have multiple network interfaces.
To select which one the Configuration Tool uses, click "Advanced" / "Network Interface" then select the network interface you want to use.
Discover Zones view
The Configuration Tool starts up in the "Discover Zones" view, showing all discovered Simple Paging components.
The online/offline status indicates whether the device is responding at a low level to discovery requests; note that it does not guarantee that the device is ready for Paging.
The basic use of the Simple Paging Configuration Tool to set device Zone IDs and Names and to set up Paging Groups was described in the previous chapter "Getting Started".
There are other useful features.
Text Color coding
Text in the tool is displayed in Black normally.
Blue text shows that a device parameter has been changed, but the change has not yet been pushed/sent to the device.
Red text indicates when there has been a problem communicating updates to a device.
Refresh
This button will cause the tool to get and display the current active configuration details for the devices, it can be used to abandon any changes made, but not sent.
Push Config
The Push Config button is used to send updated Zone ID / Names to the affected devices.
A progress bar is shown during the push operation and user interaction with the tool is blocked until the operation is finished.
The tool sends the updates to each device in turn.
When a device requires a password for authentication, a pop-up window appears for the user to supply it.
Note: the User has only one attempt per device; when the password is not entered correctly, the corresponding device is marked in red and the Zone ID and Name values are restored to previous values, discarding the
changes; the User can inspect devices in error and then redo config changes in a second attempt.
Password handling
Any or all of the Barix devices can have security passwords set; when required, the tool will prompt the user to enter the necessary passwords.
The tool remembers the last used password in every session and will try this first when it is next required to supply a password.
If the stored password does not work, the tool prompts for a new one to be entered.
If the password is not successfully entered, the tool will abandon the current operation. The tool tackles multiple device updates sequentially, so it is possible that some devices receive an update and others don't.
In this case, the affected devices are highlighted in red text.
Print/Save
Navigates to a view containing the device information, plus a freely editable column for Installers' notes.
This view can then either be printed, or saved as a .csv format file, for inclusion in the user's own installation documentation.
Web UI button
On each Device entry in the "Discover Zones" view, there is a "Web UI" button, which will launch a browser session directly on the device's web interface, giving access to more advanced configuration options for that specific
device (see the following chapter “Device Configuration via Web Interface“).
Set Groups button
Switches to the Set Groups view.
Set Groups view
This view shows the Group configuration for a specific Paging Master device; the Master can be selected from the drop down list in the top left of the view.
-
On the left there is a matrix representing 128 Zone IDs under the heading “Target Zone IDs”.
-
Above the matrix there is a series of tabs, one for each of the Paging Groups supported by the device; Zone IDs assigned to the current Group are indicated by a tick in the matrix.
-
On the right there is a box displaying details of the members of the currently selected Group.
-
Underneath the matrix, the keyboard layout for the current Master is shown.
Text Colour coding
Text in the tool is displayed in Black normally.
Yellow text shows that a device parameter has been changed, but the change has not yet been pushed / sent to the device.
Red text indicates when there has been a problem communicating updates to a device.
Refresh
This button will cause the tool to get and display the current active configuration details for the devices, it can be used to abandon any changes made, but not sent.
Save and Send
Click to push changes to the Master device; the configuration data is first saved in a “.ini” file in the application folder, using a predefined name pattern (DevType_DevName_IP.ini), which the tool reports; next the updated
configuration is sent to the device, which will apply it and reboot.
If the user selects a different master from the drop-down list without first saving any changes that have been made, a warning pop-up will appear; this gives the user the opportunity to save or abandon the changes before
changing the view.
Import File
Using the configuration tool it is possible to load a saved configuration into a device, enabling quick and easy setup of multiple Master Stations.
This button opens a file browser control to find and load a previously saved group configuration “.ini” file; note that all tabs will become shaded after this operation to indicate that configuration is obtained by means of the
import functionality; the User can further modify the groups before updating the device using the Save & Send button.
Defining Paging Groups
To change the Group Name, double click on the tab and then change the text as required; "Enter"' finalizes the change.
To change the Group members, select the Group by clicking on its tab and then within the matrix, click with the mouse in the box corresponding to the ID(s) you wish to select / remove; a tick indicates that the ID is selected
and the details of the device will appear in the members list if the device is online.
IDs shown grey in the matrix are offline, green highlighting means that at least one device with that ID is online.
Device Configuration via Web Interface
In some cases it may be necessary to perform extra configuration to ensure perfect operation of the Paging solution. The web UI for the Paging Station, Endpoint and Gateway are broadly the same: a home page with some basic information, plus tabs for:
-
Configuration – of the device
-
Discovery – shows all Simple Paging components (not Paging Endpoint)
-
Status – of the device
-
Defaults – reset configuration to default values
-
Update – perform firmware update on the device
-
Reboot – restart the device
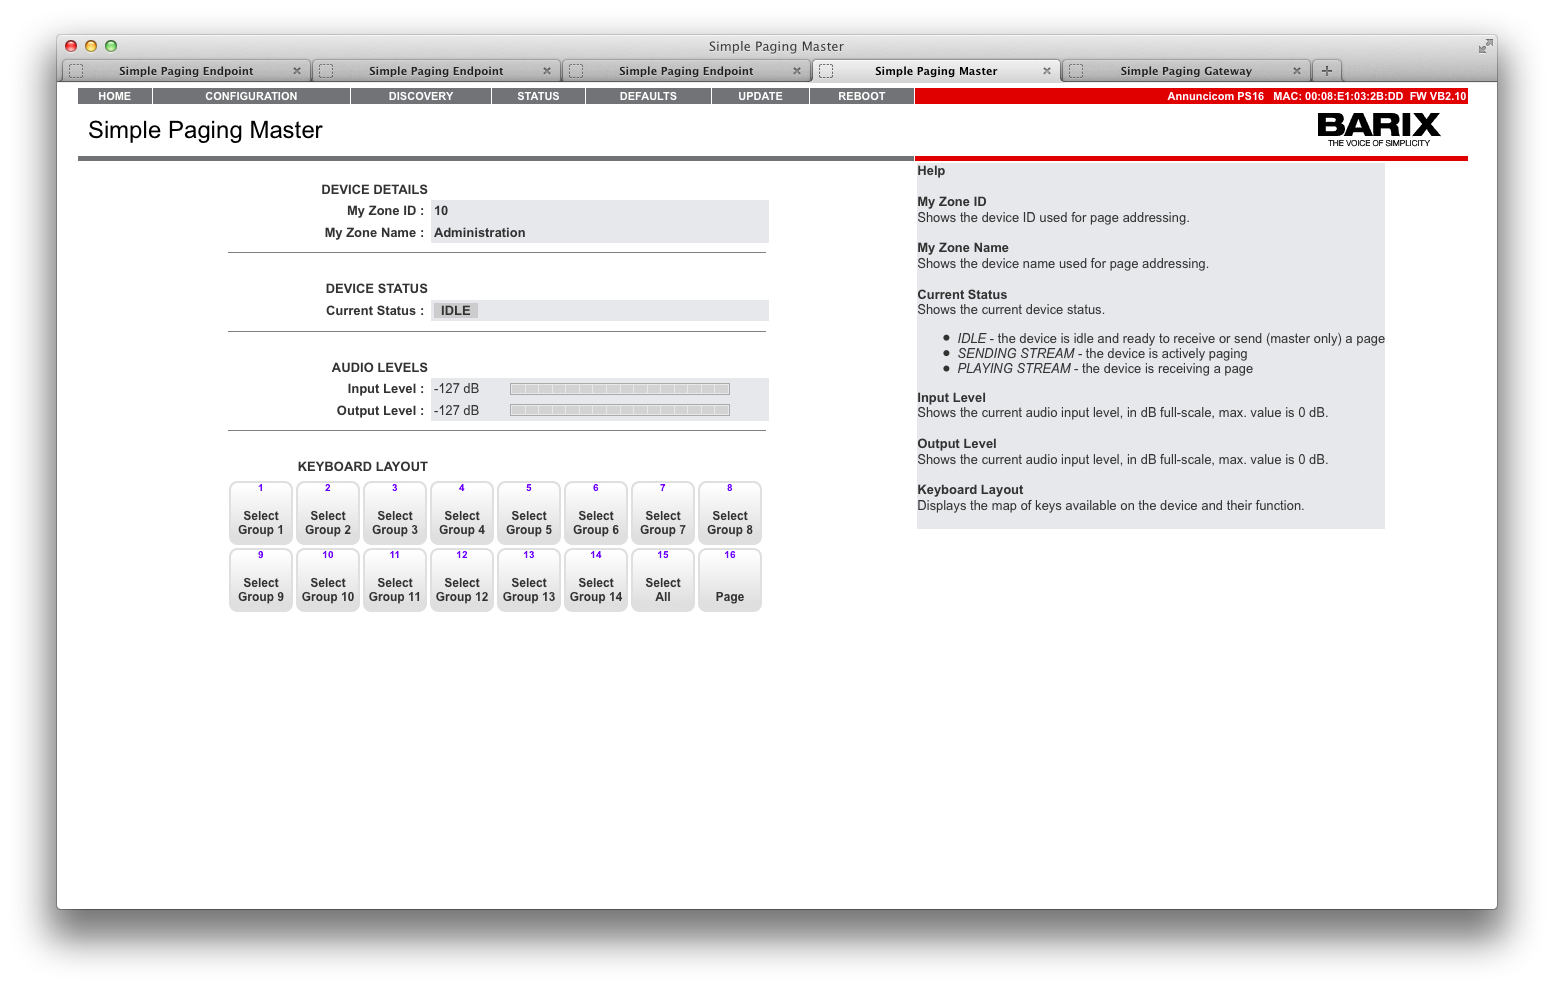
Illustration 6: Sample device UI Home page
Simple Paging web UI Configuration
Basic Configuration: parameters
Click on the Web UI 'Configuration' tab, the browser will display the 'Basic' configuration view.
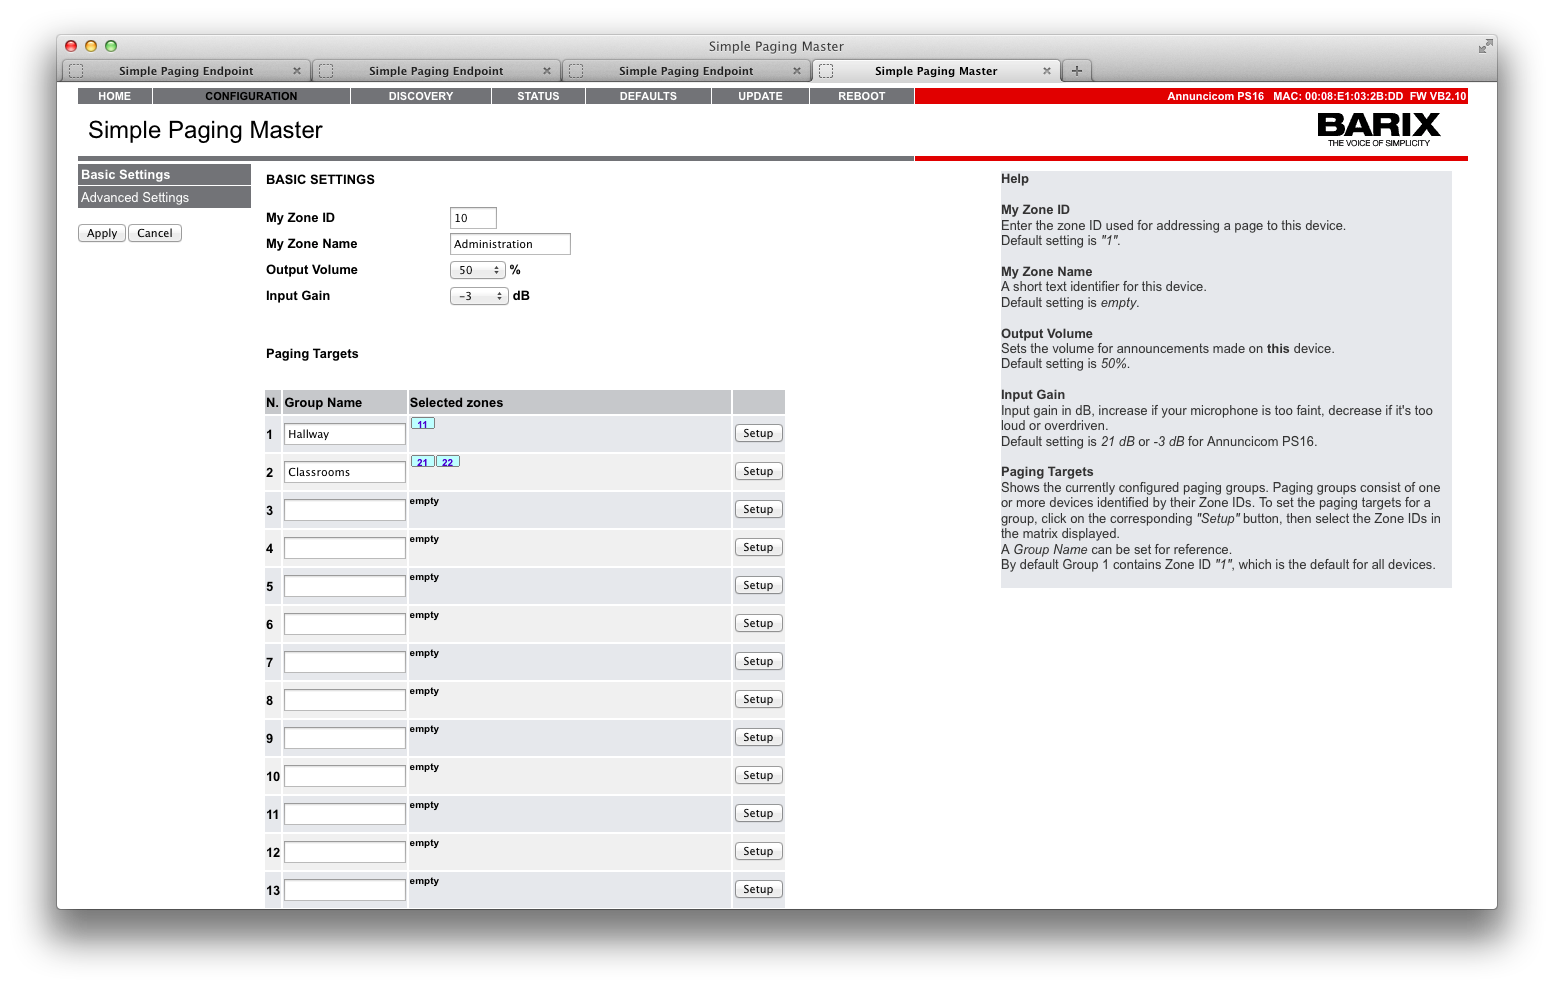
Illustration 7: Simple Paging Master basic configuration UI page
The Basic Settings tab allows you to set the:
-
Zone ID
-
Zone Name
-
Loudspeaker Volume (Output Volume)
-
Microphone Gain (Input Gain)
To save changes, click on "Apply"; the device will reboot.
For Master and Gateway devices, this page also shows the current Paging Group definitions and allows you to set names for Paging Groups, and gives access to configure the Groups, to allocate Paging Zones to the Groups.
By default just Group 1 is defined, including Zone ID 1; all other groups are empty.
Basic configuration: Group Setup
Click on the “Setup” button for the Group you want to configure: the UI displays a matrix the same as that used in the Simple Paging Configuration tool, as shown below.
Click on the check boxes to add Paging Zones to the Group; a green background color indicates that there is at least one device online with this Zone ID; A yellow background color shows the Zone ID of the device being
configured.
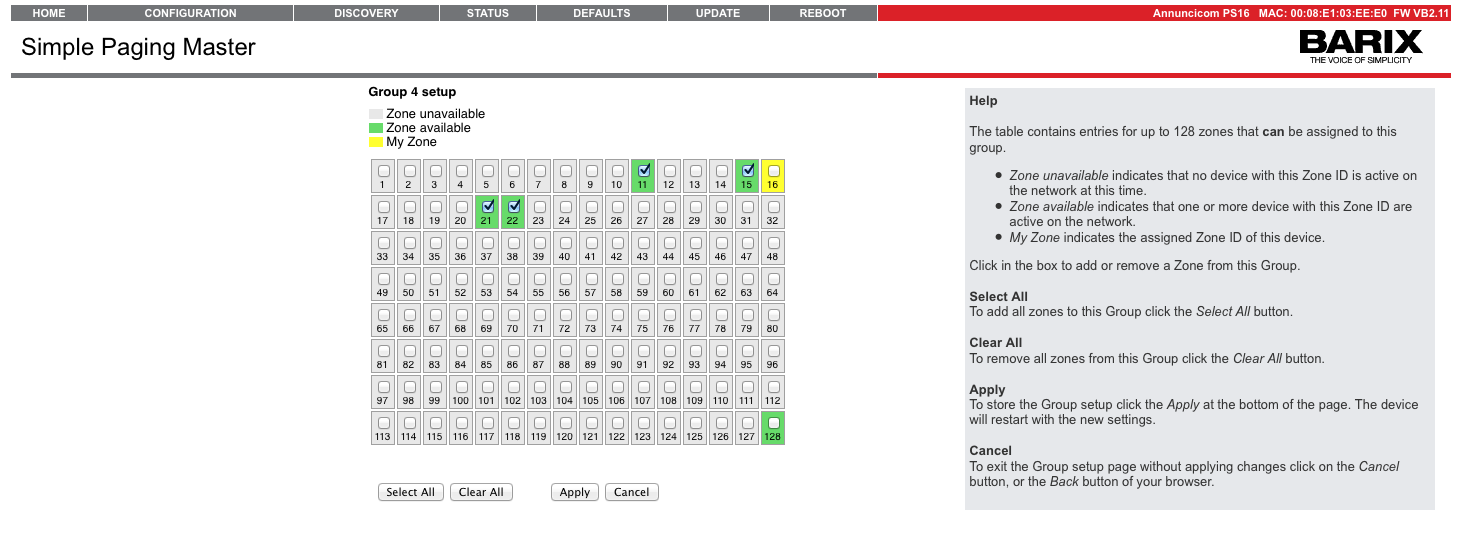
After selecting the Zones IDs to belong to the Group, click “Apply” to save the details; the device will reboot, saving the new Group definition.
This process must be repeated for every Group to be set up; for this reason, it is recommended to use the Configuration Tool, as all Groups can be easily set in one operation.
Advanced settings: Network configuration
From the Configuration page, click on "Advanced"; further options will be displayed, starting at the Network Settings page.
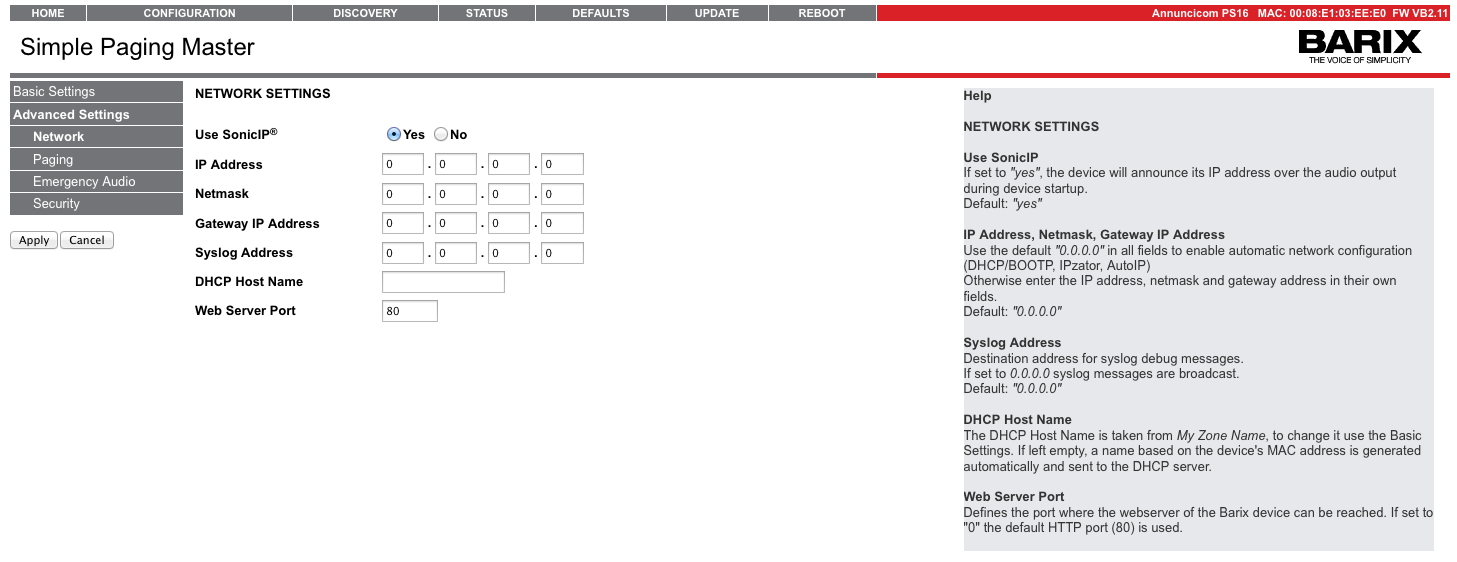
-
Use SonicIP
If set to "yes", the device will announce its IP address during device startup; default: "yes"
-
IP Address
Enter the desired device IP address e.g. "192.168.0.12" for an internal LAN; "0.0.0.0" sets the device for automatic discovery using DHCP; default: "0.0.0.0"
-
Netmask
If DHCP is being used, then this can be left at the default "0.0.0.0", otherwise, enter the 4 values of the desired IP e.g. "255.255.255.0" for a C class network.
-
Gateway IP Address
Enter the 4 values of the desired Gateway IP address e.g.:
"0.0.0.0" for no Gateway
"192.168.0.1" for a Gateway in a LAN
Note: The Gateway has to be set only when connecting to other devices over the WAN (through a router).
Default: "0.0.0.0".
-
Syslog Address
Destination address for Syslog messages; Set this to your Syslog logging machine address, if your Syslog messages are recorded centrally; if set to 0.0.0.0 Syslog messages are sent over local network as a broadcast.
Default: "0.0.0.0".
-
DHCP Host Name
Name of the device sent in DHCP requests; if left empty, a name based on the device's MAC address is generated automatically; enter up to 15 characters.
-
Web Server Port
Defines the port where the web server of the device can be reached; if set to "0" the default HTTP port 80 is used; it is recommended to leave this alone if using the Configuration Tool.
Advanced Settings: Paging
Click on the "Paging" menu option; this option is not shown on Paging Endpoints (the Simple Paging control protocol ensures that the Endpoints listen out for announcements correctly).
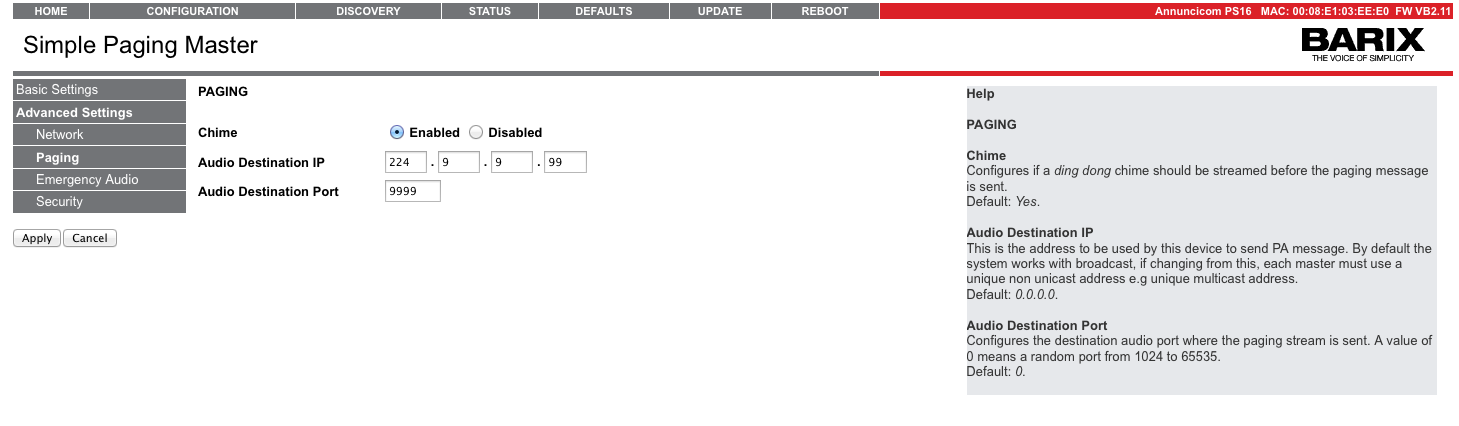
Chime
The PS Touch and PS1 can play a two-tone chime before taking the audio from the microphone when an announcement is made; this chime is to attract listeners' attention before the announcement starts.
Default: enabled.
Audio Destination IP
By default the Paging Station and Gateway devices send audio using the local network's broadcast address.
The broadcast address depends on the IP address and Netmask of the device. For example, if the IP address of device is 192.168.0.12 and the Netmask is 255.255.255.0, then the broadcast address will be 192.168.0.255.
Configure this parameter to change this default behavior, for example to use a multicast address.
The IP address set here will be used by this device to forward audio to the zones.
Default: 0.0.0.0.
Audio Destination Port
Controls the UDP port number to be used for sending the audio; this may be required in the case that the local network has some restriction to use only certain port numbers; otherwise leave this parameter untouched.
Default: 0.
Advanced Settings: Emergency Audio
Click on the "Emergency Audio" menu option to access this function.
Many institutions have an emergency notification system, which is typically a single source distinct from the PA system.
Barix Simple Paging supports an Emergency Notification socket, which will receive an RTP audio stream on a configurable IP address and Port.
Audio received on this socket has the highest priority and is relayed immediately by all Barix Simple Paging hardware, irrespective of whether they are playing background music, or if an announcement is in progress.
Note:
-
each audio source has an associated volume; typically Emergency messages will be at a higher volume than BGM or standard Paging announcements;
-
the incoming audio for BGM and Emergency Audio must be an RTP stream in a Barix supported audio format: mp3, PCM uLaw/aLaw;
-
emergency audio has the highest priority and will override any other audio source.
A Paging message has middle priority (will interrupt BGM playback, but in turn be dropped if an Emergency Announcement is made).
Background Music has the lowest priority and only plays if no other source is active.
Setting up a Simple Paging device to receive Emergency Notification audio
The Emergency Notification socket needs to be defined individually on every device that you wish to relay the emergency notifications on.
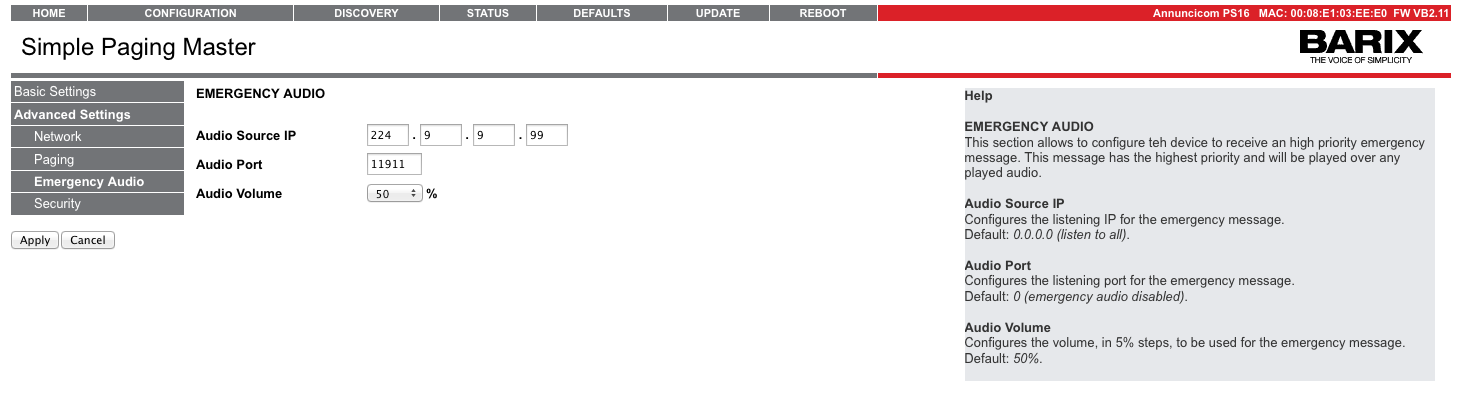
-
Enter the IP Address and port number of the Emergency Audio source; multicast addresses are supported.
-
Set the desired volume for Emergency Notifications; typically this will be louder than either BGM or Paging Announcements.
-
Click on "Apply": the device will save the changes and restart; the device is now set up with an Emergency Notification channel that will override all other audio playback.
Device behavior with Emergency Audio
The Simple Paging system has 3 levels of audio priority, Emergency Audio is the highest.
When the device receives an RTP stream in a supported format on the configured Emergency Audio socket, it will immediately relay it at the configured Emergency Audio volume.
The device status is shown as "Playing Notification" for as long as an audio stream is received on this socket.
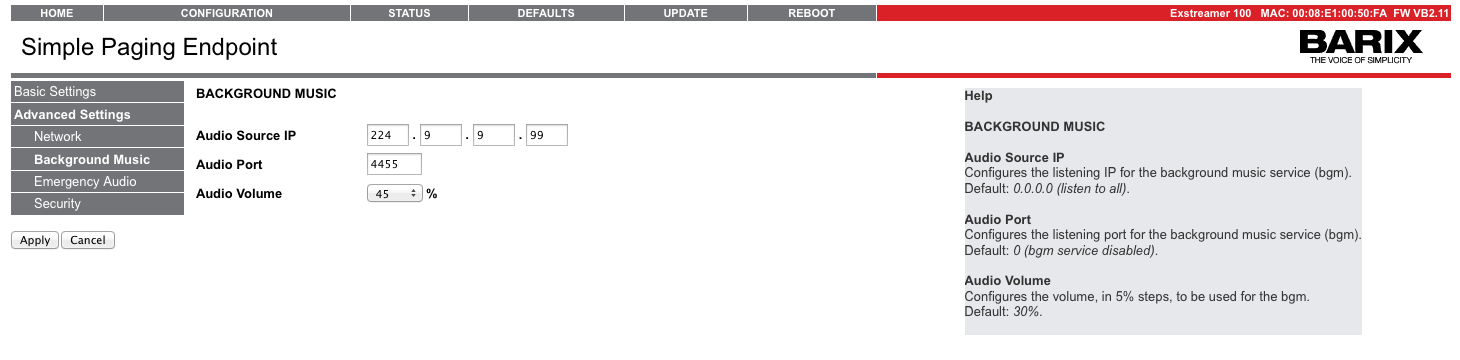
Advanced Settings: Background music and PA integration
Click on the "Background Music" menu option to access this function.
Many institutions use Background Music to create a suitable ambience throughout the facility, typically playing different audio in different zones. Barix Simple Paging supports this, allowing users to personalize Background
Music right down to individual device level.
Each Barix Simple Paging Endpoint supports a Background Music socket to receive an RTP audio stream on a configurable IP address and Port; the audio playback is made at a configured Background Music volume.
Audio received on this socket has the lowest priority and is played only if there is no active Paging announcement or Emergency Notification in progress.
Note:
-
Each audio source has an associated volume; typically Emergency messages will be at a higher volume than BGM or standard Paging announcements.
-
The incoming audio for BGM and Emergency Audio must be an RTP stream in a Barix supported audio format: mp3, PCM uLaw/aLaw.
-
Paging Master stations do not support Background Music playback.
-
Emergency audio has the highest priority and will override any other audio source.
A Paging message has middle priority (will interrupt BGM playback, but in turn be dropped if an Emergency Announcement is made).
Background Music has the lowest priority and only plays if no other source is active.
Setting up a device to receive Background Music
The Background Music socket needs to be defined individually on every Simple Paging Endpoint that is required to play Background Music.
-
Enter the IP Address and port number of the Background Music source; multicast addresses are supported.
-
Set the desired volume for music playback; this is different to the Paging and Emergency Notification volumes.
-
Click on "Apply": the device will save the changes and restart; the device is now set up to play Background Music.
Device behavior with Background Music
The Simple Paging system has 3 levels of audio priority with Background Music having the lowest.
When the device receives an RTP stream in a supported format on the configured Background Music socket, it will immediately play it at the configured Background Music volume.
The device status is shown as "Playing BGM" whilst this audio stream is played on this socket.
Any Paging announcement or Emergency Audio will cause immediate interruption of the BGM playback; the Simple Paging Endpoint will play out the higher priority audio before returning to Background Music playback.
Advanced Settings: Security
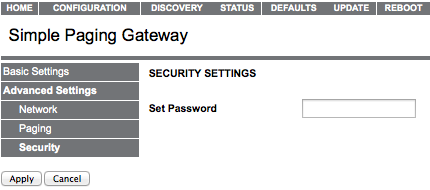
-
Set Password: Paging Gateway device
The password set on the Paging Gateway device is used to control paging announcements made from smart devices.
If no password is set on the Paging Gateway, any smart device with the Paging App will be able to make announcements.
For this reason, a password must be set at least on the Paging Gateway!
-
Set Password: Other devices
It is recommended that all the system devices are password protected; using a shared password makes working with the configuration tool simpler.
Discovery function
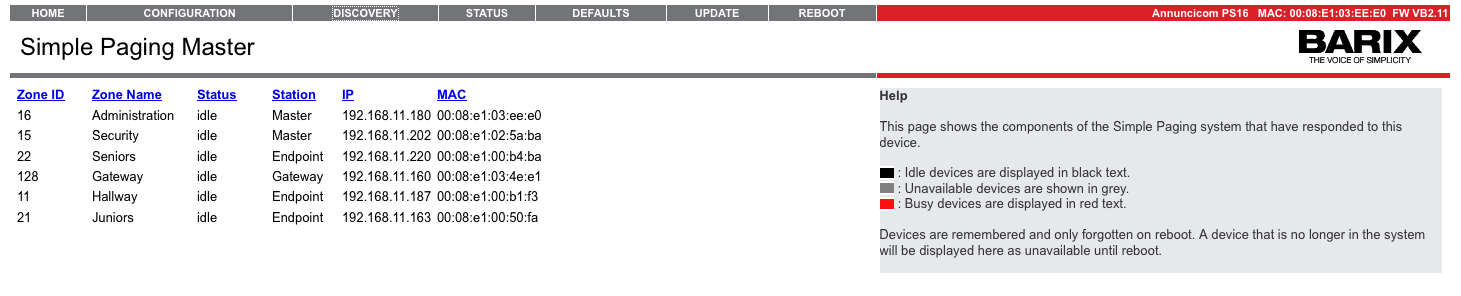
This tab shows the list of simple paging devices online on the local network, reporting the following parameters for each device:
-
Zone Id
-
Zone Name
-
Status: “Idle”,”Busy” or “Unavailable”; this status refers to Paging messages only.
-
Station: this is the type of device; “Gateway”, “End Point” or “Master”.
-
IP: the IP address of the device.
-
MAC: the MAC address of the device.
Status Page
Click on this tab to see a summary of the system status and working configuration.
The page shows information in three main groupings:
-
Device information: uptime, hardware information, base firmware information.
-
Application status.
-
Application configuration.
Factory Defaults
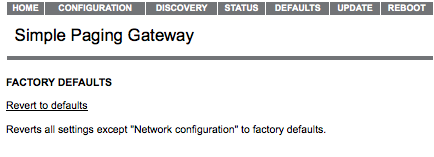
Click on "Revert to defaults" to revert all settings except "Network configuration" to factory defaults; while restarting the device a screen appears showing a number counting down.
On startup, a screen appears confirming the successful application of factory defaults.
This function is important when changing firmware types, since they use the device memory differently.
If factory default settings are not applied when a new application is loaded, the new application might not work correctly.
Hard default settings
To revert all settings (including the "Network configuration") to factory defaults the Reset button has to be pressed for about 10 seconds while the device is powered.
Restoring the factory defaults using the Reset button is not possible if the “Factory Default” option in the “Security” web page is disabled.
Update
Clicking on the “Update” button displays functionality to update the device firmware.
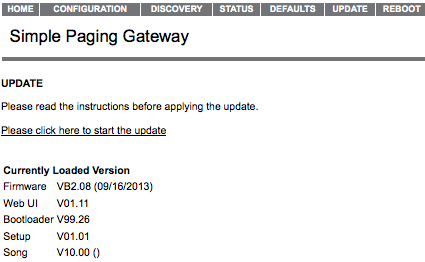
-
Click on "Please click here to continue" to start the update process; before you click the link note that once started, the update process can only be cancelled by power cycling the device.
-
The device will restart in a special mode called "Bootloader" and a screen appears showing a number counting down; in "Bootloader" mode the standard http port 80 is always used.
-
To upload a file click on "Browse..." to locate the firmware or application file you want to update; once selected, click on "Upload".
This process can take a few minutes; after a successful upload the following text appears: "Resource" successfully loaded.
Click on update before updating the next component or unplug the power supply to reboot the device.
If you choose "update" you may upload another resource, or click the "reboot" button.
If you choose to reboot the following text appears:rebooting...
Click here to reload the main page.
-
The device takes a few seconds to reboot; if you have a fixed IP address or DHCP resolves to the IP address used before, the main page will appear.
-
When changing firmware types, it is recommended to restore factory defaults after uploading firmware, to avoid any unexpected behavior.
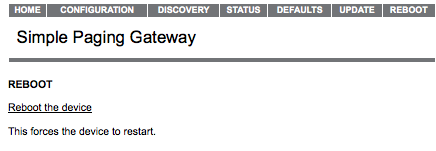
Reboot
Click on the link “Reboot the device” to reboot the device.