Which of the 4 methods to use for operating a FW Update
Firmware Update
There are 4 methods for operating a FW upgrade on Barix audio devices: WEB update, Serial Rescue, TFTP, Gold Unit. Each of them is suited for a different situation and purpose.
WEB update
The WEB update is done via a standard WEB Browser running on a PC. The device needs to be running on and visible to the IP network.
This method is suited for field upgrade of the FW. It will not change the current configuration settings.
You may need to force the Factory Default (keep reset button pressed 5-10 sec until lights change blinking) if you have major FW differences (implying a different EEPROM layout).
Note, the web update works only and always on port 80, even if you have changed the web server port in the configuration !!
Detailed procedure
(as per _readme1st.txt file provided in the rescue package)
- Open a browser and type the announced IP address into the URL field and hit the ENTER key.
- Click on the UPDATE button to enter the update page.
- Click on "Please click here to continue" to launch the update process. The device will restart in a special mode called Bootloader showing a number counting down. Upon start up the following screen appears ready for the update process.
- To upload and update click on "Browse" to locate the file you want to update. Browse to the folder "update_rescue" and choose the file compound.bin.
- Once selected, click on "Upload". This process can take a few minutes. After a successful upload click on the "update" link and when the Update window reappears click the "Reboot" button or if there is no button, click on Browse and select the file "reboot". The device will reboot with the new firmware.
Upgrade Bootloader only
Sometimes it is necessary to upgrade the Bootloader only. This can be done as follow:
- Open a browser and type the announced IP address into the URL field and hit the ENTER key.
- Click on the UPDATE button to enter the update page.
- Click on "Please click here to continue" to launch the update process. The device will restart in a special mode called Bootloader showing a number counting down. Upon start up the following screen appears ready for the update process.
- Click on the "Advanced Update" link.
- Type in a target web page (e.g. WEB14). This page should be unused. Attention: The name must be written in capital letters.
- To upload and update the Bootloader click on "Browse" to locate the file you want to update. Browse to the folder "update_rescue" and choose the file UNIFULL.SPB.
- Once selected, click on "Upload". This process can take a few seconds. After a successful upload click on the "update" link and when the Update window reappears click the "Reboot" button or if there is no button, click on Browse and select the file "reboot". The device will reboot with the new Bootloader.
Attention: If the target web page was used this update overwrites the content in the web page. So be careful choosing the web page!
Serial Rescue
The Serial rescue operation is done via a serial cable and requires a command shell opened on a local PC.
This method is suited for Rescue operation as it will also load the Boot-loader and restore the Default Settings.
So if you need to keep the actual configuration settings:
Open a browser and type the announced IP address followed by "/status" into theURL field and hit the ENTER key.
Print this page which contains the current configuration settings of the device in order to reenter them after the update.
Detailed procedure
(as per _readme1st.txt file provided in the rescue package)
- Unplug power supply.
- Connect the supplied serial crossover cable to your PC's serial port and to the devices serial port.
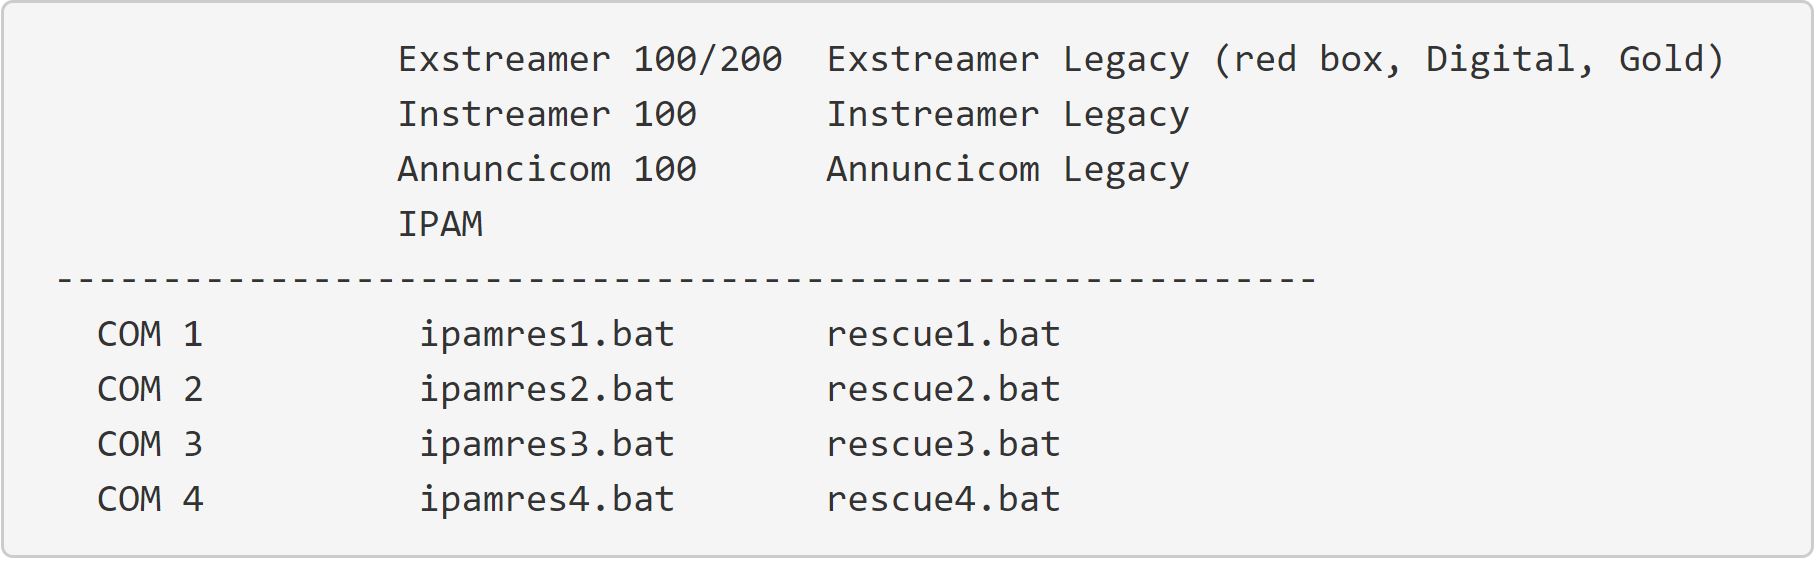
- Start The following script in the folder "update_rescue" depending on your Barix device model and COM port you are using the information from the box below.
- A message 'Waiting for the device' will be shown on the bottom of the screen.
- Plug in the power supply now.
- Wait until a message 'SUCCESSFUL' appears on the second line.
- Close the rescue program.
- Unplug power supply.
- Plug in the power supply.
- Your device is set to factory defaults and should work now.
- Reconfigure the Exstreamer to your last configuration.
TFTP
The TFTP firmware update allows to update Barix audio devices over network, over this it would be also possible to automate updates (e.g. to many devices over one script). To update the firmware components, the Barix device must be in Bootloader mode, only then the FTP Server is active.
A firmware consists of different parts, over TFTP all these parts must/can be loaded separately with a separate TFTP command. An overview about the parts of the firmware is available in the "Gen.bat" (contained in FW package), this lists the files for the update and the target positionwhere the files must be loaded to. Here is an example (Gen.bat) from the ABCL SIP firmware:
load_win.exe -g compound.bin abclw.rom 0xc000 fs.bin 0xc100 sg.bin 0xc200 abclapp.cob 0xc400 custom1.cob 0xc600 esnd.rom 0xc800 bclio.bin 0xc900 applications.cob 0xcA00
When only the ABCL application should be changed but not the complete firmware, then the file "applications.cob" can be load to target "WEB10" (address 0xCA00 = target "WEB10"). When only the file "custom1.cob" should be updated the this must be loaded to "WEB6" (address 0xC600 = target "WEB6").
When the complete firmware package should be updated over TFTP then then all components must be loaded by separate TFTP commands. In this case the file for target "WEB0" (abclw.rom , the firmware file it self) should be loaded as last, because this is causing an automatic reboot on the Barix device and returning to normal operation mode.
Syntax of the TFTP command (in windows) :
TFTP -i [ip-address] PUT [file] [target]
e.g. TFTP -i 192.168.1.25 put abclapp.cob WEB4
The following options can be used to bring a Barix device into bootloader mode:
- power off, press reset button and keep it pressed while power on (for approx. 3 seconds)
or
- press the "Update" button from the Barix device´s web setup
or
- send the command "c=100" (e.g. over CGI) to bring the device into Bootloader mode
Gold Unit
Barix Gold Unit is a standard Exstreamer 100 device loaded with a special SW. The Gold Unit has a USB memory stick attached which contains the binary files to be loaded to the other devices.
The update operation is done via an Ethernet cross cable and optionally requires a serial Terminal running on a local PC for monitoring.
This method is suited for programming in production and can be tailored in terms of modules to be loaded.
If customer needs new Default Settings to be loaded, Barix can provide a customized version of the configuration file (config.bin).
Detailed procedure
Prepare USB files
The files on the USB sticks must follow a name convention in order to be loaded automatically i.e. a file on the memory stick called WEB03 will be loaded into the flash page 3, a file named WEB10 will be loaded into the flash page 10 and so on. The file FBOOT will replace the bootloader. The name EEPRO is used to write to the configuration memory (i.e. the eeprom).
The files will be available soon in standard rescue kits.
Update new Units
For the units to be loaded containing already a firmware the user would need to:
- attach the unit to be updated to the Gold Unit via Ethernet connection (direct cross cable or isolated switch) with DHCP enabled (no fixed IP allowed).
- start the unit to be updated in the boot-loader mode (by keeping the reset button pressed during start-up).
- after a short delay (1-2seconds) the boot-loader comes up and the file transfer will start automatically. The update operation will be completed in few seconds.
Optionally use a serial Terminal on the unit to be updated to verify that the download is started and finished OK.