When we talk about background music distribution for professional environments (restaurant chains, hotels, stores, gyms, car retailers, warehouses, etc..) we intend a way of distributing audio content (music tracks) to multiple locations. For such situations, the idea is to get the same audio content played and scheduled in the same way across groups of locations of the same brand in the same or different region in the world.
How to achieve this?
Technically speaking there are essentially 2 methods that can be used:
-
Streaming audio to all the locations and play it as the stream arrives. For example feeding audio to a Shoutcast or Icecast server and use these platforms to serve the stream to which the RetailPlayers can connect to. This method requires every location to be constantly connected to the streaming server used, as it is a constant flow of data served typically over the HTTP protocol (but also RTP can be used). A network failure or a server failure results in an interruption of the service and of the playback. For this reason RetailPlayer offers a 3-layer-backup mechanism that allows you to configure not only a MAIN stream to connect with but also a FALLBACK one and in case things can go really wrong in the netwokr, jump into playing FAILOVER TRACKS (music tracks uploaded from the Portal and downloaded in the Player that play only in the event of a missing MAIN or FALLBACK stream).
-
Storing audio in every location in forms of playlists and play it. This method avoids relying on a constant network connection, requiring it only when playlists must be fetched or updated. This is what Store & Play is all about. How does that work? Let’s find it out.
RetailPlayer Store & Play introduction
The main goal for this function is:
-
Get the RetailPlayer connecting with a web service hosting the music tracks and the playlist files
-
Fetch the playlist file
-
Download the tracks specified in the playlist file in the local memory
-
Play from local storage the tracks downloaded
To achieve this the Store & Play function on RetailPlayer allows you to instruct the RetailPlayer to connect to a web server’s directory, hosted at the customer premises or in the cloud, via FTP or HTTP. This is the directory where tracks and playlists files (.m3u or .pls) are saved.
Barix doesn’t provide the cloud storage capacity, the web service must be already up and running at the customer’s premises. The customer is responsible for any network’s firewall configuration to allow the RetailPlayer device to connect with the FTP (passive ftp) or HTTP service.
The scope of the playlist files (which are simple text files) is to contain the filenames of the tracks that the player has to download and play, following the sequence expressed from top to bottom (it is possible in any case to shuffle the playback while configuring the Store & Play channel on the Portal). It is important to have the tracks and the playlist files in the same directory for the RetailPlayer to find the tracks specified in the playlist file.
The files can be served to the RetailPlayer over HTTP(s) or FTP (passive ftp) protocol.
Once the RetailPlayer receives the Store & Play configuration from the Portal it downloads all the tracks found in the playlist file and will start to play them accordingly.
There is no limit in the number of channels (playlists) that can be created in the Portal, though the storage capacity on the device cannot be exceeded
RetailPlayer Store & Play - How to
|
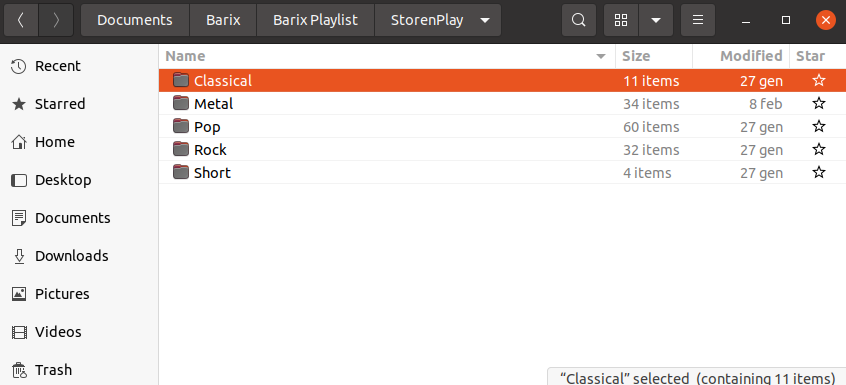
Prepare the content on your web server. I.e. create a dedicated directory for each playlist (or channel) you need to serve. In this example the web server runs an FTP server and is available at: ftp://mydemoftp.fakeurl.dnx/StorenPlay/ This is the root folder of the web service, where the playlists (channels) are being served. NOTE: The FTP server must work in passive ftp mode and, if on the internet, it must use its public IP address when sending data to the client during connection establishment process.
|
|
|
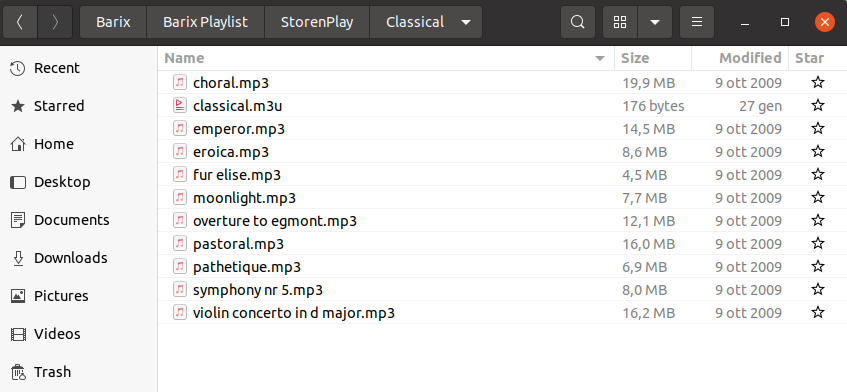
Each folder contains the playlists information: music tracks and a playlist file in .m3u format. The .m3u file is a text file containing the filenames of the files that the player will have to download and it specifies the sequence of playback to be followed (unless Shuffle mode is turned on, later on the Portal when configuring the Store and Play channel) In this example we will end up having 5 playlists (channels) served at the following endpoints: ftp://mydemoftp.fakeurl.dnx/StorenPlay/Classical/classical.m3u ftp://mydemoftp.fakeurl.dnx/StorenPlay/Metal/metal.m3u ftp://mydemoftp.fakeurl.dnx/StorenPlay/Pop/pop.m3u ftp://mydemoftp.fakeurl.dnx/StorenPlay/Rock/rock.m3u ftp://mydemoftp.fakeurl.dnx/StorenPlay/Short/short.m3u
|
|
|
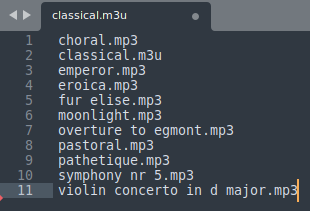
Here is the content of the m3u file “classical.m3u” from the above example, opened with a text editor. A quick method to generate an .m3u file, if you are on a Linux machine, is to run this command in the same directory where the music files are stored: Where you can rename “myplaylist” with any suitable name for your playlist. This will list (ls) the content of the directory and redirect the output into the desired text file (playlist.m3u) which is then created and saved in the same location from where the command is invoked. IMPORTANT: RetailPlayer doesn’t decode correctly special characters of filenames. Make sure to not use any special character or accented characters in the m3u (i.e. #%()=?^ìèéòç etc…) When generating the playlist with a program like VLC (or others), make sure to adjust the filenames accordingly in a way that they can be parsed correctly by RetailPlayer. |
|
|
Now that playlists (music tracks + .m3u files) are prepared on the web server it is time to configure the RetailPlayer device from the Portal. Go on and create a new Channel by selecting the type: “Store & Play”:
When ready, click on SAVE confirming the channel creation |

|
|
Do this for every playlist you need the player to handle. In our example the goal is to get 5 channels where each one points to one of the playlists
|

|
|
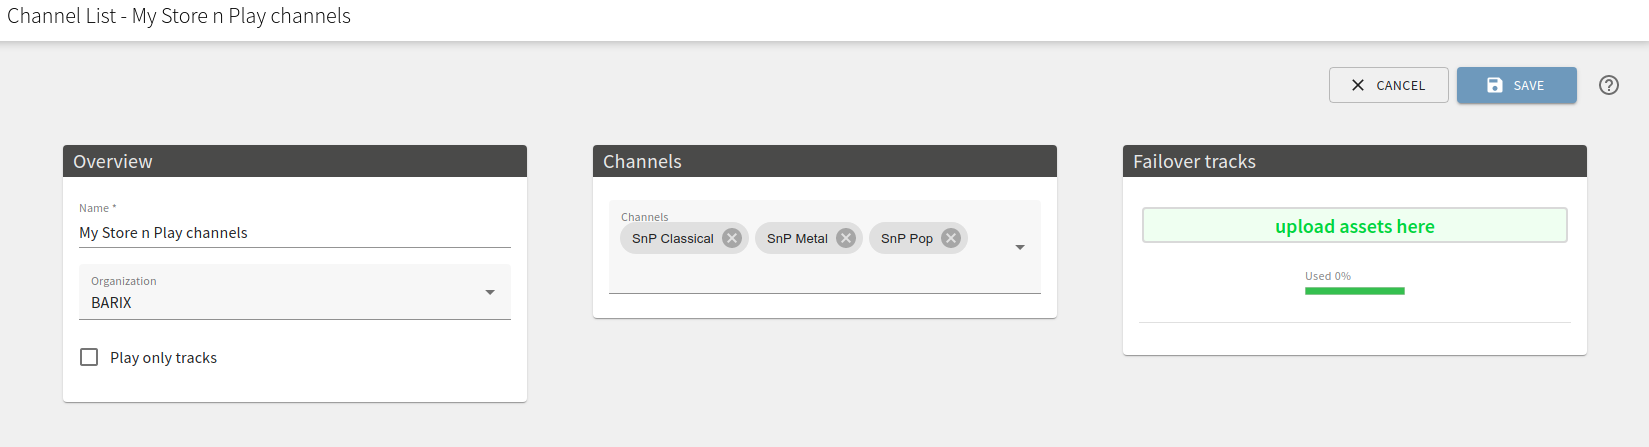
Once all your Store & Play channels are created assign the ones you want a specific device to play to a Channel List - When the channel list is created it is possible to ASSIGN it to any RetailPlayer device of your organization (or sub organization)
|
|
|
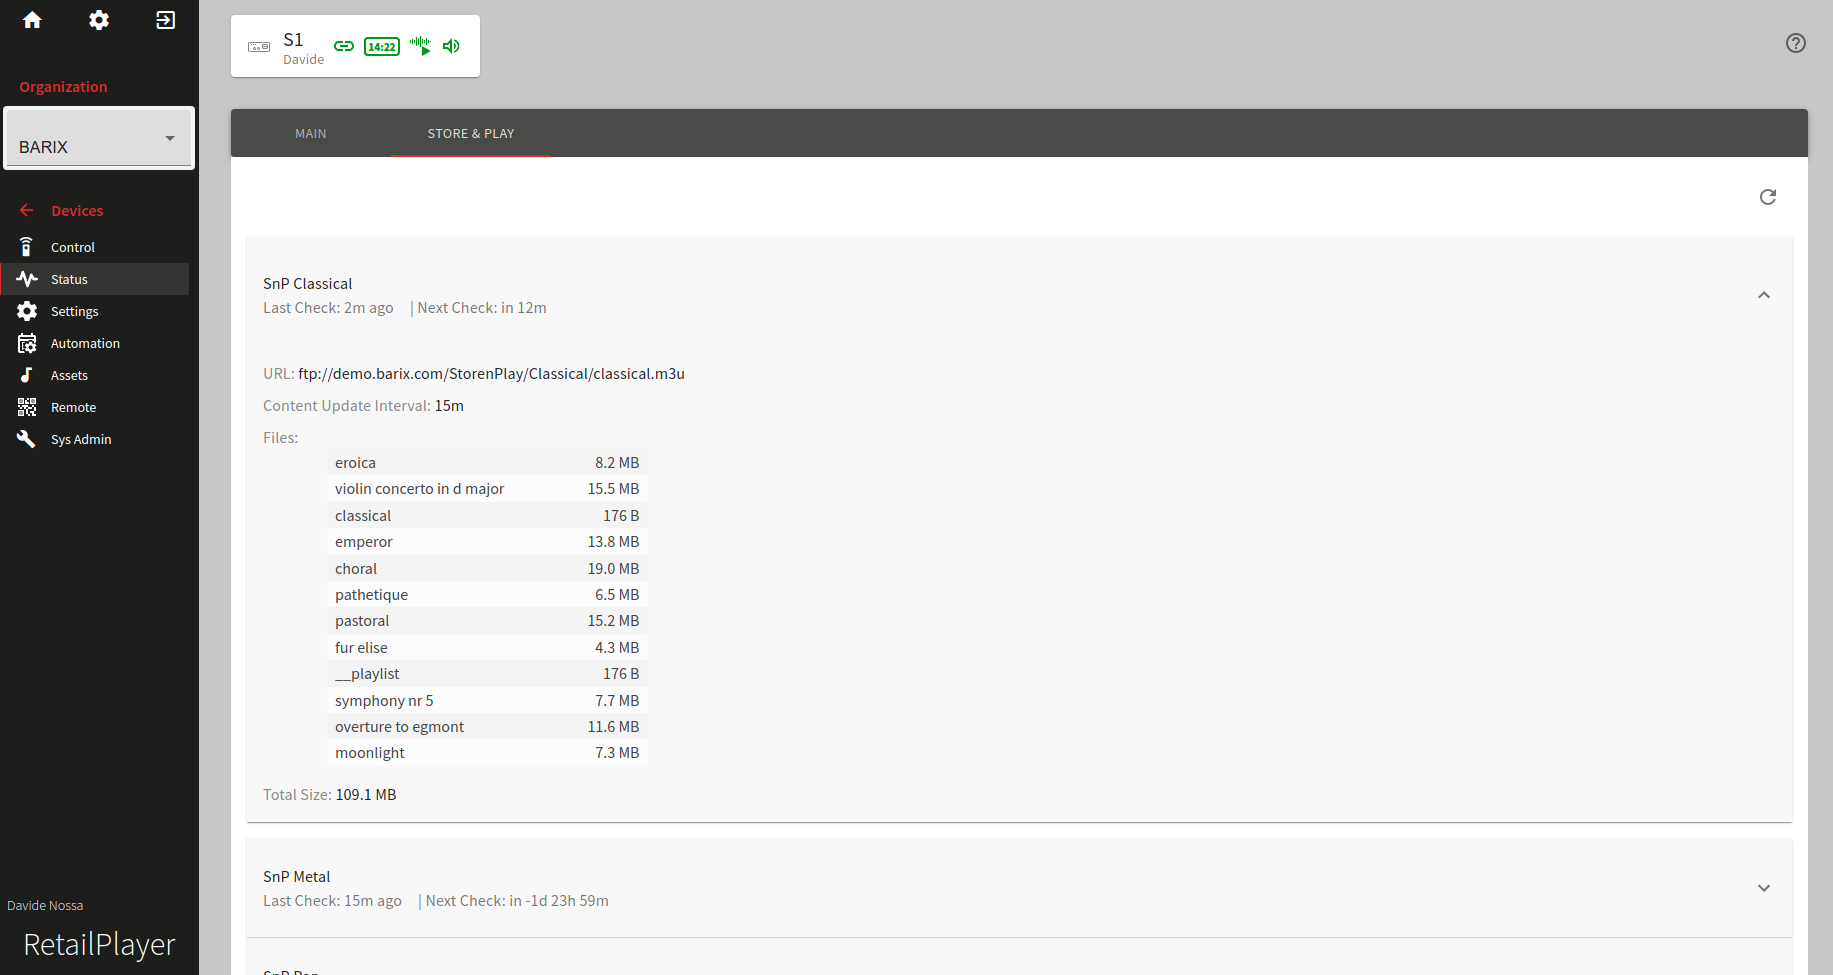
When the channel list is assigned to a RetailPlayer device, the device will connect to the web servers as per channel’s configuration and will start to download the content of ALL the channels (playlists) assigned to it. In each RetailPlayer device' status page it is possible to check the status of the Store & Play channels and the space occupied by each playlist. If there are some errors connecting to the server it will show up in this area with the description of the problem While the RetailPlayer downloads the playlist it is already possible to play it. In fact as soon as the first track is stored on the local memory it can be played, the download moves forward in background while all other tracks are downloaded. |
|
|
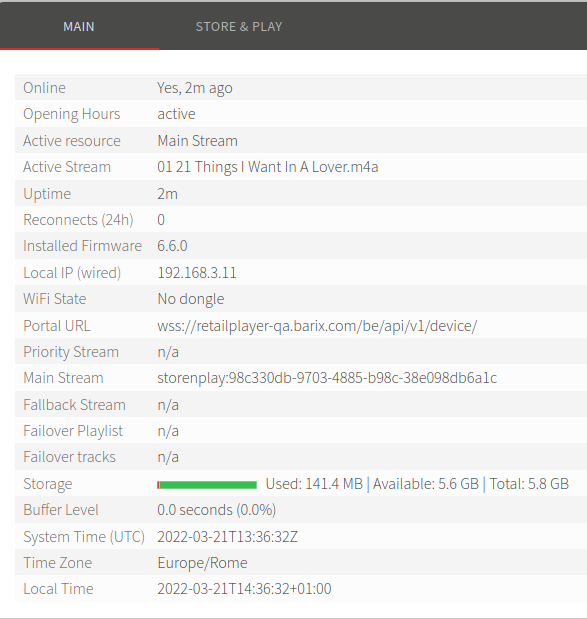
In the status page of each device it is possible to verify the amount of space available on the local storage. The standard max. space available is 5.8GB which can be used for: Store & Play tracks, Assets and Faliover Tracks. |
|
|
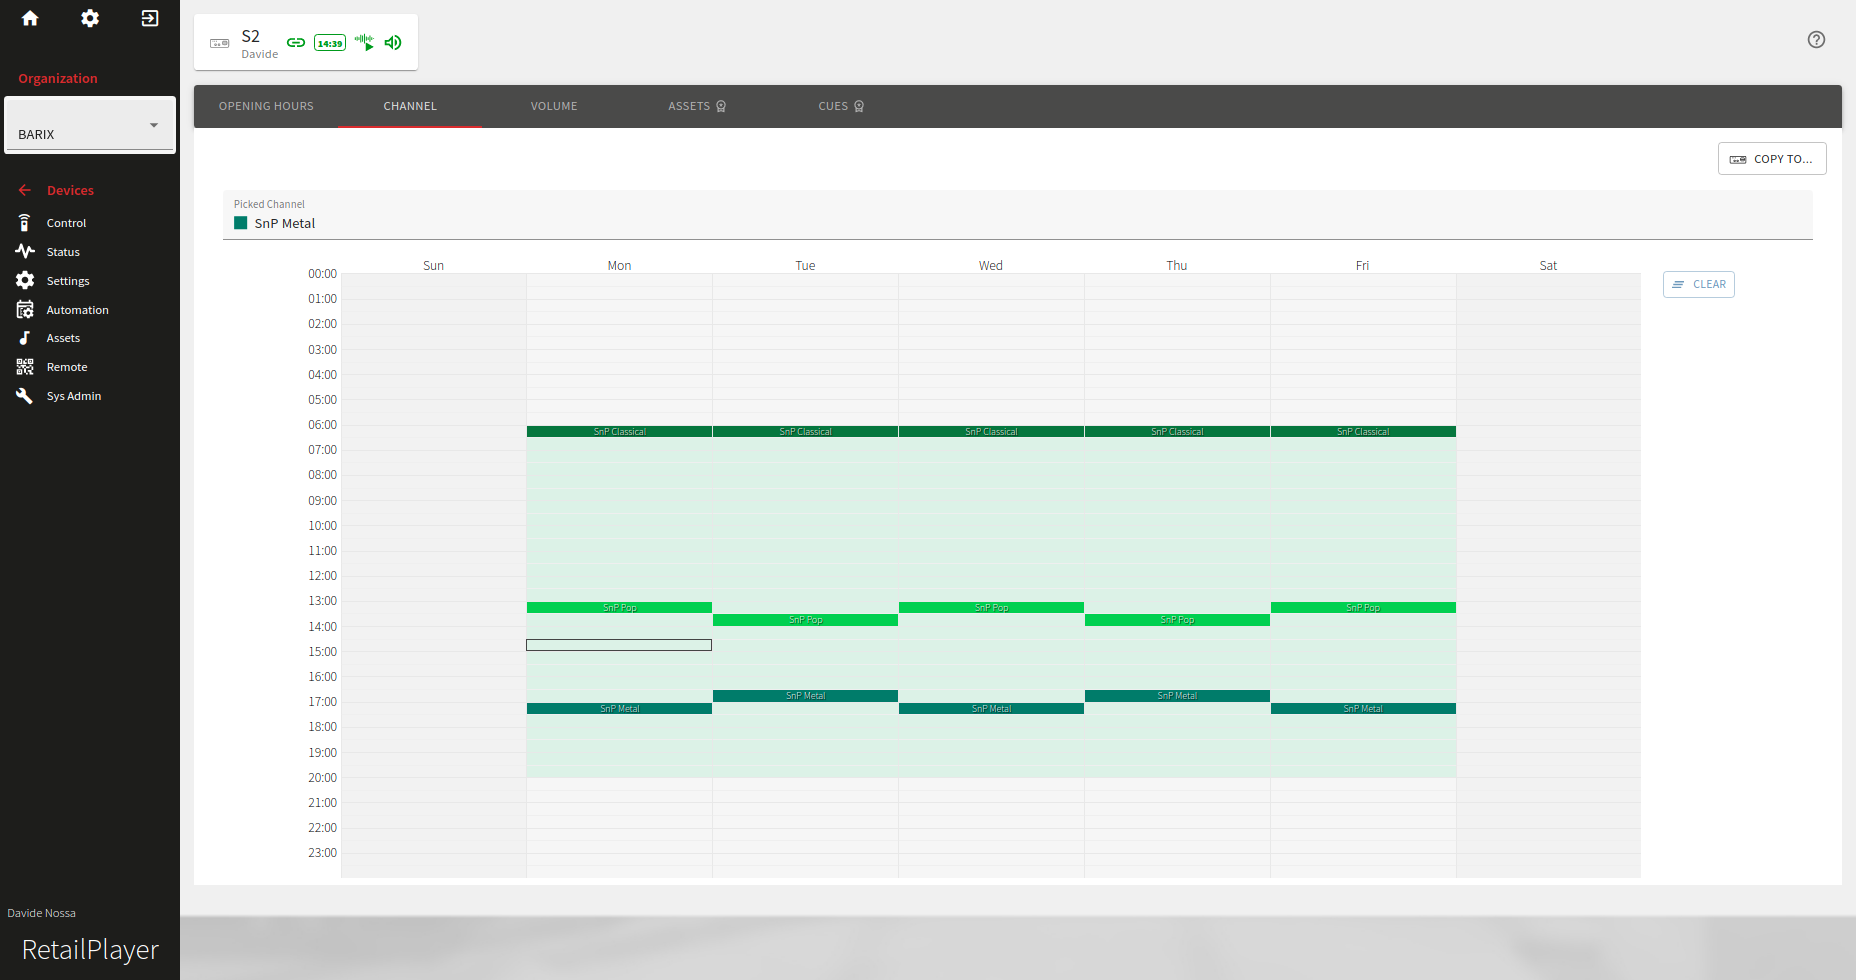
With the possibility to create as many channels as desired comes also the possibility to schedule the automatic switch of these channels over a weekly scheduler Head over in the device’s Automation tab → Channel Scheduler to program the weekly play-out of the Store & Play channels. To create the channel scheduler:
If the same configuration must be applied on multiple devices part of the same ORG use the COPY TO… function which will allow you to “push” the same configuration to multiple devices of the same ORG at once. The scheduler runs from the moment it is saved. When using the scheduler make sure the Time Zone of the device is configured correctly in the settings page. |
|
Important considerations
Consider the following when building your BGM distribution with RetailPlayer Store & Play function:
-
In order for the M3U file to be parsed correctly by the RetailPlayer device it doesn’t have to contain any special character or accented character. Make sure to name your files correctly otherwise the download of the same will report an error.
-
When using as FTP server to serve the files RetailPlayer uses PASSIVE FTP to establish the connection. Make sure this mode is supported on the server and that the server ftp application provides its public IP in the data sent to the client to establish the connection (many ftp applications provide by default their local IP). A practical configuration example can be found at this link.
If you still need further support please contact support@barix.com