Scope
This document aims to help the reader to understand what is Flexa and how to start building custom Flexa applications that can run on Barix Flexa devices.
Barix Flexa enabled Devices are:
|
PN |
Description |
|
2019.9279 |
M400 Flexa EU package |
|
2019.9280 |
M400 Flexa US package |
|
2019.9281 |
M400 Flexa UK package |
|
2019.9282 |
M400 Flexa NoPSU package |
|
2018.9257P |
Barionet 400 package (incl. Syn-Apps and incl. InformaCast) (no power supply) |
|
2016.9187P |
Barionet 1000 package (OEM package, no power supply) |
Flexa applications can only run on top of these devices, it is not possible to install the Flexa firmware on any other device and it is not possible to convert any other device into a Flexa one.
This manual is written based on the latest Flexa firmware image released. Make sure to run always the latest version of the firmware before starting any development on Flexa.
General Introduction
Flexa is many things! But mainly is a tool to develop simple applications that run on Barix Flexa devices. The advantage of the Flexa System is that it doesn’t require to compile code and produce images to make a device solving a specific problem. The only thing required is to write a program that runs on the Flexa devices and that can be deployed on the same. The mentioned Barix devices must be Flexa devices, which are the ones leaving the factory with a Flexa image. The goal is to offer the possibility to build several applications capable to run on top of the Flexa firmware.
Flexa is based on three pillars:
-
Flexa Package: The "Flexa Package" consists of a device (Barionet/M400) and a registration ID (RegID), which is a unique alphanumeric code assigned to every Barix device when it is manufactured. These devices come with the "Flexa Image" loaded. This image supports Lua, Python and Bash. It has a Barix Audio/Control library (successor of ABCL), which makes it integratable with other IoT devices and common IoT hubs. Furthermore, the Flexa Image supports the "Flexa Package Management" client (also called “Flexa Agent”) through which it is possible to receive the custom application and in a second step the application updates.
-
Flexa Package Management: Users of Flexa devices must write their applications in Python or Lua and package them following precise rules described in this document. The packages can then be distributed via “Partner Portals” (cloud based service that can be offered by Barix or that can be entirely built by users and communicates with Flexa devices via means of an API). The Flexa Image implements a simple client, which connects with the partner portal, fetches and installs the package.
-
Registry and Communication Scheme: Users are free to distribute their packages either relying on a web portal and the local client application or only on the local client application. The "Flexa Registry" is a Barix hosted database containing ALL the regIDs of the devices and has the job of keeping track of which device is used for what application and can tell the device from which portal it can request packages from. Flexa devices and the “Partner Portal” have a protocol implemented which defines how they communicate with the "Registry".
Workflow
There are mainly 2 ways to upload, install and maintain flexa apps on a Barix Flexa device:
-
Distributing the app via a service portal
-
Loading the app from the local web server accessed via web interface
Service Portal Distribution
Barix delivers the Flexa device, which allows to implement applications in easy-to-learn scripting language such as Lua or Python and offers a scheme to load and update software packages to devices either locally or remotely. This scheme allows OEM users to host applications in their Portal or on the Barix Linuquick server.
When application packages are distributed remotely, a partner portal is required. A diagram representation of the workflow involving a partner portal is depicted below:
.png?cb=88eb340dc5ab7a210a85c1dbf9c5dbe0)
The above image explained step-by-step:
-
Devices RegIDs are entered into the Partner Portal (or Barix Linuquick Portal).
-
The Partner Portal talks to the Barix Flexa Registry providing the association of its service url with its regIDs
-
The end users receive the Barix Flexa device. They connect it to the network and power it up, the device will automatically connect with the Flexa Registry upon boot asking to the registry to which service url it should connect to fetch its application
-
The registry informs the device to which service url (partner portal) the device must connect
-
The device contacts the Service URL provided by the registry
-
The partner portal (service URL) sends the application to the device, which downloads it, installs it and run it. From now on the device will always connect with this service url to fetch updates when they are available. No constant connection is required once the device fetches the app it can be disconnected from the service portal, unless a connection is required for changing the configuration of the app itself.
Barix offers a Service Portal to be used for this purpose, called “Linuquick”. Contact us at support@barix.com to get started with Linuquick.
Users can also build and run their own service portal. To do this there are 2 APIs required and that must be implemented:
-
Flexa Registry ↔︎ Service Portal API
-
Flexa Devices ↔︎ Service Portal API
Contact Barix at support@barix.com to receive the Flexa API documentation
Uploading an app via web interface
Distributing an app using a service portal is not the only way, it is also possible to load application packages from the local web server that runs on the device, thus from its local web interface. In this case the process is straightforward as it is only required the application package and the Flexa device.
The key idea is that Flexa users have a simple way to write code on Barix devices providing custom applications that solve specific problems. Using Flexa, it is possible to simply upload the application to a web server, and all the customer-base, which register to this service, get the application loaded onto their device.
Software architecture
Flexa devices have its software structured as shown by the image below.
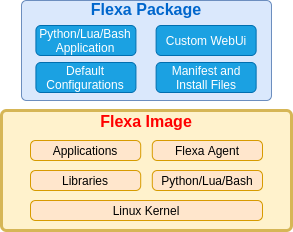
As the above diagram shows, there are two main components in a Flexa device:
-
Flexa Image: This is a firmware image built by Barix using Yocto Linux distribution. This image has some basic software libraries and applications. It also includes Lua, Python, and Bash scripting languages that can be used to develop the Flexa applications. This is the portion of the software that remains common among all the Flexa devices.
-
Flexa Package: This is the package that includes the Flexa application that will run on top of the Flexa Image. In addition to the application, the package needs to have manifest and install files (explained later in this document) and, optionally, some default configurations that can be used by the application and a custom WebUI.
Libraries and Applications
This is a list of all software libraries supported by the Flexa image.
|
Language |
Module |
Description |
Version |
Reference |
|---|---|---|---|---|
|
|
Linux Kernel |
Linux Kernel with drivers and base system libraries. |
5.5.8-yocto-standard |
|
|
Python |
Core |
Provides Python support and all built-in modules, such as
|
3.7.8 |
|
|
Python |
alsaaudio |
It contains wrappers for accessing the ALSA API from Python. |
0.8.4 |
|
|
Python |
psutil |
It is a cross-platform library for retrieving information on
|
5.6.3 |
|
|
Python |
numpy |
Toolbox for mathematical applications. Usefull for audio processing. Remark: Flexa only supports NumPy - not SciPy! |
1.17.0 |
|
|
Python |
pyserial |
Using serial interfaces with Python. |
3.4 |
|
|
Python |
jsonschema |
An implementation of JSON Schema validation for Python. |
3.0.2 |
|
|
Python |
requests |
Python interface for HTTP requests. |
2.22.0 |
|
|
Python |
pyuci |
Unified configuration interface bindings. Useful to store configurations. |
0.6 |
|
|
Python |
vlc |
This module provides bindings for the LibVLC public API. |
3.0.7110 |
|
|
Python |
zeroconf |
A pure Python Multicast DNS Service Discovery Library. |
0.28.0 |
|
|
Python |
ifaddr |
A Cross-platform network interface and IP address enumeration library. |
0.1.7 |
|
|
Python |
paho-mqtt |
A module for MQTT version 3.1.1 client. |
1.4.0 |
|
|
Python |
flask |
Flask is a micro web framework written in Python. |
1.0.2 |
|
|
Python |
pjsua |
SIP User Agent Library based on PJSIP. |
2.8 |
|
|
Python |
baco |
Python interface for Baco library. Baco is an audio library developed by Barix that allows the creation of audio players and audio streamers. |
0.9.90 |
|
|
Lua |
core |
Contains the support of applications developed using the language LUA. |
5.3.5 |
|
|
Lua |
cjson |
A fast JSON encoding/parsing module for Lua. |
2.1.0 |
|
|
Lua |
luvit |
Asynchronous I/O for Lua. |
1.23.2 |
|
|
Lua |
socket |
Network support for Lua. |
3.0 |
|
|
Bash |
core |
The GNU Bash for shell scripting. |
5.0.7 |
Apart from that, Flexa image features a few command-line applications, which can be called from the Lua/Python/Bash script, such as:
|
Application |
Description |
Version |
Reference |
|---|---|---|---|
|
uci |
Utility to store and retrieve configurations in the system. |
|
|
|
ffmpeg |
Application to handle video, audio, and other multimedia files and streams. |
4.2.1 |
|
|
netcat |
An utility for reading from and writing to network connections using TCP or UDP. |
0.7.1 |
|
|
curl |
Curl is a command-line tool for transferring data specified with URL syntax. |
7.66.0 |
|
|
openssl |
Secure Socket Layer (SSL) binary and related cryptographic tools. |
1.1.1g |
The image also contains scripts that will restart the Flexa app if it has stopped because of an error and contains an init script that will execute the application after boot.
Getting Started
To develop Flexa applications it is necessary to have a few coding skills, basic JSON knowledge and to know a few Linux shell commands. The preferred language, to develop Flexa applications, is Python (for Flexa M400 audio devices) because it is the language with more modules available inside Flexa image. But Lua and Bash can also be used (Lua is the preferred choice for Barionet). To edit the application files you can use any IDE of your choice.
If you want also to make a custom webUI, you will need to have some knowledge of HTML and Javascript.
Environment Setup
Device Setup
Prepare the device to receive the Flexa package:
-
Connect the device to a DHCP network.
-
Power up the device.
-
Use the Barix Discovery Tool to figure out the IP and open the webUI in your browser by typing the device IP address. A web page similar to the one below will appear.
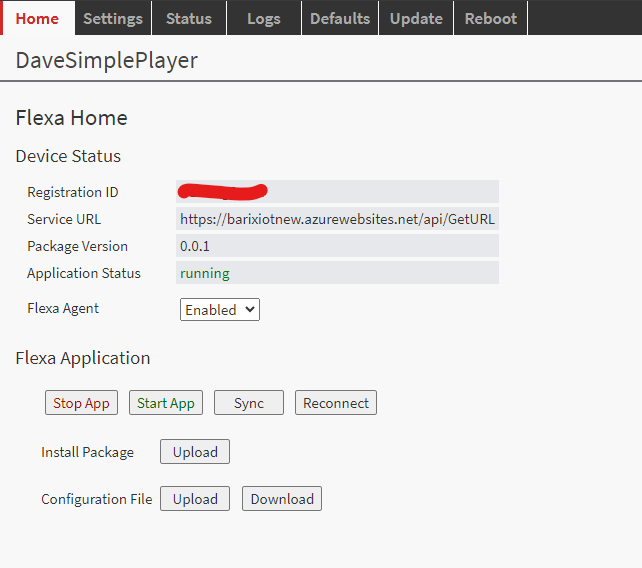
This page allows the stop and start of the Flexa application. It has button called “Sync” to run Flexa Agent and sync the application with the version selected on the service portal. As this application only runs on boot or periodically to contact remote Flexa services, it may be necessary to use this button to speed up the development when the application is served by service portal.
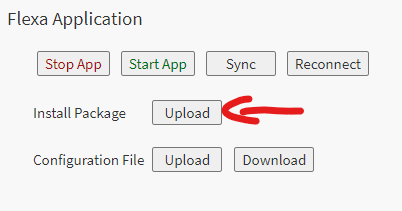
There are also 2 important buttons:
-
Install Package: this function allows you to upload and install your application package from the web interface.
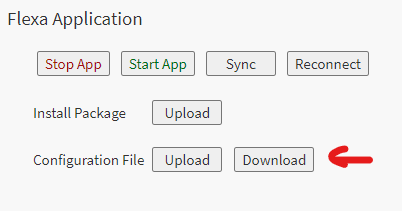
-
Load configuration file: this function allows you to upload a configuration file for your application to change parameters of the same.
The applications are loaded into a persistent partition of the file-system, so that a reset to defaults never wipes the application after it is installed.
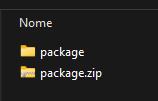
Package Structure
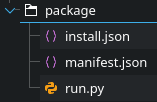
The Flexa package is a “zip” file containing the application’s files and also a few JSON files needed to give some extra information to the system, as the application name, entry point, etc…
The following picture shows the minimal structure of a Flexa package.
-
install.json: A file with instructions for package installation and application entry point.
-
manifest.json: A file to specify the application’s name and which firmware versions the application is compatible with.
-
run.py: This is the application’s file. It may exist more than one and you can name it for whatever you want. Nonetheless, one of the files needs to be the entry point of your application and that needs to be specified on install.json file (more information in the next chapters).
Manifest File
The manifest file is a JSON file that needs to be included in the Flexa package and it allows you to define the application’s name and the firmware versions the application is compatible with.
Follows an example with the content for this file:
{
    "name": "Application Name",
    "firmware_versions": [
        {
            "from": "2.2.5"
        }
    ]
}
After the package is installed you can see the defined name on the web UI.
Install File
The install file allows the definition of the entry point of your application, the command to execute the application, and also a list of files that can be installed in the system if necessary. Follows an example with the content for this file:
{
    "scripPath": "run.py",
    "run": "python3 run.py",
    "files": [
        {"name": "alsa/app-sound.conf", "dest": "/etc/barix"},
        {"name": "uci/application", "config": true},
        {"name": "cm6533/cm6533", "dest": "/etc/init.d", "updaterc": "defaults 99"},
    ]
}
-
scripPath: to define which file will be the entry point of your application. Mandatory item.
-
run: to define the command that will execute the application. Mandatory item.
-
files: to define a list of files that can be installed in the device’s filesystem. This is can be useful to add/modify ALSA plugins, add UCI configurations in the system, add init scripts, etc. Optional item.
-
name: the path for the file inside the package.
-
dest: the destination directory in which the file is going to be installed.
-
config: a flag to instruct the system that the file is going to be installed as a UCI configuration.
-
updaterc: to instruct the system that the file is an init script and the device needs to execute it on boot. The content of this field is used as arguments for this command.
-
Building a Flexa Package
-
The best practice is to create a folder with the application name in your computer's workspace. Inside this folder, you create another folder called “package”.
-
In the "package" folder, you create the manifest and install files, along with your application files.
-
“zip” the “package” folder.
-
Login in the device’s web interface and UPLOAD your package in the device, the application will execute right after its installation is completed, the HOME tab will indicate clearly the status of the app.
Modules API
The Flexa image already includes a few modules listed in the “Libraries and Applications” chapter. The majority of them are open source and you can consult the API in the reference pages. Nevertheless, Barix develops a proprietary module called “Baco” that deals with audio stuff.
The purpose of this chapter is to document the API of those proprietary modules.
Using Audio Interfaces
The audio cards on Barix devices are managed by ALSA, a software framework that provides an API for sound card device drives. This framework makes part of the majority of Linux devices with audio support and Barix devices are no exception. Almost all command-line tools of ALSA are available in the Flexa image and can be used on your application, such as:
-
speaker-test: to test speakers.
-
aplay/arecord: an utility for the playback/capture of audio files.
-
amixer/alsamixer: can be used to change the volume of the audio cards.
To list all audio cards of your device, type the following command:
aplay -l
Then, to address the desired audio card, just use the following syntax:
hw:<card index>,<device index>
For example, to play a test tone of 1000Hz on card 2 use the following command:
speaker-test -D plug:analog_out -t sine -f 1000 -c 2
By definition on Barix devices, the IPAM internal audio card (H3 Codec) is referred to by the index 2 (hw:2,0) and I2S external cards use the index 1 (hw:1,0). A few devices also have external USB audio cards and these use index 3 and following.
ALSA also supports plugins and Barix devices have a few already created:
-
analog_out: a mixer for the IPAM internal audio card.
-
digital_out: a mixer for the I2S external card.
For example, to play a file to the audio output via python using the subprocess module:
subprocess.run(["aplay", "-D", "plug:analog_out", "audio.mp3"], capture_output=True)
To add your own plugins, write them on a file called app-sound.conf and add it to the package. Then, instruct install.json to install this file in the device filesystem, like the example below:
{
    "files": [
        {"name": "alsa/app-sound.conf", "dest": "/etc/barix"}
    ]
}
Finally, after package installation, reboot the device to make the changes effective.
Baco Module
Baco is a C++ library created and maintained by Barix that aims to provide a simple interface to create audio players and streamers. For Flexa applications there is also a Python interface that can be used. To use Baco module, include these lines in your Python application:
import baco
baco.initializeLogger("/var/log/baco.log", baco.LogPriority.DEBUG, 5000000, 2)
baco.initializeAudioLib()
To see all available functions and classes type “help(baco)” in a Python shell.
>>> import baco
>>> help(baco)
Players
Baco supports several types of players each one with a different type of buffer management. The following diagram shows how the audio is processed in a Baco player.

The player is formed by a chain of different modules transparent to the user, but useful to understand why some configurations are needed. The players can be configured to have an input buffer and/or an output buffer. The input buffer holds the audio packets when they are received by the player. Then, these packets go through a decoder to convert them to PCM audio frames. This raw audio is then forwarded to a resampler to modify the frame format if desired. The resampler module can also be used to increase/decrease the delay when playing. Finally, the output buffer holds the audio frames that are sent to the ALSA layer to be played by the speaker.
To create a player using Baco create an instance of the class SimplePlayer, like the example below.
player = baco.SimplePlayer("http://barix.streamguys.net/barix_hi", "plug:analog_out", 44100, baco.FULLBUFFER)
The first parameter is the URL of the stream/file to be played. For example, to play a local file just use file://<path to the file>.
The second parameter is the audio card in which the audio will be played. In this example, we are using the plugin “analog_out” but you can use the audio card directly (e.g.: hw:2,0).
The third parameter is to specify which sample rate the player uses for the output audio.
There is also a fourth parameter to specify the type of player we want to use. Currently, Baco uses buffers and the resampler to implement three different types of players:
-
CONSTDELAY: a player that aims to maintain a constant delay over time. The target delay is configurable but must be higher than 20ms. The recommended setting is also to disable the input buffer. Follows an example to create a constant delay player:
# Create an instance of the constant delay player
player = baco.SimplePlayer("rtp://224.2.2.1:10200", "plug:analog_out", 44100, baco.CONSTDELAY)
# Disable input buffer
player.setInputFifoDuration(0)
# Set the size of the output buffer (5sec)
player.setOutputFifoDuration(5000)
# The player will start playing when the output buffer level reaches this value
player.setReadyThreshold(4500)
# Set maximum deviation for the delay
player.setMaxDelta(30)
# Connect to the stream and start playing
player.connect()
-
FULLBUFFER: a player especially suited for network streams with a control loop that tries to keep the buffer full at all the time. The start threshold is configurable so that the player becomes ready to play before the buffer is full, which would take too much time. Once playback starts, the control logic will fine-tune the clock compensation in order to allow the buffer to fill up over time without noticeable distortion.
# Create an instance of the full buffer player
player = baco.SimplePlayer("http://barix.streamguys.net/barix_hi", "plug:analog_out", 44100, baco.FULLBUFFER)
# Disable input buffer
player.setInputFifoDuration(0)
# Set the size of the output buffer (10sec)
player.setOutputFifoDuration(10000)
# The player will start playing when the output buffer level reaches this value
player.setReadyThreshold(8000)
# Connect to the stream and start playing
player.connect()
-
GENERIC: a trivial player implementation without any kind of buffer management. The buffers could be disabled or set with any size value.
# Create an instance of the generic player for low lantency playing
player = baco.SimplePlayer("rtp://0.0.0.0:10300", "plug:analog_out", 44100, baco.GENERIC)
# Disable input buffer
player.setInputFifoDuration(0)
# Disable output buffer
player.setOutputFifoDuration(0)
# Connect to the stream and start playing
player.connect()
Streamers
Baco also supports the creation of audio streaming. Some Barix devices have inputs for other audio devices (line-in) or microphones. This audio can be captured, encoded, and encapsulated in a stream to a remote destination or a local file.
Follows an example to create an instance of the GenericStreamer supported by Baco:
streamer = baco.GenericStreamer("hw:2,0", 8000)
The first parameter specifies which audio card is going to be used to capture the audio. Then, you can also set the sample rate used on this capture. The default value is 48KHz. There are also more two parameters called bufferSize and periodSize for mode advanced use. They allow to set the buffers on ALSA layer.
For the created streamer, you need to add a “stream” in which you are going to define the destination for it, codecs, encapsulation, etc. As an example, the following code adds a stream to the generic streamer created above. As the code clearly shows, it is an RTP stream sent to the address 224.1.1.1, port 10200, using an MP3 codec and a sample rate of 48KHz.
streamer.addStream("rtp://224.1.1.1:10200", baco.MP3, 48000)
Finally, call the following method to start sending data in this stream.
streamer.start()
PJSUA Module
PJSUA is a Python open-source module that implements a multimedia communication client library based on SIP protocol. This module uses as its core the PJSIP library, widely used in IP phones.
The API description for this module is available here https://www.pjsip.org/python/pjsua.htm and you can also find a simple example here.
Logging
Implement a proper logging mechanism is fundamental when building a Flexa app.
On the web UI of every Flexa device is possible to download log files from the LOG tab clicking on ‘Download all Logs’.
This archive contains files stored in the /var/log/ folder, thus is possible from a custom application to write into a log file stored in such folder to have app logs available for information or debugging purposes.
The flexa image comes with the python syslog module. Anything logged with this module ends up in /var/log/messages along with other system logs.
IMPORTANT
When writing a custom log file make sure to not call it ‘flexa.log’ as this overwrites the image log file.
GPIOs (Flexa MPI400)
Flexa MPI400 offers 2x GPIs and 2x Relays.
It is possible to access these IOs from the filesystem as follow:
Relay 1: /dev/gpio/rel1/value (normally opened)
Relay 2: /dev/gpio/rel2/value (normally closed)
Input 1: /dev/gpio/in1/value
Input 2: /dev/gpio/in2/value
Audio Interface IO switch
M400 Flexa
Flexa M400 offers the possibility to switch the 2x RCA connections present on the back panel to be audio inputs or audio outputs. This is achieved by simply invoking the following script:
m400-rca in    # Turn RCA into Inputs
m400-rca out   # Turn RCA into Outputs
Use os module or the subprocess module to invoke the above script from python code.
MPI400 Flexa
To enable/disable audio on an MPI400 Flexa use the following script:
mpi400-audio enable/disable
Application Configuration
It is possible for your application to be controlled via a configuration file. The Flexa image supports on the web UI the possibility to upload a json configuration file, which can be parsed by the flexa application.
To add a configuration file to the flexa package:
-
An example of a configuration file is shown below
JSON{ "url" : "http://barix.streamguys.net/barix_hi", "volume" : 70 } -
Upload the file via web UI
-
Now the file is stored in the same path where the main app runs, this is important to know so the main app can be programmed to read this file from the same root folder which is “/mnt/data/package/”
One of the key advantages for Flexa is that it allows also configuration to be managed by the service portal in a way that is possible to remotely configure devices installed in the field. This argument is out from the scope of this manual.
Application Upload Example - Simple Player
Let’s look at how we can build a simple Flexa app that works as a simple player with re-connections if the stream fails. It also reads the stream url and volume from the configuration file that we can upload via web UI
-
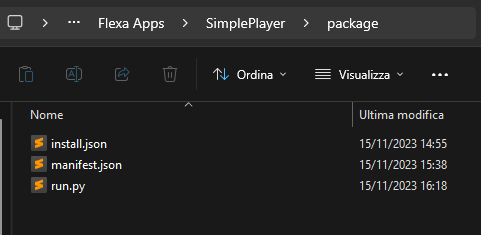
Prepare the folder hierarchy on your PC:
in this example we create a folder called ‘Flexa Apps’ on the Desktop, inside of it a folder called ‘SimplePlayer’ and inside of it a folder called ‘package’
It is inside 'package that we are going to work -
In the ‘package’ folder create the necessary files. Our entry point in this example is called “run.py”
-
Create install.json:
JSON{ "scripPath": "run.py", "run": "python3 run.py", "files": [ ] } -
Create manifest.json - NOTE here is where you give a name to your app, which will appear on the web UI later.
JSON{ "name": "MySimplePlayer", "firmware_versions": [ { "from": "2.2.5" } ] } -
Create run.py - this is our application entry point. NOTE line 27 and 30 where we read the values of the volume and url from the config file.
import baco
import alsaaudio
import time
import json
import os
STREAM_ALIVE = False
# Callback called by Baco when the stream changes its state
def callback(alive):
global STREAM_ALIVE
STREAM_ALIVE = alive
# Read configuration file
with open("/mnt/data/package/config.json", "r") as f:
config = json.load(f)["AppParam"]
# Set M400 to be a decoder
os.system("m400-rca out")
# Initialize Baco
baco.initializeLogger("/var/log/baco.log", baco.LogPriority.DEBUG, 5000000, 2)
baco.initializeAudioLib()
# Set volume to 100%
alsaaudio.Mixer(cardindex=2, control="DAC").setvolume(100)
alsaaudio.Mixer(cardindex=2, control="Line Out").setvolume(config["volume"])
# Create and configure the player
player = baco.SimplePlayer(config["url"], "plug:analog_out", 44100, baco.FULLBUFFER)
player.setCallback(callback)
player.setInputFifoDuration(0)
player.setOutputFifoDuration(7000)
player.setReadyThreshold(5000)
player.connect()
connecting = True
while True:
if connecting and STREAM_ALIVE:
connecting = False
elif not connecting and not STREAM_ALIVE:
connecting = True
player.connect()
time.sleep(1.0)
-
Prepare your config.json file as follow:
{ "url" : "http://barix.streamguys.net/barix_hi", "volume" : 70 } -
config.json doesn’t necessarily be present in your package at the beginning (it will be uploaded successfully). So go on and zip the ‘package’ folder to prepare it for being uploaded
-
In the web ui of the Flexa device upload your package.zip and wait for the device to reboot
-
After reboot reconnect to the web ui and this time upload your configuration file using the dedicated function
-
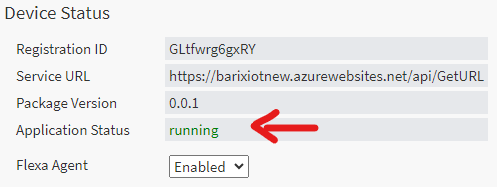
Make sure to STOP and START the app. The application status must show running
-
Check the log files by downloading the log archive from the LOGS tab - if anything is wrong it will be shown in this archive.

-
Now the device should be playing the configured streaming url. Try changing the config.json and upload a new config with different values. Always remember to STOP and START again the app when doing this, so the new values are applied.
Enjoy your new Flexa programmable device